
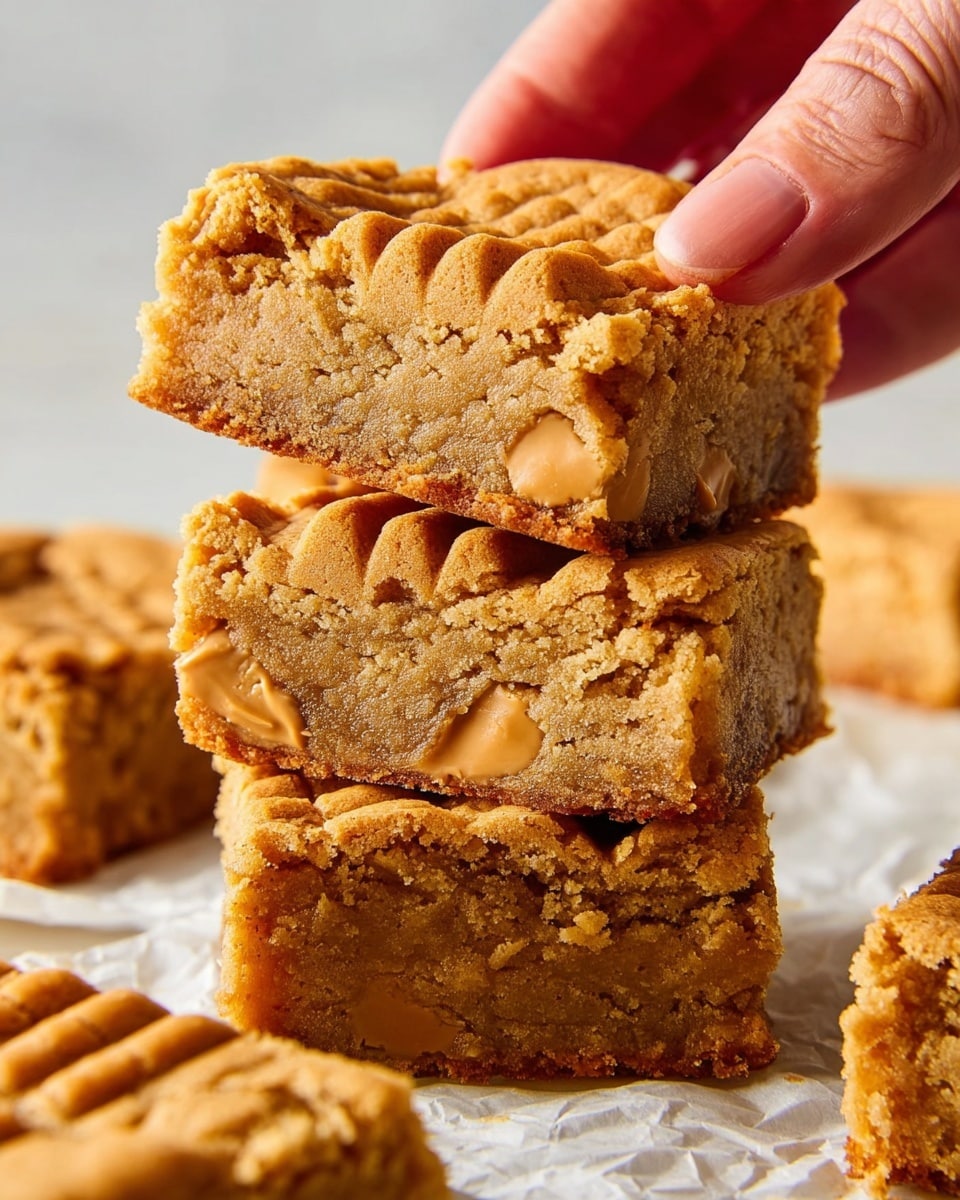
I absolutely love how this Nutter Butter Cookie Bars Recipe turns out – it’s like peanut butter heaven baked into a chewy, buttery bar that is perfect for any occasion. Whether you’re craving something sweet with a little crunch or need an easy dessert to impress friends, these bars deliver every time. When I first tried this recipe, I was hooked by the way the Nutter Butter cookies add texture and that irresistible peanut butter flavor that makes you want just one more bite.
You’ll find that this recipe is both simple and satisfying, making it ideal for a cozy afternoon treat or a crowd-pleasing potluck dessert. The combination of peanut butter chips and chopped Nutter Butter cookies baked right into the batter sets this apart from your average cookie bars. Plus, the whole cookie halves on top create a fun and unique look that always gets compliments. Trust me, once you make these, they’ll quickly become your go-to peanut butter dessert.
Why You’ll Love This Recipe
- Ultimate Peanut Butter Flavor: The peanut butter in both batter and cookies creates a rich, nutty taste you won’t want to miss.
- Simple Ingredients: You only need a handful of pantry staples to get these bars baking quickly.
- Textural Delight: Chopped cookies inside and whole cookies on top provide crunch and chew in every bite.
- Perfect for Sharing: These bars cut into squares make an effortless treat for family, friends, or bake sales.

Ingredients You’ll Need
The ingredients in this Nutter Butter Cookie Bars Recipe work beautifully together to create a rich, moist base with bursts of peanut flavor from both the cookies and chips. Here’s a closer look at what makes each one important and some tips for shopping.
- Cooking spray: Helps the bars release easily from the pan, making cleanup a breeze.
- Light brown sugar: Adds moisture and a subtle caramel note that complements peanut butter.
- Unsalted butter: Use real butter for the best flavor and texture; it also helps the bars stay tender.
- All-natural chunky peanut butter: Chunky adds texture and nutty bits, but creamy works if that’s what you have on hand.
- Pure vanilla extract: Enhances sweetness and rounds out the nutty flavors nicely.
- Kosher salt: Balances the sweetness and heightens the peanut flavor.
- Large eggs: Room temperature eggs help create a consistent batter and even baking.
- Baking powder: Just enough to give the bars a light, tender crumb.
- All-purpose flour: The structure for the bars; spoon it in to avoid packing and a dense result.
- Nutter Butter cookies: Both chopped inside and whole on top, they give that iconic peanut butter cookie taste and texture.
- Peanut butter chips: These melt slightly for gooey pockets of peanutty goodness throughout.
Variations
I love making this Nutter Butter Cookie Bars Recipe my own by mixing in different textures and flavors depending on the occasion. Don’t be afraid to experiment a little – that’s part of the fun! Here are a few ideas I’ve enjoyed personally and think you’ll like too.
- Add Chocolate Chips: I sometimes mix in semi-sweet chocolate chips alongside peanut butter chips for a double-chocolate-peanut butter combo that my family goes crazy for.
- Use Creamy Peanut Butter: If you prefer a smoother bar with less crunch, swapping chunky for creamy peanut butter works great.
- Try a Sprinkle of Sea Salt: A few flakes on top before baking can brighten flavors and add a delightful salty-sweet contrast.
- Omit Nuts for Nut Allergies: You can carefully replace the peanut butter and chips with sunflower seed butter and seed-based chips to keep it safe and delicious.
How to Make Nutter Butter Cookie Bars Recipe
Step 1: Prep Your Pan and Preheat Oven
Start by preheating your oven to 350°F and greasing a 13″ x 9″ metal baking pan with cooking spray. I like to line mine with parchment paper so I can lift the bars right out after baking without any fuss. Don’t forget to grease the parchment too – it makes cleanup a cinch!
Step 2: Mix the Peanut Butter Batter
Grab a large bowl and, using a handheld mixer on medium-high speed, beat together the brown sugar, melted butter, peanut butter, vanilla extract, and salt until everything is well combined and glossy. Then, add the eggs one at a time, beating on low speed after each addition – this keeps the batter smooth and prevents it from curdling. Finally, stir in the baking powder until fully mixed in. This step is where all the magic starts to happen!
Step 3: Fold in Flour, Cookies, and Chips
Switch to a rubber spatula and gently fold the flour into the batter until just a few streaks remain. Overmixing here can make the bars dense, so take it slow. Next, fold in the coarsely chopped Nutter Butter cookies along with two-thirds of the peanut butter chips. These chunks give you those irresistible chewy and crunchy bites throughout.
Step 4: Layer the Batter and Decorate
Spread the batter evenly in your prepared pan using an offset spatula or the back of a spoon. Now comes the fun part – twist apart the remaining whole Nutter Butter cookies and press the separated halves into the top of the batter, peanut side up. Finally, sprinkle the remaining peanut butter chips on top to add a little extra sweetness and melty goodness as it bakes.
Step 5: Bake and Cool
Bake your bars until they’re a light golden brown, and a toothpick inserted in the center comes out clean – usually between 23 and 27 minutes. It’s tempting to underbake for gooeyness, but give them enough time to set so they slice cleanly. Once out of the oven, let them cool in the pan for a bit, then use the parchment overhang to lift them onto a cutting board before slicing into bars. I always find this step so satisfying!
Pro Tips for Making Nutter Butter Cookie Bars Recipe
- Use Room Temperature Eggs: This helps your batter mix evenly and improves the texture of your bars.
- Don’t Overmix the Flour: Folding just until no flour streaks remain keeps your bars tender rather than tough.
- Press Cookies Gently: When adding the cookie halves on top, press just enough so they stick but don’t flatten them completely.
- Watch Your Bake Time: Start checking around 23 minutes to avoid overbaking, which can dry out the bars.
How to Serve Nutter Butter Cookie Bars Recipe
Garnishes
I personally love a light dusting of powdered sugar or a drizzle of melted chocolate over the bars for a pretty finishing touch. Sometimes I sprinkle a few crushed Nutter Butter cookie crumbs on top right after baking for extra crunch and visual appeal. These little garnishes elevate the presentation without overwhelming the intense peanut butter flavor.
Side Dishes
These bars are perfect on their own but also go wonderfully with a scoop of vanilla ice cream or a rich chocolate milk for a classic flavor combo. If you’re serving at brunch, I like pairing them with fresh berries or a simple fruit salad to brighten the meal.
Creative Ways to Present
For parties or special occasions, I’ve served these Nutter Butter Cookie Bars Recipe squares stacked on a wooden board with small bowls of peanut butter chips and whole cookies around as decorations. Wrapping individual bars in parchment and tied with twine also makes a cute party favor. Trust me, presentation adds that extra “wow” factor your guests will notice.
Make Ahead and Storage
Storing Leftovers
I usually keep leftover cookie bars in an airtight container at room temperature for up to 3 days, and they stay nice and chewy. If your kitchen is warm, popping them in the fridge also works well but they may firm up a bit.
Freezing
Freezing is a great option if you want to make these bars ahead of time. I wrap individual squares tightly in plastic wrap, then place them in a freezer-safe bag. They freeze beautifully and keep well for up to 3 months.
Reheating
To enjoy frozen bars, I let them thaw at room temperature or briefly warm them in the microwave for 10-15 seconds to get that freshly-baked feel. Just be careful not to overheat or they can dry out.
FAQs
-
Can I substitute creamy peanut butter for chunky in this recipe?
Absolutely! Using creamy peanut butter will give your bars a smoother texture without the added crunch from peanut pieces. Both work well, so go with your preference.
-
Do I have to use Nutter Butter cookies, or can I substitute other peanut butter cookies?
Nutter Butter cookies are special because of their classic peanut butter cream sandwich flavor and texture, but you can try other peanut butter sandwich cookies if needed. Just keep in mind the final taste and texture might be slightly different.
-
How can I tell when the bars are done baking?
Look for a light golden brown color on the edges and top, and insert a toothpick in the center. If it comes out clean or with just a few moist crumbs (not wet batter), your bars are ready.
-
Can I use a glass baking dish instead of metal?
Yes, but glass usually bakes a bit slower and retains heat longer, so start checking for doneness a few minutes earlier to avoid overbaking.
Final Thoughts
This Nutter Butter Cookie Bars Recipe really feels like a little slice of comfort wrapped in peanut butter goodness. I love sharing it with friends because it’s so easy yet impressively delicious every time. If you haven’t tried baking with Nutter Butter cookies before, this recipe is a fantastic place to start – it highlights their unique flavor in such a fun, approachable way. Give it a go in your kitchen, and I’m sure you’ll find yourself coming back to this recipe again and again.
Print
Nutter Butter Cookie Bars Recipe
- Prep Time: 10 mins
- Cook Time: 27 mins
- Total Time: 37 mins
- Yield: 15 bars
- Category: Dessert
- Method: Baking
- Cuisine: American
Description
Nutter Butter Cookie Bars are rich, peanut buttery blondies packed with chunks of Nutter Butter cookies and peanut butter chips. These bars combine the classic peanut butter and cookie flavors into a chewy, moist dessert that’s perfect for sharing or satisfying a sweet tooth. Easy to make and baked in a single pan, they are an irresistible treat for peanut butter lovers.
Ingredients
For the Cookie Bars
- Cooking spray
- 1 3/4 cups (350 g) packed light brown sugar
- 3/4 cup (1 1/2 sticks) unsalted butter, melted
- 3/4 cup (180 g) all-natural chunky peanut butter
- 1 tsp pure vanilla extract
- 3/4 tsp kosher salt
- 3 large eggs, room temperature
- 1 tsp baking powder
- 2 cups (240 g) all-purpose flour
- 8 Nutter Butter cookies (about 4 oz), coarsely chopped
- 5 whole Nutter Butter cookies, divided
- 1 cup peanut butter chips (about 6 oz), divided
Instructions
- Preheat and Prepare Pan: Preheat the oven to 350°F (175°C). Grease a 13″ x 9″ metal baking pan with cooking spray and line it with parchment paper, leaving an overhang on two long opposite sides. Grease the parchment paper with cooking spray to prevent sticking.
- Mix Wet Ingredients: In a large bowl, using a handheld mixer on medium-high speed, beat together the light brown sugar, melted butter, chunky peanut butter, vanilla extract, and kosher salt until well combined and smooth.
- Add Eggs and Baking Powder: Add the eggs one at a time, beating on low speed after each addition to incorporate fully. Then add the baking powder and mix until the batter is well combined.
- Incorporate Flour and Cookies: Using a flexible rubber spatula, fold in the all-purpose flour gently until only a few streaks remain. Then fold in the coarsely chopped Nutter Butter cookies and two-thirds of the peanut butter chips.
- Assemble in Pan: Transfer the batter to the prepared baking pan and spread it evenly with an offset spatula or the back of a spoon. Twist apart the remaining whole Nutter Butter cookies and press the separated cookie halves, peanut butter side facing up, into the top of the batter. Sprinkle the remaining one-third of peanut butter chips evenly over the top.
- Bake: Bake the bars in the preheated oven for 23 to 27 minutes, or until they are light golden brown and a tester inserted into the center comes out clean.
- Cool and Serve: Allow the blondies to cool completely in the pan. Using the parchment paper overhang, lift the bars out of the pan and place them on a cutting board. Cut into 15 squares and serve.
Notes
- Make sure the eggs are at room temperature to help achieve a smooth batter.
- You can substitute crunchy peanut butter with creamy if preferred.
- Line the pan with parchment paper for easy removal and clean-up.
- Baking time may vary slightly depending on your oven; start checking at 23 minutes.
- For extra crunch, lightly toast the chopped cookies before folding them in.
- Store bars in an airtight container at room temperature for up to 3 days or refrigerate for up to a week.
Nutrition
- Serving Size: 1 bar (approx. 1/15 of recipe)
- Calories: 290 kcal
- Sugar: 22 g
- Sodium: 150 mg
- Fat: 16 g
- Saturated Fat: 6 g
- Unsaturated Fat: 9 g
- Trans Fat: 0 g
- Carbohydrates: 31 g
- Fiber: 2 g
- Protein: 6 g
- Cholesterol: 55 mg
