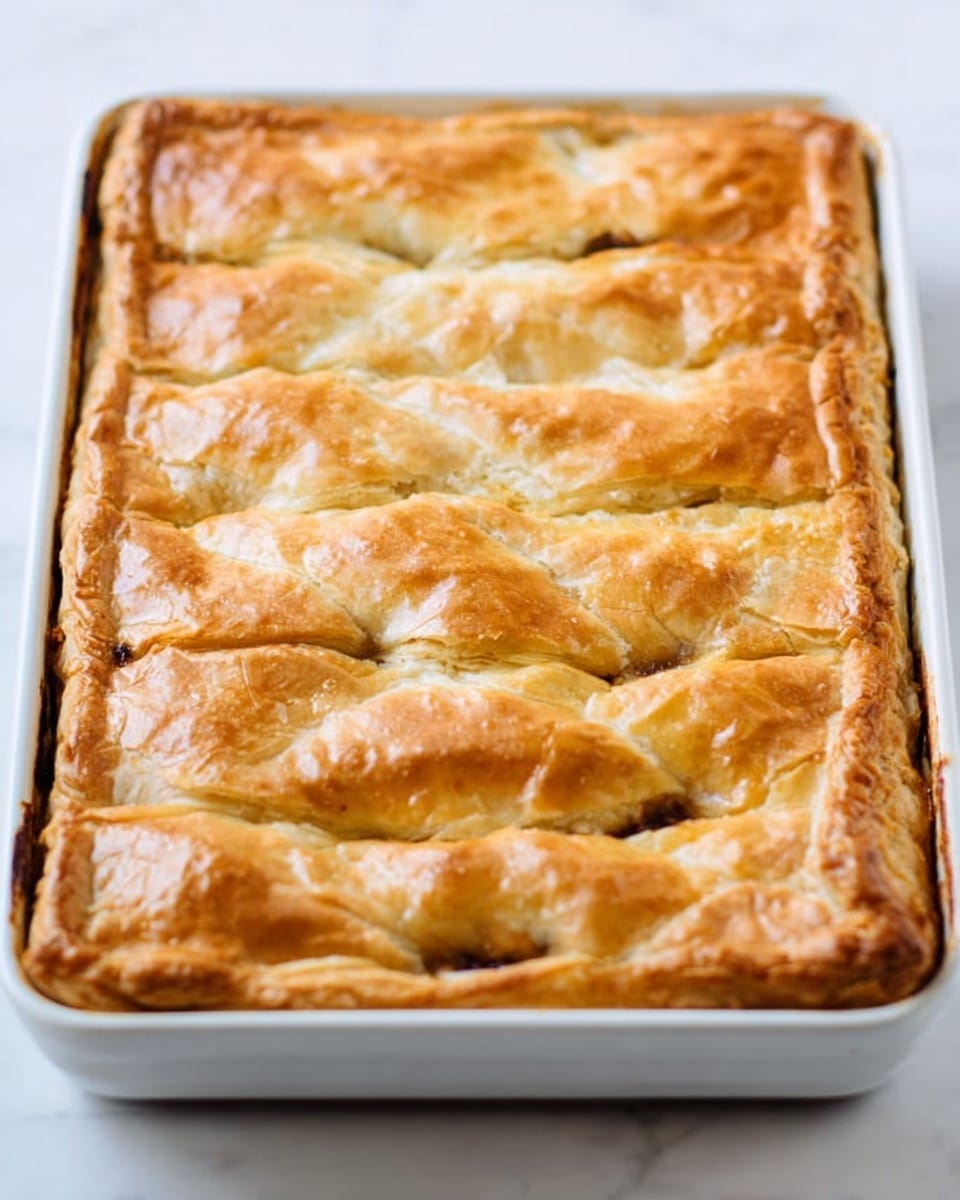
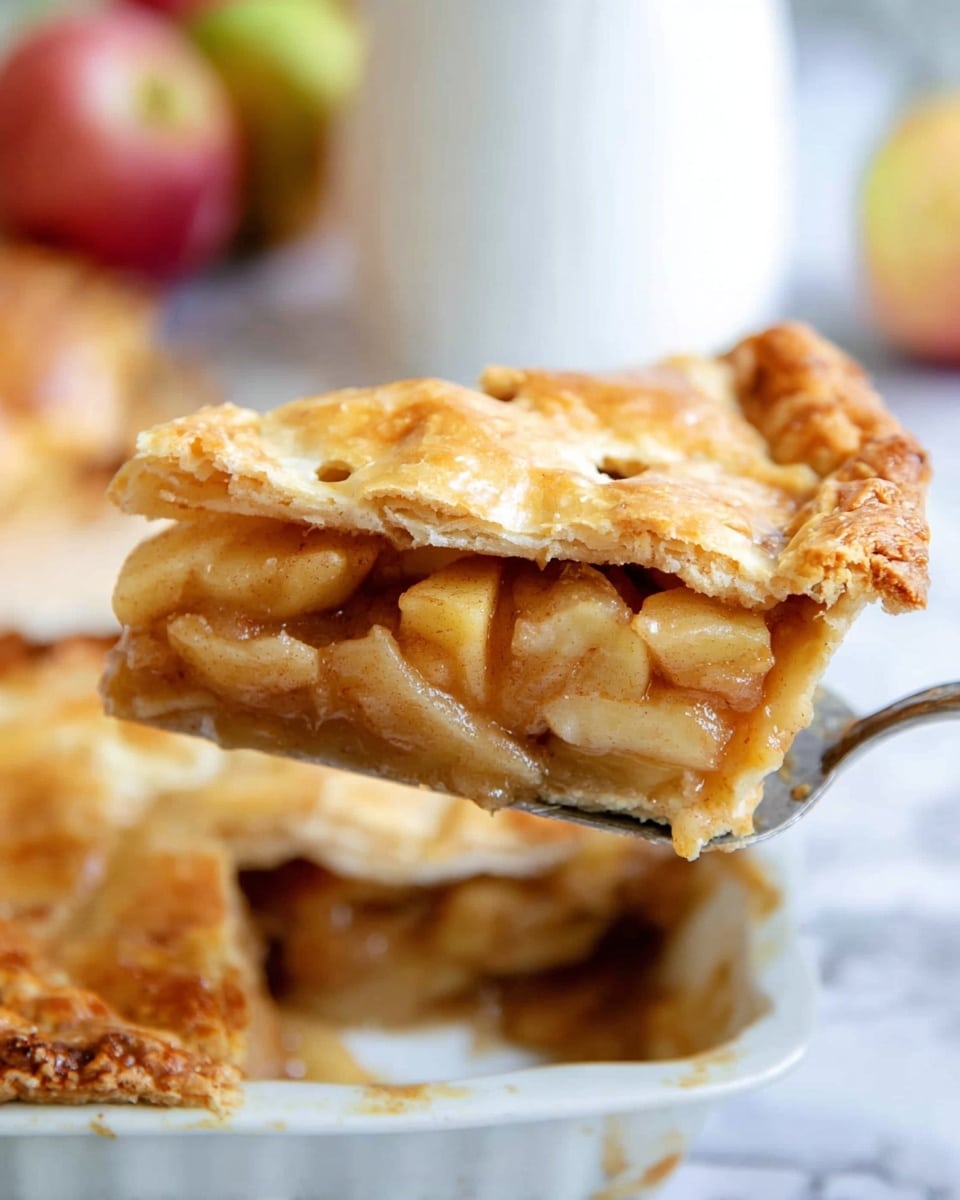
I absolutely love sharing this Apple Slab Pie Recipe with friends because it’s one of those cozy, all-American desserts that feels like a big warm hug on a plate. When you first try making it, you’ll notice how the large, rustic shape is perfect for feeding a crowd or bringing to potlucks, and it really stands out from your typical round pies. The combination of a tender, buttery crust with a perfectly spiced apple filling is just irresistible.
What makes this Apple Slab Pie Recipe so special is how easy it is to pull off without any fancy equipment, plus you get so many generous slices for your effort. I discovered this trick when I wanted a pie that could serve my whole family without worrying about running out – and honestly, it quickly became a go-to recipe for holidays and gatherings. You’ll find that the flavors improve even more after it cools, making leftovers a delight you look forward to.
Why You’ll Love This Recipe
- Perfect for Feeding a Crowd: The slab format gives you lots of slices, ideal for family gatherings or potlucks.
- Crunchy, Buttery Crust: The combination of shortening and cold butter creates a flaky crust that’s bursting with flavor.
- Simple, Fresh Ingredients: No fancy add-ons—just classic apples and spices done right.
- Great Make-Ahead Dessert: It keeps well covered, making it perfect for prepping in advance.
Ingredients You’ll Need
For this Apple Slab Pie Recipe, the ingredients pair beautifully to balance flaky, buttery crust with soft, spiced apple filling. I always recommend picking crisp, tart apples for the best texture and the perfect sweet-tart bite.
- All-purpose flour: Key to the crust’s structure and your thickening agent in the filling.
- Salt: Enhances the crust flavors and balances sweetness.
- Shortening: Creates that tender, flaky texture in the crust.
- Cold butter: Adds richness and buttery flavor–make sure it’s chilled!
- Vegetable oil: Helps keep the dough soft and pliable for rolling.
- Milk: Moistens the dough while adding a slight sweetness.
- Lemon juice: Stops the apples from browning and adds a hint of brightness.
- Apples: Use a mix, like Granny Smith and Honeycrisp, for balanced sweetness and tartness.
- Sugar: Sweetens the filling and adds a caramelized touch to the crust.
- Ground cinnamon: Essential warm spice that pairs perfectly with apples.
- Ground nutmeg: Adds depth without overpowering.
- Egg: Used for egg wash to give the crust a beautiful golden shine.
- Water: Mixed with egg for brushing crust.
Variations
I love how versatile this Apple Slab Pie Recipe is — you can totally make it your own by swapping spices, adjusting sweetness, or adding texture with nuts. Feel free to experiment, because these tweaks can really transform the pie to suit your taste or special dietary needs.
- Spice It Up: I’ve tried adding ground ginger or cloves once, and it gave the filling a cozy extra kick that my guests adored.
- Gluten-Free Option: Swap in a gluten-free flour blend for the crust, but watch the moisture carefully—it might need a little less milk.
- Nutty Crunch: Toasted walnuts or pecans sprinkled over the filling before adding the top crust add a beautiful texture that’s a family favorite.
- Less Sweet: If you like your pies less sweet, reduce the sugar by a quarter cup and let the natural fruit shine.
How to Make Apple Slab Pie Recipe
Step 1: Prepare Your Flaky Crust
Start by mixing flour and salt in a large bowl, then cut in shortening and cold butter until you see small pea-sized bits. This little step is what gives the crust those flaky layers I love. Next, stir together the milk and lemon juice—you’ll notice the milk curdles slightly, which is perfect for tenderizing the dough. Add the milk mixture and vegetable oil to your dry ingredients and stir until it comes together into a soft dough. Don’t be shy about using your hands to bring it all together! Wrap the dough into two discs, refrigerate for about 30 minutes, and enjoy the calm before the delicious storm.
Step 2: Make Your Apple Filling
While that dough chills, peel and chop your apples into small pieces. I like chopping small—not too fine—so you get wonderful pockets of tender, slightly chunky fruit. Toss the apples with sugar, flour, cinnamon, and nutmeg, mixing until every piece is coated in that cinnamon-sugar goodness. This simple coating thickens the filling perfectly and lets those classic apple flavors shine.
Step 3: Roll Out and Assemble
Roll one disc of dough out on a floured surface until you have a rustic 13×18” rectangle about 1/8” thick. Don’t stress about perfect edges here — that rustic look is charm in pie form! Lay the dough into your 10×15” jelly roll pan and let the extra hang over the sides. Now sprinkle the crust with a mixture of sugar and flour—this crust dust keeps the bottom crust from getting soggy, an invaluable trick I learned over time. Spread your spiced apple filling evenly on top.
Roll out the second dough disc to the same size and lay it gently over the apples. Fold the edges of both crusts back together, tucking them into the pan for a sturdy edge. Pinch or crimp with your fingers or fork, whichever you prefer—both look lovely! Don’t forget to slice a few slits on top to vent that delicious steam while baking.
Step 4: Egg Wash and Bake
Brush the crust lightly with an egg wash made from a beaten egg and water, then sprinkle with sugar for a sparkle and crunch that you’ll love. Bake at 400°F for 30 minutes, then tent loosely with foil to prevent over-browning and bake another 20-25 minutes until the crust is golden and the filling bubbles up the slits. Let it cool for at least 2 hours before slicing—this step is crucial for the filling to set properly, and trust me, it’s worth the wait!
Pro Tips for Making Apple Slab Pie Recipe
- Use a Pizza Stone: I like to bake on a preheated pizza stone for even heat distribution—it helps the bottom crust get crispy without burning.
- Don’t Overwork the Dough: Handling the crust too much warms the butter and leads to tough pastry, so be gentle and quick when mixing and rolling.
- Mix Apple Varieties: Combining tart and sweet apples adds complexity and balance to the filling’s flavor.
- Let it Cool Fully: I’ve learned that slicing too soon results in juicy seepage, so patience is your friend here for neat, perfect slices.
How to Serve Apple Slab Pie Recipe
Garnishes
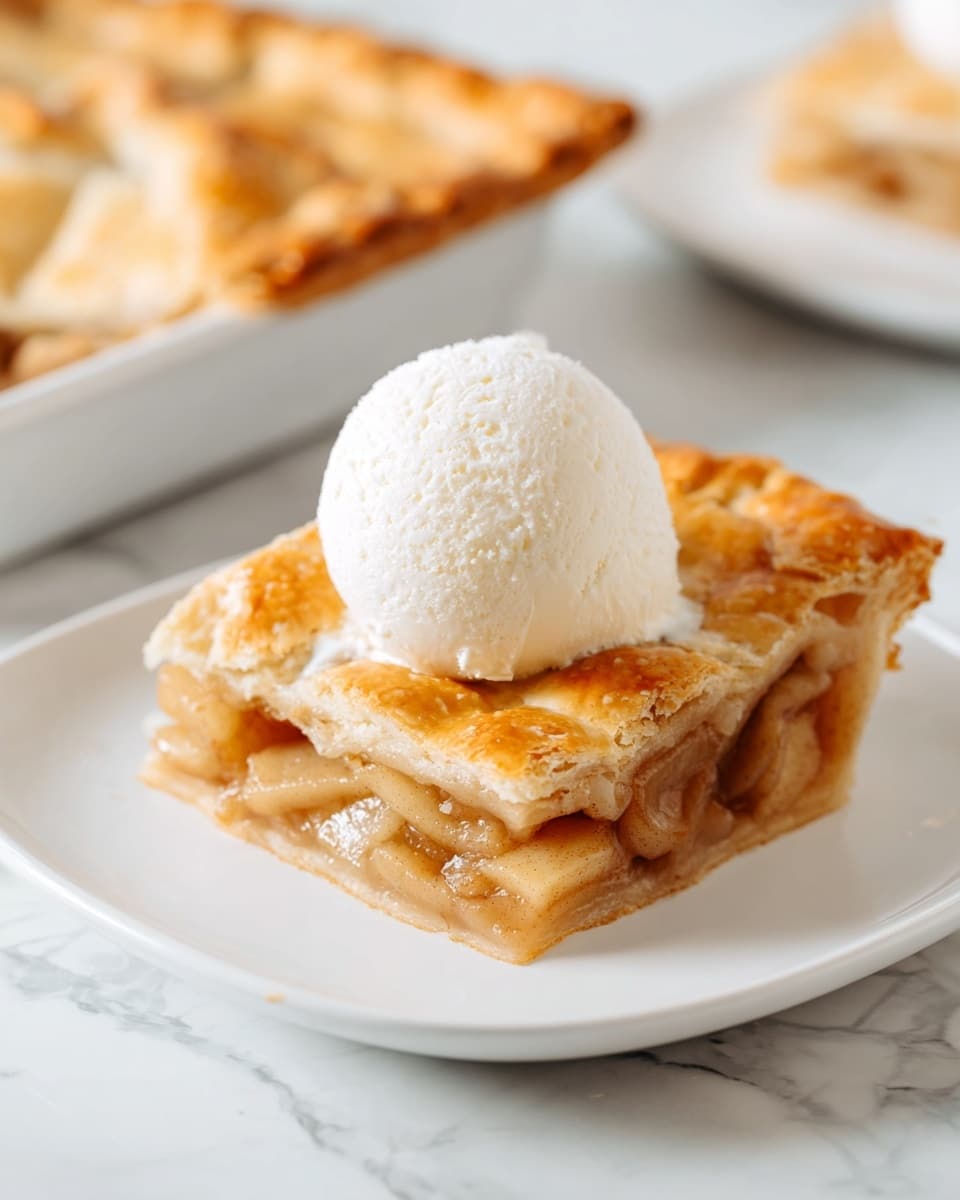
I usually stick to simple garnishes for this pie because the flavors are so rich on their own— a scoop of vanilla bean ice cream or a dollop of whipped cream is all you really need. Sometimes I sprinkle a little extra cinnamon sugar on top before serving for a pretty touch. Honestly, it’s those warm, melty accompaniments that make every bite feel extra special.
Side Dishes
Apple slab pie pairs beautifully with a cup of freshly brewed coffee or a warm chai latte. For a festive gathering, I like offering some sharp cheddar cheese slices alongside the pie—a classic combo that surprises people but works wonderfully. And if you’re aiming for a full cozy dessert spread, some roasted nuts or spiced cider are right there as winners in my book.
Creative Ways to Present
For holidays, I’ve occasionally topped the pie with decorative cutout leaves made from leftover crust dough—simple but so charming! If you want to get extra festive, drizzle some caramel sauce over each slice before serving. It turns this homestyle pie into a dessert plate that looks effortlessly elegant when guests arrive.
Make Ahead and Storage
Storing Leftovers
I usually keep leftover apple slab pie right in the baking pan, covered tightly with plastic wrap. This method locks in moisture but keeps the crust from drying out. You’ll find it stays fresh and delicious for up to 3 days, though honestly, it rarely lasts that long in my house!
Freezing
If you want to freeze this pie, I recommend wrapping it tightly in foil and plastic wrap for protection. From personal experience, freezing before baking gives the best results—you can bake from frozen by adding a few extra minutes to the baking time. It’s a handy trick for prepping ahead of busy holidays.
Reheating
Reheating apple slab pie is easy! I pop slices in a 350°F oven for 10-15 minutes to warm through and crisp up the crust again. Avoid microwaving if you can—it tends to make the crust soggy. Trust me, a few extra minutes in the oven keeps it tasting just like fresh-baked.
FAQs
-
Can I use store-bought pie crust for the Apple Slab Pie Recipe?
Absolutely! While homemade crust adds unbeatable flavor and flakiness, store-bought crust is a convenient shortcut. Just make sure to adjust the crust dust step to keep the bottom crisp and watch the baking time closely, as pre-made crusts can brown faster.
-
What kinds of apples work best for this pie?
I recommend mixing tart apples like Granny Smith with sweeter varieties such as Honeycrisp or Fuji. This combo balances tartness and sweetness while giving your filling a nice texture that holds up well during baking.
-
How do I prevent a soggy bottom crust?
The crust dust of sugar and flour sprinkled on the bottom crust before adding the filling helps absorb excess moisture. Also, baking on a preheated pizza stone or baking sheet can improve bottom crispiness. Lastly, letting the pie cool properly allows the filling to set and prevents dripping.
-
Can I prepare the pie filling a day in advance?
Yes! You can prep the apple filling a day ahead, just store it covered in the fridge. This actually lets the flavors meld beautifully. Make sure to bring it back to room temperature before assembling the pie to keep the crust from getting soggy.
Final Thoughts
Making this Apple Slab Pie Recipe always brings me back to family gatherings and cozy fall afternoons. It’s one of those recipes that feels like an heirloom—simple ingredients, honest effort, and a big return in smiles and satisfaction. If you’re looking for a pie that’s easy to share, generously sliced, and always delicious, I can’t recommend this one enough. Give it a go—you’ll have everyone asking for seconds (and the recipe) in no time!
Print
Apple Slab Pie Recipe
- Prep Time: 45 minutes
- Cook Time: 55 minutes
- Total Time: 3 hours 40 minutes
- Yield: 24 slices
- Category: Dessert
- Method: Baking
- Cuisine: American
Description
This delicious Apple Slab Pie features a rustic double crust filled with spiced apple filling. Perfect for serving a crowd, it’s baked in a jelly roll pan with a crisp, golden topping that complements the tender, cinnamon-laced apples inside.
Ingredients
Pie Crust
- 4 cups all-purpose flour
- 2 teaspoons salt
- 1 ¼ cup shortening
- ½ cup cold butter, cut into small cubes
- 1 Tbsp. vegetable oil
- ¾ cup milk
- 1 Tbsp. lemon juice
Apple Pie Filling
- 10-12 cups apples (about 4 pounds), peeled and chopped
- ⅔ cups sugar
- ¼ cup all-purpose flour
- 1 ½ teaspoons ground cinnamon
- ½ teaspoon ground nutmeg
Crust Dust
- 2 Tbsp. all-purpose flour
- 2 Tbsp. sugar
Egg Wash
- 1 egg, beaten
- 1 Tbsp. water
Instructions
- Prepare Pie Dough: Mix flour and salt in a large bowl. Cut in shortening and cold butter until the mixture resembles small peas. Combine milk and lemon juice in a small bowl, then add vegetable oil and this milk mixture to the flour mixture. Stir until a soft dough forms, using your hands if necessary.
- Chill Dough: Divide dough into two equal discs, wrap each in plastic wrap, and refrigerate for about 30 minutes while preparing the filling.
- Make Filling: Peel and chop apples into small pieces. In a large bowl, sprinkle the sugar, flour, cinnamon, and nutmeg over the apples and toss until evenly coated.
- Preheat Oven: Heat oven to 400°F (205°C). Place a pizza stone on the rack if available to preheat alongside the oven.
- Roll Bottom Crust: On a lightly floured surface, roll one dough disc into a rustic 13×18 inch rectangle about ⅛ inch thick. Place it into a 10×15 inch jelly roll pan, letting excess dough hang over the edges.
- Add Crust Dust: Sprinkle the mixture of 2 Tbsp flour and 2 Tbsp sugar evenly over the bottom crust in the pan.
- Fill Pie: Pour the apple filling over the crust dust layer, spreading evenly.
- Roll Top Crust: Roll out the second dough disc into a similar 13×18 inch rectangle and place it over the apple filling.
- Seal Edges: Fold the top and bottom crust edges together and tuck into the sides of the pan. Crimp edges using your fingers or a fork to seal.
- Vent and Wash: Cut slits in the top crust to allow steam to escape. Brush the crust lightly with the egg wash (beaten egg and water) and sprinkle with sugar.
- Bake: Bake for 30 minutes, then loosely tent the pie with foil and bake for an additional 20-25 minutes until the crust is golden and the filling bubbles.
- Cool: Let the pie cool at least 2 hours before slicing to allow filling to set.
Notes
- Store leftover pie covered with plastic wrap in the pan for up to 3 days to maintain freshness.
- If using dark-colored baking sheets instead of a jelly roll pan, you may need to adjust baking time to avoid overbrowning.
Nutrition
- Serving Size: 1 slice (1/24th of pie)
- Calories: 220 kcal
- Sugar: 15 g
- Sodium: 150 mg
- Fat: 11 g
- Saturated Fat: 3.5 g
- Unsaturated Fat: 6 g
- Trans Fat: 0 g
- Carbohydrates: 30 g
- Fiber: 2 g
- Protein: 2 g
- Cholesterol: 30 mg

