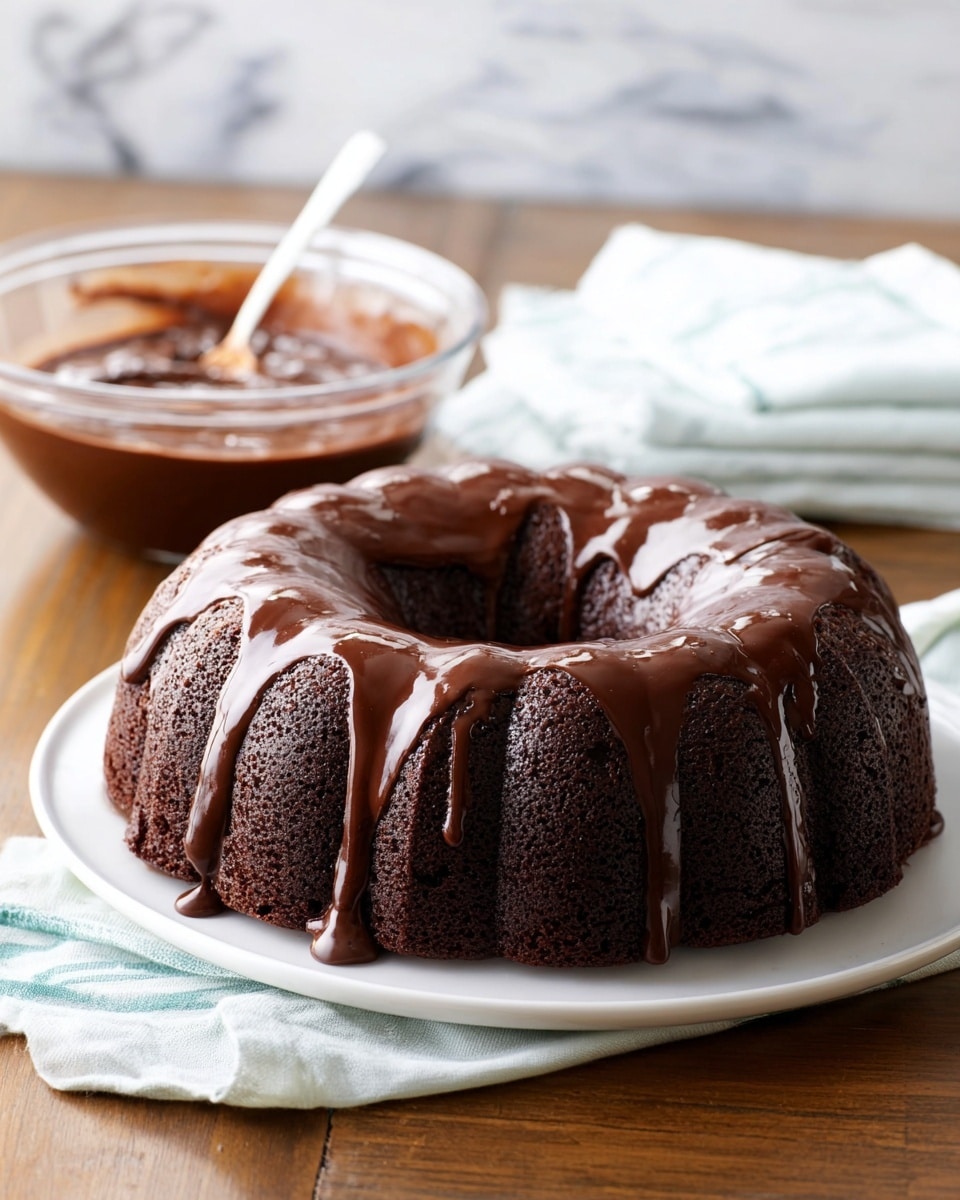
If you’re craving a rich, moist, and utterly chocolatey dessert, you’ve got to try this Black Magic Cake Recipe. It’s one of those cakes that just feels like a hug on a plate—deep chocolate notes boosted by a little coffee magic that takes the flavor over the top. When I first tried making this cake, I was blown away by how simple the ingredients were but how fantastically decadent the final result tasted. Trust me, keep reading because this cake will quickly become your go-to for celebrations or just a sweet midweek treat.
Why You’ll Love This Recipe
- Rich Flavor Boosted by Coffee: The subtle coffee enhances the chocolate in the best way, adding depth without overpowering.
- Moist and Tender Texture: Vegetable oil and buttermilk keep this cake wonderfully soft and moist every time.
- Simple Ingredients, Beginner-Friendly: You don’t need fancy or hard-to-find items—most are pantry staples.
- Versatile and Customizable: Perfect for different pan shapes and your favorite frosting choices.

Ingredients You’ll Need
This Black Magic Cake Recipe is straightforward but clever—each ingredient serves a purpose to create that perfect chocolate cake. Using buttermilk or sour milk is key to tenderness, and adding brewed coffee might sound unusual but it truly intensifies the cocoa flavor.
- Sugar: Provides sweetness and helps create the perfect crumb.
- All-purpose flour: The cake’s structure; be sure to measure correctly for best results.
- HERSHEY’S Cocoa: The star of the show for deep chocolate flavor—unsweetened cocoa is a must.
- Baking soda and baking powder: These leaveners ensure your cake rises beautifully.
- Salt: Balances sweetness and enhances overall flavor.
- Eggs: They bind the ingredients and give the cake richness.
- Buttermilk or sour milk: Adds tang and helps keep the cake tender and moist.
- Coffee (strong black or instant coffee with boiling water): Secret ingredient that amps up chocolate flavor—don’t skip it!
- Vegetable oil: Keeps the cake moist and tender longer than butter alone.
- Vanilla extract: Rounds out the chocolate and brings warmth to every bite.
Variations
One of the things I love about this Black Magic Cake Recipe is how easy it is to make your own spin on it. Whether you want it gluten-free, add some spice, or try a whole new frosting, there are simple ways to customize it.
- Gluten-Free Option: Substitute the all-purpose flour with a 1:1 gluten-free baking flour blend—I tried this when baking for a friend with allergies, and it worked wonderfully without sacrificing texture.
- Spiced Chocolate Twist: Add a teaspoon of cinnamon or a pinch of cayenne for an unexpected warmth that pairs amazingly with the coffee.
- Frosting Variations: While classic chocolate buttercream is my go-to, I’ve also topped it with a tangy cream cheese frosting or simple vanilla bean icing for a lighter finish.
- Pan Shapes: This cake bakes well in tube pans, round pans, or a sheet pan—so feel free to pick the shape that suits your occasion.
How to Make Black Magic Cake Recipe
Step 1: Prepare Your Pan and Oven
First things first: preheat your oven to 350°F (175°C). Whether you’re using a 12-cup fluted tube pan, two 9-inch rounds, or a 13×9-inch pan, grease and flour it thoroughly. I like to use a combination of butter and flour for greasing because it gives the best release without drying out the cake edges, but baking spray works great too.
Step 2: Mix Dry Ingredients
In a large bowl, combine sugar, flour, cocoa powder, baking soda, baking powder, and salt. Stir well to evenly distribute the leaveners and salt. When I make this, I always take a moment to sift the cocoa and flour together before mixing—it helps prevent lumps and makes for a smoother batter.
Step 3: Add Wet Ingredients and Beat
Now, add in the eggs, buttermilk, coffee, vegetable oil, and vanilla extract to your dry mixture. Beat on medium speed for about 2 minutes. The batter will be thin—that’s exactly what you want for this cake’s moist texture. Don’t worry if it looks a bit runny; it bakes up perfectly. I learned early on not to overbeat because it can toughen the crumb.
Step 4: Bake and Cool
Pour the batter evenly into your prepared pan(s). Bake for 50-55 minutes if you’re using a fluted tube pan, 30-35 minutes for round pans, or 35-40 minutes for a rectangular pan. You’ll know it’s done when a wooden pick inserted in the center comes out clean. When the timer goes off, let the cake cool in the pan for 10 minutes, then run a knife around the edges to help loosen it before transferring to a wire rack to cool completely. This step is crucial—if you try to remove it too early, the cake might break.
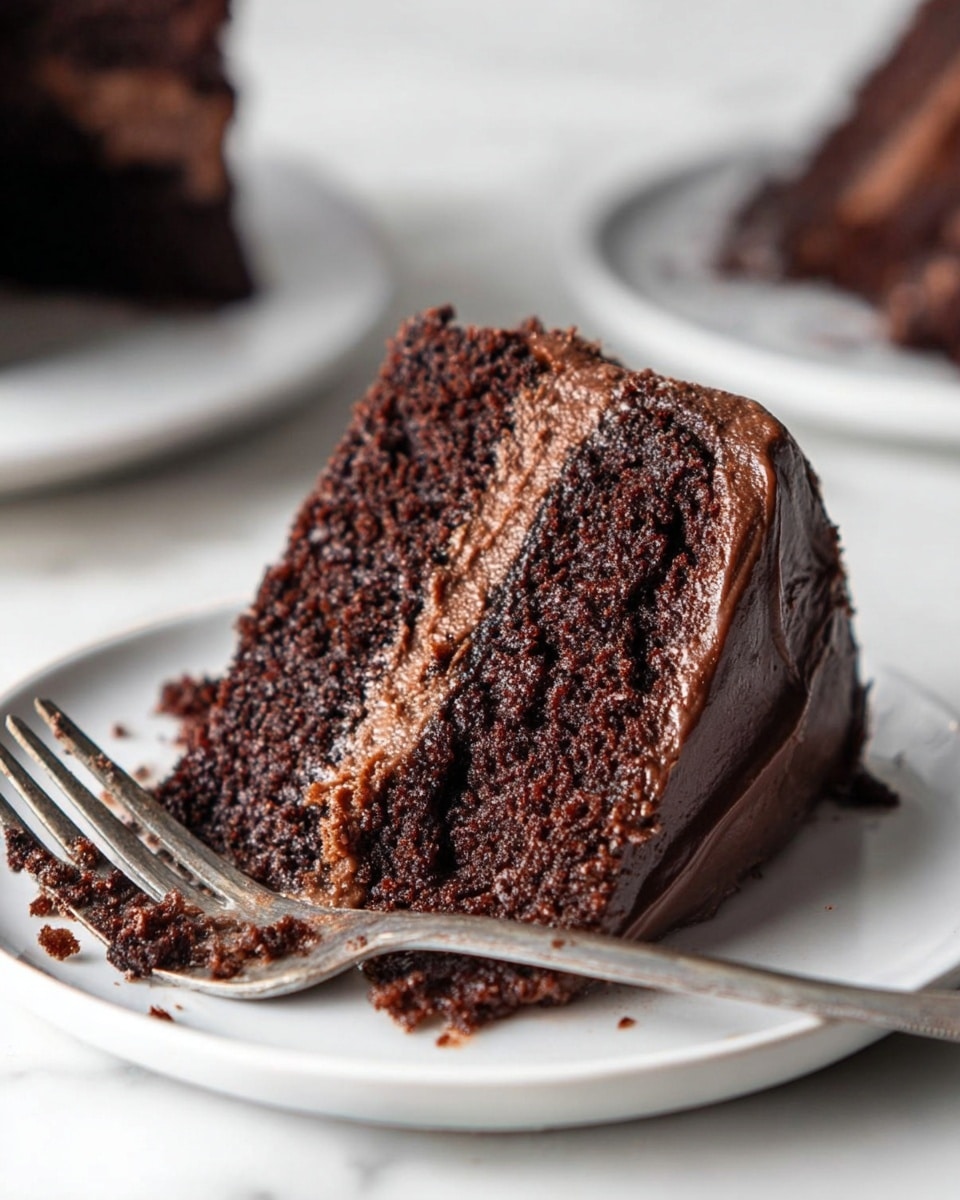
Step 5: Frost and Enjoy
Once cooled, frost as you like. I love a classic chocolate buttercream, but creamy vanilla frosting or even a dusting of powdered sugar also work great. My family goes crazy for this cake with a scoop of vanilla ice cream on the side—trust me, it’s worth the extra scoop!
Pro Tips for Making Black Magic Cake Recipe
- Use Strong Coffee: I discovered this trick the first time I made the cake—strong brewed coffee (or good-quality instant) really brings out the cocoa flavor without tasting like coffee.
- Don’t Skip the Buttermilk: It’s the secret to the soft crumb and tangy note, so if you don’t have buttermilk, sour milk works fine by adding a teaspoon of vinegar or lemon juice to regular milk.
- Set Timer Carefully: Oven temps vary, so start checking your cake 5 minutes before the minimum baking time to avoid overbaking and drying out the cake.
- Cool Properly Before Frosting: Patience pays off here; frost only once completely cool to prevent melted frosting and soggy spots.
How to Serve Black Magic Cake Recipe
Garnishes
I love to sprinkle some chocolate shavings or a dusting of cocoa powder on top after frosting—it adds a subtle touch and looks like you put in way more effort than you did. Sometimes fresh berries or a few mint leaves give it a fresh punch that brightens the richness.
Side Dishes
Serving this cake with a scoop of vanilla or coffee ice cream is divine, and a dollop of whipped cream never hurts. If you want to keep it simple, a warm cup of coffee or milk pairs perfectly for that cozy vibe.
Creative Ways to Present
For holidays or parties, I’ve decorated the top with edible gold flakes or piped rosettes with a contrasting frosting color. Another favorite trick is layering the cake with a rich ganache or salted caramel between the layers for a luxurious touch.
Make Ahead and Storage
Storing Leftovers
I wrap leftover cake tightly in plastic wrap and store it at room temperature for up to 3 days. This keeps the cake moist, but if your kitchen is warm, refrigeration is better—just bring it back to room temp before serving for the best taste.
Freezing
If I ever have a lot of cake left, I slice it into portions and freeze individually wrapped pieces. The Black Magic Cake freezes well for up to 2 months, and I always thaw them overnight in the fridge before serving.
Reheating
To warm up slices, I pop them into the microwave for about 15-20 seconds or briefly into a warm oven. Warming brings back that fresh-baked softness and intensifies the chocolate aroma—so good.
FAQs
-
Can I use regular milk instead of buttermilk?
Yes! If you don’t have buttermilk, you can make sour milk by adding 1 tablespoon of vinegar or lemon juice to 1 cup of regular milk and letting it sit for 5-10 minutes. This gives the acidity needed to react with the baking soda and keep your cake moist and tender.
-
Does the coffee flavor come through strongly?
Not at all—it just enhances the chocolate flavor. The coffee taste is subtle and won’t make your cake taste like coffee unless you use an extremely strong brew or add a lot more.
-
Can I make this cake vegan?
To veganize it, you’d need to substitute the eggs with a flax or chia egg, use plant-based milk with lemon juice as a buttermilk substitute, and replace vegetable oil with a neutral oil if desired. The texture might be slightly different, but it’s worth experimenting!
-
What’s the best frosting to pair with this cake?
Classic chocolate buttercream is always fantastic, but cream cheese frosting, vanilla bean icing, or even a simple dusting of powdered sugar all complement the cake’s rich flavor nicely.
Final Thoughts
I absolutely love how this Black Magic Cake Recipe turns out every single time—it’s dependable, delicious, and not intimidating even if you’re new to baking. It’s the kind of recipe I recommend to friends who want to impress without stress because it checks every box for flavor and texture. So, grab your ingredients and give it a go—you’ll be amazed at how this modest list produces something so special. Enjoy baking this little marvel as much as my family and I do!
Print
Black Magic Cake Recipe
- Prep Time: 15 minutes
- Cook Time: 35 to 55 minutes depending on pan
- Total Time: 1 hour 30 minutes (including cooling time)
- Yield: 1 cake (12 servings)
- Category: Dessert
- Method: Baking
- Cuisine: American
Description
This Black Magic Cake recipe is a rich, moist, and deeply chocolatey treat enhanced with the secret ingredient of coffee to boost the chocolate flavor. Made with Hershey’s Cocoa, buttermilk, and vegetable oil, this beginner-friendly cake is perfect for any occasion. It can be baked in various pans and customized with your favorite frosting, such as buttercream or vanilla bean icing.
Ingredients
Dry Ingredients
- 2 cups sugar
- 1-3/4 cups all-purpose flour
- 3/4 cup HERSHEY’S Cocoa
- 2 teaspoons baking soda
- 1 teaspoon baking powder
- 1 teaspoon salt
Wet Ingredients
- 2 eggs
- 1 cup buttermilk or sour milk
- 1 cup strong black coffee or 2 teaspoons powdered instant coffee plus 1 cup boiling water
- 1/2 cup vegetable oil
- 1 teaspoon vanilla extract
Instructions
- Prepare Oven and Pans: Preheat your oven to 350°F. Grease and flour your choice of baking pans: a 12-cup fluted tube pan, two 9-inch round pans, or one 13x9x2-inch rectangular pan.
- Mix Dry Ingredients: In a large bowl, combine 2 cups sugar, 1 3/4 cups all-purpose flour, 3/4 cup Hershey’s Cocoa, 2 teaspoons baking soda, 1 teaspoon baking powder, and 1 teaspoon salt. Stir well to evenly distribute all dry ingredients.
- Add Wet Ingredients: To the dry mixture, add 2 eggs, 1 cup buttermilk, 1 cup brewed coffee (or dissolved instant coffee), 1/2 cup vegetable oil, and 1 teaspoon vanilla extract. Beat the mixture on medium speed for 2 minutes. The batter will be thin, which is expected.
- Pour and Bake: Pour the cake batter evenly into the prepared pans. Bake according to your pan choice: 50 to 55 minutes for a fluted tube pan, 30 to 35 minutes for round pans, or 35 to 40 minutes for a rectangular pan. Check doneness by inserting a wooden pick into the center; it should come out clean.
- Cool and Frost: Let the cake cool for 10 minutes in the pan. Loosen the cake from the sides and remove it onto wire racks to cool completely. Once cooled, frost with your desired icing such as buttercream or vanilla bean frosting.
Notes
- Skip the boxed cake mixes; this homemade recipe delivers moist, rich chocolate flavor with simple pantry ingredients.
- The coffee adds depth and enhances the chocolate taste without making the cake taste like coffee.
- You can substitute strong brewed coffee with instant coffee dissolved in boiling water.
- Try different pan shapes to vary presentation and bake times.
- Customize with your favorite frostings such as buttercream or vanilla bean icing for extra flavor.
- For a fun twist, try the Espresso-Filled Mini Cakes recipe for a more flavorful coffee-chocolate treat.
Nutrition
- Serving Size: 1 slice (87g)
- Calories: 260
- Sugar: 26g
- Sodium: 500mg
- Fat: 11g
- Saturated Fat: 1.5g
- Unsaturated Fat: 9.5g
- Trans Fat: 0g
- Carbohydrates: 41g
- Fiber: 0g
- Protein: 4g
- Cholesterol: 35mg


