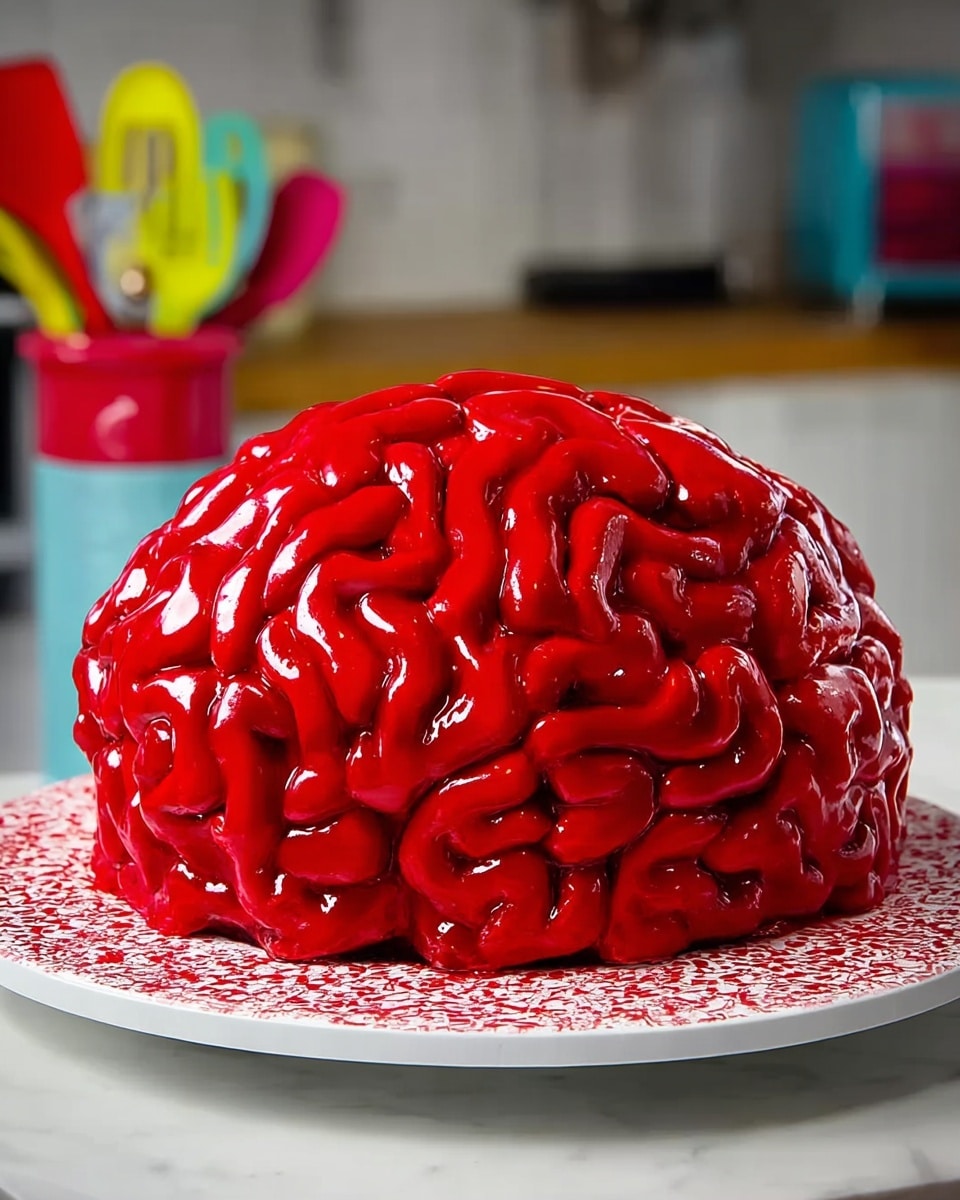
If you’re on the hunt for a show-stopping dessert that’s both spooky and delicious, you’ve got to try this Brain Cake Recipe. I absolutely love how this cake turns out—moist red velvet layers with the dreamiest pink buttercream and just the right amount of raspberry jam to look like “brain blood.” It’s perfect not only for Halloween but any time you want to wow friends or family. Keep reading, and I’ll walk you through every step to make sure your Brain Cake looks eerie yet tastes heavenly.
Why You’ll Love This Recipe
- Deliciously Moist Texture: The combo of buttermilk and oil keeps the cake incredibly soft and tender.
- Fun and Festive: That brain shape with raspberry “blood” is a guaranteed conversation starter at any party.
- Creamy, Dreamy Frosting: The buttercream-cheesecake frosting adds a tangy smoothness that balances the sweetness perfectly.
- Perfect for All Levels: I’ve broken down the steps so that even if you’re not an expert baker, you’ll still nail it.

Ingredients You’ll Need
The ingredients in this Brain Cake Recipe come together perfectly to create those vibrant red velvet layers and luscious frosting that look almost too cool to eat. When shopping, grab fresh dairy products for the best texture and flavor, and don’t skip sifting the cocoa – it really helps make the crumb light.
- Cake flour: Using cake flour makes the cake light and tender, which is essential for that soft brain texture.
- Unsweetened cocoa powder: Sift this to avoid clumps and get a smooth batter.
- Baking soda: This works with vinegar and buttermilk to give the cake a nice rise and tender crumb.
- Fine salt: Just a touch enhances all the flavors.
- Unsalted butter: Room temperature butter cream-whips better and creates a silky texture.
- Granulated sugar: Sweetness with structure—make sure to measure correctly.
- Large eggs: Bring them to room temp to help the batter emulsify smoothly.
- Buttermilk: Adds moisture and a slight tang that’s classic in red velvet.
- Vegetable or canola oil: Keeps the cake moist and tender even a day later.
- Vanilla extract or vanilla bean paste: Adds warmth and depth to the flavor.
- White vinegar: Reacts with the baking soda to fluff up the cake.
- Red gel food coloring (or liquid food coloring): Essential for that vibrant brain-red color without thinning the batter.
- Full-fat cream cheese: Room temperature for smooth mixing into the frosting.
- Powdered sugar: For a silky, stable buttercream—be sure to sift to avoid lumps.
- Heavy whipping cream: Adds richness and helps the frosting hold its shape.
- Seedless raspberry or strawberry jam: This is your “brain blood” layer — pure deliciousness and an eye-catching detail.
- Water: Mixes with jam to thin it for drizzling.
Variations
I love tweaking this Brain Cake Recipe depending on the occasion or the ingredients I have on hand. You can customize it to your preferred flavor or dietary needs—just make sure you keep the balance between the cake and frosting to maintain that perfect moistness and tang.
- Chocolate Lover’s Brain Cake: I once added a little espresso powder to the batter to deepen the cocoa flavor, and my family went crazy for it.
- Vegan Version: Swap eggs with flax eggs and use plant-based buttermilk—I’ve had good luck with full-fat coconut milk as a substitute.
- Extra Fruity: Mix a little fresh strawberry puree into the frosting for an added berry twist that brightens the flavor.
- Less Sweet: Use less powdered sugar in the frosting if you want a milder sweetness—just balance it with a bit more salt or cream cheese.
How to Make Brain Cake Recipe
Step 1: Prepare Your Ingredients and Pans
Start by preheating your oven to 350°F (175°C). Grease and flour your cake pans (I usually use an 8-inch round pan) or line them with parchment paper for an easy release. Bring your eggs, buttermilk, butter, and cream cheese to room temperature — I’ve learned this step helps everything mix together smoothly and gives you a tender cake crumb and silky frosting.
Step 2: Mix the Dry Ingredients
In a large bowl, sift together the cake flour, cocoa powder, baking soda, and fine salt. This ensures you don’t get any clumps, especially in the cocoa, which can be tricky if not sifted. Trust me, taking this extra minute makes all the difference.
Step 3: Cream Butter and Sugar
Using a stand mixer or hand beaters, cream the room-temp unsalted butter with the granulated sugar until the mixture is fluffy and pale. This usually takes about 3-4 minutes on medium speed. This step traps air in the batter, helping your cake rise beautifully.
Step 4: Add Eggs and Vanilla
Beat in the eggs one at a time, making sure each is fully incorporated before adding the next. Add the vanilla extract or paste for that warm vanilla undertone that lovers of red velvet cake adore.
Step 5: Combine Wet and Dry
Alternate adding the dry ingredients and the buttermilk mixed with oil, beginning and ending with the dry mix. This keeps the batter from overmixing and developing too much gluten, which can make the cake tough. Stir in the white vinegar and red food coloring last for that signature blush color and tender crumb.
Step 6: Bake the Layers
Pour the batter evenly into the prepared pans and smooth the tops. Bake for about 27 minutes, or until a toothpick inserted in the center comes out clean. I like to rotate the pans halfway through baking if my oven heats unevenly. Once out of the oven, let the cakes cool in the pans for 10 minutes, then transfer to a wire rack to cool completely—which can take around 1 hour.
Step 7: Make the Buttercream-Cream Cheese Frosting
Beat the softened unsalted butter and cream cheese together until smooth and creamy, about 3-5 minutes. Add vanilla extract and fine salt. Gradually mix in sifted powdered sugar and the heavy cream until you get a light, fluffy frosting with a lovely pink tint by adding a small squirt of red food coloring. This frosting is my absolute favorite because it’s not too sweet and spreads like a dream.
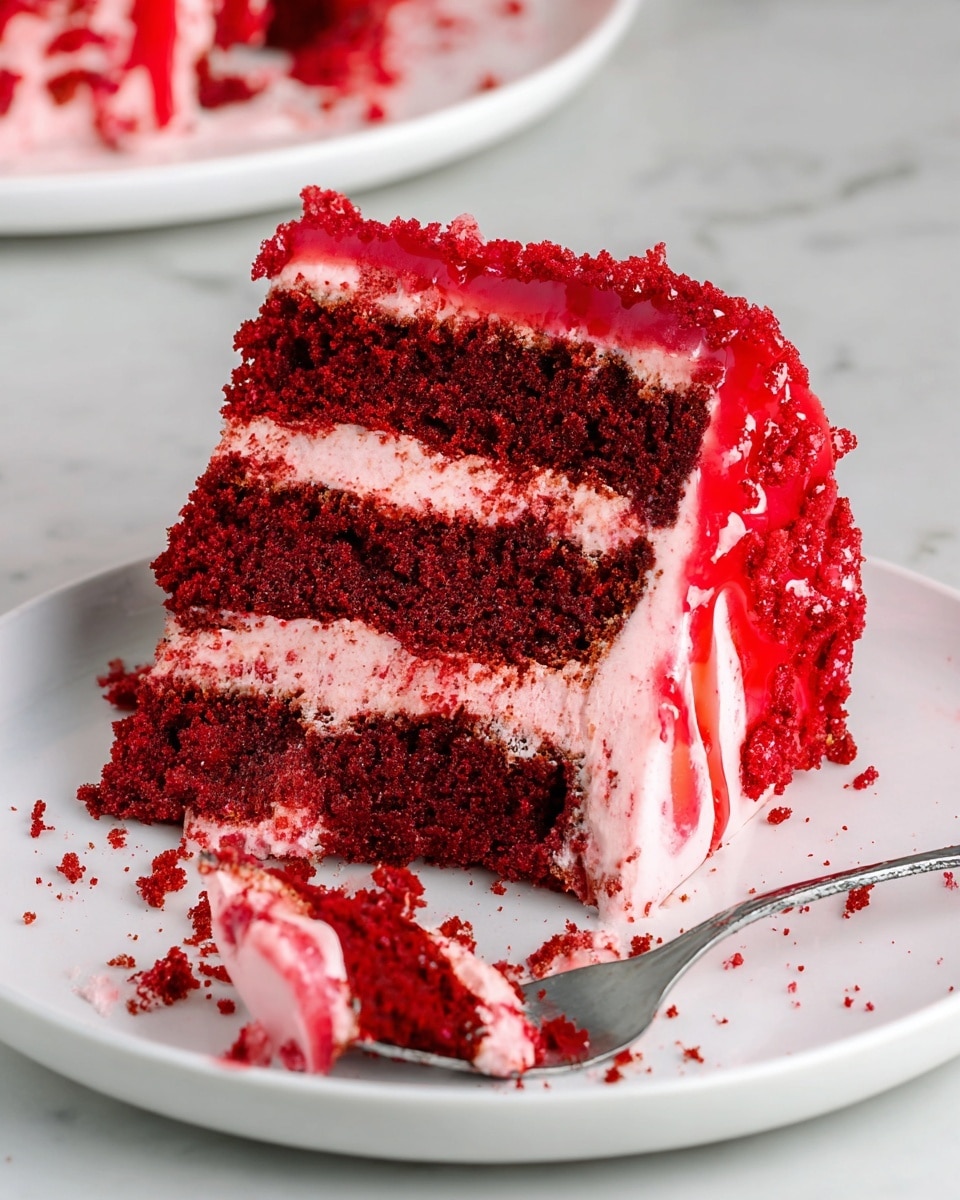
Step 8: Assemble Your Brain Cake
Start with a cake layer, spread a thin layer of frosting, then dollop and gently spread the seedless raspberry or strawberry jam mixed with water to create that luscious “blood” effect. Repeat layering, then cover the whole cake with the pink buttercream. Use an offset spatula or piping bag to sculpt the characteristic brain folds—don’t worry if it’s not perfect, the imperfections make it look more realistic!
If you want to add extra “blood,” thin a little jam with water and drizzle it artistically on top and sides. It’s a spooky, delicious flourish everyone notices.
Pro Tips for Making Brain Cake Recipe
- Room Temperature Ingredients: I can’t stress this enough—eggs, butter, cream cheese, and buttermilk should be at room temp for a smooth batter and frosting.
- Gel Food Coloring Over Liquid: Use gel food coloring to get that vibrant red color without thinning your batter or frosting.
- Don’t Overmix: Mix the dry and wet ingredients just until combined to keep your layers tender rather than dense.
- Chill for Neat Decorating: If frosting gets too soft, pop the cake in the fridge for 15-20 minutes—it makes sculpting the brain folds easier.
How to Serve Brain Cake Recipe
Garnishes
I like to keep it simple with minimal garnishes so the brain design steals the show. A light dusting of edible glitter over the top or a few fresh raspberries at the base add subtle elegance without drawing attention away from the “brain.” Sometimes I even add a thin rosemary sprig for a slight “veiny” effect—it’s quirky but fun!
Side Dishes
Pair this cake with a scoop of vanilla ice cream or a dollop of whipped cream for a perfect balance. For drinks, I love serving it alongside a berry-infused sparkling water or hot cocoa for cooler nights—keeps the spooky vibe intact!
Creative Ways to Present
For Halloween parties, I’ve experimented with placing the brain cake inside a shallow “skull” mold or on a slate board with dry ice fog around it—it’s a total showstopper. Another fun way is to create mini brain cupcakes using this same recipe and pipe the frosting on top for individual servings. Guests love that!
Make Ahead and Storage
Storing Leftovers
I store leftover Brain Cake tightly wrapped in plastic wrap or an airtight container in the fridge. Because of the cream cheese frosting, refrigeration is a must. It stays perfect for up to 4 days, but honestly, mine rarely lasts that long!
Freezing
If you want to freeze the cake, slice it into portions and wrap each piece tightly with plastic wrap and foil. Freeze for up to 2 months. When I thaw, I leave it in the fridge overnight to avoid soggy frosting and maintain texture. This way, you can enjoy your Brain Cake anytime.
Reheating
Since it’s a cake with cream cheese frosting, make sure to keep it cool and avoid heating it. If you want to bring it to room temperature before serving, I remove it from the fridge about 20-30 minutes prior—this softens the frosting so the flavors shine without risking texture changes.
FAQs
-
Can I make this Brain Cake Recipe without red food coloring?
Yes! The classic brain cake gets its signature color from red food coloring, but you can omit it if you prefer a more subtle look. Keep in mind the cake will look more like a traditional chocolate cake. For a natural alternative, beet juice powder or pomegranate juice might work, but test in small batches since they can affect flavor and moisture.
-
How do I create the brain folds on the cake?
After frosting the entire cake with your pink buttercream, use an offset spatula or the back of a spoon to pipe or sculpt swirling folds that mimic the brain’s texture. Going slow here helps, and chilling the cake briefly can make the frosting easier to shape without it smearing.
-
Can I use store-bought frosting instead of making my own?
You can, but homemade cream cheese buttercream offers the best flavor balance and texture for this Brain Cake Recipe. Store-bought frostings may be too sweet or too soft to hold the brain shape well. If using store-bought, choose a firm cream cheese-based frosting and chill the cake as you decorate.
-
What pans work best for this cake?
I recommend standard 8-inch round cake pans for easy stacking and shaping, but you can also use a brain-shaped mold if you want an even more realistic look. Just adjust baking time accordingly and test for doneness with a toothpick.
Final Thoughts
This Brain Cake Recipe holds a special place in my heart because it combines the fun of creative decorating with the comforting taste of classic red velvet and cream cheese frosting. Whether you’re baking for a spooky Halloween party or just to impress your friends, this cake is sure to bring smiles and maybe a little shriek of delight. Give it a go—you’ll enjoy every creepy, creamy bite as much as I do!
Print
Brain Cake Recipe
- Prep Time: 20 min
- Cook Time: 27 min
- Total Time: 77 min
- Yield: 20 servings
- Category: Dessert
- Method: Baking
- Cuisine: American
Description
This Brain Cake is a spooky and delicious treat perfect for Halloween, featuring moist red velvet cake layers paired with creamy pink buttercream and a raspberry jam ‘blood’ filling that adds a striking and tasty touch.
Ingredients
Cake
- 2 1/2 cups cake flour (300g)
- 2 Tbsp unsweetened cocoa powder, sifted (10g)
- 1 tsp baking soda (6g)
- 1/2 tsp fine salt (3g)
- 1/2 cup (1 stick) unsalted butter, room temperature (113g)
- 1 3/4 cups granulated sugar (350g)
- 2 large eggs, room temperature (112g)
- 1 1/4 cups buttermilk, room temperature (300g)
- 1/2 cup vegetable or canola oil (120g)
- 2 tsp vanilla extract or vanilla bean paste (8g)
- 1 tsp white vinegar (4g)
- 1 tsp red gel food coloring (or 1 Tbsp liquid food coloring)
Buttercream
- 1 1/2 cups (3 sticks) unsalted butter, room temperature (339g)
- 1 cup (8 oz) full-fat cream cheese, room temperature (226g)
- 1 Tbsp vanilla extract or vanilla bean paste (12g)
- 1 tsp fine salt (6g)
- 7 cups powdered sugar (904g or a 2lb. bag)
- 3 Tbsp heavy whipping cream, room temperature (45g)
- Small squirt of red gel food coloring (or 1 tsp liquid food coloring)
Jam Filling
- 1/2 cup seedless raspberry or strawberry jam
- 3 Tbsp water (45g)
- [1/4 tsp red gel food coloring or 1 tsp liquid food coloring – optional]
Instructions
- Prepare Cake Batter: Preheat your oven and prepare your cake pans by greasing and flouring them. In a mixing bowl, sift together cake flour, cocoa powder, baking soda, and fine salt. In a separate large bowl, cream the butter and granulated sugar until light and fluffy. Add the eggs one at a time, beating well after each addition.
- Mix Wet Ingredients: Combine buttermilk, vegetable or canola oil, vanilla extract, white vinegar, and red gel food coloring in a separate bowl. Gradually add the wet ingredients to the creamed mixture, alternating with the dry ingredients, beginning and ending with the dry ingredients. Mix until just combined, being careful not to overmix.
- Bake the Cake: Divide the batter evenly between the prepared pans and bake for approximately 27 minutes or until a toothpick inserted into the center comes out clean. Remove from oven and allow cakes to cool completely in the pans for 10 minutes before transferring them to a wire rack to cool fully.
- Prepare Buttercream: In a large bowl, beat the unsalted butter and cream cheese together until smooth and creamy. Add the vanilla extract and salt, then gradually add the powdered sugar, beating on low speed until incorporated. Finally, add the heavy whipping cream and red food coloring, mixing until the buttercream is light, fluffy, and uniformly pink in color.
- Prepare Jam Filling: In a small bowl, combine the seedless raspberry or strawberry jam with water and optional red food coloring. Mix until smooth and slightly runny to resemble ‘blood’. Set aside.
- Assemble the Cake: Once the cake layers are completely cooled, level the tops if necessary. Spread a thin layer of buttercream on the first layer, then add a generous layer of the jam mixture to create the ‘blood’ effect. Add the next cake layer and repeat if using multiple layers. Finish with the remaining buttercream, covering the top and sides of the cake smoothly to resemble a brain surface.
- Decorate: For the classic brain effect, use piping techniques with the buttercream to create brain folds and texture. Optionally, use extra red food coloring in strategic places to enhance the ‘bloody’ appearance. Chill the cake briefly if necessary to set the buttercream before serving.
Notes
- This brain cake is perfect for Halloween!
- Made with moist red velvet cake layers, pink buttercream, and raspberry jam ‘blood’.
- Use gel food coloring for a more vibrant, longer-lasting color.
- Ensure all ingredients are at room temperature for best mixing results.
- Buttercream can be adjusted for sweetness by varying powdered sugar amount.
Nutrition
- Serving Size: 1 slice (approx. 100g)
- Calories: 596 kcal
- Sugar: 60 g
- Sodium: 333 mg
- Fat: 31 g
- Saturated Fat: 16 g
- Unsaturated Fat: 14 g
- Trans Fat: 0.2 g
- Carbohydrates: 77 g
- Fiber: 1 g
- Protein: 4 g
- Cholesterol: 89 mg


