If you’re hunting for a show-stopping dessert that combines spooky vibes with delicious flavors, you’re going to absolutely flip for my Brain Cake with Red Velvet Layers and Blood-Red Buttercream Frosting Recipe. This cake is not just a feast for your eyes—it’s rich, moist, and with that tangy cream cheese frosting and jam “blood,” it’s downright addictive. Whether you’re planning for Halloween or just want to impress your friends with something wildly unique, stick with me—I’ll walk you through every step so it turns out flawless!
Why You’ll Love This Recipe
- Unique and Stunning Presentation: You won’t find a cake that looks as eerily awesome but tastes like a classic red velvet treat.
- Moist and Flavorful Layers: The red velvet layers are balanced perfectly with a hint of cocoa and tang from the buttermilk.
- Decadent yet Tangy Frosting: That blood-red cream cheese buttercream is creamy, smooth, and just a little bit tangy—trust me, it’s addictive.
- Ease of Prep and Customization: The cake layers can be made ahead and frozen, so you’re not stressed on party day.

Ingredients You’ll Need
Each ingredient in this Brain Cake with Red Velvet Layers and Blood-Red Buttercream Frosting Recipe plays a crucial role in creating its signature texture and flavor. I always recommend using the best quality ingredients you can get your hands on—real vanilla, fresh buttermilk, and cream cheese that’s full-fat for that perfect creamy frosting.
- Cake Flour: Gives a tender crumb and the right light texture that makes the cake moist but not dense.
- Unsweetened Cocoa Powder: Just a hint for that classic red velvet nuance without overwhelming the flavor.
- Baking Soda: Helps the cake rise and contributes to its characteristic red velvet texture.
- Unsalted Butter: Room temperature is key for creaming—it helps with volume and fluffiness.
- Granulated Sugar: Sweetens and creates a lovely soft crumb inside the cake.
- Large Eggs: Make sure they’re at room temperature to help the batter come together smoothly.
- Buttermilk: This adds tang and moisture—it’s essential for that velvet texture.
- Vegetable or Canola Oil: Keeps the cake moist and tender.
- Vanilla Extract or Vanilla Bean Paste: Adds warmth and depth to the cake’s flavor.
- White Vinegar: Reacts with the baking soda to make the cake rise beautifully and enhances the color.
- Red Gel Food Coloring: For that vivid, deep red color without impacting texture.
- Full-Fat Cream Cheese: For the frosting—never skimp here, it’s what gives it tang and creaminess.
- Powdered Sugar: Sweetens and thickens the frosting; sift or powder it finely to avoid lumps.
- Heavy Whipping Cream: Adds smoothness and helps create a spreadable frosting.
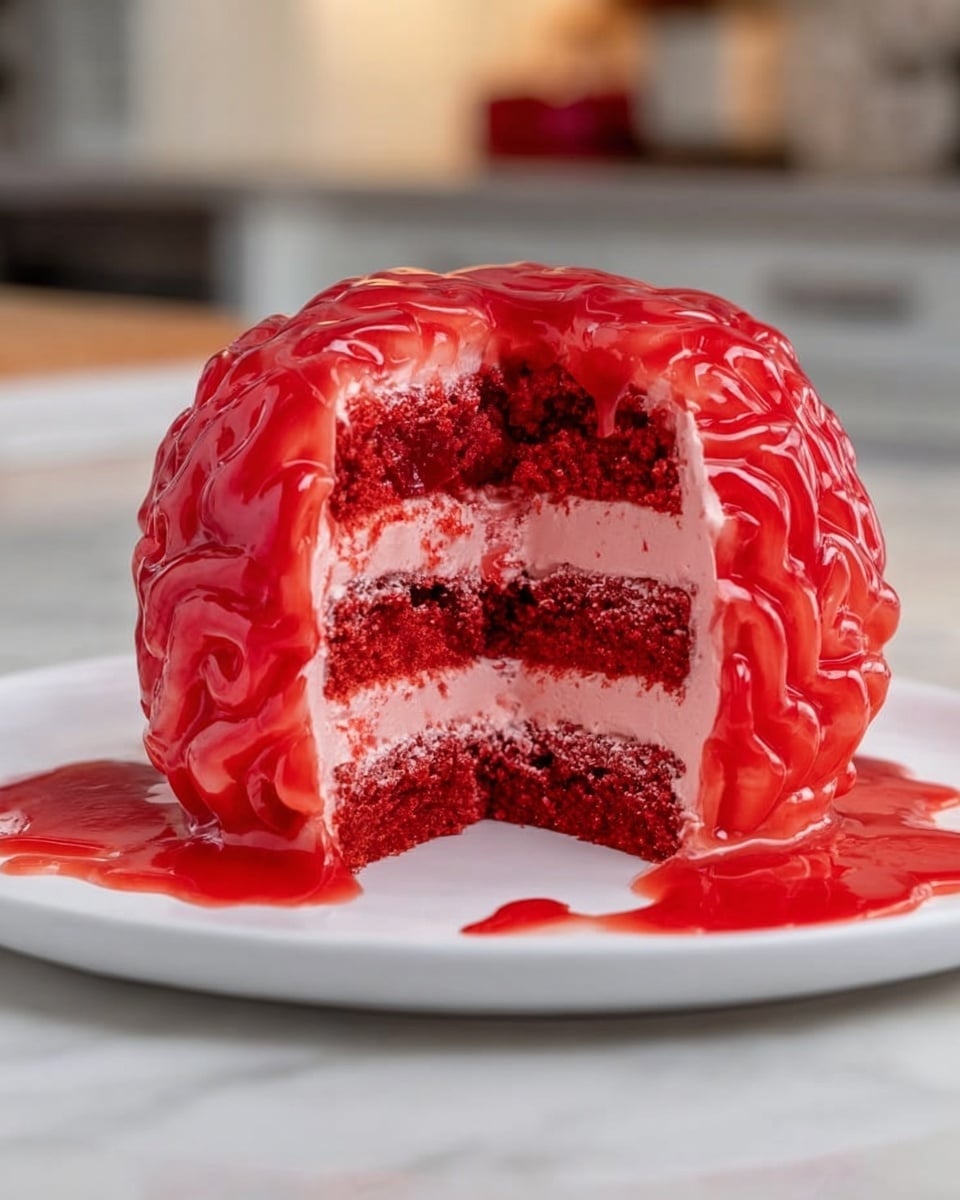
- Seedless Raspberry or Strawberry Jam: Our edible fake blood—adds the perfect balance of sweet and tart.
Variations
One of the things I love about this Brain Cake with Red Velvet Layers and Blood-Red Buttercream Frosting Recipe is how easy it is to tweak for your own style or dietary needs. I’ve tried a few fun twists, and honestly, it’s a great base to get creative with.
- Vegan Version: I swapped dairy with plant-based milks and vegan butter, plus an egg replacer—you’d never guess it was vegan if I didn’t tell you.
- Healthier Version: I’ve reduced sugar here and there or used natural sweeteners in the frosting, though I keep the cream cheese for tang.
- Flavor Variation: Try adding a hint of espresso powder to the batter for a mocha twist that enhances the cocoa notes.
- Different Food Coloring: I once used natural beet juice for color, but the gel food coloring keeps the layers vibrant without impacting flavor.
How to Make Brain Cake with Red Velvet Layers and Blood-Red Buttercream Frosting Recipe
Step 1: Prep and Mix Your Red Velvet Magic
Start by preheating your oven to 350°F (175°C) and prepping your pans—three 8-inch or 7-inch cake pans work best. Grease them well and line with parchment because you want your layers to come out cleanly without any fuss. Next, sift together your dry ingredients—cake flour, cocoa powder, baking soda, and salt—to avoid lumps and guarantee an even rise. Cream your butter and sugar together; this is where your cake starts getting that lovely light texture, so don’t rush it. When it’s pale and fluffy, add your eggs one at a time, then the wet ingredients, including that gorgeous red food coloring—yes, it might look a little strange or separated at first, but it comes together beautifully once you add the dry mix. Mix your dry ingredients in gradually and stop as soon as the batter is uniform—over-mixing will toughen the cake. Divide the batter equally and bake until a toothpick comes out with moist crumbs. A little tip? If your layers bake unevenly or puff up too much, don’t stress—you’ll trim and shape them later!
Step 2: Carve Your Brain Shape—Don’t Be Afraid to Get Creative!
Once your cake layers have cooled for about 10 minutes, gently flip them out onto a wire rack. I usually don’t bother leveling mine because they bake nice and flat, but you can always trim if necessary. Now the fun part: shaping! I cut about an inch off two sides per layer to round off the oval shape, then used a small sharp knife to carve the top into a soft dome that looks like the brain’s surface. Here’s my secret: if your layers feel like they’re crumbling or too soft to cut smoothly, pop them in the freezer for 20 minutes—the slight chill firms them up for easier slicing. You can also freeze layers ahead of time and thaw them when you’re ready to assemble, which really breaks the work into manageable chunks!
Step 3: Whip Up That Blood-Red Cream Cheese Buttercream
Get your butter and cream cheese softened and beat them together until super smooth—this is the base for your frosting, and texture here matters. Stir in vanilla and salt, then gradually add your powdered sugar and cream, mixing low to avoid a sugary cloud explosion in your kitchen (I learned this the hard way!). Adjust thickness as needed; if your frosting feels too stiff to pipe, an extra splash of cream will rescue it. Add a tiny squirt of red food coloring to get that faint pink tone—later, the raspberry jam will give us the brilliant blood-red depth, so no need to go overboard with color now. Cover with plastic wrap so it doesn’t crust over while you move on.
Step 4: Make the Edible Fake Blood
This is where your cake really transforms from delicious to delightfully creepy. Mix seedless raspberry or strawberry jam with water and a little red gel food coloring to brighten it up if needed. Whisk until smooth and thin but still syrupy—this jam is what you’ll brush over your frosting squiggles to simulate all that glistening, fresh brain blood. Cover and set this aside so it’s ready for the final decoration.
Step 5: Assemble, Frost, and Decorate Your Brain Cake
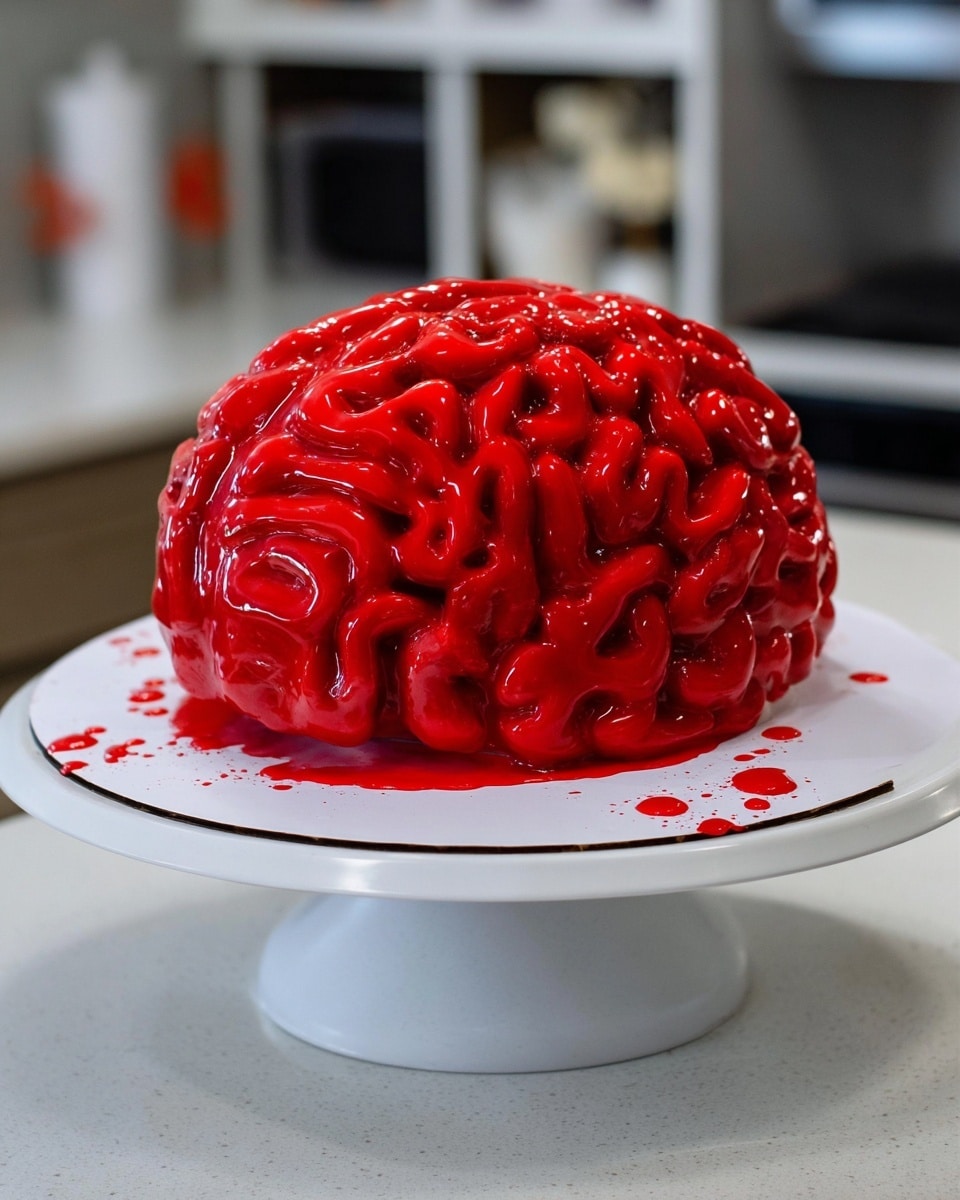
Start stacking your cake layers on a sturdy board using a bit of frosting underneath to keep the first layer in place. Spread each layer evenly with frosting before piling the next on. After stacking, shape the edges again if needed to maintain that brain-like oval. Apply a crumb coat—a thin layer of frosting all over the cake—and chill until firm. Then grab a large piping bag fitted with a round tip, and pipe squiggly lines across the top and sides to mimic the brain’s convolutions. The trick I learned is not to worry about perfection here; slight gaps or uneven piping add to the “realistic” look and won’t show once you add the fake blood. Chill again until the frosting is firm. Finally, brush on that ruby-red jam so it sinks into every crease and drips down the sides—a slightly messy look makes it even more authentic!
Pro Tips for Making Brain Cake with Red Velvet Layers and Blood-Red Buttercream Frosting Recipe
- Use a Kitchen Scale: Measuring flour by weight rather than volume helps avoid a dry cake and guarantees consistency.
- Room Temperature Ingredients: Eggs, butter, and buttermilk mixing better when not chilled ensures silky batter and better rise.
- Chill Those Layers: Freezing the cake for 20 minutes before carving makes for cleaner cuts and less crumbly edges.
- Don’t Over-pipe: If your brain frosting lines aren’t perfect, don’t sweat it—once the edible blood coats the cake, those little imperfections disappear.
How to Serve Brain Cake with Red Velvet Layers and Blood-Red Buttercream Frosting Recipe
Garnishes
I usually keep garnishes minimal because the cake itself is so impressive visually. Sometimes I add a few edible red rose petals or a sprinkle of crushed freeze-dried raspberries to echo that bloody effect. If it’s Halloween, a few fake plastic spiders or skulls on the cake board get everyone’s attention instantly and add a fun touch!
Side Dishes
This creepy cake pairs surprisingly well with simple sides like a fresh berry salad or a vanilla bean ice cream scoop to balance the sweetness. For a party, I like serving it alongside a sharp cheddar cheese plate or dark chocolate truffles to keep the flavor profile interesting.
Creative Ways to Present
For a truly memorable centerpiece, place the Brain Cake on a black or dark red cake stand to amplify the blood-red hues. I’ve even tried injecting a little edible gelatin “vein” detail inside some of the frosting swirls. Adding dim lighting or candles near the cake enhances that spooky vibe—people always ask how I made it look so realistic!
Make Ahead and Storage
Storing Leftovers
After the big reveal, you’re likely to have some brain cake leftover (lucky you!). I wrap slices tightly in plastic wrap and store them in an airtight container in the fridge. The buttercream keeps the cake moist, and it stays delicious for up to a week. I also gently cover the cut parts with extra frosting to prevent drying out—trust me, it makes a difference.
Freezing
I love freezing leftover cake and even the unassembled layers! Wrap everything well—double layer plastic wrap plus foil works best. When you want it again, thaw overnight in the fridge. The texture holds up surprisingly well, and the flavors stay vibrant.
Reheating
I find that this cake is best eaten at room temperature to enjoy the full spectrum of flavors and texture, so take it out of the fridge an hour before serving. If you’re reheating a slice, a few seconds in the microwave (about 10-15 seconds) works great to soften the frosting and warm the cake just enough without drying it out.
FAQs
-
Can I make the Brain Cake with Red Velvet Layers and Blood-Red Buttercream Frosting Recipe ahead of time?
Absolutely! I usually bake and freeze the cake layers in advance, sometimes even a few days ahead. The frosting can also be made and stored separately. This approach makes the whole process less stressful and guarantees fresher, moister cake when you assemble it closer to your event.
-
What if I don’t have red gel food coloring?
You can use liquid food coloring, but be cautious with the amount as too much can alter the cake’s texture and taste. Gel coloring is my preferred choice since it’s more concentrated and won’t dilute your batter or frosting.
-
Can I make this cake dairy-free or vegan?
Yes! Substitute dairy milk with your favorite plant-based milk and use vegan butter sticks. For eggs, I highly recommend an egg replacer that works well in cakes. The cream cheese frosting can be replaced with a vegan cream cheese or all-butter vegan frosting for a similar tangy effect.
-
How do I avoid the brain cake crumbling when cutting the layers?
If your layers feel delicate, chilling or even briefly freezing them before carving makes a big difference. It firms them up and helps prevent tearing or crumbling when you shape the cake.
-
How large is this brain cake, and how many does it serve?
This recipe yields a cake that serves about 20 people, thanks to the trimming that shapes it into the brain silhouette. If you need a larger or tiered version, check out cake batter calculators online to scale the recipe accordingly.
Final Thoughts
I honestly didn’t expect to become obsessed with this Brain Cake with Red Velvet Layers and Blood-Red Buttercream Frosting Recipe when I first made it, but every time I serve it, people go absolutely nuts—not just for the spooky look but for how delicious it is. I love that it combines showmanship with classic red velvet flavor and a frosting that’s tangy and silky smooth. Give yourself plenty of time to prep, don’t stress the small details, and enjoy every messy, fun moment of decorating. Trust me, your friends and family will be talking about your brain cake masterpiece long after the party’s over!
Print
Brain Cake with Red Velvet Layers and Blood-Red Buttercream Frosting Recipe
- Prep Time: 20 minutes
- Cook Time: 27 minutes
- Total Time: 1 hour 17 minutes
- Yield: 20 servings
- Category: Dessert
- Method: Baking
- Cuisine: American
Description
This Brain Cake is a spooky and delicious red velvet cake shaped and decorated to resemble a realistic brain. Featuring moist red velvet layers, creamy tangy cream cheese buttercream frosting tinted pink, and a luscious edible fake blood made from raspberry jam for a dramatic finish, this cake is perfect for Halloween, themed parties, or anyone who loves fun and creative desserts. The recipe includes detailed instructions for baking, shaping, frosting, and decorating the cake to achieve the brain-like appearance.
Ingredients
Red Velvet Cake
- 2 1/2 cups cake flour (300g)
- 2 Tbsp unsweetened cocoa powder, sifted (10g)
- 1 tsp baking soda (6g)
- 1/2 tsp fine salt (3g)
- 1/2 cup (1 stick) unsalted butter, room temperature (113g)
- 1 3/4 cups granulated sugar (350g)
- 2 large eggs, room temperature (112g)
- 1 1/4 cups buttermilk, room temperature (300g)
- 1/2 cup vegetable or canola oil (120g)
- 2 tsp vanilla extract or vanilla bean paste (8g)
- 1 tsp white vinegar (4g)
- 1 tsp red gel food coloring or 1 Tbsp liquid food coloring
Cream Cheese Buttercream Frosting
- 1 1/2 cups (3 sticks) unsalted butter, room temperature (339g)
- 1 cup (8 oz) full-fat cream cheese, room temperature (226g)
- 1 Tbsp vanilla extract or vanilla bean paste (12g)
- 1 tsp fine salt (6g)
- 7 cups powdered sugar (904g) or a 2 lb. bag
- 3 Tbsp heavy whipping cream, room temperature (45g)
- small squirt of red gel food coloring or 1 tsp liquid food coloring
Edible Fake Blood
- 1/2 cup seedless raspberry or strawberry jam
- 3 Tbsp water (45g)
- 1/4 tsp red gel food coloring or 1 tsp liquid food coloring (optional)
Instructions
- Prepare the cake pans: Preheat your oven to 350°F (175°C). Grease three 8-inch or three 7-inch cake pans with non-stick baking spray and line the bottoms with parchment paper to prevent sticking.
- Sift dry ingredients: In a medium bowl, sift together the cake flour, cocoa powder, baking soda, and salt. Set aside for later incorporation.
- Cream butter and sugar: Using a stand mixer fitted with a whisk attachment or a hand mixer, beat the butter and sugar on medium-high speed for 1–2 minutes until the mixture becomes lighter in color and fluffy. Scrape down the bowl as needed.
- Add eggs: Mix in the eggs, one at a time, on medium speed until fully combined.
- Add wet ingredients and food coloring: On low speed, add the buttermilk, oil, vanilla extract, white vinegar, and red food coloring. The batter may look separated or broken; this is normal at this stage.
- Combine dry and wet mixtures: Gradually add the sifted dry ingredients in two portions to the wet ingredients, mixing on low speed just until combined. Avoid overmixing to keep the cake tender.
- Divide and bake: Evenly divide the batter between the prepared cake pans (approximately 415g per pan). Bake for 24–28 minutes or until a toothpick inserted in the center comes out with a few moist crumbs.
- Cool cake layers: Let the cakes cool in the pans for 10 minutes, then run an offset spatula around the edges and invert onto wire racks to cool completely. The layers bake flat so leveling is optional.
- Shape the brain: Stack the cooled layers and cut about 1 inch off two sides to create an oval brain shape. Round the top edges with a sharp knife. If the cakes crumble or tear, chill them in the freezer for 20 minutes before cutting.
- Make the cream cheese buttercream: Beat the butter and cream cheese on medium speed for 30 seconds until smooth. Add in vanilla and salt, mixing on low to combine.
- Add powdered sugar and cream: Slowly add powdered sugar and heavy cream on low speed. Adjust consistency with extra cream or powdered sugar as needed. Add a small amount of red food coloring to tint the frosting light pink. Cover with plastic wrap to prevent crusting.
- Prepare edible fake blood: Whisk together seedless raspberry or strawberry jam, water, and optional red food coloring until smooth and thin. Cover and set aside.
- Assemble and frost the cake: Place the bottom cake layer on a greaseproof cake board using a dab of frosting to secure it. Spread an even layer of frosting between each layer and stack. Trim the whole cake to perfect the rounded brain shape.
- Crumb coat and chill: Spread a thin coating of frosting around the entire cake and smooth with an offset spatula or acetate sheet. Chill in the fridge for 20 minutes or freezer for 5 minutes until firm.
- Pipe brain lines: Using a piping bag fitted with a large round tip, create a line down the center of the cake to separate hemispheres. Pipe squiggly, irregular lines on each side to mimic brain folds.
- Firm the frosting: Chill the cake again for 30 minutes in the fridge or 10 minutes in the freezer until the frosting is firm to touch.
- Apply fake blood: Use a pastry brush to generously spread the edible fake blood mixture over the piped frosting, filling all crevices and covering the surface. Add some blood around the base for extra effect.
- Final chilling and serving: Chill briefly if desired to set the blood layer. Remove cake from fridge about 1–2 hours before serving to allow it to come to room temperature for best flavor and texture.
Notes
- This recipe yields about 20 servings due to trimming and shaping the cake. For different sizes or tiers, use a cake batter calculator to adjust the amounts.
- Make cake layers in advance and freeze to simplify the process. The frosting can also be made ahead and stored in the fridge (up to 1 month) or freezer (up to 3 months).
- For best results, measure flour properly using the spoon and level method or weigh with a kitchen scale.
- Use room temperature ingredients to ensure smooth mixing and a tender crumb.
- Chilling cake layers before assembly makes cutting and shaping easier and reduces breakage.
- Gel food coloring is recommended to avoid affecting the frosting and batter consistency or flavor.
- To make this cake vegan or dairy-free, replace buttermilk and heavy cream with dairy-free alternatives, substitute vegan butter sticks, and use an egg replacer for eggs.
- Use any leftover cake crumbs to make cake pops or sprinkle over ice cream for an extra treat.
- Store frosted cake in the fridge up to one week or freeze up to one month, wrapped tightly to maintain moisture.
Nutrition
- Serving Size: 1 slice (1/20th of cake)
- Calories: 480
- Sugar: 45g
- Sodium: 320mg
- Fat: 28g
- Saturated Fat: 14g
- Unsaturated Fat: 12g
- Trans Fat: 0.3g
- Carbohydrates: 56g
- Fiber: 1g
- Protein: 4g
- Cholesterol: 75mg


