If you’re on the hunt for an eye-catching, spooky treat that’s as delicious as it is fun to make, you’re going to adore this Cake Ball Brains Recipe. I absolutely love how these cute (and slightly creepy) brain-shaped cake balls turn out — they’re perfect for Halloween parties, weird dessert tables, or just showing off your candy-making skills! Stick with me, and I’ll walk you through every single step to make these adorable brain-shaped delights that your friends and family will go crazy for.
Why You’ll Love This Recipe
- Fun and Unique: Nothing beats the fun of biting into a brain-shaped cake ball during spooky season or any time you want to impress your guests!
- Simple Ingredients: You can easily find everything at your local grocery store, and it’s a great way to use leftover cake.
- Customizable Flavors: Whether you want cherry preserves or a tangy raspberry, you can adjust the filling to your taste.
- Showstopper Presentation: This Cake Ball Brains Recipe transforms an ordinary cake ball into a conversation-starting masterpiece.

Ingredients You’ll Need
The magic of this Cake Ball Brains Recipe starts with the perfect mix of moist chocolate cake and sweet frosting, balanced out by a creamy white chocolate shell and a fruity, slightly tart filling. Shopping for good quality cake and candy melts really pays off here.
- Baked chocolate cake: Homemade or store-bought, just make sure it’s fresh—it’s easier to mix when it’s a little crumbly but not dried out.
- Vanilla frosting: I usually go with a smooth, creamy type to hold the cake balls together just right.
- White candy melts or pure white chocolate: Candy melts are easier to work with, but high-quality white chocolate adds an irresistible flavor.
- Oil-based candy coloring (optional): Perfect for adding a little spooky color to your white chocolate brains without messing with the texture.
- Cherry, raspberry, or strawberry preserves or dessert sauce: This adds the “gory” effect inside — and trust me, the fruitiness brightens up each bite.
- Red liquid food coloring: To transform those fruit preserves into creepy, realistic brain filling.
Variations
I always encourage you to put your own spin on things! Play around with the fillings and coatings — each version brings something unique and delicious to the table. Here are a few of my favorite twists on this Cake Ball Brains Recipe.
- Different fillings: I’ve tried raspberry preserves for a tangier bite and even chocolate ganache for a super rich center—both are total crowd-pleasers.
- Color tweaks: Adding green or pink oil-based coloring to the white chocolate makes your brains look funky and fun without changing taste or texture.
- Dairy-free version: Swap frosting for dairy-free frosting and white chocolate for vegan alternatives—I’ve had great luck with these swaps!
- Mini-sized brains: Making smaller versions is perfect if you want lots of bite-sized treats for a party tray.
How to Make Cake Ball Brains Recipe
Step 1: Prep Your Cake Base
Start by trimming off the crusty edges of your chocolate cake — those dry parts just don’t work well here. Then crumble up the soft inner part into a large bowl or the bowl of your stand mixer. Add about ¼ cup of that creamy vanilla frosting and mix it gently but thoroughly until the crumbs stick together into a soft, moldable ball. If it feels a little dry, add frosting a teaspoon at a time until you hit that perfect texture. This mix should be moist and hold together without being sticky or gooey.
Step 2: Coat the Brain Mold
Now for the fun part! Melt your white candy melts or pure white chocolate and stir in any oil-based candy coloring if you want colored brains—green is my spooky fave. Spoon a little of this melted chocolate into each cavity of your brain-shaped mold, then spread it evenly to make a thin shell. Wipe off any excess on the edges to get a clean finish. Freeze the mold for about 5 minutes if you’re using candy melts or refrigerate 15 minutes for real white chocolate. This helps the shell set perfectly before you add the filling.
Step 3: Add the “Guts” Filling
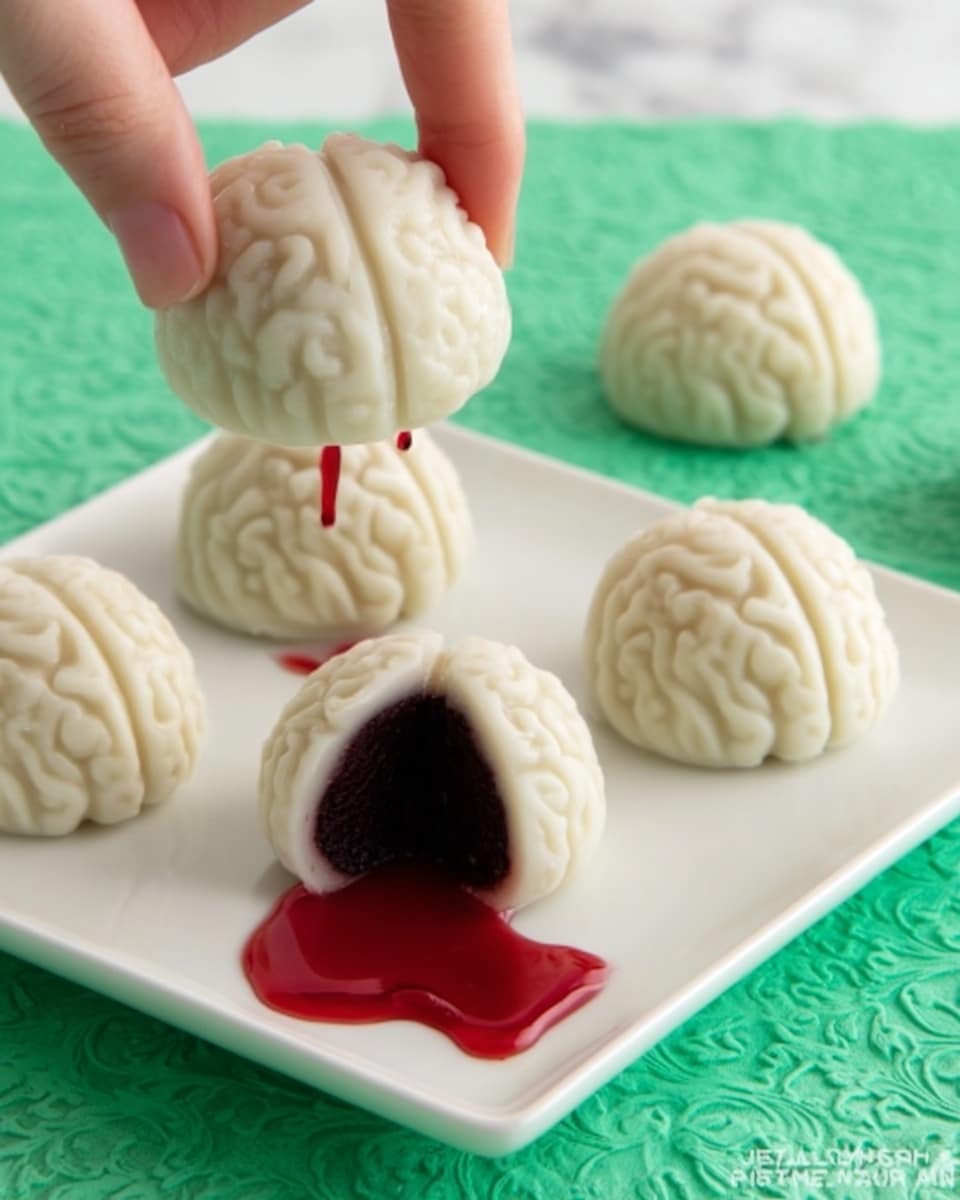
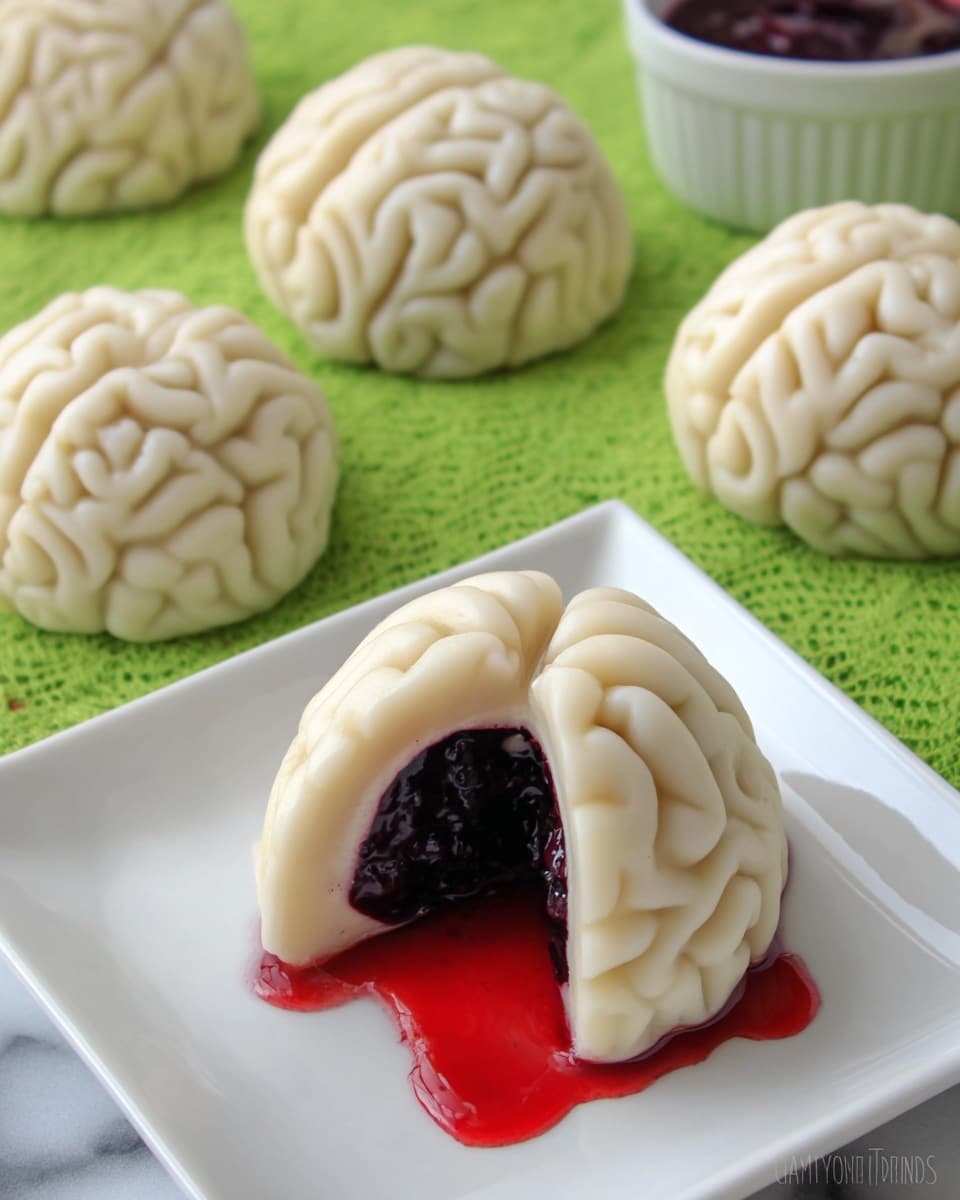
Mix a few drops of red liquid food coloring into your fruit preserves until you get a deliciously eerie color. I like to strain out any fruit pieces or seeds here to keep the filling smooth and easy to work with. Spoon roughly ¾ teaspoon of this red fruit filling into each cavity, right over the chocolate shell — think of it as the gooey “brain matter” inside!
Step 4: Fill with Cake Mixture and Seal
Scoop about 2 tablespoons of the cake ball mixture into each cavity, gently pressing it down but leaving just enough space to add a final layer of chocolate coating. Top each cake ball with a spoonful of melted white chocolate to seal everything in and smooth it out carefully. Wipe off any extra chocolate around the mold edges. Freeze again for 5 minutes if you used candy melts or refrigerate for 10 if you used real white chocolate. This final chill sets everything perfectly.
Step 5: Unmold and Enjoy
Once everything is set, pop the brains out of the mold. They should have a smooth, shiny finish with a perfectly sealed, fruity “brain” center. Store them in an airtight container and watch your family’s faces light up with delight—or horror, because they look sooo real!
Pro Tips for Making Cake Ball Brains Recipe
- Moist Cake Is Key: Slightly day-old cake works best — it binds easier with frosting without getting soggy.
- Use Oil-Based Coloring: This prevents your white chocolate from seizing up or becoming grainy when coloring.
- Don’t Overfill: Leave enough space in the mold for the coating layer on top, or it won’t seal properly.
- Keep It Clean: Wiping mold edges before chilling avoids jagged edges and helps your brains look polished.
How to Serve Cake Ball Brains Recipe
Garnishes
I like to add a bit of edible glitter or shimmer dust to the brains for a gruesome, wet look. Sometimes a tiny drizzle of red gel icing adds extra “veiny” details that really amp up the creepy factor. You could also dust with a bit of cocoa powder for a more old-school chocolatey vibe.
Side Dishes
These brains pair surprisingly well with a side of fresh berries or a tangy citrus sorbet to balance the sweetness. For parties, I love placing them on a platter with other Halloween-themed treats like “eyeball” truffles or gummy worms.
Creative Ways to Present
I once lined mine up on a bed of crushed ice with fake blood (red berry sauce) drizzled artistically around. Another time, I served them in little glass jars labeled as “mad scientist samples”—a total hit! You could also use a skull-shaped serving dish to keep the spooky theme going strong.
Make Ahead and Storage
Storing Leftovers
I keep leftover cake ball brains in an airtight container in the fridge, and they stay fresh for up to a week. Just make sure they’re not too close to any strong-smelling foods, so they don’t pick up unwanted flavors.
Freezing
If you want to save some for later, these brains freeze beautifully. I wrap them individually in parchment paper or plastic wrap before placing them in a freezer-safe container. When you’re ready to enjoy them, thaw overnight in the fridge for best texture.
Reheating
Because these are more of a chilled treat, I recommend enjoying them cold or at room temperature rather than reheating. If you do want them a bit softer, letting them sit out for 10–15 minutes before eating works wonders.
FAQs
-
Can I use store-bought cake for this Cake Ball Brains Recipe?
Absolutely! Using a moist, store-bought chocolate cake works just fine. Just make sure to remove the edges so your cake ball mixture stays soft and not dry.
-
What’s the difference between using candy melts and white chocolate?
Candy melts are easier to melt and handle with fewer tempering requirements, making them great for beginners. White chocolate gives a richer flavor but needs careful tempering or refrigeration to set nicely.
-
How do I prevent my candy coating from cracking?
Make sure to apply even, thin layers of melted candy or chocolate and chill them promptly. Avoid thick coatings and handle the cakes gently when unmolding.
-
Can I make these without a brain mold?
While a brain mold makes the shape so much easier and more realistic, you can try shaping the cake balls by hand and decorating them with piping or icing to mimic a brain’s ridges.
-
How long do Cake Ball Brains stay fresh?
Stored in an airtight container in the fridge, they’ll stay fresh for about a week. Avoid room temperature storage for extended periods to keep the coating intact.
Final Thoughts
When I first made this Cake Ball Brains Recipe, I was thrilled at how easy it was to turn simple ingredients into something so delightfully spooky and tasty. It’s such a crowd-pleaser that’s perfect for holidays or whenever you want to add a little fun to your dessert lineup. Trust me, once you make these, you’ll find any occasion a little more thrilling—plus, you’ll wow everyone with your candy artistry! So go ahead, grab your mold, and dive in. You’ve got this, and those brains won’t last long on your platter!
Print
Cake Ball Brains Recipe
- Prep Time: 1 hr
- Cook Time: 0 mins
- Total Time: 1 hr
- Yield: 32 brain cake balls
- Category: Dessert
- Method: No-Cook
- Cuisine: American
- Diet: Vegetarian
Description
These Cake Ball Brains combine rich chocolate cake with creamy vanilla frosting and a fruity jelly center, all enrobed in a thin shell of white candy coating. Perfect for Halloween parties or spooky-themed treats, these brain-shaped cake balls are as fun to make as they are to eat.
Ingredients
Cake Ball Mixture
- 1 baked chocolate cake (use either a 9 x 13-inch sheet cake or 2 8-inch round cakes)
- ¼ – ½ cup vanilla frosting
Candy Coating
- 30-38 ounces melted white candy melts or melted and tempered pure white chocolate
- Optional: black, pink, or green oil-based candy coloring
Filling
- ⅔ cup cherry, raspberry, or strawberry preserves or dessert sauce (about ¾ teaspoon per brain)
- Red liquid food coloring
Instructions
- Prepare the Cake: Cut the edges off the chocolate cake and discard. Break up the center of the cake into a mixing bowl or the bowl of a stand mixer.
- Mix with Frosting: Add ¼ cup white frosting and mix until the mixture holds together in a soft ball. Add more frosting if needed to achieve the right consistency. Set aside.
- Color the Candy Coating (Optional): If desired, stir in drops of oil-based candy coloring into the melted white chocolate to add color for the brain shells.
- Create the Chocolate Shells: Spoon melted white chocolate into each brain mold cavity, spreading to form a thin, even shell. Repeat for all cavities. Wipe off any candy coating around the mold edges.
- Chill the Shells: Freeze the molds for 5 minutes if using candy melts, or refrigerate for 15 minutes if using pure white chocolate to set the shells.
- Prepare the Filling: Stir a few drops of red liquid food coloring into the fruit preserves, then strain out any fruit pieces or seeds.
- Fill the Brains: Spoon about ¾ teaspoon of the colored fruit filling into each chocolate shell cavity.
- Add Cake Mixture: Scoop about 2 tablespoons of the cake ball mixture and press it into each cavity over the fruit filling, leaving room for a final candy coating layer.
- Seal the Brains: Spoon more white candy coating on top of each filled cavity and smooth out to seal. Wipe off any excess coating around the mold edges.
- Final Chill and Unmold: Freeze the molds for 5 minutes if using candy melts or refrigerate for about 10 minutes with pure white chocolate. Then carefully unmold the candy-coated brain cake balls.
Notes
- Store the candy-coated brains in an airtight container for up to one week to maintain freshness.
- Using a stand mixer can help achieve a smooth cake ball mixture early in the process.
- Oil-based candy coloring ensures the melted chocolate does not seize; avoid water-based colors.
- Tempering pure white chocolate before use will help the shells harden with a shiny finish.
- Straining the preserves removes seeds or fruit bits that could puncture the chocolate shells.
Nutrition
- Serving Size: 1 brain cake ball
- Calories: 150
- Sugar: 18g
- Sodium: 80mg
- Fat: 7g
- Saturated Fat: 4g
- Unsaturated Fat: 2g
- Trans Fat: 0g
- Carbohydrates: 22g
- Fiber: 1g
- Protein: 1g
- Cholesterol: 15mg

