If you’re anything like me and love the blend of sweet, nutty, and buttery flavors wrapped in a perfect bite-sized treat, then this Caramel Apple Cheesecake Recipe is going to become your new obsession. I absolutely love how the classic tang of cheesecake melts into the warm, spiced apple chunks and luscious caramel, making it ideal for cozy nights or impressive gatherings. Stick with me here—I’ll walk you through every step so your cheesecake comes out just right, every single time.
Why You’ll Love This Recipe
- Perfect Balance of Flavors: The creamy cheesecake, caramel sweetness, and soft spiced apples blend just right, giving you a bite that’s both comforting and exciting.
- Easy to Customize: Whether you want more caramel drizzle or a cinnamon kick, you can easily tweak it to fit your taste buds or occasion.
- Impressive Yet Simple: This recipe looks fancy but comes together with straightforward steps that anyone can follow.
- Great for Any Occasion: From holiday dinners to casual weekend treats, this cheesecake fits right in and always gets rave reviews.

Ingredients You’ll Need
I’ve found that mixing fresh apples with a homemade caramel sauce really elevates the entire cheesecake experience. You’ll want good-quality cream cheese and fresh tart apples to get the best results. Here’s a quick rundown of the stars in this recipe.
- Cream Cheese: Full-fat cream cheese gives you that rich, creamy texture that cheesecake is famous for.
- Apples: I recommend tart apples like Granny Smith for a nice balance against the sweet caramel.
- Caramel Sauce: Using a homemade caramel makes all the difference, but store-bought can work in a pinch.
- Graham Cracker Crust: It’s the best base for holding all that goodness and adds a subtle crunch.
- Sugar & Spices: Brown sugar and cinnamon bring warmth and depth, making it feel just like apple pie.
- Eggs & Vanilla Extract: Essentials for smoothness and enhancing the cheesecake flavor.
Variations
What I love most about this Caramel Apple Cheesecake Recipe is how easy it is to make it your own. Whether you want a little more crunch, a splash of bourbon in your caramel, or a completely different crust, I’ve tried quite a few variations and you’ll find your perfect fit here.
- Add Nuts: I sometimes sprinkle toasted pecans or walnuts on top for an extra layer of texture and flavor—totally worth it!
- Swap the Crust: My go-to alternative is a gingersnap crust, which gives the whole dessert a spicy twist.
- Use Different Apples: Fuji or Honeycrisp apples give a sweeter profile if tart isn’t your jam.
- Dairy-Free Version: Try using a vegan cream cheese and coconut caramel sauce to adapt for dietary needs without losing flavor.
How to Make Caramel Apple Cheesecake Recipe
Step 1: Prepare Your Crust Base
I always start by pressing my graham cracker crust into the pan evenly—don’t rush this part! Use slightly damp fingertips to help it stick better and avoid dry crumbs. Once pressed, pop it into the fridge while you prep the filling. This chilling step helps prevent soggy crust later, which is a game changer.
Step 2: Cook the Spiced Apples
Next, I sauté thinly sliced apples with a bit of butter, brown sugar, cinnamon, and a pinch of nutmeg until they’re tender but still hold their shape. Trust me, this step infuses your cheesecake with warmth and prevents raw apple bites. Let them cool before folding into the cheesecake batter.
Step 3: Whip Up the Creamy Cheesecake Filling
Using room temperature cream cheese, beat until smooth and creamy before adding sugar, eggs, vanilla, and a touch of cinnamon. I like to whisk everything gently here—overmixing can introduce too much air and cause cracks later. Fold in those cooled apples carefully so you don’t break them.
Step 4: Bake and Add That Caramel Touch
Pour the filling over the chilled crust and bake at the recommended temperature until the edges just set and the center slightly jiggles when you gently shake the pan. When it cools, drizzle warm caramel sauce on top—you’ll find this is the moment that pulls everything together beautifully.
Pro Tips for Making Caramel Apple Cheesecake Recipe
- Room Temperature Ingredients: This is crucial for a smooth cheesecake batter and to avoid lumps—patience pays off.
- Don’t Overbake: The cheesecake should look slightly wobbly in the center when you take it out; it will continue to set as it cools.
- Chill Thoroughly: Refrigerate at least 4 hours or overnight for firm slices that hold nicely when serving.
- Caramel Drizzle Last: Add the caramel right before serving so it stays deliciously glossy and doesn’t soak into the cheesecake.
How to Serve Caramel Apple Cheesecake Recipe
Garnishes
I love topping this cheesecake with a dollop of freshly whipped cream—light and fluffy, it balances the sweetness perfectly. Sometimes I sprinkle a little ground cinnamon or finely chopped toasted pecans on top for an extra crunch and a pretty finish.
Side Dishes
Pairing this with a cup of hot spiced cider or a simple fresh fruit salad works wonders. The warm spices in the cheesecake complement these sides beautifully without overwhelming your palate.
Creative Ways to Present
For special occasions, I’ve served this cheesecake in pretty individual glass jars layered with caramel and apple slices, giving everyone their own personalized dessert. It’s fun, festive, and keeps things mess-free at parties!
Make Ahead and Storage
Storing Leftovers
I always cover my cheesecake tightly with plastic wrap—or better yet, a cake dome—and keep it refrigerated. It stays fresh and delicious for up to 5 days, but honestly, mine disappears faster!
Freezing
If you need to freeze leftovers, slice the cheesecake first, wrap pieces individually in plastic wrap and foil, and freeze them in airtight containers. Thaw overnight in the fridge before serving to maintain the creamy texture.
Reheating
This cheesecake is best enjoyed chilled, but if you want a warm twist, briefly zap a slice in the microwave for 10-15 seconds to soften it slightly without melting the structure or caramel.
FAQs
-
Can I make this Caramel Apple Cheesecake Recipe ahead of time?
Absolutely! In fact, making it a day ahead enhances the flavors. Just be sure to store it covered in the fridge, and add the caramel drizzle right before serving to keep it looking fresh.
-
What type of apples work best for this cheesecake?
I recommend tart varieties like Granny Smith because they hold their shape during cooking and provide a nice contrast to the sweet caramel and creamy cheesecake filling.
-
Can I use store-bought caramel sauce?
Yes, you can! While homemade caramel adds a special depth of flavor, a good quality store-bought caramel sauce works well and saves time without sacrificing taste.
-
How do I prevent cracks in my cheesecake?
Make sure your cream cheese is at room temperature before mixing, avoid over-beating, and bake slowly. Also, cooling the cheesecake gradually and not opening the oven door during baking helps keep it smooth.
-
Can I make mini caramel apple cheesecakes instead?
Definitely! Use a mini muffin pan lined with cupcake liners and adjust baking time to about 20-25 minutes—perfect for bite-size treats at parties or gatherings.
Final Thoughts
This Caramel Apple Cheesecake Recipe holds a special place in my heart because it feels like a warm hug on a plate. I love sharing it with friends and family, watching their faces light up after the first bite. I promise you’ll enjoy making it as much as eating it—trust me on this one! So grab your ingredients and let’s get baking; your new favorite dessert awaits.
Print
Caramel Apple Cheesecake Recipe
- Prep Time: 2 hr 40 min
- Cook Time: 25 min
- Total Time: 3 hr 5 min
- Yield: 24 mini pies
- Category: Dessert
- Method: Baking
- Cuisine: American
Description
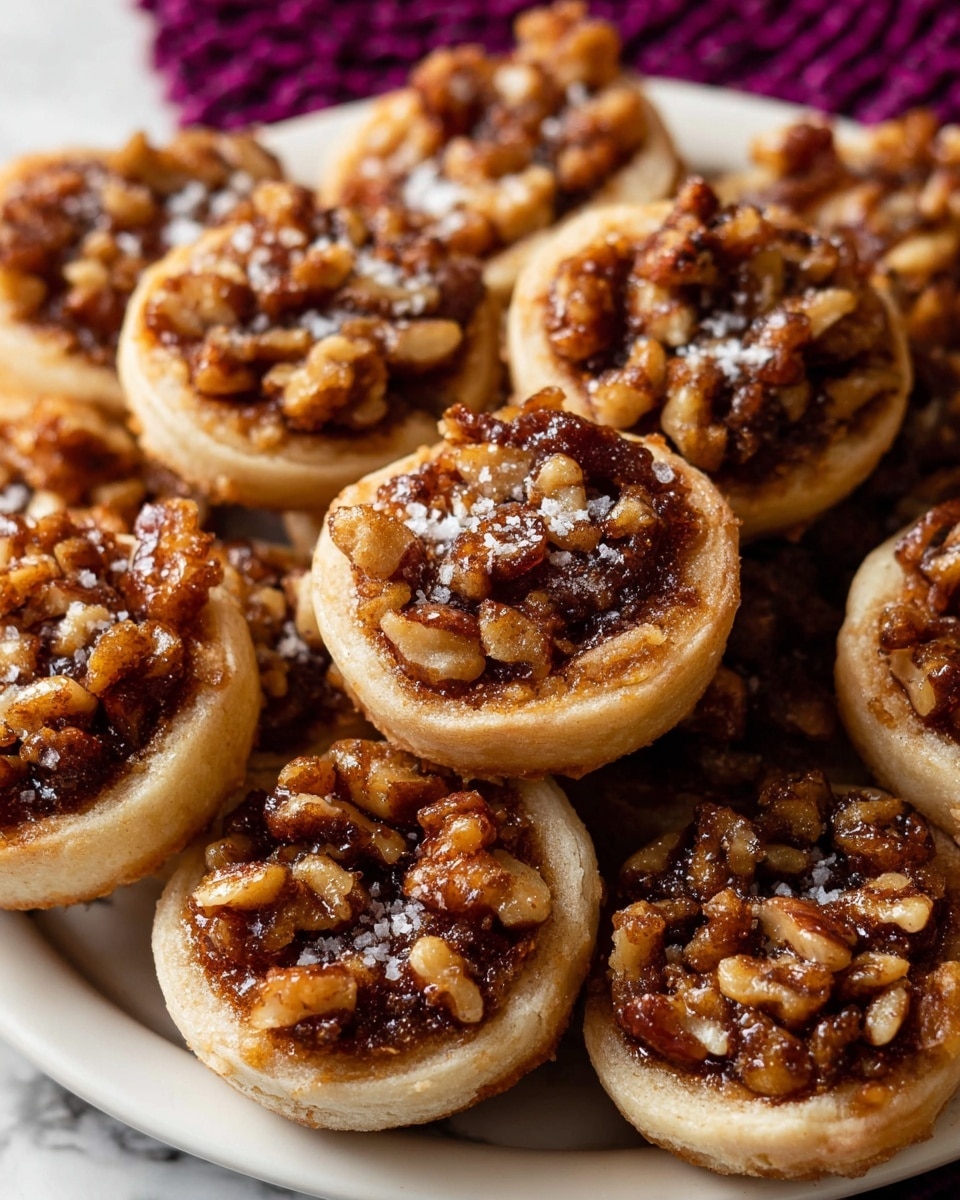
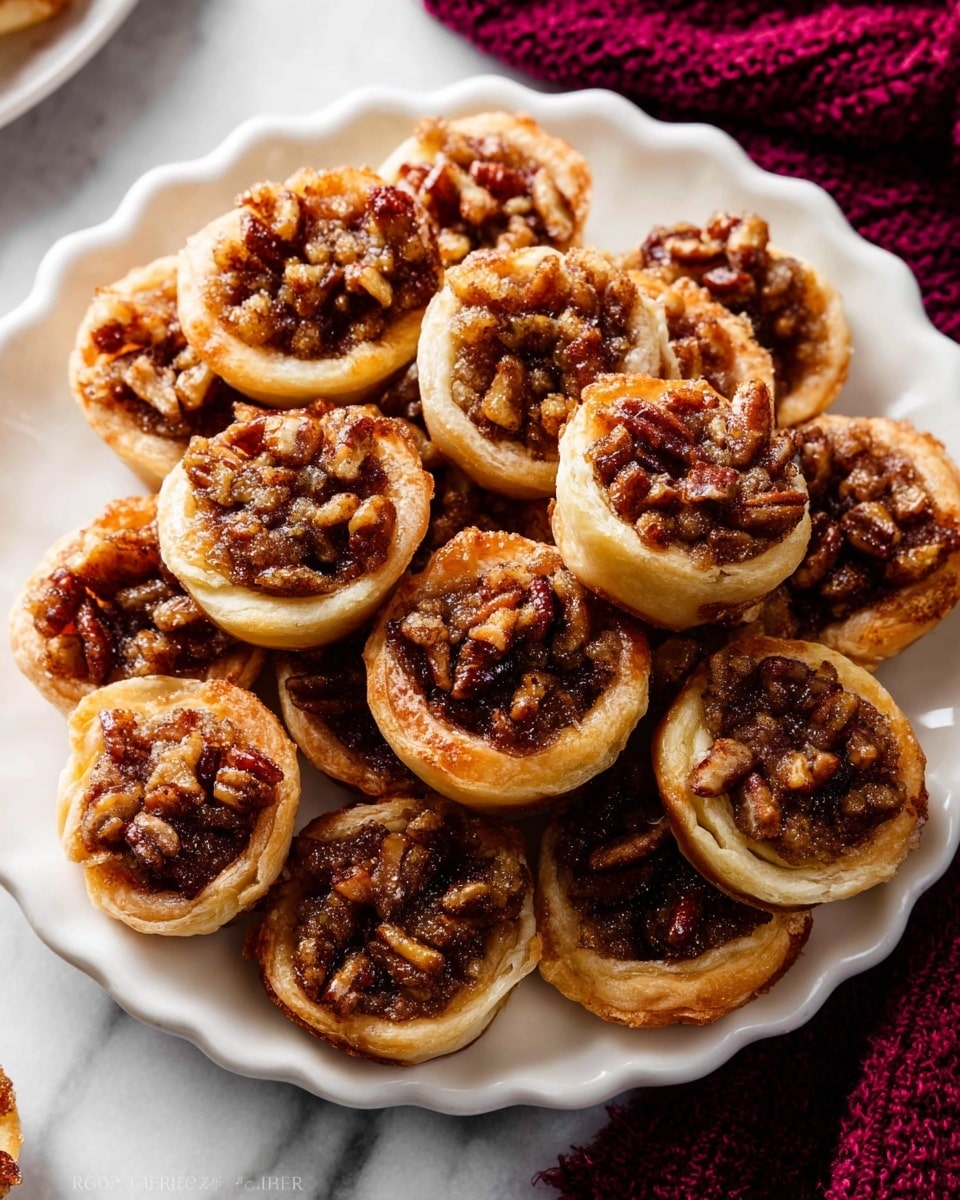
These Mini Pecan Pies are a delightful twist on the classic dessert, baked in a mini muffin pan for perfect bite-sized treats. Featuring a flaky homemade or store-bought pie crust filled with a rich and buttery pecan filling spiced with cinnamon and nutmeg, topped with a sprinkle of coarse sea salt for a perfect balance of sweet and savory. These pies are ideal for holiday gatherings or anytime you crave a small, indulgent dessert.
Ingredients
Pie Crust
- 1 unbaked pie crust (store-bought or homemade all-butter pie crust)
Filling
- 3 Tablespoons (43g) unsalted butter
- 1/2 cup (100g) packed dark brown sugar
- 1 large egg
- 1 teaspoon pure vanilla extract
- 1/4 teaspoon ground nutmeg
- 1/2 teaspoon ground cinnamon
- 3/4 cup (100g) chopped pecans
- Coarse sea salt or flaky sea salt for sprinkling
Instructions
- Prepare the dough: Make sure the pie dough is prepared and chilled for at least 2 hours to ensure it is firm and manageable.
- Roll and cut rounds: On a floured surface, roll the dough into a 12-inch circle. Use a 2.75-inch (7 cm) cookie cutter to cut out about 24 rounds. Re-roll scraps as needed, working quickly to prevent the dough from getting too soft.
- Fit dough into pan: Grease a 24-count mini muffin pan with nonstick spray. Press each dough round into the muffin cups, shaping the dough up the sides. Chill the pan with dough shells for 5–10 minutes while preheating the oven.
- Pre-bake crusts: Preheat oven to 325°F (163°C). Bake the crusts for 7 minutes to set the shape and prevent sogginess from the filling. Then increase oven temperature to 350°F (177°C).
- Make filling: Melt butter and let cool slightly. Whisk together brown sugar, egg, vanilla, nutmeg, and cinnamon in a bowl, then whisk in the melted butter. Stir in the chopped pecans.
- Fill crusts: Spoon 1–2 teaspoons of the filling into each prebaked crust, then sprinkle with coarse sea salt.
- Bake mini pies: Bake at 350°F (177°C) for 16–18 minutes until the crust edges turn lightly golden and the filling is set. Avoid overbaking.
- Cool and serve: Allow pies to cool completely in the pan to firm up. Use a spoon to gently remove each mini pie. Serve with whipped cream if desired.
- Storage: Store leftovers covered at room temperature or refrigerated for up to 3 days.
Notes
- For best results, chill pie dough overnight or at least 2 hours before use.
- You can use store-bought all-butter pie crust for convenience.
- If using a 12-count muffin pan, increase filling amounts accordingly.
- Sprinkling coarse sea salt on top enhances the sweet and buttery flavors.
- Mini pies are perfect for parties and easy to eat without utensils.
Nutrition
- Serving Size: 1 mini pecan pie
- Calories: 140
- Sugar: 12g
- Sodium: 70mg
- Fat: 8g
- Saturated Fat: 3g
- Unsaturated Fat: 4g
- Trans Fat: 0g
- Carbohydrates: 18g
- Fiber: 1g
- Protein: 2g
- Cholesterol: 30mg

