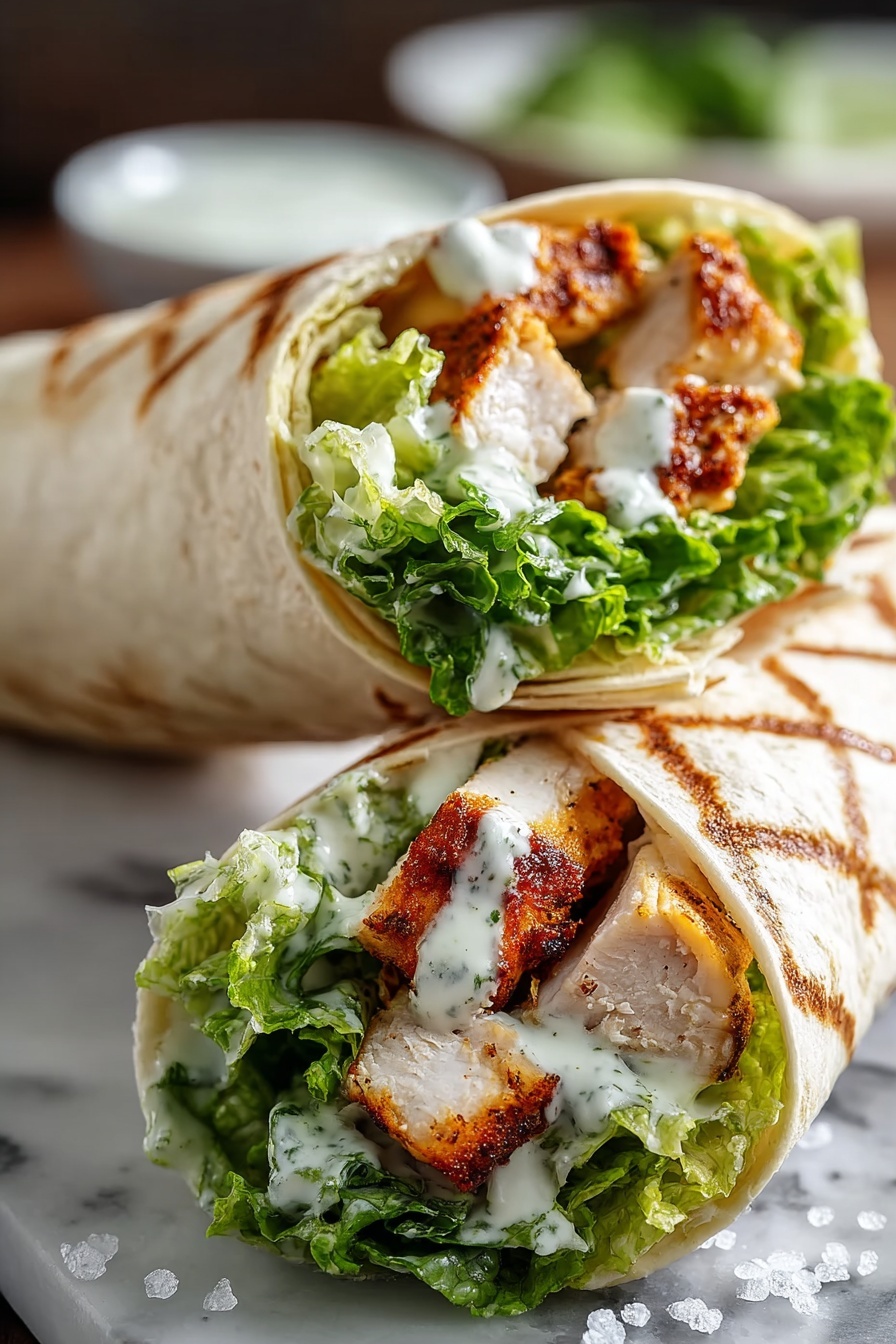
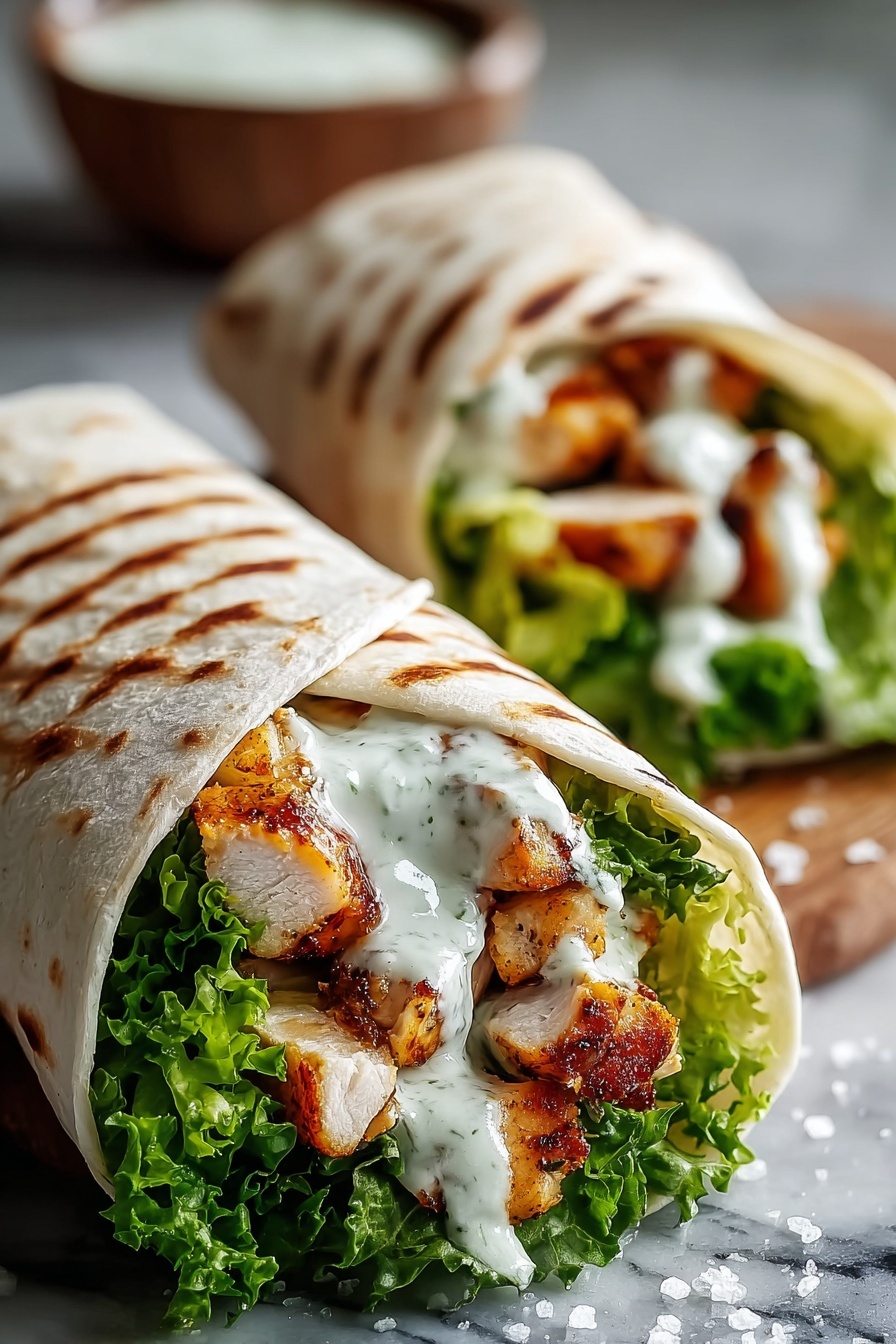
If you’re looking for a delicious, easy-to-make lunch or light dinner that’s sure to impress, you’ve just hit the jackpot with this Chicken Caesar Wraps Recipe. I absolutely love how fresh and satisfying these wraps feel—they’re a perfect balance of crisp romaine, savory grilled chicken, creamy Caesar dressing, and a touch of parmesan, all wrapped up nicely in a soft tortilla. Trust me, once you try this, you’ll want to make it again and again!
Why You’ll Love This Recipe
- Simple & Quick to Make: From start to finish, you can have these wraps ready in under 40 minutes.
- Customizable Ingredients: You get to add crunchy croutons, smoky bacon bits, or fresh cherry tomatoes to suit your mood.
- Crowd-Pleaser: Whether it’s a family lunch or casual party, these wraps always disappear fast.
- Make-Ahead Friendly: You can prep ahead and chill the wraps, making lunchboxes or meal prep totally stress-free.

Ingredients You’ll Need
The mix of fresh, crunchy romaine with tender grilled chicken and that creamy Caesar dressing truly brings this recipe to life. When I shop, I always pick up good-quality grilled chicken (or grill my own) to make sure every wrap is bursting with flavor.
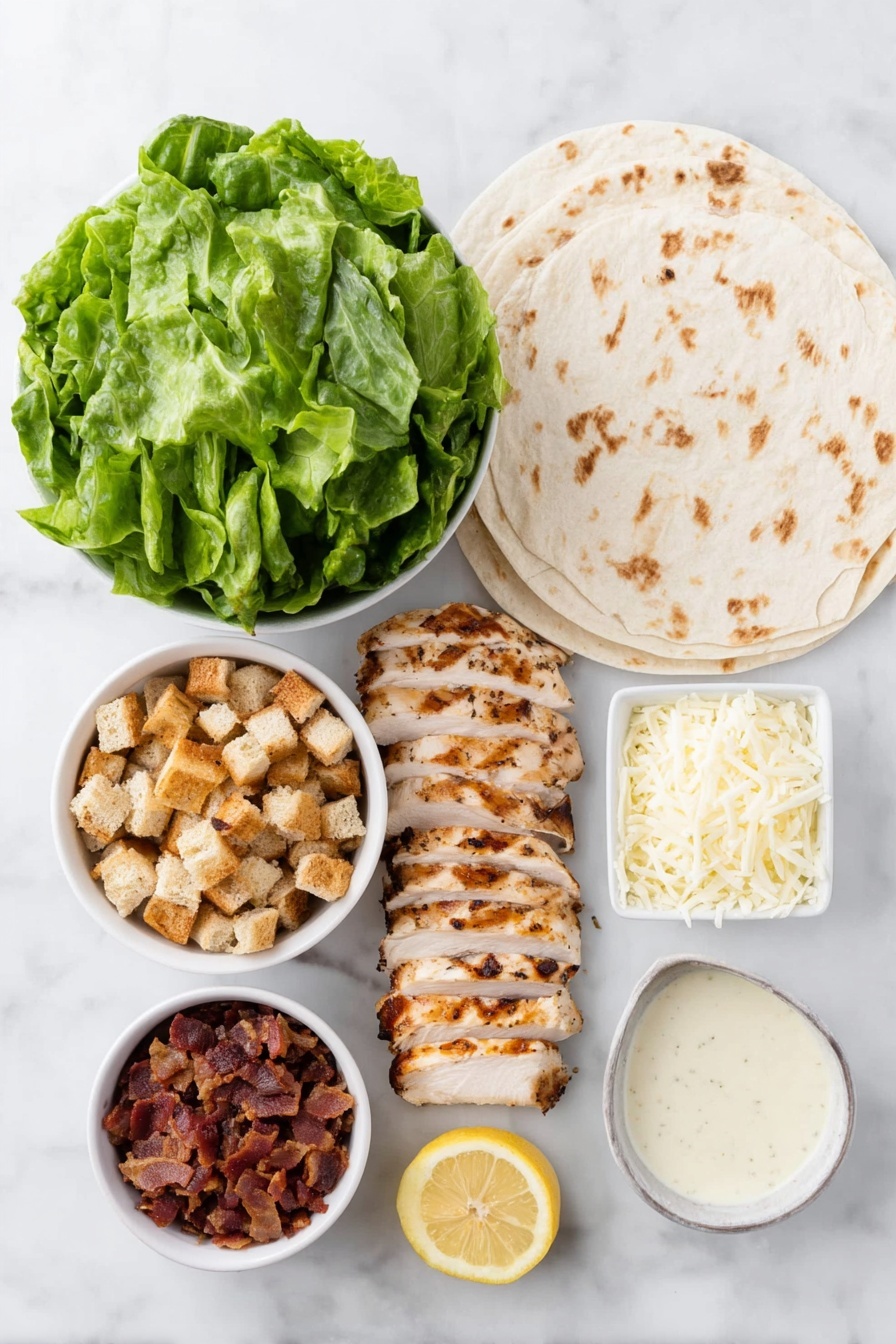
- Large Flour Tortillas: Soft and flexible, these are perfect to hold all the filling without tearing.
- Fresh Romaine Lettuce: Crisp and refreshing—make sure to wash and dry thoroughly to avoid sogginess.
- Grilled Chicken Breasts: Tender, juicy, and sliced thin for easy wrapping and bites.
- Garlic Powder: Just a little sprinkle adds savory depth without overwhelming the wrap.
- Fresh Lemon Juice: A splash brightens up the flavors, especially the chicken and dressing.
- Parmesan Cheese: Grated parmesan melts slightly and adds that signature caesar tang.
- Croutons: Optional but trust me, they add the best crunch!
- Cherry Tomatoes: Halved for a juicy burst of freshness between each bite.
- Bacon Bits: For a smoky kick—I love adding these when I crave something extra savory.
- Caesar Dressing: The creamy base that ties everything together.
- Black Pepper: Freshly cracked is best to season to taste.
Variations
One of the things I love about this Chicken Caesar Wraps Recipe is how easy it is to make your own tweaks. Whether you’re aiming for a lighter version or want to get creative with flavors, there’s room for personalization.
- Grilled Veggie Variation: Sometimes, I swap out the chicken for grilled zucchini or peppers for a vegetarian twist that’s just as delicious.
- Low-Carb Option: Use large lettuce leaves instead of tortillas, and you’ll have a fresh, crunchy wrap without any gluten.
- Spicy Kick: Add a dash of hot sauce or sprinkle some red pepper flakes into the chicken before assembling for a spicy version my family goes nuts over.
- Homemade Caesar Dressing: Making your own dressing can elevate the entire wrap — I like adding anchovy paste for that authentic zing.
How to Make Chicken Caesar Wraps Recipe
Step 1: Prep and Season the Chicken
Start by grilling your chicken breasts until they’re cooked through and juicy—this usually takes about 10 minutes depending on thickness. Once cooked, let the chicken rest fully before slicing it into thin strips; this resting step helps keep the juices locked in. I like to sprinkle a bit of garlic powder and a squeeze of fresh lemon juice on the chicken slices—they add subtle but noticeable flavor depth you’ll appreciate.
Step 2: Prepare the Lettuce and Other Ingredients
While the chicken is cooling, make sure your romaine lettuce is thoroughly washed and dried. This is key because soggy lettuce can turn your wraps limp and unpleasant. I’ve found using a salad spinner helps a ton here. Halve your cherry tomatoes and set aside any optional toppings like croutons and bacon bits for easy assembly later.
Step 3: Assemble Your Wraps
Lay each large flour tortilla flat on your countertop. Spread a thin, even layer of Caesar dressing right in the center of each tortilla—don’t overdo it or the wrap can get soggy. Next, add a handful of the romaine leaves, then arrange the sliced chicken in a line down the middle. Sprinkle the parmesan cheese over the top, then add your optional croutons, cherry tomatoes, and bacon bits if using.
Step 4: Roll and Chill
Fold the bottom edge of the tortilla up over the fillings, then fold in each side tightly to keep everything contained. Roll firmly from bottom to top to create a neat wrap. I like to secure each wrap with a toothpick or plastic wrap, especially if I’m making these ahead of time. Pop them in the fridge until you’re ready to eat—letting them chill for at least 10 minutes really helps the flavors meld deliciously.
Step 5: Slice and Serve
When it’s time to serve, use a sharp knife to cut each wrap diagonally. This makes for a great presentation and helps hold the wrap together when eating. Plus, the diagonal cut just feels fancier, doesn’t it? If you’re making these for an event, wrapping each individually also makes them easy to grab and go.
Pro Tips for Making Chicken Caesar Wraps Recipe
- Don’t Skip Drying Lettuce: Wet lettuce is the number one culprit for sogginess—pat it dry with paper towels if you don’t have a spinner.
- Use Room Temperature Elements: Make sure your chicken and dressing aren’t too cold when assembling, so the wrap stays soft and flavorful.
- Wrap Tightly but Gently: You want a snug wrap that stays closed, but too much force can tear the tortilla; I learned that the hard way!
- Prep Ahead Sensibly: Avoid adding croutons until right before serving to keep their crunch intact.
How to Serve Chicken Caesar Wraps Recipe
Garnishes
I love adding a sprinkle of extra grated parmesan and a few cracked black pepper bits on top just before serving—it makes the wrap look polished and adds extra flavor. A lemon wedge on the side to squeeze over is a simple touch that brightens every bite.
Side Dishes
Pair these wraps with some light sides like a crisp cucumber salad or a handful of kettle-cooked chips for some crunch. On cooler days, a warm cup of tomato soup alongside makes this simple meal feel special and cozy.
Creative Ways to Present
If you’re serving these at a party, cut the wraps into smaller, bite-size pinwheels arranged beautifully on a platter with toothpicks. Another fun idea is wrapping them individually in parchment paper tied with twine—adds charm and keeps things tidy for guests.
Make Ahead and Storage
Storing Leftovers
Once wrapped tightly, I store leftover Chicken Caesar Wraps in airtight containers or wrap them individually in plastic wrap and place in the fridge. They hold up well for up to 2 days, which makes for a fantastic, grab-and-go lunch the next day.
Freezing
I don’t usually freeze these wraps because the lettuce and dressing can become watery after thawing, but if you want to freeze, I suggest wrapping the chicken separately and assembling the wrap fresh when ready to eat. This keeps the texture much better.
Reheating
Reheat leftover wraps gently in a skillet over low heat just to warm the chicken without making the tortilla tough. If you’re short on time, a quick 20-second zap in the microwave works too—just watch carefully so it doesn’t get soggy or chewy.
FAQs
-
Can I use rotisserie chicken instead of grilled chicken breasts?
Absolutely! Using rotisserie chicken saves time and adds great flavor. Just shred or slice it before assembling your wraps. It’s one of my favorite shortcuts when I’m in a hurry.
-
What’s the best way to keep the wraps from getting soggy?
Keep the lettuce as dry as possible and spread the Caesar dressing thinly. Also, add crunchy ingredients like croutons or bacon bits just before eating, rather than during assembly or storage.
-
Can I freeze Chicken Caesar Wraps?
Freezing isn’t ideal because the lettuce and dressing can turn watery and limp once thawed. Instead, freeze chicken separately and assemble wraps fresh for best texture.
-
How do I customize this wrap for a vegetarian diet?
Just swap the grilled chicken for your favorite grilled vegetables or marinated tofu. Use vegetarian Caesar dressing or make your own without anchovies to keep it vegetarian-friendly.
Final Thoughts
This Chicken Caesar Wraps Recipe has become a go-to in my kitchen—not just because it’s easy and tasty, but because it’s so adaptable. Whether I’m making a quick solo lunch or prepping for a group, it never disappoints. I hope you’ll love making and enjoying these wraps as much as I do; they’re one of those simple pleasures that always make me smile. Give it a try, and let me know how you customize it for your own family favorites!
Print
Chicken Caesar Wraps Recipe
- Prep Time: 15 minutes
- Cook Time: 10 minutes
- Total Time: 35 minutes
- Yield: 4 wraps
- Category: Lunch
- Method: No-Cook
- Cuisine: American
Description
These Chicken Caesar Wraps are a fresh and flavorful handheld meal featuring grilled chicken, crisp romaine lettuce, parmesan cheese, and classic Caesar dressing all wrapped in a soft flour tortilla. Perfect for a quick lunch or light dinner, these wraps combine savory, tangy, and crunchy textures into one easy-to-make recipe.
Ingredients
Wrap Base
- 4 Large Flour Tortillas
Filling
- 2 cups Fresh Romaine Lettuce, washed and dried
- 2 Grilled Chicken Breasts, sliced
- ½ teaspoon Garlic Powder
- 1 teaspoon Fresh Lemon Juice (optional)
- ¼ cup Parmesan Cheese, grated
- 4 tablespoons Caesar Dressing
- ¼ teaspoon Black Pepper
Optional Toppings
- ½ cup Croutons
- ½ cup Cherry Tomatoes, halved
- ¼ cup Bacon Bits
Instructions
- Prepare the Chicken: Cook and cool the grilled chicken breasts completely. Slice them into even strips to ensure easy wrapping and balanced flavor in each bite.
- Prepare the Vegetables: Wash and thoroughly dry the fresh romaine lettuce leaves to avoid soggy wraps and ensure crisp texture.
- Lay Out Tortillas: Place each large flour tortilla flat on a clean surface to prepare for assembling the wrap.
- Apply Dressing: Spread a thin layer of Caesar dressing in the center of each tortilla, which serves as the base sauce and adds moisture and flavor.
- Add Lettuce and Chicken: Place dry romaine leaves over the dressing, then align the sliced chicken breasts in a line down the middle of the tortilla.
- Season and Add Cheese: Sprinkle garlic powder, black pepper, and grated parmesan cheese evenly over the chicken and lettuce to enhance flavor.
- Add Optional Toppings: If desired, add croutons for crunch, halved cherry tomatoes for freshness, and bacon bits for a smoky touch.
- Wrap the Tortillas: Fold the bottom edge of the tortilla up over the filling, then fold in both sides tightly. Roll firmly from bottom to top to form a secure wrap. Use plastic wrap or toothpicks to hold the wrap together if needed.
- Refrigerate: Refrigerate the prepared wraps until serving to allow flavors to meld and maintain freshness. Let them rest for about 10 minutes before cutting.
- Serve: Using a sharp knife, cut each wrap diagonally. Wrap individually for storage or serve immediately.
Notes
- Ensure the chicken is fully cooled before assembling to prevent soggy tortillas.
- Dry the lettuce thoroughly to maintain crispness inside the wrap.
- The optional lemon juice adds a nice brightness but can be omitted based on preference.
- Use plastic wrap or toothpicks to keep wraps secure during storage or transport.
- These wraps are great for meal prep and can be refrigerated for up to 2 days.
Nutrition
- Serving Size: 1 wrap
- Calories: 410
- Sugar: 3g
- Sodium: 720mg
- Fat: 18g
- Saturated Fat: 5g
- Unsaturated Fat: 10g
- Trans Fat: 0g
- Carbohydrates: 34g
- Fiber: 3g
- Protein: 32g
- Cholesterol: 80mg


