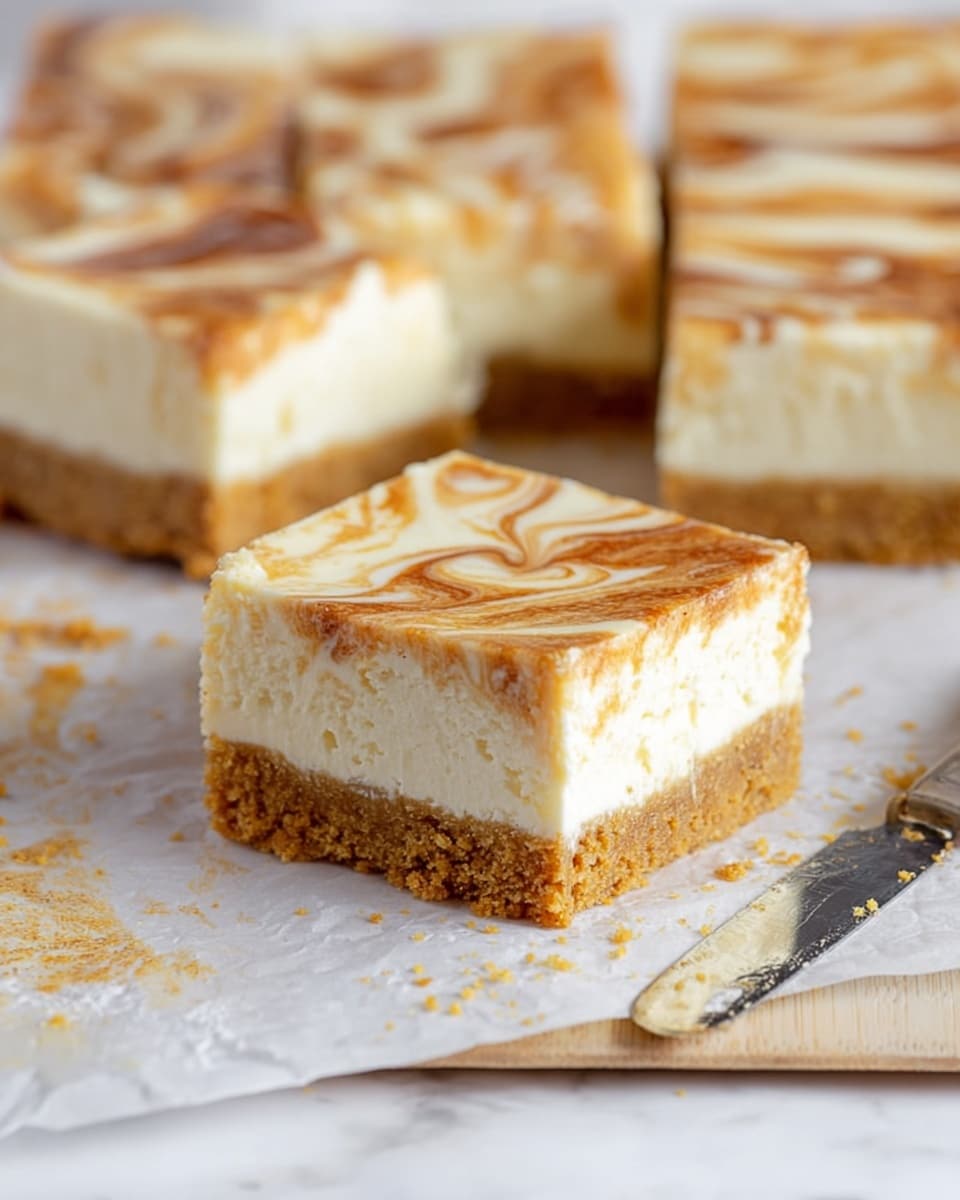
If you’ve been searching for a dessert that’s both comforting and a little indulgent, you’re going to love this one. I’m excited to share my swirled Pumpkin Cheesecake Bars recipe — imagine the rich, creamy texture of cheesecake mingling with cozy pumpkin pie spices, all resting on a buttery graham cracker crust. It’s one of those treats that instantly signals fall, but honestly, I make it year-round. This recipe is straightforward, forgiving, and perfect for sharing with friends and family. Keep reading and I’ll walk you through every step so your bars come out perfect every time.
Why You’ll Love This Recipe
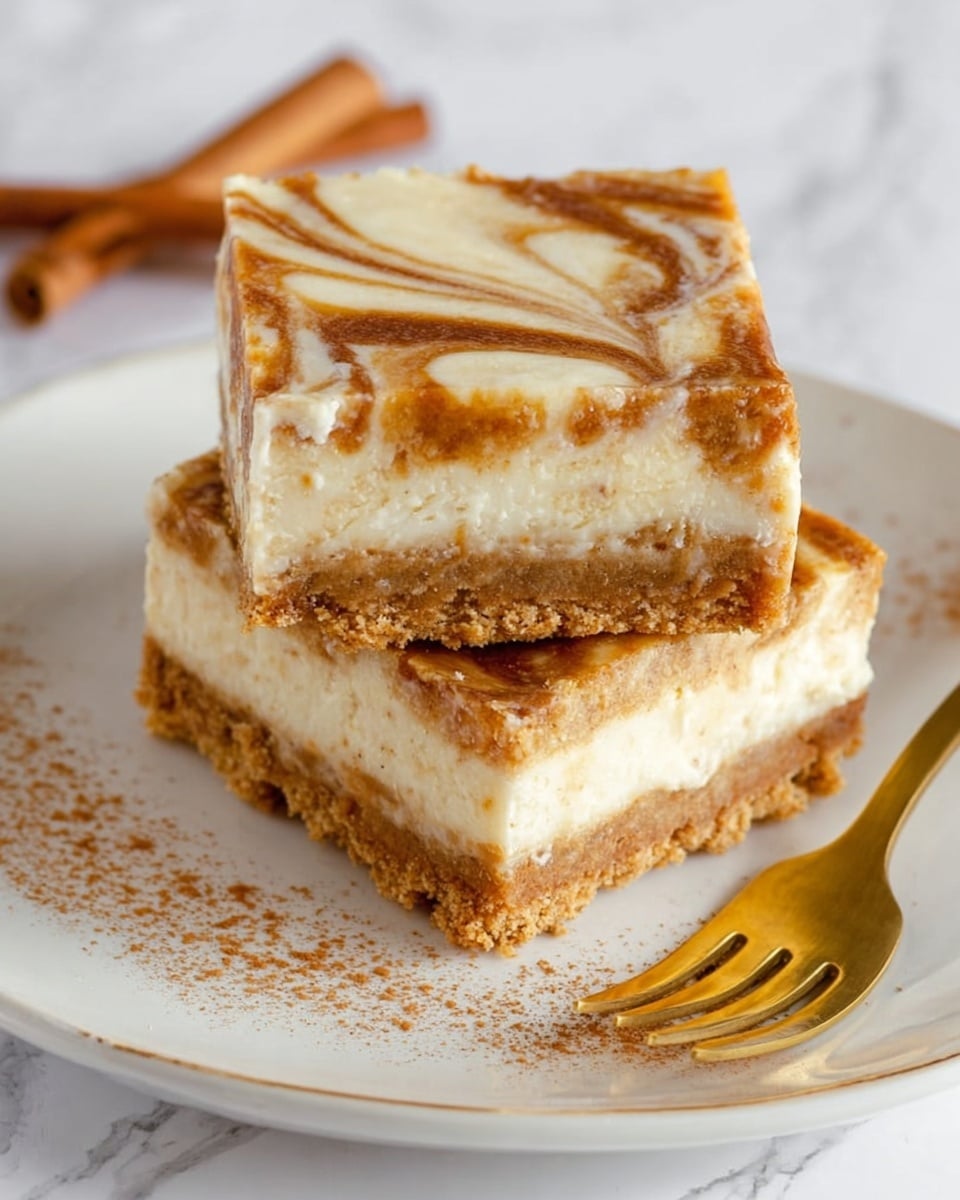
- Dual Flavors in One Bite: The pumpkin and cheesecake layers complement each other perfectly, creating a balanced flavor you’ll crave.
- Simple Ingredients: What’s great is you can probably find everything in your pantry already, making this easy to whip up anytime.
- Perfect Texture: Creamy, smooth filling with a crunchy, buttery crust – every bite is an absolute delight.
- Great for Sharing: These bars are perfect for potlucks, holidays, or just a sweet weekend treat to share with loved ones.

Ingredients You’ll Need
The ingredients here come together to build layers of flavor and texture. The graham crackers give that classic crunchy base, while the pumpkin pie spice makes the filling just right with warm, familiar notes. A quick tip—make sure your cream cheese is at room temperature; it blends so much better that way, giving you that silky smooth filling.
- Graham crackers: The key to a sturdy, buttery crust—use rectangular ones for easier crust formation.
- Granulated sugar: Balances the spices and pumpkin sweetness in both crust and filling.
- Unsalted butter: Melted to bind your crust and add rich flavor; unsalted helps control saltiness.
- Pumpkin puree: Make sure to use pure pumpkin, not pumpkin pie filling, for the best texture and flavor.
- Pumpkin pie spice: This blend saves so much time and captures the fall vibes perfectly.
- Ground cinnamon: Adds depth and warmth to your pumpkin layer.
- All-purpose flour: Helps stabilize the pumpkin layer so those bars hold together beautifully.
- Cream cheese: Full fat is best for rich, creamy texture—don’t forget room temperature!
- Pure vanilla extract: Lifts the cheesecake flavor, making it taste homemade and comforting.
- Full fat sour cream: Adds creaminess and a slight tang that balances the sweetness.
- Salt: Enhances all the flavors, making your bars taste well-rounded.
- Large eggs: Also room temperature for smooth mixing and perfect setting.
Variations
I love mixing things up with this recipe depending on the season or what’s in my pantry. You can easily make it your own and add different twists that keep it exciting for your taste buds.
- Adding Nuts: A sprinkling of chopped pecans or walnuts on top before baking adds a wonderful crunch, and my family always asks for this version during the holidays.
- Spice Swap: If you want a little more warmth, try adding a pinch of ground ginger or clove to the pumpkin layer—I found it deepens the flavor without overpowering.
- Gluten-Free: Swap the graham cracker crust for a gluten-free graham cracker version—just as delicious, trust me!
- Mini Bars: Use a smaller baking pan to make bite-sized bars, perfect for parties or lunchbox treats.
How to Make Classic Apple Crisp Recipe
Step 1: Prep Your Pan & Crust
Start by preheating your oven to 350°F and lining a 9×13 baking pan with foil—this step makes cleanup a breeze. I prefer using a metal pan because it bakes the crust evenly and crisply, but a glass pan works fine too; just watch the baking time as it might take a few minutes longer. Crush your graham crackers into fine crumbs—using a food processor or putting them in a zip-top bag and rolling with a rolling pin works well. Then mix the crumbs with sugar and melted butter until everything is evenly moistened.
Step 2: Press and Bake the Crust
Firmly press the graham cracker mixture into the bottom of your prepared pan, creating an even layer. Try to compact it tightly so it holds together after baking. Pop it into the oven and bake for about 10 minutes until it’s just set and starting to get golden—this step is crucial for preventing a soggy bottom once you add your fillings.
Step 3: Make the Cream Cheese Filling
While the crust bakes, beat your cream cheese on medium speed until smooth and fluffy — about 3 minutes is usually perfect. Gradually add sugar and keep beating until well combined. Then mix in vanilla, sour cream, and salt. I discovered adding sour cream really brightens the cheesecake layer and keeps it from being too dense. Beat in the eggs one at a time, scraping down the bowl between additions for a smooth batter.
Step 4: Prepare the Pumpkin Layer
In a separate bowl, mix pumpkin puree with pumpkin pie spice, cinnamon, and flour until everything is fully incorporated. The flour here helps keep the pumpkin layer from being watery and makes cutting the bars neater after baking—trust me, it’s a little trick I learned the hard way!
Step 5: Assemble and Swirl
Pour the cream cheese mixture over your baked crust first, smoothing it into an even layer. Then spoon dollops of the pumpkin mixture all over the top. Using a butter knife or skewer, gently swirl the two layers together – you don’t want them fully combined, just a pretty marbled effect. This is the step my family loves watching me do because it’s almost therapeutic!
Step 6: Bake Until Set
Bake your assembled bars for about 50 minutes or until the edges are set but the center still jiggles slightly when you gently shake the pan — it will firm up as it cools. Avoid overbaking or you’ll lose that lovely creamy texture. Once baked, let the bars cool completely before refrigerating for at least 4 hours or overnight to fully set. Patience is key here; the chill time makes slicing clean and the flavors even better.
Pro Tips for Making Classic Apple Crisp Recipe
- Room Temperature Ingredients: I always set my cream cheese and eggs out at least 30 minutes before baking—it makes mixing smoother and prevents lumps.
- Don’t Skip the Chill: Refrigerating overnight is a game-changer for sliceable bars with perfect texture.
- Swirling Technique: Use a light hand with the knife when swirling; too much mixing and you lose the distinct flavors.
- Watch the Bake Time: Overbaking dries out the bars—pull them as soon as the center jiggles, not fully set.
How to Serve Classic Apple Crisp Recipe
Garnishes
I love topping these bars with a generous dollop of freshly whipped cream or a scoop of vanilla ice cream—the cool creaminess pairs beautifully with the spiced pumpkin. Sometimes, I grate a little dark chocolate on top for a hint of decadence that surprises everyone.
Side Dishes
This dessert stands well on its own, but if you want a little extra, I like serving it alongside warm coffee or a chai latte. For a holiday spread, adding spiced nuts or a cheese platter balances the sweetness perfectly.
Creative Ways to Present
For special occasions, try cutting these bars into bite-sized squares and serving them on a decorative platter with mini forks—your guests will love picking them up. You could also drizzle some caramel sauce over each square for an elevated touch that makes dessert feel super special.
Make Ahead and Storage
Storing Leftovers
I store leftover bars in an airtight container in the fridge, and honestly, the flavors get even better the next day. They keep well for up to 4 days, which is perfect when you want to enjoy a treat throughout the week.
Freezing
You can freeze these bars by wrapping them tightly in plastic wrap and then foil before placing in the freezer. From my experience, they hold up well for up to 2 months. When you’re ready to enjoy, just thaw overnight in the refrigerator.
Reheating
If you prefer warm bars, I gently reheat them in the oven at 300°F for about 10 minutes—this keeps the crust crisp and the filling creamy without drying it out. Avoid microwaving to preserve texture.
FAQs
-
Can I use canned pumpkin pie filling instead of pumpkin puree?
I recommend using pure pumpkin puree rather than pie filling. Pie filling usually has added sugars and spices that can affect the overall flavor and texture of your bars. Using plain puree lets you control the spice level and sweetness precisely.
-
How do I prevent cracks in the cheesecake layer?
One trick I’ve learned is to avoid overmixing the batter and to bake just until the center jiggles slightly. Also, using room temperature ingredients helps create a smooth batter that bakes evenly and reduces cracking.
-
Can I substitute the sour cream with yogurt?
Yes, you can use full-fat plain Greek yogurt as a substitute for sour cream. It keeps the creamy texture and adds a similar tang, but I’d avoid low-fat versions to maintain richness.
-
How long does it take to chill the bars properly?
I recommend chilling the bars at least 4 hours, but overnight is best. This chilling time allows the layers to set firmly, making slicing easier and flavors more developed.
Final Thoughts
These Pumpkin Cheesecake Bars have become one of my absolute favorite go-to desserts whenever I want to impress without too much fuss. What I love most is how they blend two classic flavors into a single, luscious bar that’s easy to share and enjoy. I encourage you to try this recipe soon — you’ll find the process enjoyable and the result downright irresistible. Trust me, once you make these, you’ll want to keep a batch ready for every occasion!
Print
Classic Apple Crisp Recipe
- Prep Time: 25 min
- Cook Time: 50 min
- Total Time: 5 hr 15 min
- Yield: 18 servings
- Category: Dessert
- Method: Baking
- Cuisine: American
Description
Delight in these rich and creamy Pumpkin Cheesecake Bars, combining the warm spices of pumpkin pie with a smooth, luscious cheesecake atop a buttery graham cracker crust. Perfect for fall gatherings or a festive dessert any time of year.
Ingredients
Crust
- 15 whole rectangular graham crackers
- 1/4 cup granulated sugar
- 8 tablespoons unsalted butter, melted
Filling
- 1-1/4 cups pumpkin puree
- 1-1/2 teaspoons pumpkin pie spice
- 1-1/2 teaspoons ground cinnamon
- 1 tablespoon all-purpose flour
- Three 8-oz packages full fat cream cheese, at room temperature
- 1-2/3 cups granulated sugar
- 1-1/2 teaspoons pure vanilla extract
- 1/2 cup full fat sour cream
- 1/8 teaspoon salt
- 3 large eggs, at room temperature
Instructions
- Preheat and Prepare Pan: Preheat your oven to 350°F (175°C). Line a 9×13 inch baking pan with foil, making sure there is an overhang on the sides for easy removal later. Lightly grease the foil with butter or non-stick spray.
- Make the Crust: Crush the graham crackers into fine crumbs using a food processor or by placing them in a plastic bag and crushing with a rolling pin. Combine the crumbs with 1/4 cup sugar and the melted butter. Press this mixture evenly into the bottom of the prepared pan to form the crust. Set aside.
- Prepare the Cheesecake Filling: In a large mixing bowl, beat the softened cream cheese until smooth and creamy. Gradually add 1-2/3 cups sugar, vanilla extract, and salt, continuing to beat until fully combined and smooth. Add eggs one at a time, mixing well after each addition.
- Add Pumpkin Mixture: In a separate bowl, mix pumpkin puree, pumpkin pie spice, cinnamon, and flour until combined. Gently fold this pumpkin mixture into the cream cheese batter until evenly incorporated but be careful not to over-mix.
- Add Sour Cream: Fold in the sour cream to the batter to add creaminess and balance flavors.
- Pour and Swirl: Pour the filling over the crust in the baking pan, spreading it evenly. For a marbled effect, you can swirl in some extra pumpkin puree or more cream cheese mixture if desired.
- Bake: Place the pan in the preheated oven and bake for about 50 minutes. The edges should be set but the center will still have a slight jiggle.
- Cool and Chill: Remove the bars from the oven and let them cool completely on a wire rack. Once cool, refrigerate for at least 4 hours or overnight to allow the cheesecake to fully set before slicing.
- Serve: Use the foil overhang to lift the bars from the pan. Cut into 18 squares and serve chilled. Enjoy your delicious pumpkin cheesecake bars!
Notes
- These swirled Pumpkin Cheesecake Bars combine the traditional flavors of pumpkin pie with creamy cheesecake on a buttery graham cracker crust, offering a perfect dessert for fall or holiday occasions.
- For cleaner slices, warm the knife under hot water and wipe dry before cutting each bar.
- Using full-fat cream cheese and sour cream ensures a rich and creamy texture.
- A metal pan is preferred for even baking, but a glass pan will work; if using glass, add a few extra minutes to baking time.
- Let the bars chill thoroughly for best texture and flavor.
Nutrition
- Serving Size: 1 bar (approximately 1/18th of recipe)
- Calories: 294 kcal
- Sugar: 21 g
- Sodium: 200 mg
- Fat: 20 g
- Saturated Fat: 11 g
- Unsaturated Fat: 6 g
- Trans Fat: 1 g
- Carbohydrates: 26 g
- Fiber: 1 g
- Protein: 4 g
- Cholesterol: 84 mg


