If you’re looking for a show-stopping turkey recipe that yields irresistibly crisp skin and tender, juicy meat, you’re in the right place. I absolutely love this Crispy Spatchcock Turkey with Rich Gravy Recipe because it transforms the usual roast into a faster, more flavorful feast with a homemade gravy that makes every bite sing. Whether it’s a holiday centerpiece or a special weekend dinner, this method will have you feeling like a pro—and your family will go crazy for it.
Why You’ll Love This Recipe
- Crispy Skin Every Time: Spatchcocking the turkey flattens it for even roasting, so the skin crisps up beautifully all over.
- Juicy, Evenly Cooked Meat: No more dry white meat or overcooked thighs—this method delivers tender perfection throughout.
- Rich, Flavorful Gravy from Scratch: Using the turkey’s neck, backbone, and drippings makes the gravy incredibly savory and satisfying.
- Faster Roasting Time: It takes less time than a traditional roast, so you’ll spend less time waiting and more time enjoying.

Ingredients You’ll Need
The magic of this Crispy Spatchcock Turkey with Rich Gravy Recipe really comes from simple, fresh ingredients working in harmony. I always recommend getting the best quality turkey you can find because it makes a noticeable difference. The veggies and herbs add layers of comforting flavor to the gravy that you’ll want to spoon over everything.
- Large onions: These bring sweetness and depth; don’t skip them in the gravy base.
- Carrots: Add subtle earthiness and natural sweetness to the gravy.
- Celery stalks: Provide aromatic support and balance the vegetables.
- Fresh thyme sprigs: Thyme pairs beautifully with turkey and makes a fragrant gravy.
- Whole turkey: Choose a 12-14 pound bird—perfect size for spatchcocking and feeding a crowd.
- Vegetable oil: Helps crisp the skin without smoking at high heat.
- Kosher salt and freshly ground black pepper: Essential for seasoning and enhancing natural flavors.
- Low-sodium chicken or turkey broth: Use homemade if possible, for an extra rich gravy.
- Bay leaves: Add a subtle earthy note to the gravy stock.
- Butter: For a silky, rich gravy finish.
- Flour: To thicken the gravy to the perfect consistency.
Variations
I love how versatile this Crispy Spatchcock Turkey with Rich Gravy Recipe can be. Over the years, I’ve played around with herbs, spices, and even cooking liquids to tweak it for different occasions or dietary needs. Feel free to make it your own!
- Herb Variations: I sometimes swap thyme with rosemary or sage for a woodsy twist that my family adores come autumn.
- Citrus Infusion: Adding a bit of orange zest or lemon slices under the turkey gives a bright note that balances the richness.
- Gluten-Free Gravy: You can use cornstarch instead of flour to keep the gravy gluten-free without compromising on thickness.
- Brined Turkey: If you’re working with a pre-brined turkey, just skip the extra salt when seasoning to keep flavors balanced.
How to Make Crispy Spatchcock Turkey with Rich Gravy Recipe
Step 1: Prepare Your Oven and Roasting Pan
First things first, set your oven rack in the middle position and preheat it to a blazing 450°F (230°C). This high heat is key for that crisp skin we’re after. Line a rimmed baking sheet or broiler pan with aluminum foil to catch drippings—makes cleanup easy, trust me. Scatter about two-thirds of your roughly chopped onions, carrots, celery, and thyme sprigs evenly across the pan. Then, place a slotted broiler or wire rack right on top of the veggies so the turkey won’t be sitting directly in the juices but gets that wonderful aroma steaming from below.
Step 2: Spatchcock and Season the Turkey
Pat your turkey completely dry with paper towels—moisture is the enemy of crisp skin! Rub all over with a tablespoon of vegetable oil, then season generously with kosher salt and freshly ground black pepper. If your turkey’s already been brined or salted, skip the extra salt here. Don’t forget to tuck the wing tips behind the back—they brown beautifully without burning this way. Place the turkey on the rack, flattening the breasts slightly by pressing down on the breastbone to help it cook evenly. The spatchcock technique cuts out the backbone, so the bird lies flat—game changer for cooking.
Step 3: Roast the Turkey to Perfection
Pop the turkey into your hot oven and roast it, rotating the pan every 20-25 minutes to ensure even browning. You’re aiming for an instant-read thermometer to hit 150°F (66°C) in the deepest part of the breast and at least 165°F (74°C) in the thighs. For a 12-14 pound turkey, this usually takes about 80 minutes—much faster than a traditional roast. Once done, transfer the rack to a clean baking sheet and let the turkey rest at room temperature for about 20 minutes—resting locks in juices so every slice stays moist.
Step 4: Make the Rich Gravy While the Turkey Roasts
This part is where the real magic happens. Chop up the reserved turkey neck, backbone, and giblets, then heat your remaining tablespoon of oil in a saucepan over high heat until it’s shimmering. Toss in the turkey parts and brown them well—about five minutes. Add the remaining onions, carrots, and celery and continue cooking until they soften and pick up some color, another five minutes or so. Pour in your broth, toss in the remaining thyme sprigs and bay leaves, then bring to a boil. Reduce to a bare simmer and let this stock bubble away for 45 minutes to develop deep flavor. After, strain the liquid through a fine-mesh strainer, discarding the solids, and skim off excess fat from the top.
Step 5: Finish the Gravy
Melt butter in a saucepan over medium-high heat, then whisk in the flour, stirring constantly until golden brown—this creates a nutty roux that thickens your gravy beautifully. Gradually whisk in the strained broth in a slow stream to avoid lumps. Bring the mixture to a boil and then simmer until reduced to about one quart, around 20 minutes. Season with salt and pepper to taste, cover, and keep warm. When the turkey is done resting, skim any pan drippings of fat, strain them, and whisk the juices into your gravy for that extra layer of flavor.
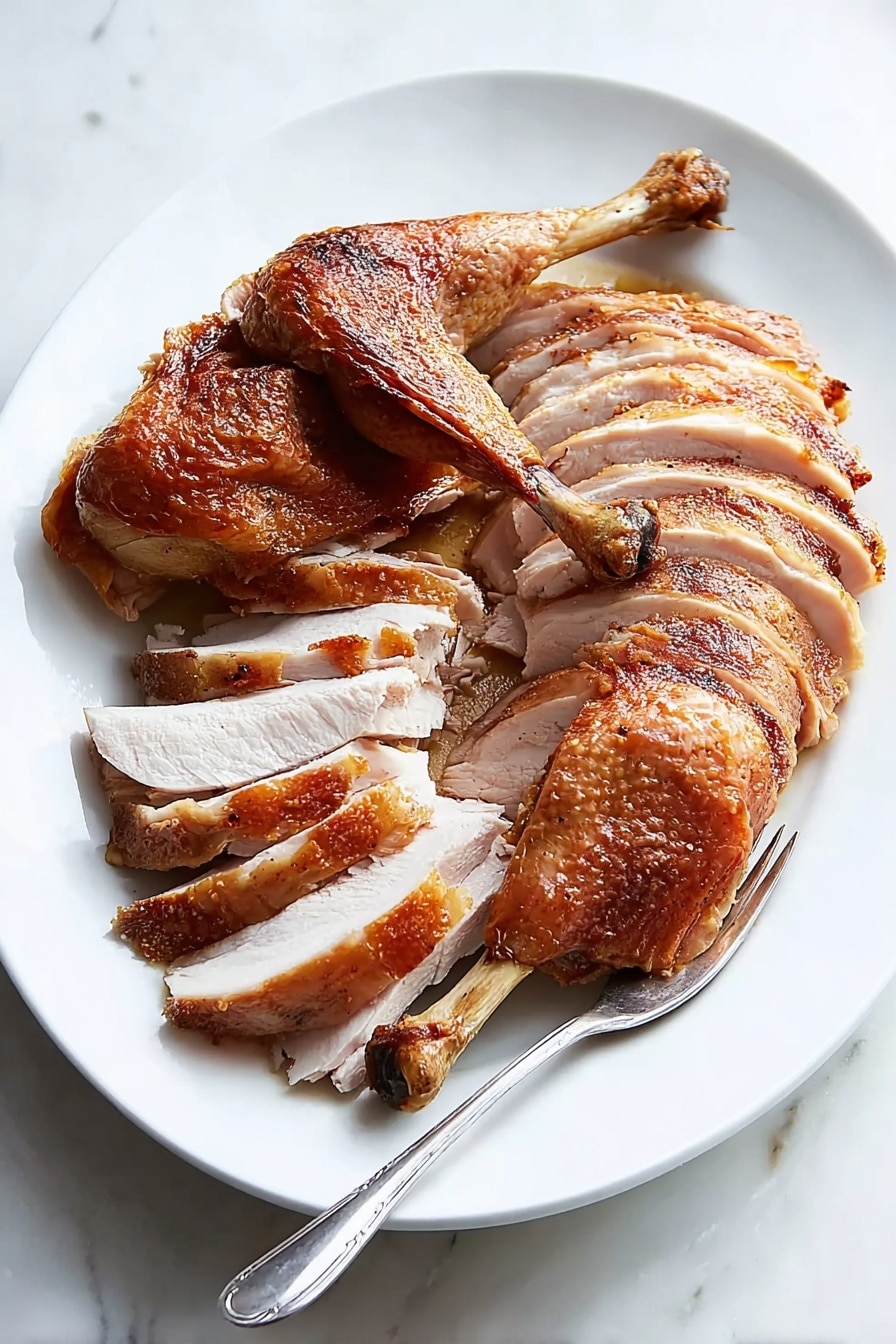
Step 6: Carve and Serve
Finally, carve your beautifully rested turkey and serve it alongside that silky, rich homemade gravy. I guarantee this Crispy Spatchcock Turkey with Rich Gravy Recipe will get lots of compliments—and maybe a few requests for seconds.
Pro Tips for Making Crispy Spatchcock Turkey with Rich Gravy Recipe
- Dry the Skin Thoroughly: I’ve found that patting the turkey skin completely dry and not skipping the oil rub makes the crispiest skin possible.
- Use a Thermometer: Trust me, an instant-read thermometer is your best friend to avoid over or undercooking—and it takes the guesswork out.
- Don’t Skip the Resting: Resting lets the juices redistribute for moist meat; carving too soon will dry it out fast.
- Simmer Gravy Gently: Low and slow simmering develops rich flavor without burning or reducing it too much.
How to Serve Crispy Spatchcock Turkey with Rich Gravy Recipe
Garnishes
I usually keep garnishes simple—fresh thyme sprigs or a few parsley leaves scattered over the carved turkey and gravy add a fresh burst of color and aroma. Occasionally I’ll toss a few roasted grapes or sliced oranges on the serving platter for a pop of sweetness and brightness that complements the savory flavors.
Side Dishes
My go-to sides with this Crispy Spatchcock Turkey with Rich Gravy Recipe are classic mashed potatoes (to soak up all that gravy), roasted Brussels sprouts with pancetta, and a simple green bean almondine. For a seasonal touch, think buttery roasted sweet potatoes or a crisp apple and fennel salad that cuts through the richness.
Creative Ways to Present
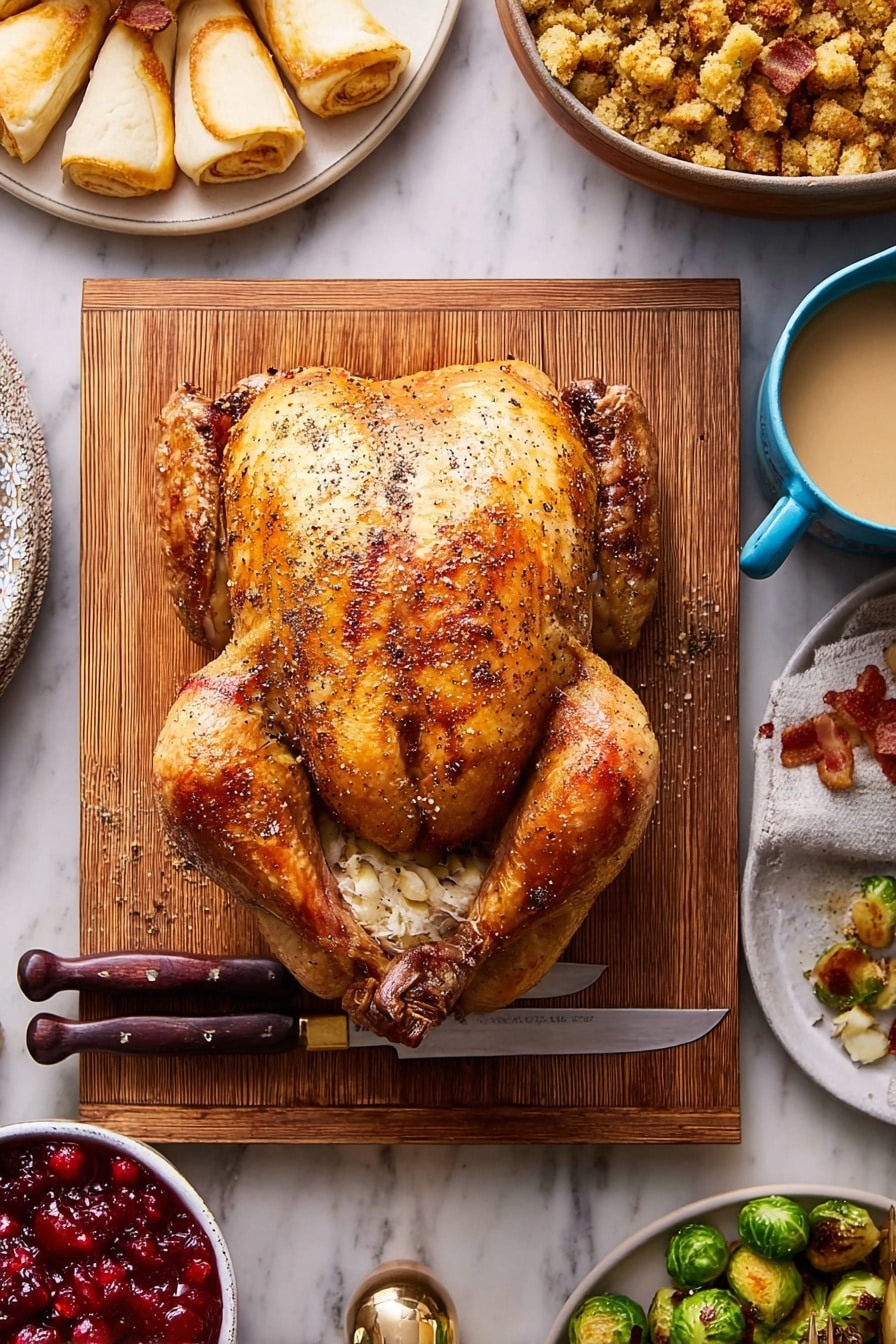
For special occasions, I love arranging the spatchcocked turkey on a large wooden board surrounded by piles of roasted root vegetables and fresh herb bundles. It’s rustic yet elegant, and the sprawling layout lets everyone admire the crispy skin before carving. Adding edible flowers or citrus slices can make the platter pop if you want a fancy touch without much effort.
Make Ahead and Storage
Storing Leftovers
After enjoying your feast, I usually store leftover turkey and gravy separately in airtight containers in the refrigerator. The turkey stays moist longer when kept chilled quickly, and gravy reheats beautifully. Make sure to cool everything down before refrigerating to keep flavors fresh.
Freezing
If you want to freeze leftovers, carve the turkey first and package portions tightly wrapped in plastic wrap and foil or in freezer-safe bags. The rich gravy freezes well too; just leave a little space in the container for expansion. I’ve found that freezing both separately and thawing overnight in the fridge works best to keep texture and flavor.
Reheating
To reheat, I gently warm the gravy on the stove over low heat, stirring occasionally. For the turkey, wrap slices in foil and heat in a 325°F oven until warmed through—it keeps the meat tender and avoids drying out. If you’re in a hurry, a quick microwave zap with a damp paper towel over the meat works too.
FAQs
-
What exactly does spatchcock mean?
Spatchcocking means removing the backbone of the turkey so it can be flattened out before roasting. This technique allows the bird to cook more evenly and quickly, resulting in extra crispy skin and juicy meat all around.
-
Can I use a smaller or larger turkey for this recipe?
Yes! This recipe works best with a 12-14 pound turkey, but you can scale the vegetables and broth accordingly for smaller or larger birds. Just keep the cooking times flexible and use a thermometer for best results.
-
Do I have to make the gravy from the turkey parts?
While you can skip the homemade gravy, I highly recommend making it—it uses those parts for incredible depth of flavor that you can’t get from store-bought gravy. Plus, cooking the neck and giblets adds richness that’s worth the extra step.
-
How do I know when the turkey is done?
An instant-read meat thermometer is your best tool. The breast should hit 150°F and the thighs 165°F before you pull it out. Remember, the turkey will continue to cook slightly while resting.
-
Can I brine this turkey before spatchcocking?
Absolutely! If you brine it, just be careful not to oversalt when seasoning before roasting. Brining enhances moisture and flavor, so it can be a great extra step if you have the time.
Final Thoughts
I remember the first time I tried this Crispy Spatchcock Turkey with Rich Gravy Recipe—I was so blown away by how fast it cooked and how perfectly crisp the skin turned out. It quickly became my go-to for every turkey occasion because it solves so many of the problems I used to have with roasting large birds. I hope you’ll enjoy making (and eating!) it as much as I do because it really turns turkey dinner into a celebratory feast with minimal fuss. Give it a try next time you want a turkey that’s juicy, crispy, and downright delicious.
Print
Crispy Spatchcock Turkey with Rich Gravy Recipe
- Prep Time: 10 minutes
- Cook Time: 105 minutes
- Total Time: 135 minutes
- Yield: 12 servings
- Category: Main Course
- Method: Baking
- Cuisine: American
Description
This Crisp-Skinned Spatchcocked Roast Turkey recipe delivers perfectly cooked white and dark meat with stunningly crisp skin. The turkey is butterflied for even cooking and roasted at high heat, while a rich, flavorful homemade gravy is prepared simultaneously using the pan drippings, turkey neck, backbone, and giblets.
Ingredients
Vegetables and Herbs
- 3 large onions, roughly chopped (about 1 1/2 quarts)
- 3 large carrots, peeled and roughly chopped (about 1 quart)
- 4 stalks celery, roughly chopped (about 1 quart)
- 12 thyme sprigs
- 2 bay leaves
Turkey and Seasoning
- 1 whole turkey (12 to 14 pounds total), butterflied (spatchcocked), backbone, neck, and giblets reserved
- 2 tablespoons vegetable oil, divided
- Kosher salt and freshly ground black pepper
Broth and Gravy
- 1 1/2 quarts low-sodium homemade or store-bought chicken or turkey broth
- 3 tablespoons butter
- 4 tablespoons all-purpose flour
Instructions
- Prepare the Oven and Vegetables: Adjust the oven rack to the middle position and preheat your oven to 450°F (230°C). Line a rimmed baking sheet or broiler pan with aluminum foil, then scatter two-thirds of the chopped onions, carrots, celery, and thyme sprigs evenly across the bottom. Place a slotted broiler rack or wire rack directly on top of the vegetables.
- Prepare the Turkey: Pat the turkey dry thoroughly with paper towels. Rub 1 tablespoon of vegetable oil evenly over all surfaces of the turkey. Season all sides liberally with kosher salt and freshly ground black pepper unless the turkey is already brined or salted. Tuck the wing tips neatly behind the back. Place the turkey breast-side up on the wire rack, pressing down on the breastbone slightly to flatten the bird for even cooking.
- Roast the Turkey: Transfer the baking sheet with the turkey to the oven. Roast the turkey, rotating occasionally for even browning, until an instant-read thermometer inserted into the deepest part of the breast reaches 150°F (66°C) and the thigh temperature is at least 165°F (74°C), approximately 80 minutes.
- Make the Gravy Base: While the turkey roasts, roughly chop the reserved neck, backbone, and giblets. Heat the remaining 1 tablespoon of vegetable oil in a 3-quart saucepan over high heat until shimmering. Add the chopped turkey parts and cook, stirring occasionally, until they are lightly browned, about 5 minutes. Add the remaining onions, carrots, and celery; cook and stir occasionally until the vegetables soften and develop some browning, about 5 more minutes.
- Add Broth and Simmer: Pour in the chicken or turkey stock along with the remaining thyme sprigs and bay leaves. Bring the mixture to a boil, then reduce to a bare simmer and cook for 45 minutes to develop deep flavors. Strain the broth through a fine-mesh strainer into a 2-quart liquid measuring cup, discarding solids. Skim off any fat from the surface of the broth.
- Prepare the Gravy: In a 2-quart saucepan, melt the butter over medium-high heat. Stir in the flour and cook, stirring constantly, until the mixture turns golden brown and fragrant, about 3 minutes. Gradually whisk the prepared broth into the roux in a slow, steady stream to avoid lumps. Bring to a boil, then reduce to a simmer and cook until the gravy is reduced to about 1 quart and has thickened, approximately 20 minutes. Season with salt and pepper to taste, cover, and keep warm.
- Rest the Turkey and Combine Juices: When the turkey is fully cooked, remove it from the oven and transfer the rack to a clean baking sheet. Let the turkey rest at room temperature for 20 minutes before carving to allow juices to redistribute. Carefully pour any collected pan juices through a fine-mesh strainer into a measuring cup, skimming off excess fat. Whisk these juices into the warm gravy for added flavor.
- Carve and Serve: Carve the rested turkey and serve it alongside the rich homemade gravy for a delicious holiday centerpiece.
Notes
- Spatchcocking (butterflying) the turkey allows for more even cooking and results in exceptionally crisp skin.
- This recipe uses both the turkey carcass parts and pan drippings to create a deeply flavorful gravy.
- If using a pre-brined or kosher turkey, omit the additional salting to prevent oversalting.
- Resting the turkey after roasting is essential to keep the meat juicy and tender.
Nutrition
- Serving Size: 1 serving (approx. 1/12 of recipe)
- Calories: 552
- Sugar: 0 g
- Sodium: 696 mg
- Fat: 24 g
- Saturated Fat: 8 g
- Unsaturated Fat: 16 g
- Trans Fat: 0 g
- Carbohydrates: 4 g
- Fiber: 0 g
- Protein: 76 g
- Cholesterol: 288 mg


