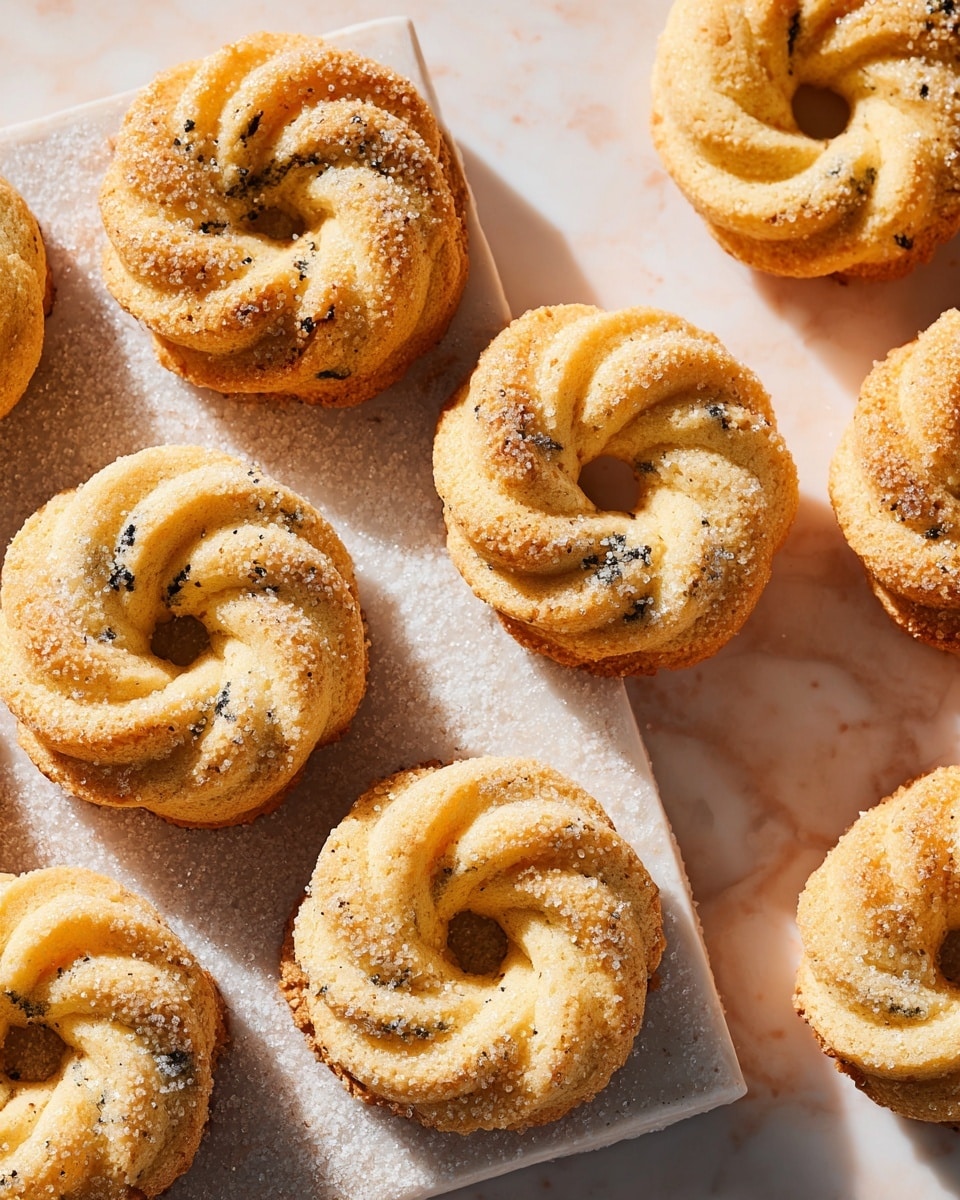
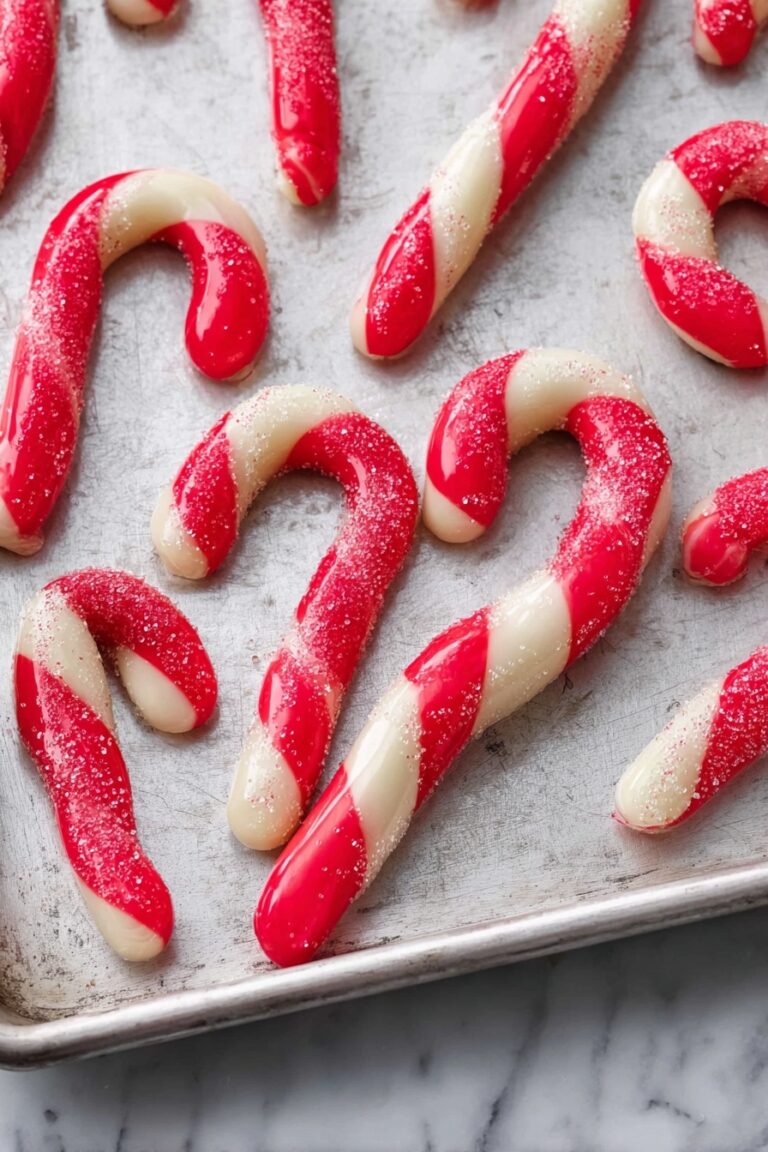
I absolutely love how this Danish Butter Cookies Recipe turns out every single time. The rich, buttery flavor combined with the subtle zing of lemon zest and bursts of dried currants make these cookies a standout in any cookie jar. They’re perfect for those cozy afternoons when you’re craving something sweet but not overwhelmingly sugary.
When I first tried this recipe, I was amazed at how straightforward the process was, yet how elegant the results felt. You’ll find that these cookies work wonderfully for holiday gatherings, gifting, or just a simple treat with your afternoon tea. The texture is delightfully tender, and the crispy edges add just the right amount of contrast.
Why You’ll Love This Recipe
- Pure Butter Magic: Using real unsalted butter gives these cookies their rich, melt-in-your-mouth texture.
- Simple Ingredients: You probably have everything on hand, making it easy to whip these up anytime.
- Perfectly Crispy Edges: The quick freeze before baking locks in shape and texture for that trademark crunch.
- Versatile for Any Occasion: These cookies feel fancy but are actually super easy—great for gifting or your own cookie jar!

Ingredients You’ll Need
This Danish Butter Cookies Recipe uses classic pantry staples that blend effortlessly to create that iconic buttery, crisp bite. A few tips on sourcing ingredients to ensure your cookies come out just right!
- Unsalted Butter: Use high-quality butter, room temperature for easy creaming; it truly makes a difference in flavor and texture.
- Granulated Sugar: Adds sweetness and helps create crisp edges when baked.
- Large Egg: Makes the dough tender and gives structure; best used at room temperature for even mixing.
- Fresh Lemon Zest: Not bottled—fresh zest brightens the flavor beautifully.
- Pure Vanilla Extract: Adds warmth and depth; go for pure extract rather than imitation.
- All-Purpose Flour: Essential for structure; sift if clumpy for smooth batter.
- Dried Currants: Tiny bursts of tart sweetness that balance the rich butter.
- Baking Soda: Helps with lightness; measure carefully for perfect rise.
- Kosher Salt: Enhances all the flavors and balances the sweetness.
- Sanding Sugar: For that sparkling, pretty finish and light crunch on the outside.
Variations
I love mixing things up with this Danish Butter Cookies Recipe by swapping out or adding flavors. It’s a great way to make it your own and impress your friends with something unexpected.
- Add Citrus Twist: Sometimes I swap lemon zest for orange or even lime zest for a different zing that pairs beautifully with the rich butter.
- Nutty Notes: Toasted finely chopped almonds or pecans make a lovely crunch without overpowering the cookies.
- Chocolate Drizzle: Once cooled, I drizzle melted dark chocolate over half the cookies for a decadent touch that my family goes crazy for.
- Gluten-Free Version: I’ve had success replacing all-purpose flour with a cup-for-cup gluten-free blend, just keep an eye on baking time.
How to Make Danish Butter Cookies Recipe
Step 1: Cream the Butter and Sugar Until Light and Fluffy
Start by beating the room-temperature butter and granulated sugar in a large bowl using an electric mixer on medium speed. I usually do this for about 3 minutes until the mixture is creamy and pale. This step is crucial for the right texture—you want that air whipped into the butter-sugar combo. Then, add the egg, fresh lemon zest, and vanilla extract, mixing them in until combined and smooth.
Step 2: Gently Fold in the Dry Ingredients and Currants
Now, sift together the all-purpose flour, baking soda, and kosher salt. Slowly add this to your wet mixture, beating on low or folding gently to avoid overmixing. Finally, stir in the dried currants evenly throughout the dough. I find folding helps keep the dough tender rather than dense. Stop mixing as soon as everything is just combined.
Step 3: Pipe and Chill the Cookie Dough
Line a baking sheet with parchment paper, then spoon about a quarter of the dough into a piping bag fitted with a ½-inch star tip. Pipe small rings about 1¾ inches in diameter directly onto the pan. I love this step because shaping the cookies uniformly really helps them bake evenly. Once piped, pop the tray into the freezer for about 20 minutes until the dough firms up—this helps maintain that perfect shape during baking.
Step 4: Coat with Sanding Sugar and Bake
Preheat your oven to 350°F (180°C). While the oven warms, dip each chilled cookie ring lightly into sanding sugar for a sparkling finish. Place them about an inch apart on parchment-lined baking sheets. Bake for 13 to 18 minutes, rotating the sheets halfway through, until the edges turn a lovely golden color. You’ll know they’re done when the aroma fills your kitchen and edges feel crisp.
Step 5: Cool and Repeat
Once baked, transfer the cookies to a wire rack to cool completely. Repeat the piping, freezing, sugar coating, and baking process with the remaining dough. This step helps keep the entire batch crisp and evenly baked. Patience pays off!
Pro Tips for Making Danish Butter Cookies Recipe
- Room Temperature Ingredients: Make sure your butter and egg are at room temperature to get a smooth, creamy batter that combines easily.
- Don’t Overmix: Mixing flour too much can toughen the cookies, so stop as soon as dry ingredients are incorporated.
- Freezing Step is Key: Freezing before baking prevents spreading and ensures crisp edges with a soft center.
- Use Parchment Paper: This keeps your cookies from sticking and makes cleanup way easier.
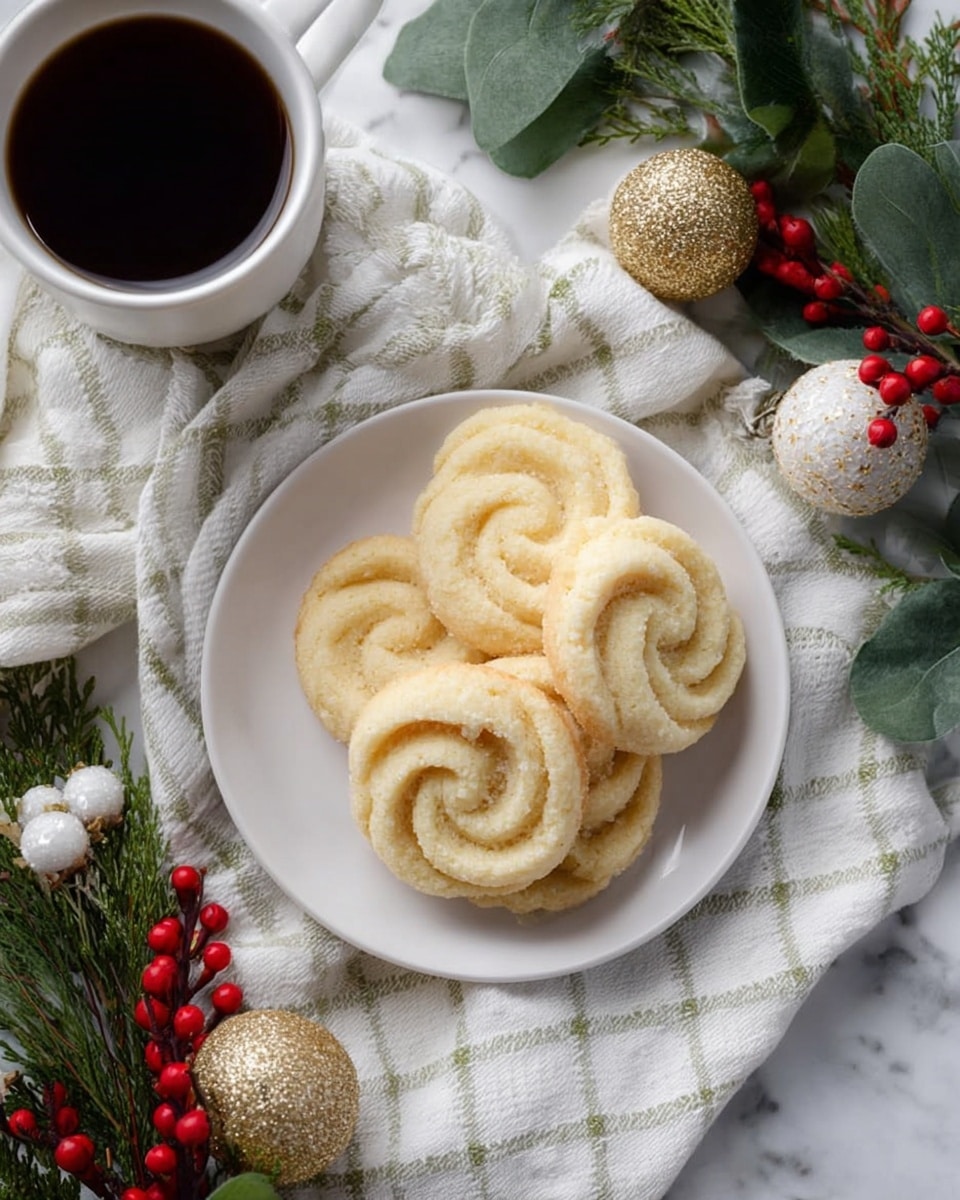
How to Serve Danish Butter Cookies Recipe
Garnishes
I enjoy sprinkling a little extra sanding sugar on top right after baking while the cookies are still warm—it adds a lovely sparkle and subtle crunch. Sometimes, I’ll dip half of a cookie in melted chocolate and add a sprinkle of sea salt for an irresistible combo that’s great for gift trays.
Side Dishes
These cookies pair beautifully with a hot cup of coffee or a fragrant black tea. For holiday parties, I like serving them alongside spiced mulled wine or warm apple cider to complement their buttery flavors.
Creative Ways to Present
For a festive touch, arrange Danish Butter Cookies Recipe rings in a circle on a decorative plate and fill the center with fresh berries or soft cheese. They also look charming stacked in clear jars tied with a ribbon—perfect for gifting neighbors or friends!
Make Ahead and Storage
Storing Leftovers
I store leftover Danish Butter Cookies in an airtight container at room temperature, where they keep wonderfully crisp for up to 3 days. Avoid stacking too tightly to maintain crispness, and I usually add a small sheet of parchment paper between layers to prevent sticking.
Freezing
Freezing these cookies is a game-changer if you want to prep ahead. I pop the piped cookie dough on a tray, freeze until firm, then transfer to a freezer-safe bag. You can bake them straight from frozen and just add a minute or two to the bake time. This has saved me during busy holidays more than once!
Reheating
To freshen up stored or frozen cookies, I warm them in a 300°F (150°C) oven for 3-5 minutes. This brings back that freshly baked crunch and soft center without drying them out. It’s like they just came out of the oven again!
FAQs
-
Can I substitute currants with raisins or other dried fruit?
Absolutely! While currants add a particular tart burst, raisins, dried cranberries, or chopped dried cherries also work beautifully. Just make sure they’re finely chopped or roughly the same size to ensure even distribution in the dough.
-
Why do I need to freeze the dough before baking?
Freezing the dough firms it up, which helps the cookies maintain their shape and prevents excessive spreading during baking. This step is key for those perfectly crisp edges paired with a tender center typical of Danish butter cookies.
-
Can I make this Danish Butter Cookies Recipe dairy-free?
It’s possible to use dairy-free butter substitutes, but the flavor and texture can differ. I recommend trying high-quality vegan butters that mimic real butter’s moisture and fat content for best results. Expect slightly less crispness and richness.
-
How long do Danish butter cookies stay fresh?
Stored in an airtight container at room temperature, these cookies stay fresh and crisp for about 3 days. Beyond that, they’re best frozen to preserve their delightful texture and flavor.
Final Thoughts
This Danish Butter Cookies Recipe holds a special place in my baking repertoire because it’s simple, reliable, and always delivers that buttery, melt-in-your-mouth magic. If you’ve been searching for a cookie recipe that feels classic yet impressive, this one’s for you. I hope you enjoy making (and eating!) these as much as I do—it’s like a little buttery hug in every bite.
Print
Danish Butter Cookies Recipe
- Prep Time: 30 Minutes
- Cook Time: 18 Minutes
- Total Time: 48 Minutes
- Yield: Approximately 35 cookies
- Category: Dessert
- Method: Baking
- Cuisine: Danish
Description
Danish Butter Cookies are classic, buttery, and tender cookies studded with dried currants and flavored with lemon zest and vanilla. These crisp and delicate cookies are piped into charming rings, coated with sanding sugar for a delightful crunch, then baked until golden. Perfect for festive gift-giving or everyday treats.
Ingredients
Cookie Dough
- 1 cup (2 sticks, ½ pound, or 227 grams) unsalted butter, room temperature
- 1/2 cup (100 grams) granulated sugar
- 1 large egg, room temperature
- 1 tablespoon finely grated lemon zest
- 1 teaspoon pure vanilla extract
- 2 cups (250 grams) all-purpose flour
- 5 ounces (142 grams) dried currants
- 1/2 teaspoon baking soda
- 1/2 teaspoon kosher salt
Finishing
- 1 handful sanding sugar
Instructions
- Prepare the dough: In a large bowl, use an electric mixer on medium speed to beat the butter and sugar together for about 3 minutes until combined and creamy. Then add the egg, lemon zest, and vanilla extract; continue beating until well combined. Gradually beat in the flour, dried currants, baking soda, and kosher salt until just combined, being careful not to overmix.
- Pipe the cookies: Line a rimmed baking sheet with parchment paper. Transfer about one-quarter of the dough into a piping bag fitted with a ½-inch (1.2-centimeter) star tip. Pipe small rings approximately 1¾ inches (3.6 centimeters) in diameter onto the prepared baking sheet. Repeat with the remaining dough, arranging the rings evenly spaced. Place the baking sheet in the freezer and freeze the dough rings for about 20 minutes until firm.
- Preheat oven and prepare sanding sugar: While the cookies chill, heat the oven to 350°F (180°C) and line two rimmed baking sheets with parchment paper. Pour a small amount of sanding sugar into a bowl.
- Coat and arrange cookies: Quickly dip the frozen cookie rings into the sanding sugar to coat thoroughly. Then transfer the sugared cookies about 1 inch apart onto the prepared baking sheets. Return any remaining dough rings to the freezer to keep firm until ready to bake.
- Bake the cookies: Bake the cookies in the preheated oven for 13 to 18 minutes, rotating the sheets halfway through baking to ensure even cooking. Bake until the cookies are golden around the edges but still delicate in the center.
- Cool on racks: Remove the baking sheets from the oven and transfer the cookies to wire racks to cool completely.
- Repeat baking with remaining dough: Repeat the coating and baking process for the remaining cookies, keeping dough chilled between batches.
- Storage: The cookies can be made up to 3 days ahead and stored in an airtight container at room temperature, or frozen for up to 2 months.
Notes
- Using room temperature butter and egg ensures the dough mixes smoothly and the cookies bake with a tender crumb.
- Freezing the piped dough rings helps them maintain shape during baking and results in nicely defined ridges from the star tip.
- Be sure to rotate the baking sheets halfway through baking for even color and doneness.
- Sanding sugar adds a delightful crunch and shimmer to the surface of the cookies.
- For best flavor, use fresh lemon zest and high-quality vanilla extract.
Nutrition
- Serving Size: 1 cookie
- Calories: 110
- Sugar: 6 g
- Sodium: 60 mg
- Fat: 7 g
- Saturated Fat: 4 g
- Unsaturated Fat: 3 g
- Trans Fat: 0 g
- Carbohydrates: 11 g
- Fiber: 0.5 g
- Protein: 1 g
- Cholesterol: 20 mg

