
I absolutely love sharing this Easy No-Knead Sourdough Bread Recipe with you because it takes all the intimidation out of sourdough baking. If you’ve ever thought making sourdough at home was complicated or time-consuming, this recipe will prove you wrong. It’s straightforward, requires minimal hands-on time, and results in a beautifully crusty, tangy loaf that everyone will rave about. Stick with me, and I’ll walk you through every step to get that perfect loaf right out of your oven.
Why You’ll Love This Recipe
- No Fuss, No Knead: You won’t spend hours working the dough—just mix and let time do the magic.
- Beginner-Friendly: Even if this is your first sourdough, every step is simple and approachable.
- Deep Flavor & Crunchy Crust: The slow fermentation and baking method create that irresistible tang and crackly crust we all crave.
- Flexible Timing: You can adjust rising times depending on your schedule or kitchen temperature.

Ingredients You’ll Need
The ingredients in this Easy No-Knead Sourdough Bread Recipe are simple but chosen to help you get that perfect loaf every time. Make sure you use a lively, active starter and unbleached flour for the best structure and flavor.

- Mature Starter: Your sourdough starter must be bubbly and active; it’s the heart of this bread.
- Unbleached Bread Flour or All-Purpose Flour: Bread flour offers more protein for gluten development but all-purpose works fine too.
- Filtered Water: Chlorine-free water ensures your starter and dough stay healthy and rise well.
- Sea Salt: Adds flavor depth and strengthens the dough’s structure.
Variations
I love how this recipe is a great canvas for you to add your own twist—whether you’re feeling fancy with seeds or want to dial back the tang. Experimenting can be part of the fun!
- Whole Wheat Blend: I sometimes swap 100 grams of bread flour with whole wheat flour for a nuttier taste and more fiber—just keep an eye on hydration as whole wheat absorbs more water.
- Seeded Sourdough: Adding a tablespoon of flax, sunflower, or sesame seeds gives the crust an extra crunch that my family goes crazy for.
- Herb Infusion: Fresh rosemary or thyme folded lightly into the dough before shaping adds a lovely aroma and flavor that’s perfect for sandwiches.
How to Make Easy No-Knead Sourdough Bread Recipe
Step 1: Build Your Starter the Night Before
The secret to this recipe’s success starts the night before. I always combine 25 grams of mature starter with 75 grams each of flour and warm water (around 90°F) in a jar. Mix it well until no dry flour remains, then cover it loosely and let it sit at room temperature overnight. By morning, your starter will be bubbly and doubled—this active “ripe starter” is what will give your bread that signature rise and flavor.
Step 2: Mix Your Dough in the Morning
Next morning, mix 100 grams of that ripe starter with 300 grams of warm filtered water in a large bowl until the starter is fully dispersed—no lumps. Then, add 500 grams of bread flour and 10 grams of sea salt. Stir everything until you get a shaggy, sticky dough. It won’t look smooth, and that’s totally okay. Use your hands to gather it into a rough ball—sticky is exactly what you want here.
Step 3: Let Your Dough Rise Warm and Slow
Place the bowl in your oven with just the light on. I discovered this trick when my kitchen was too chilly—the oven light keeps the dough warm at around 80-85°F, perfect for fermentation without overheating. Cover the bowl loosely with plastic wrap and let the dough rise for 5-6 hours until it’s puffy and doubled. When you gently poke it, your finger should leave an indent that slowly bounces back.
Step 4: Shape with Gentle Folds
Lightly flour your work surface, then turn the dough out seam side down. Starting from the top edge, gently pull the dough and fold it towards the center. Repeat with the bottom, then the left and right edges, pinching to seal. Do this folding sequence twice for some structure. Flip the dough seam side down, cup your hands around it, and gently rotate to create a tight, smooth ball. It should feel taut but still soft and pillowy. I always practice this part slowly—it’s easier than it looks and really improves the crumb.
Step 5: Final Proofing in Your Basket
Dust a bread basket generously with flour, or if you don’t have one, use a bowl lined with a well-floured kitchen towel. Place the shaped dough seam side up in the basket and dust the top lightly with more flour. Cover loosely and return it to the oven (light on) for 2-3 hours until it doubles again and feels airy when gently pressed.
Step 6: Bake Your Loaf in a Dutch Oven
Preheat your oven to 450°F but don’t preheat your Dutch oven—that’s the difference here. Place a sheet of parchment on your counter, then turn the dough out seam side down onto the parchment. Score a decisive ½-inch deep slash lengthwise across the top. Using the parchment edges as handles, transfer the dough into your Dutch oven, cover with the lid, and reduce heat to 425°F. Bake covered for 40 minutes, then remove the lid and bake 5-10 minutes more until the crust is deep golden and sounds hollow when tapped.
Step 7: Cool Completely Before Slicing
This step is key! Removing the bread from the Dutch oven and placing it on a rack to cool for at least two hours lets the crumb set beautifully. The internal temp should reach 190–205°F. I know it’s tempting, but slicing too early leads to gummy bread. Patience pays off with a crust that snaps and a soft, flavorful center.
Pro Tips for Making Easy No-Knead Sourdough Bread Recipe
- Use Active Starter: I always float test my starter beforehand to make sure it’s ready to give your bread the best rise.
- Oven Light for Warm Proofing: If your kitchen is cold, the oven light trick keeps the dough at a consistent, cozy temperature without having to turn the oven on.
- Scoring Confidence: Make your cut smooth and decisive—hesitating can make the dough rip unpredictably during baking.
- Don’t Skip Cooling: It’s tempting, but cutting the bread too soon results in a gummy crumb—wait until the loaf’s fully cooled for best texture.
How to Serve Easy No-Knead Sourdough Bread Recipe

Garnishes
I like to brush the crust lightly with olive oil when it’s warm and sprinkle flaky sea salt on top for a little extra flavor and sparkle. It’s simple but really enhances that gorgeous crust. You can also brush with melted butter for a richer finish.
Side Dishes
This sourdough pairs perfectly with creamy soups like tomato bisque or classic French onion. My family also loves it alongside sharp cheeses and fresh fruit for an easy, elegant snack board.
Creative Ways to Present
For special occasions, I slice the bread into smaller rounds and toast them with garlic and herbs for crostini. It’s a stunning appetizer and lets guests enjoy the crusty tang in bite-sized form.
Make Ahead and Storage
Storing Leftovers
I store leftover loaves wrapped loosely in a paper bag at room temperature for up to three days. This keeps the crust crisp without trapping moisture. Avoid plastic unless you want soft crust—the paper bag breathes just right.
Freezing
To freeze, I slice the bread first, then use an airtight container or freezer bag to keep the slices fresh for up to three months. When I’m ready to enjoy, I just toast the slices directly from frozen—easy and delicious.
Reheating
For reheating, I pop the whole loaf or slices in a 350°F oven for about 10 minutes to refresh the crust. It’s like the bread just came out of the oven again—crispy outside and soft inside.
FAQs
-
Can I use all-purpose flour instead of bread flour for this recipe?
Yes, you can! While bread flour has a higher protein content which helps with gluten development, all-purpose flour still produces a lovely loaf in this recipe. The texture might be a little less chewy, but it will still have great flavor and a crusty exterior.
-
What is the purpose of the oven light during fermentation?
The oven light provides a gentle, warm environment for your dough to rise, especially helpful if your kitchen tends to be cool. It keeps the dough at an ideal temperature (around 80-85°F) without over-proofing, ensuring reliable and consistent results.
-
Why does the dough need to be sticky?
Sticky dough might feel tricky, but it actually leads to a beautifully open crumb and crisp crust. The moisture in the dough helps the gluten develop naturally during the long fermentation, so resist the temptation to add extra flour while mixing or shaping.
-
Can I make this bread without a Dutch oven?
While a Dutch oven helps create steam for a crispy crust, you can bake the bread on a baking stone or heavy pan with a tray of water beneath it inside the oven to simulate steam. Covering the dough with a large metal bowl during the first part of baking can also help trap steam.
-
How do I know when my starter is ready to use?
A ripe starter should be bubbly, doubled in size, and pass the float test—meaning a small spoonful floats in water. If it sinks, it needs more time or feedings before it’s strong enough to leaven bread properly.
Final Thoughts
This Easy No-Knead Sourdough Bread Recipe has truly changed the way I bake at home. It’s accessible, friendly for beginners, and yields that wonderful loaf you’d pay a lot for in a bakery. Give yourself a little time, follow these steps, and you’ll be rewarded with a crusty, flavorful sourdough that feels like a warm hug fresh from your oven. Don’t be afraid to try it—you might just discover, like I did, that making sourdough bread at home can be joyful, relaxing, and totally doable.
Print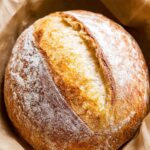
Easy No-Knead Sourdough Bread Recipe
- Prep Time: 15 minutes
- Cook Time: 50 minutes
- Total Time: 10 hours 5 minutes
- Yield: 8 servings
- Category: Bread
- Method: Baking
- Cuisine: American
Description
This Easiest Ever Sourdough Bread recipe delivers a no-knead, artisan-style loaf with a crisp crust and tender crumb. Using a simple starter build from the night before, this method allows for easy preparation and long fermentation for optimal flavor, producing a delightful homemade bread with minimal effort.
Ingredients
Starter Build (Night Before)
- 25 grams mature starter (about 2 tablespoons)
- 75 grams unbleached bread flour or all-purpose flour (½ cup + 1 teaspoon)
- 75 grams water, 90℉ (⅓ cup)
Dough
- 100 grams ripe starter (heaping ⅓ cup)
- 300 grams filtered water, 90℉ (1¼ cups + 1 tablespoon)
- 500 grams white bread flour or unbleached all-purpose flour (3½ cups + ½ teaspoon)
- 10 grams sea salt (2⅛ teaspoons)
Instructions
- Build the Starter: The evening before baking, combine 25g mature starter with 75g flour and 75g warm water (90°F) in a clean mason jar. Stir well until no dry flour remains, cover loosely with plastic wrap, and let rest at room temperature for 8-12 hours until doubled and bubbly.
- Mix the Dough: The next morning, in a large bowl, combine 100g ripe starter with 300g warm water and stir until fully dispersed. Add 500g bread flour and 10g sea salt, mixing until a shaggy, sticky dough forms. Use your hands to bring it together into a sticky ball.
- First Rise: Cover the bowl with plastic wrap and place it in the oven with the light on (this creates a warm environment around 80-85°F). Let the dough rise for 5-6 hours until puffy and doubled in size, passing the poke test where an indent slowly fills back in.
- Shape the Dough: Lightly flour your counter and turn the dough out seam-side down. Perform fold and tuck motions from all sides to center, pinch to seal, then flip the dough seam-side down and use cupped hands to rotate and tighten into a smooth, taut ball but still soft.
- Second Rise: Dust a bread basket generously with flour, place the dough seam-side up inside, dust again lightly, and cover with plastic wrap. Return the basket to the oven with the light on for 2-3 hours until doubled and airy, maintaining the poke test.
- Preheat Oven & Prepare Dough: Remove dough from oven and preheat your oven to 450°F. Place a sheet of parchment paper on the counter and gently turn dough onto it, seam side down. Score the top lengthwise about ½-inch deep with a sharp knife or lame.
- Bake Covered: Using the parchment, lift dough into a Dutch oven (no preheating Dutch oven needed). Cover and reduce oven temperature to 425°F. Bake covered for 40 minutes.
- Bake Uncovered: Remove the Dutch oven lid carefully and bake for an additional 5-10 minutes until the crust is dark golden and sounds hollow when tapped.
- Cool: Use parchment corners to remove bread to a cooling rack. Allow to cool completely for at least 2 hours until internal temperature reaches 190-205°F. The crust will be crisp and the crumb fully set, ready to slice and enjoy.
Notes
- Use an active, bubbly starter for best results; if it does not float in water, it likely isn’t ready.
- If you don’t have a proofing basket, a large bowl lined with a floured kitchen towel works well.
- The dough will be sticky during mixing, which is normal and helps form artisan texture.
- For colder kitchens, fermentation times may be longer; using the oven light keeps the dough warm.
- Score the dough confidently to ensure even rising; a simple straight cut is great for beginners.
- Bread flour is preferred but all-purpose flour can be substituted with minor differences.
- Store bread at room temperature in a paper bag for up to 3 days, or slice and freeze in an airtight container for up to 3 months.
Nutrition
- Serving Size: 1 slice (about 80g)
- Calories: 180
- Sugar: 0.3g
- Sodium: 370mg
- Fat: 1g
- Saturated Fat: 0.2g
- Unsaturated Fat: 0.6g
- Trans Fat: 0g
- Carbohydrates: 38g
- Fiber: 2g
- Protein: 6g
- Cholesterol: 0mg


