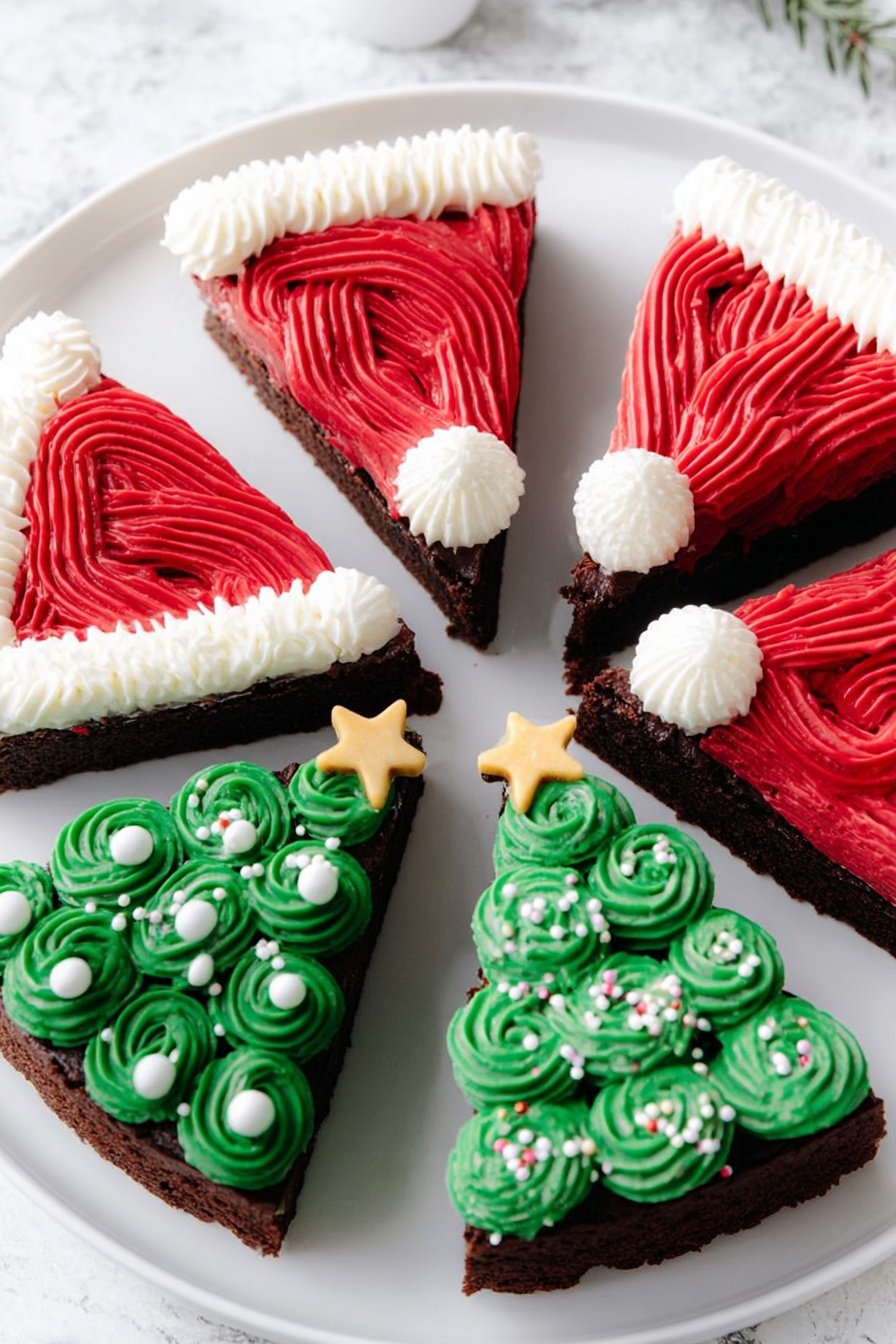
If you’re searching for the perfect holiday treat that’s as fun to make as it is to eat, you’re in for a real treat with my Festive Frosted Christmas Brownies Recipe. I absolutely love how thick, fudgy, and colorful these brownies turn out, covered with cheerful red and green frosting and topped with shimmer from edible gold stars and white pearls. Whether you’re hosting a party or looking for a cozy bake to share with the family, this recipe will bring that extra sparkle to your Christmas dessert spread.
Why You’ll Love This Recipe
- Delightfully Festive: The colorful frosting and shiny decorations bring Christmas cheer right to your dessert plate.
- Thick, Fudgy Brownies: Using a double batch makes these brownies extra decadent and satisfyingly rich.
- Easy to Personalize: You can tweak colors, decorations, or even the frosting thickness to match your style.
- Fun for All Skill Levels: Whether you’re a baking newbie or a seasoned pro, this recipe is straightforward and rewarding.

Ingredients You’ll Need
When I make these Festive Frosted Christmas Brownies, I keep the ingredients simple but impactful — classic brownie base meets smooth, brightly colored frosting. Using quality store-bought brownie mixes saves time, but you can also go homemade if you prefer. And don’t skimp on the sprinkles — they really make the presentation pop!
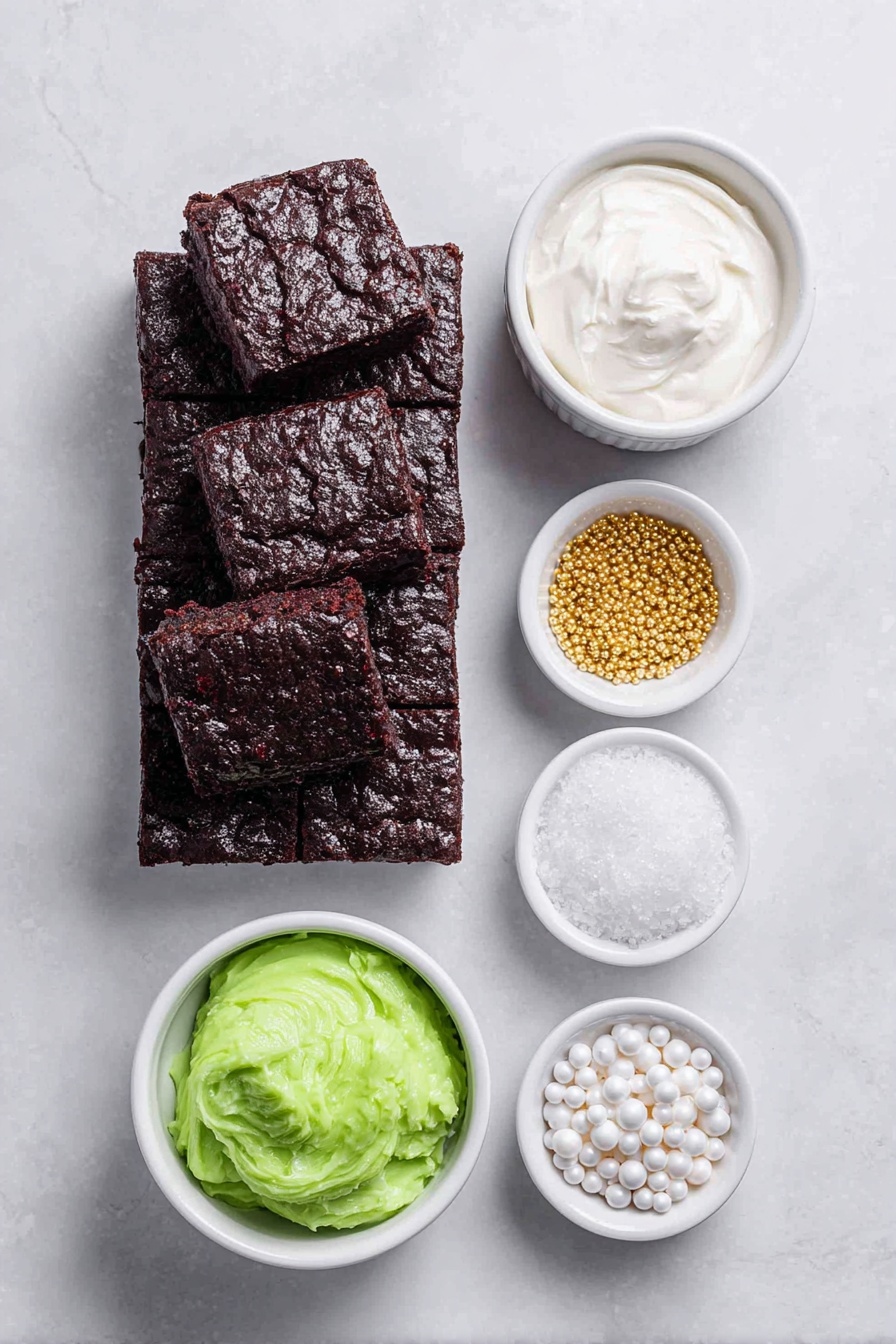
- Brownie Mix: I usually double up the brownie mix for ultra-thick brownies that hold up well under the frosting.
- White Frosting: Choose a creamy frosting that’s easy to color and pipe; homemade or store-bought both work fine.
- Edible Gel Food Coloring: Gel colors blend smoothly into frosting without making it watery—plus, they’re easy to control!
- Edible Gold Stars: Adds a whimsical, shiny detail that screams holiday celebration.
- White Pearl Sprinkles: These give a snowy, elegant touch that pairs beautifully with the green frosting.
- Icing Bags and Frosting Tips: The star tips create those pretty frosting swirls; my go-to size is large star 1M.
Variations
I love how versatile the Festive Frosted Christmas Brownies Recipe is! Over the years, I’ve played with different colors and decoration combos, and it’s always a hit. Feel free to make these your own — I encourage you to get creative with frosting designs and toppings to match your holiday style.
- Single Batch Version: I sometimes use just one box of brownie mix for thinner brownies; they bake quicker and are still delicious, just less thick.
- Natural Food Coloring: If you want to avoid artificial dyes, I’ve tried beet juice or spinach powder for red and green colors—it gives a subtle, pretty hue but less vibrant.
- Nutty Twist: Adding chopped pecans or walnuts to the brownie mix creates a lovely crunch that balances the creamy frosting.
- Chocolate Frosting Swap: For chocolate lovers, try a chocolate buttercream instead of white frosting for a rich flavor contrast.
How to Make Festive Frosted Christmas Brownies Recipe
Step 1: Prepare Your Pan and Mix the Brownies
First, preheat your oven according to the brownie mix instructions—this is crucial for even baking. I spray a 9-inch springform pan with oil to ensure easy removal later. Then, mix together two boxes of brownie mix (or a double batch if homemade) and pour the batter evenly into your prepared pan. Since this is a double batch, the brownies will be nice and thick, just what we want for frosting them like little Christmas trees!
Step 2: Bake and Cool
Bake the brownies a little longer than the box suggests because of the thickness—mine usually take about 5-10 extra minutes. You’ll know they’re done when a toothpick inserted comes out clean or with just a few moist crumbs. After baking, let the brownies cool completely in the pan—this step prevents the frosting from melting into the warm brownies, which can be a messy disaster!
Step 3: Cut and Color Your Frosting
Remove the cooled brownie slab from the springform pan and place it on a cutting board. Cut it into eight triangular pieces—think of them as little Christmas tree slices. Next, divide your white frosting into three small bowls. Mix red food coloring in one bowl, green in another, and leave the third plain white—these are your festive colors! I like using gel food coloring for vivid shades without making the frosting runny.
Step 4: Pipe Your Decorations
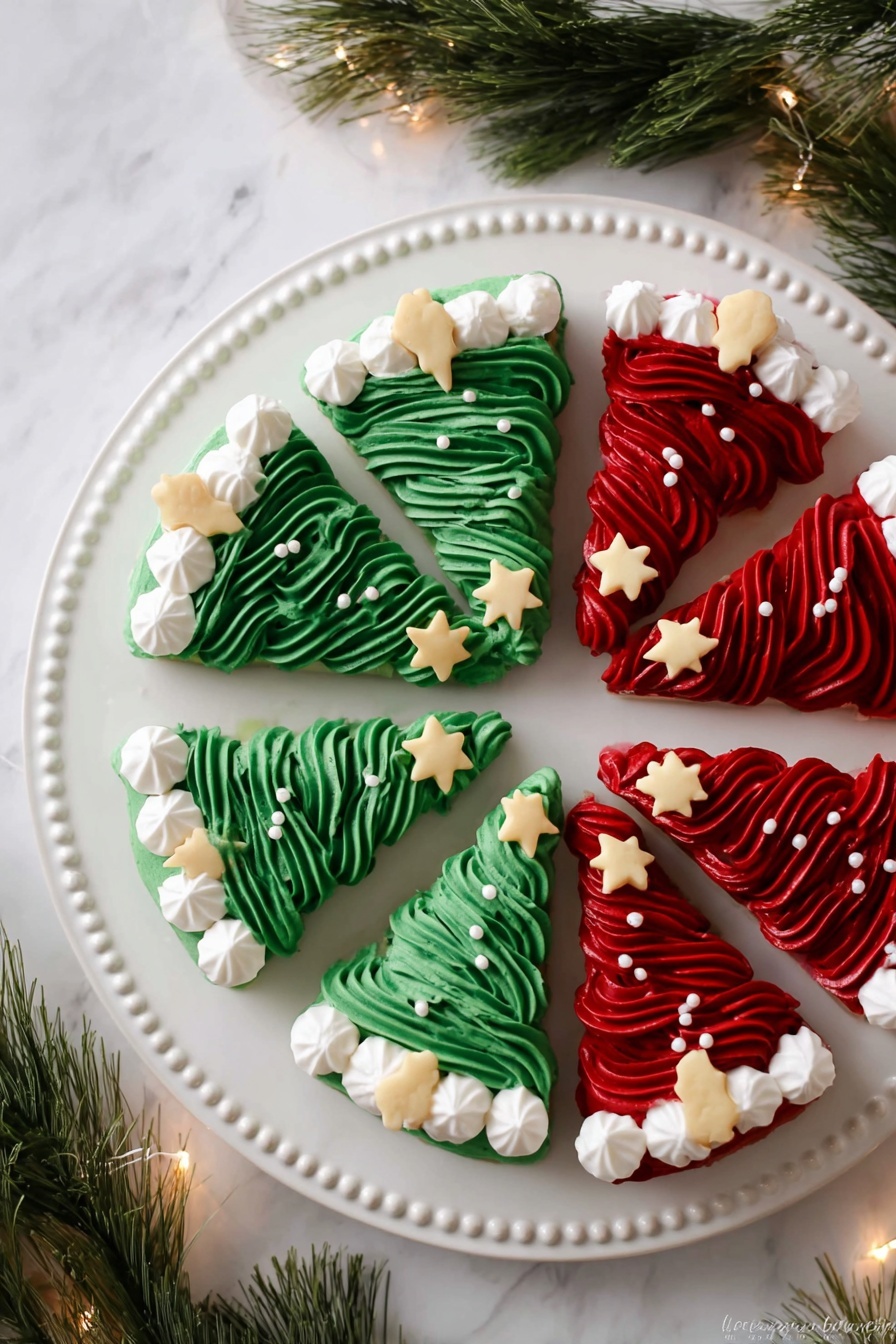
Put each colored frosting into individual icing bags fitted with a large star tip (1M is my favorite). Now, pipe green frosting onto the brownie triangles to mimic Christmas trees, adding white pearl sprinkles like snowy decorations and edible gold stars to top them off like starry treetops. For the other brownies, use combinations of green and white frosting to create adorable Santa hats or holiday themes. The piping takes a bit of practice but trust me, it’s totally worth the festive wow factor!
Step 5: Serve and Enjoy!
Once decorated, serve these delightful Festive Frosted Christmas Brownies to your lucky friends and family. You’ll get plenty of smiles and “oh wow, you made these?” moments guaranteed. They’re perfect for parties, school events, or cozy nights by the fire.
Pro Tips for Making Festive Frosted Christmas Brownies Recipe
- Use a Springform Pan: It’s a game changer for thick brownies—you can remove the sides without messing up the edges.
- Don’t Frost Warm Brownies: Patience here prevents frosting from melting and keeps your decoration crisp and clean.
- Gel Colors for Vibrancy: They offer rich, true red and green hues without watering down the frosting texture.
- Practice Your Piping: If you’re new to icing bags, practice a few swirls on parchment paper before decorating your brownies.
How to Serve Festive Frosted Christmas Brownies Recipe
Garnishes
I usually stick with edible gold stars and white pearl sprinkles because they add that magical holiday sparkle and really elevate the look with minimal effort. Sometimes, I add tiny candy canes or crushed peppermint pieces for a fresh minty twist that feels super festive.
Side Dishes
These brownies pair wonderfully with a scoop of vanilla ice cream or a warm mug of cinnamon spiced hot chocolate—makes for a cozy holiday combo that my family gobbles up fast.
Creative Ways to Present
For Christmas parties, I like arranging the brownies in a circle on a festive platter with some fresh holly or pine sprigs around the edge. Another fun idea is to gift them in little holiday boxes or cellophane bags tied with bright ribbons—everyone loves a homemade treat package!
Make Ahead and Storage
Storing Leftovers
Once frosted, keep the brownies in an airtight container at room temperature for up to 3 days. I find this keeps the frosting nice without getting too sticky or drying out the brownies. If it’s warmer in your kitchen, popping them in the fridge is fine, but let them come to room temp before serving for best flavor.
Freezing
I’ve frozen unfrosted brownies baked from this recipe successfully by wrapping them tightly in plastic wrap and placing them in freezer bags. When ready to use, thaw completely, then frost and decorate as usual. Freezing after frosting isn’t ideal because the decorations can lose their charm.
Reheating
If you want warm brownies, I recommend reheating unfrosted pieces in the microwave for 15-20 seconds, then adding frosting fresh afterward. Warming frosted brownies can cause your decorations to melt or run.
FAQs
-
Can I make homemade brownies instead of using boxed mix?
Absolutely! The Festive Frosted Christmas Brownies Recipe works wonderfully with your favorite homemade brownie recipe. Just be sure to bake them in a 9-inch springform pan and adjust cooking times if your batter is thicker or thinner.
-
How do I prevent the frosting colors from mixing or bleeding?
Use gel food coloring to keep the frosting thick and not runny, and allow your brownies to fully cool before frosting. Pipe and decorate carefully, and let the frosting set at room temperature to avoid smudging.
-
Can these brownies be made gluten-free?
Yes! Use a gluten-free brownie mix or homemade gluten-free brownie recipe. Just double-check that your frosting and decorations are gluten-free as well.
-
What can I substitute for edible gold stars if I don’t have them?
Silver dragees, mini candy pearls, or even small festive sprinkles work beautifully as alternatives and give your brownies that special holiday feel.
Final Thoughts
When I first tried this Festive Frosted Christmas Brownies Recipe, I was hooked by how easy it was to transform humble brownies into a holiday showstopper with just a few frosting colors and sprinkles. It’s one of those recipes that feels joyful and special but never complicated. I really hope you give it a try this Christmas — your friends and family will love the festive vibes, and you’ll get to enjoy that sweet, homemade feeling that only holiday baking brings. Trust me, once you make these, they’ll become a yearly tradition in your kitchen, just like they did in mine!
Print
Festive Frosted Christmas Brownies Recipe
- Prep Time: 15 minutes
- Cook Time: 35-45 minutes (may vary if double batch)
- Total Time: 50-60 minutes
- Yield: 8 large triangle brownies
- Category: Dessert
- Method: Baking
- Cuisine: American
Description
Celebrate the holiday season with these festive Frosted Christmas Brownies. Made with rich, fudgy brownies and decorated with colorful red and green frosting, edible gold stars, and white pearl sprinkles, these brownies are perfect for Christmas parties or gifting. The brownie base is thick and moist, while the whimsical frosting adds a bright, joyful touch to your dessert table.
Ingredients
Brownies
- 2 boxes of brownie mix (or a double batch of homemade brownies)
- Spray oil for greasing pan
Frosting & Decoration
- White frosting, 1 to 3 jars (amount depends on desired thickness)
- Edible gel food coloring (red and green) or alternative no artificial dye food coloring
- Edible gold stars
- White pearl sprinkles
- Icing bags
- Frosting tips (large star – 1M)
Instructions
- Preheat and Prepare Pan: Preheat your oven according to the brownie box instructions. Lightly spray a 9-inch springform pan with spray oil to prevent sticking.
- Mix and Bake Brownies: Combine both boxes of brownie mix thoroughly (or prepare a double batch of homemade brownies) and pour the batter into the prepared springform pan. Bake according to the package instructions or until a toothpick inserted comes out clean. Note that baking time may be longer for a double batch.
- Cool and Cut Brownies: Once baked, allow the brownies to cool completely in the pan. Remove from the springform pan and place on a cutting board. Cut the brownies into 8 triangle-shaped pieces for a festive tree look.
- Prepare Frosting Colors: In two separate small bowls, mix white frosting with red food coloring in one and green food coloring in the other. Adjust the amount of food coloring to achieve your preferred shade.
- Fill Icing Bags: Transfer the red frosting, green frosting, and remaining plain white frosting into individual icing bags fitted with large star 1M frosting tips for easy decorating.
- Decorate Brownies: Use the green frosting to pipe Christmas tree shapes on some brownies, then adorn them with white pearl sprinkles and edible gold stars to mimic ornaments. For Santa Claus hat brownies, use both green and white frosting to create festive designs.
- Serve and Enjoy: Arrange your decorated brownies on a platter and enjoy this festive treat with family and friends.
Notes
- You can use just one box or single batch for thinner brownies if you prefer.
- Double batches may require longer baking times than the package states.
- Adjust frosting amount based on how thick you want the decorative layer and desired color intensity.
Nutrition
- Serving Size: 1 brownie (approximate)
- Calories: 350
- Sugar: 30g
- Sodium: 250mg
- Fat: 18g
- Saturated Fat: 6g
- Unsaturated Fat: 11g
- Trans Fat: 0g
- Carbohydrates: 45g
- Fiber: 2g
- Protein: 3g
- Cholesterol: 25mg


