If you’re anything like me, you love bread that’s easy, aromatic, and pulls apart perfectly to share. That’s exactly why I’m excited to share this Garlic Herb Pull-Apart Rolls Recipe with you—it’s the ultimate shortcut to soft, buttery rolls bursting with garlic and herbs, all ready in under 30 minutes! Trust me, once you try this, it will become your go-to for family dinners, potlucks, or just cozy nights at home.
Why You’ll Love This Recipe
- Quick and Easy: You’ll have fresh, mouthwatering pull-apart rolls in less than 30 minutes, perfect for busy nights.
- Flavor-Packed: The blend of garlic and herbs coats every bite for an irresistible savory hit.
- Perfect for Sharing: These rolls come apart effortlessly, making them ideal for family meals or gatherings.
- No Fancy Ingredients: Using store-bought biscuit dough means you can whip this up anytime with minimal prep.

Ingredients You’ll Need
The magic behind this Garlic Herb Pull-Apart Rolls Recipe lies in its simplicity. Using refrigerated biscuit dough saves so much time, while the garlic and herbs elevate the flavor with ease. Fresh herbs would be lovely, but dried Italian seasoning and basil work like a charm — easy to keep on hand and consistently delicious.
- Refrigerated biscuit dough: The shortcut that keeps these rolls soft and flaky without any yeast or proofing time.
- Unsalted butter: Melted to coat every piece, adding richness and helping the herbs stick perfectly.
- Salt: Just enough to highlight the garlic and herb flavors without overpowering.
- Dried Italian seasoning: A fragrant mix of herbs that bring that classic Italian flair.
- Dried basil: Adds a sweet, slightly peppery essence that works so well with garlic.
- Garlic powder: Keeps the garlic flavor mellow but present, ensuring no bite is bland.
Variations
One of my favorite things about this Garlic Herb Pull-Apart Rolls Recipe is how easy it is to customize. Sometimes I add a little shredded mozzarella or parmesan right on top before baking for an ooey-gooey finish. Don’t hesitate to play around and make it your own!
- Cheesy Pull-Apart Rolls: Adding mozzarella on top creates a golden, melty crust that my family goes crazy for.
- Spicy Kick: Sprinkle a pinch of crushed red pepper flakes into the butter mixture for a subtle heat that’s perfect with soups.
- Fresh Herb Swap: If you have fresh herbs like rosemary or thyme, chop and toss them in for a vibrant twist.
- Vegan Version: Use a plant-based butter to make these dairy-free without losing any flavor.
How to Make Garlic Herb Pull-Apart Rolls Recipe
Step 1: Prep and Cut the Biscuit Dough
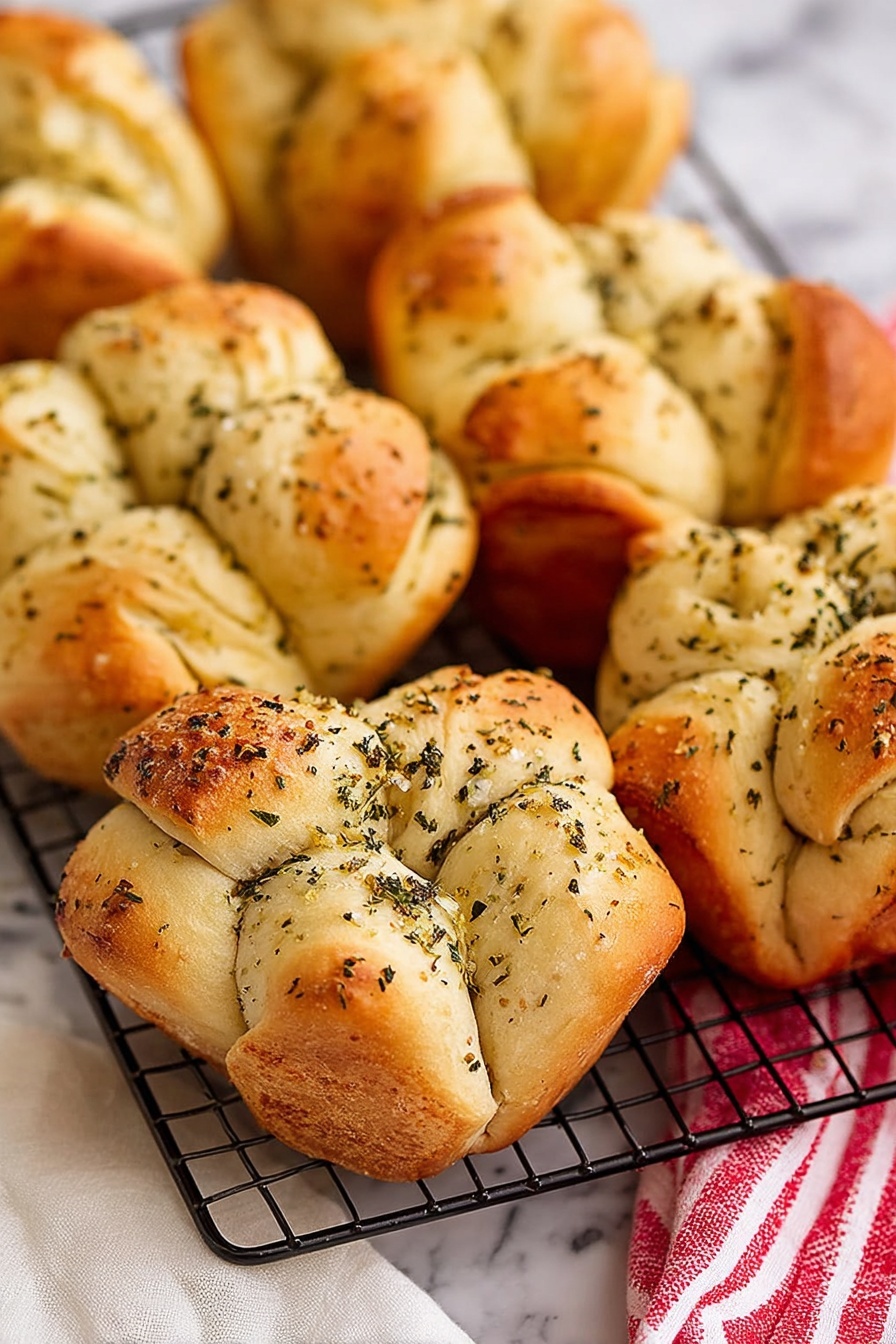
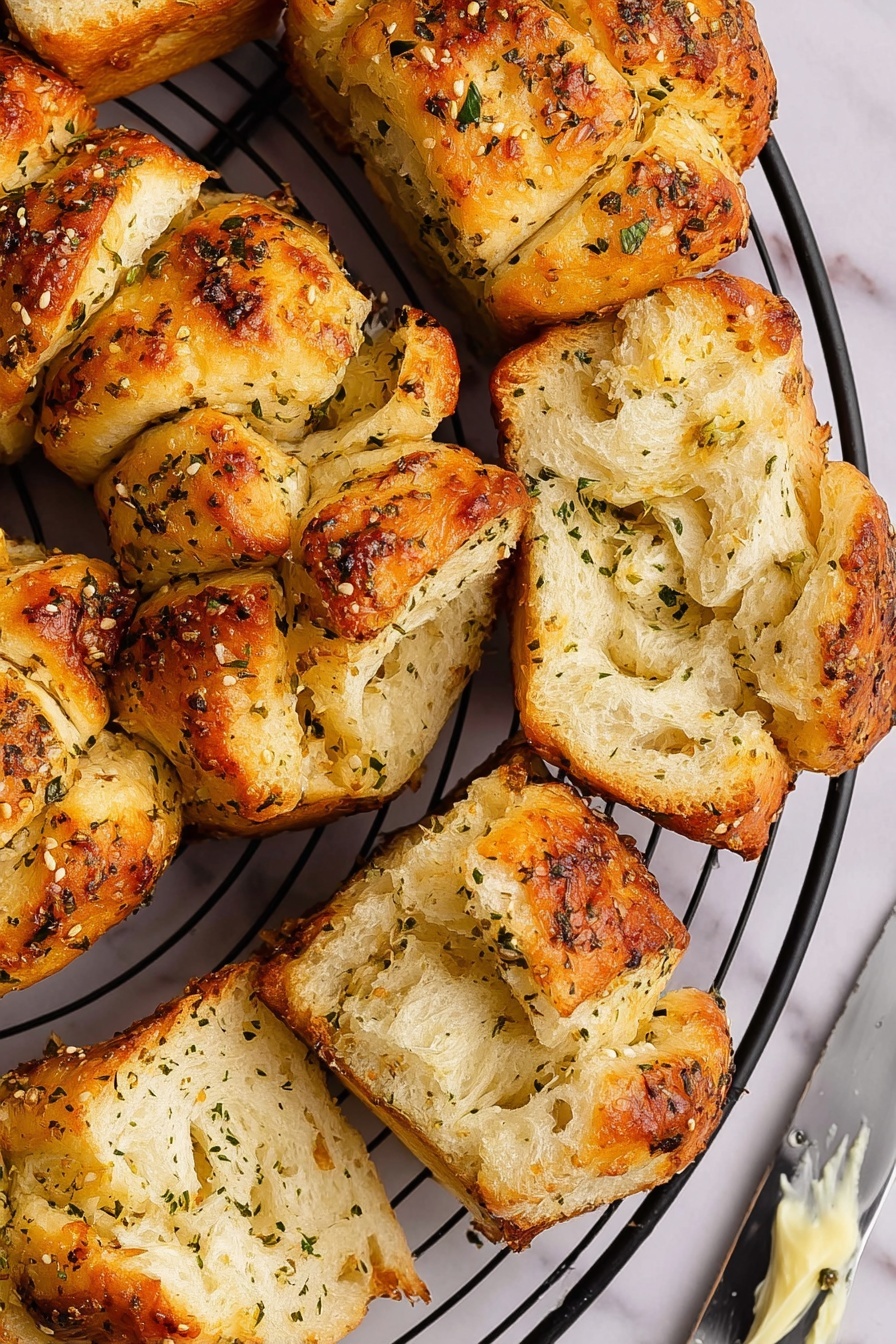
Start by preheating your oven to 350°F. Then, open your refrigerated biscuit dough and gently separate each biscuit from the can. I like to cut each biscuit into quarters so the pulls are nicely bite-sized and perfect for sharing. Toss those pieces into a large mixing bowl — it’s okay if they’re a bit sticky; that just means they’ll soak up all that buttery goodness later.
Step 2: Mix the Garlic Herb Butter
In a smaller bowl, whisk together the melted unsalted butter, salt, dried Italian seasoning, dried basil, and garlic powder until well combined. This seasoning mix is your flavor bomb, and it’s going to coat every piece of dough so each bite sings. Once mixed, pour this over your biscuit pieces and gently toss until everything is evenly coated.
Step 3: Fill the Muffin Tin and Bake
Divide the coated biscuit pieces evenly into six wells of a muffin tin. This method helps the rolls bake up soft on the inside with just enough crispy edges on top for texture. Pop the tin into your preheated oven and bake for 16 to 18 minutes, or until you see the tops turn a gorgeous golden brown. Once out, let them rest for about 5 minutes—this step helps the rolls settle and makes them easier to pull apart without falling apart completely.
Pro Tips for Making Garlic Herb Pull-Apart Rolls Recipe
- Cutting Rolls Uniformly: Make sure your biscuit quarters are roughly the same size so they cook evenly and pull apart nicely.
- Toss Gently but Thoroughly: You want every piece coated in the garlic herb butter, but too much tossing can make the dough sticky and hard to handle.
- Use a Non-Stick Muffin Tin or Grease Well: This prevents the rolls from sticking and ensures easy removal without losing their beautiful shape.
- Don’t Skip the Resting Time: Letting the rolls cool a bit before removing helps keep them fluffy and intact.
How to Serve Garlic Herb Pull-Apart Rolls Recipe
Garnishes
I love topping these rolls with a sprinkle of fresh chopped parsley or a little grated Parmesan right before serving. Not only does it brighten up the presentation, but it adds a fresh pop of flavor that complements the garlic and herbs beautifully.
Side Dishes
These pull-apart rolls are a natural partner to soups like tomato basil or creamy potato leek, and they’re perfect alongside roasted chicken or a hearty pasta bake. For a casual dinner, throw together a salad with vinaigrette, and you’ve got yourself a meal everyone will love.
Creative Ways to Present
For special occasions, I like arranging the rolls in a festive bundt pan or a cast-iron skillet, then topping with extra herbs and a drizzle of garlic butter after baking. It makes them look irresistible on the table and invites everyone to dig in together.
Make Ahead and Storage
Storing Leftovers
If you have leftovers (though honestly, that rarely happens), store the rolls in an airtight container at room temperature for up to two days. I’ve found that keeping them sealed tight maintains that soft texture without drying out.
Freezing
I’ve successfully frozen these rolls after baking. Just cool them completely, then place in a freezer-safe bag or container. When you want to enjoy them again, thaw at room temperature or gently reheat from frozen.
Reheating
To reheat, pop the rolls in a 350°F oven for about 5-7 minutes or microwave them for 20-30 seconds wrapped in a damp paper towel to keep them moist. This way, they revive their fresh-baked softness and flavor.
FAQs
-
Can I use fresh garlic instead of garlic powder?
Absolutely! Mince one or two cloves of fresh garlic and mix them into the melted butter. Fresh garlic will give a punchier, more vibrant flavor, so I recommend reducing the amount slightly to avoid overpowering the rolls.
-
What if I don’t have a muffin tin?
If you don’t have a muffin tin, you can use a small baking dish or skillet—just keep the pieces close together so they can stick and pull apart nicely. Adjust baking time if needed, keeping an eye on that golden color.
-
Can I make this gluten-free?
Yes! Choose a gluten-free biscuit dough available at many grocery stores, or make your own gluten-free biscuit dough. The rest of the recipe remains the same and you’ll still get delicious pull-apart rolls.
-
How do I keep the rolls soft after baking?
Cover the warm rolls loosely with foil or store them in an airtight container as soon as they cool enough to handle. This traps moisture inside to keep them from drying out and becoming tough.
Final Thoughts
I absolutely love how this Garlic Herb Pull-Apart Rolls Recipe comes together with so little fuss but delivers so much flavor and comfort. If you’re after a quick bread recipe that’s impressive yet uncomplicated, I truly recommend giving this a try. It’s a perfect way to bring warm, garlicky goodness to your table that everyone will want to grab (and share!). So go on, pull apart a piece, and enjoy the buttery, herby joy!
Print
Garlic Herb Pull-Apart Rolls Recipe
- Prep Time: 10 minutes
- Cook Time: 18 minutes
- Total Time: 28 minutes
- Yield: 6 rolls
- Category: Bread
- Method: Baking
- Cuisine: American
- Diet: Vegetarian
Description
These Shortcut Garlic Herb Pull-Apart Rolls are a quick and delicious bread option made from flaky refrigerated biscuit dough tossed in a flavorful garlic herb butter mixture and baked to golden perfection. Perfect for a side dish or party appetizer, they offer soft, layered rolls infused with aromatic Italian seasoning and garlic.
Ingredients
Pull-Apart Rolls
- 1 (16.3-ounce) can flaky layers refrigerated biscuit dough
Garlic Herb Butter Mixture
- 1/4 cup unsalted butter (melted)
- 1/2 teaspoon salt
- 1 teaspoon dried Italian seasoning
- 1 teaspoon dried basil
- 1 teaspoon garlic powder
Instructions
- Preheat the Oven: Set your oven to 350°F (175°C) to prepare for baking the rolls evenly.
- Prepare the Dough: Open the biscuit dough can and separate each biscuit. Cut each biscuit into quarters, then place all the pieces into a large mixing bowl.
- Make the Garlic Herb Butter: In a small bowl, combine the melted butter, salt, Italian seasoning, dried basil, and garlic powder. Mix well to create a fragrant herb butter sauce.
- Coat the Dough Pieces: Pour the garlic herb butter mixture over the bowl of biscuit pieces. Toss gently but thoroughly to ensure each piece is evenly coated in the flavorful butter.
- Arrange in Muffin Tin: Divide the coated biscuit pieces equally among 6 wells of a muffin tin, filling each well to create pull-apart sections.
- Bake the Rolls: Place the muffin tin in the preheated oven and bake for 16 to 18 minutes, or until the rolls are golden brown and cooked through.
- Cool and Serve: Remove the muffin tin from the oven and allow the rolls to cool for about 5 minutes. Carefully remove the rolls from the pan and serve warm for the best flavor and texture.
Notes
- Use a non-stick muffin tin or lightly grease the wells to prevent sticking.
- For extra cheesy rolls, sprinkle shredded mozzarella or Parmesan over the dough pieces before baking.
- Serve with marinara or ranch dipping sauce for added flavor.
- Can be stored in an airtight container at room temperature for up to 2 days and reheated before serving.
Nutrition
- Serving Size: 1 roll
- Calories: 241 kcal
- Sugar: 5 g
- Sodium: 665 mg
- Fat: 14 g
- Saturated Fat: 7 g
- Unsaturated Fat: 2.3 g
- Trans Fat: 0.3 g
- Carbohydrates: 27 g
- Fiber: 0.3 g
- Protein: 4 g
- Cholesterol: 20 mg


