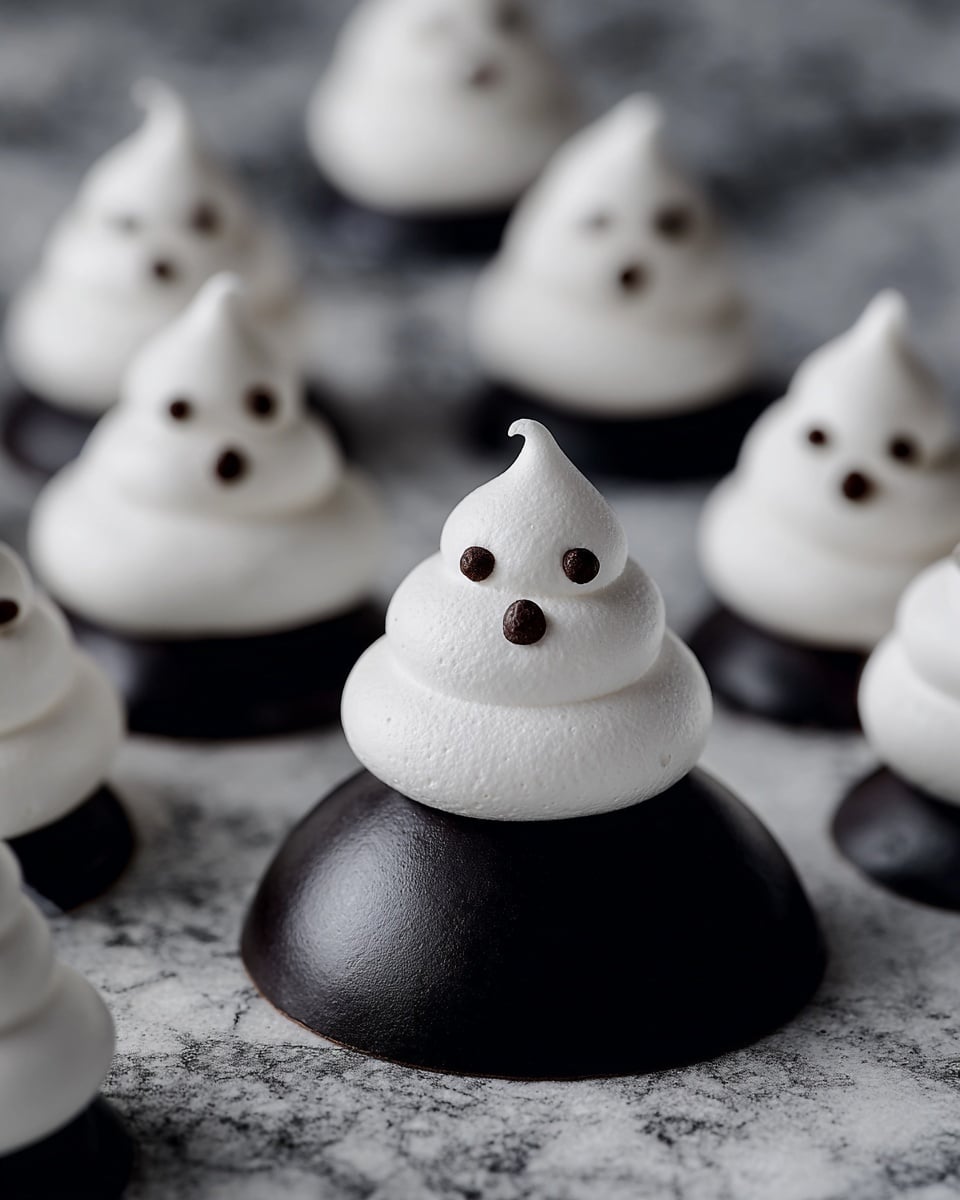
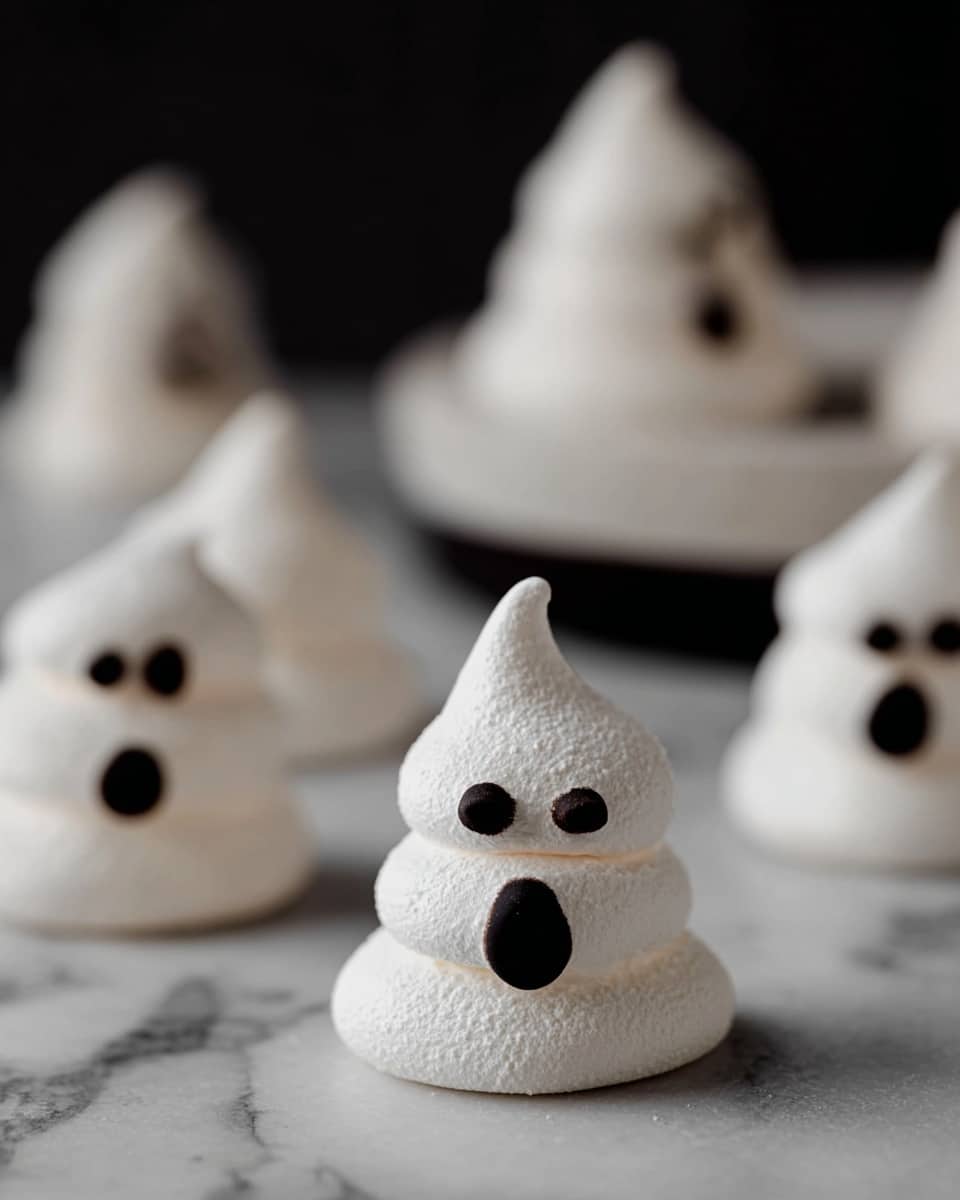
If you’re looking for a fun, spooky treat to impress your friends or just satisfy your sweet tooth, these Ghost Meringues Recipe are pure magic. Crisp on the outside with that irresistibly soft center, they’re as charming to look at as they are delicious to eat. Trust me, once you try making these playful little ghosts, you’ll find it hard to stop piping!
Why You’ll Love This Recipe
- Simple Ingredients: You only need a handful of everyday pantry staples to whip this up.
- Fun for Everyone: Kids and adults alike go crazy for the spooky shapes and chocolate faces.
- Make-Ahead Friendly: They store beautifully, so you can prepare them days in advance.
- Perfect Texture: Delightfully crunchy outside with a pillow-soft interior every time.

Ingredients You’ll Need
To make these ghostly meringues perfect, the ingredients are straightforward but important to get right. Fresh eggs and cream of tartar work together to create that ideal fluffy base, and a touch of vanilla bean paste gives it a lovely subtle flavor.
- Egg whites: Room temperature is key to whipping them up fluffy and quick.
- Cream of tartar: This little acid stabilizes the whites and helps keep everything nice and stiff.
- Granulated sugar: Adding it gradually lets the meringue develop a glossy, velvety texture.
- Vanilla bean paste: Adds a richer aroma than plain extract—totally worth it.
- Dark chocolate: Melted for painting on those spooky faces that bring the ghosts to life.
Variations
I love playing around with this Ghost Meringues Recipe depending on the occasion and mood. Don’t be afraid to tailor it—your kitchen, your rules!
- Flavored meringues: Sometimes I swap vanilla bean paste for a hint of peppermint or almond extract for a festive twist.
- Colored meringues: Adding a few drops of food coloring makes your ghosts even more playful, especially for themed parties.
- Vegan-friendly: Use aquafaba instead of egg whites, but note the texture will be slightly different.
- Nutty crunch: Sprinkle finely chopped toasted nuts on top before baking for added texture and flavor.
How to Make Ghost Meringues Recipe
Step 1: Prep Your Workspace and Oven
First thing’s first—preheat your oven to a low 200°F (93°C). Line your baking sheet with parchment paper or a silicone liner; this prevents your meringues from sticking and makes cleanup a breeze. While the oven warms, get your ingredients ready and make sure your egg whites are at room temperature—you’ll get the best volume this way.
Step 2: Whisk to Frothy Perfection
Pop your egg whites and cream of tartar into the bowl of your stand mixer with the whisk attachment. Start whisking on medium speed until the whites become frothy—this usually takes about 1-2 minutes. This step wakes up the proteins, setting the stage for that beautiful fluffy meringue.
Step 3: Sweeten and Whip Up Stiff Peaks
Gradually add the sugar one tablespoon at a time while mixing on medium-high. This patient process is key to dissolving the sugar fully and achieving a glossy, stable meringue. About 5-6 minutes in, your mixture should hold soft peaks when you pull the whisk out. Now, add the vanilla bean paste and keep beating until the meringue stands in stiff, shiny peaks that hold their shape perfectly.
Step 4: Pipe the Ghosts
Fit a piping bag with a large round tip and fill it with your meringue. Holding the bag perpendicular to your baking sheet, gently pipe out mounds about 2 inches high. Space them at least an inch apart since they don’t spread much. You’ll get charming little ghost shapes that don’t just look cute—they bake beautifully uniform.
Step 5: Bake Low and Slow
Bake the ghosts in your preheated oven for one hour, then turn off the heat but leave them inside to dry out for another 1-2 hours. This low, slow drying process is essential—it ensures a crisp exterior while keeping the inside wonderfully soft without any browning. Patience here really pays off!
Step 6: Paint on Those Spooky Faces
Once your meringues cool completely, melt your dark chocolate and grab a small food-safe paintbrush. I love this part because you can get creative—paint on wide eyes, crooked grins, or silly expressions. It’s the final touch that brings your ghosts to life and makes the recipe irresistibly festive.
Pro Tips for Making Ghost Meringues Recipe
- Egg Temperature: Make sure your egg whites are at room temp to whip up faster and fluffier—cold whites just won’t peak as well.
- Sugar Patience: Add the sugar slowly—rushing this can cause grainy meringue instead of smooth, glossy peaks.
- Drying Time: Don’t skip the time with the oven off; that extra drying ensures your ghosts dry out perfectly without cracking or browning.
- Piping Practice: Practice piping on parchment scraps before the final batch—you’ll shape those ghosts just right every time.
How to Serve Ghost Meringues Recipe
Garnishes
I love finishing off these ghost meringues with just a sprinkle of edible glitter for a magical shimmer, especially during Halloween parties. Sometimes I add tiny edible eyes or use colored cocoa butter to add pops of color—such easy ways to take your presentation to the next level.
Side Dishes
These meringues pair beautifully with a rich, creamy hot chocolate or a scoop of vanilla bean ice cream. I’ve also served them alongside berry compote to balance the sweetness with a touch of tartness—always a hit in my house.
Creative Ways to Present
For a Halloween party, I like to set these ghost meringues perched atop mini cupcakes to create “ghost cupcakes.” You can also stack them slightly atop each other on a spooky dessert platter with black lace doilies for an eerie vibe that guests remember.
Make Ahead and Storage
Storing Leftovers
Leftover ghost meringues store best in an airtight container at room temperature. I learned the hard way that moisture is the enemy, so keep them away from humid spots to preserve their crisp exterior and soft center for up to a week.
Freezing
Freezing meringues may sound odd, but it works! I wrap mine individually in parchment paper, then place them in a freezer-safe bag. When thawed at room temperature, they retain their texture remarkably well. Just avoid condensation by thawing out of direct fridge coldness.
Reheating
I usually don’t reheat meringues because they’re perfect as is, but if you want to warm them slightly, pop them in a very low oven (about 175°F) for 5 minutes. This refreshes the crispness without melting that delicate melt-in-your-mouth inside.
FAQs
-
Can I use regular vanilla extract instead of vanilla bean paste in the Ghost Meringues Recipe?
Absolutely! While vanilla bean paste adds tiny flecks and a richer flavor, regular vanilla extract works just fine and won’t affect the texture of your meringues. Use the same amount to keep the flavor balanced.
-
Why do my meringues sometimes collapse or weep liquid?
This usually means the sugar wasn’t fully dissolved or the meringue wasn’t beaten stiff enough. Be patient adding sugar slowly and make sure to beat the egg whites to stiff glossy peaks. Also, ensure your oven’s temperature is accurate—too hot can dry out and crack them!
-
Can I make ghost meringues without a stand mixer?
You can! Use a hand mixer with a whisk attachment and be ready for a slightly longer whipping time. Just make sure your bowl is clean and dry, and your egg whites are free of yolk to help achieve the best volume.
-
How long do ghost meringues keep?
Stored in an airtight container at room temperature, these meringues stay fresh and crisp for up to one week. Just keep them away from moisture, which is the biggest enemy of meringues.
Final Thoughts
I absolutely love how these ghost meringues turn out every time—there’s something so satisfying about their texture and the sheer fun of decorating spooky faces on them. When I first tried this recipe, it became an instant favorite for Halloween and beyond because it’s approachable yet endlessly charming. I hope you give this recipe a shot—you’ll be delighting yourself and your guests with every crisp, melt-in-your-mouth bite. Happy piping, and may your kitchen be filled with sweet, spooky joy!
Print
Ghost Meringues Recipe
- Prep Time: 15 minutes
- Cook Time: 1 hour
- Total Time: 3 hours 15 minutes
- Yield: 24 meringues
- Category: Dessert
- Method: Baking
- Cuisine: American
- Diet: Vegetarian
Description
Delightfully spooky ghost-shaped meringues that are crunchy on the outside and softly pillowy inside, perfect for Halloween parties or festive gatherings. These light and airy treats combine simple ingredients like egg whites and sugar, piped into adorable ghost shapes and decorated with dark chocolate faces.
Ingredients
Ingredients
- 3 large egg whites (room temperature)
- 1/4 teaspoon cream of tartar
- 3/4 cup granulated sugar
- 1/4 teaspoon vanilla bean paste
- 1/2 ounce dark chocolate (melted)
Instructions
- Preheat Oven and Prepare Baking Sheet: Preheat your oven to 200°F (93°C) and line a baking sheet with parchment paper or a silicone liner to prevent sticking and ensure even baking.
- Whisk Egg Whites and Cream of Tartar: In the bowl of a stand mixer fitted with the whisk attachment, add the egg whites and cream of tartar. Whisk on medium speed until the mixture becomes frothy, which helps stabilize the meringue.
- Add Sugar Gradually: Gradually add the granulated sugar, about 1 tablespoon at a time, while increasing the mixer speed to medium-high. Beat the egg whites until soft peaks form, approximately 5-6 minutes, then mix in the vanilla bean paste.
- Beat to Stiff Peaks: Continue beating until the meringue holds stiff peaks, indicating it’s firm enough to pipe and hold shape.
- Pipe Ghost Shapes: Transfer the meringue into a piping bag fitted with a large round tip. Hold the bag perpendicular to the baking sheet and pipe mounds about 2 inches high, spacing them about 1 inch apart since they won’t spread during baking.
- Bake: Bake the meringues at 200°F for 1 hour. Afterward, turn off the oven and let the meringues dry inside for an additional 1-2 hours to ensure they become crisp throughout.
- Cool Completely: Remove the meringues from the oven and allow them to cool completely to room temperature, which helps them set and prevents condensation.
- Decorate with Chocolate Faces: Use melted dark chocolate and a small food-safe paintbrush to paint ghostly faces onto the meringues for a festive touch.
Notes
- These ghost meringues offer a delightful contrast of crunchy exterior and soft, pillowy interior.
- Using cream of tartar stabilizes the egg whites and helps achieve stiff peaks.
- Make sure the egg whites are at room temperature for better volume and texture.
- Allowing the meringues to dry in the turned-off oven helps achieve the perfect crispness without browning.
- Piping with a large round tip creates the classic ghost shape, but feel free to get creative!
Nutrition
- Serving Size: 1 meringue
- Calories: 27 kcal
- Sugar: 6 g
- Sodium: 7 mg
- Fat: 1 g
- Saturated Fat: 0.5 g
- Unsaturated Fat: 0.5 g
- Trans Fat: 0 g
- Carbohydrates: 6 g
- Fiber: 0 g
- Protein: 1 g
- Cholesterol: 0 mg


