
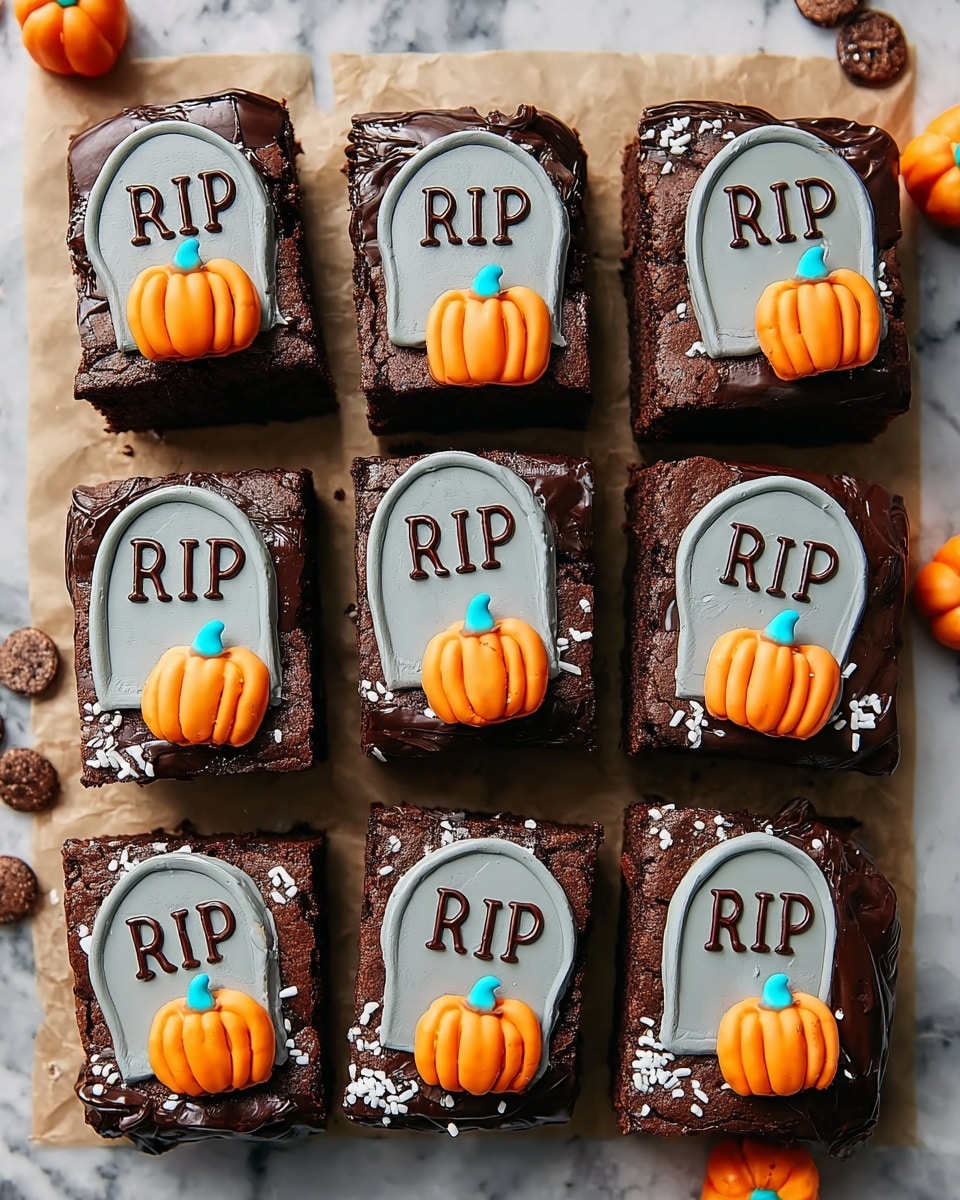
If you’re ever looking for a spooky yet downright delicious treat to wow your friends or family, this Graveyard Brownies Recipe is exactly what you need. I absolutely love how this fun, Halloween-inspired dessert brings out everyone’s inner child — not to mention it tastes incredible. Let me walk you through the whole process so you can make this eerie-yet-yummy creation with zero stress!
Why You’ll Love This Recipe
- Easy Halloween Fun: This recipe takes store-bought brownies and cookies and turns them into a spooky scene that’s a blast to make and eat.
- Perfect for All Skill Levels: Whether you’re a baking newbie or a seasoned pro, you’ll find it straightforward with minimal ingredients.
- Crowd Pleaser: My family goes crazy for the combo of fudgy brownies and crunchy tombstone cookies – it’s always the first dessert to disappear.
- Creative and Customizable: You can easily swap candies or cookie types to suit your taste or theme.

Ingredients You’ll Need
The ingredients for this Graveyard Brownies Recipe are simple, but every piece plays a part in creating that perfect spooky vibe and delicious taste. I love using a quality brownie mix as the base because it guarantees fudgy brownies every time without a lot of fuss. Also, choosing the right cookies to serve as tombstones adds a fun crunch and elegance.
- Brownie mix: Using a boxed mix keeps things easy, and you can customize with extra chocolate chips or nuts if you want.
- Rectangular cookies (such as Milano): These make perfect tombstones since they’re sturdy and have a nice shape for writing.
- Black gel or chocolate icing: For writing “RIP” – I find gel icing is easiest to control for neat lettering.
- Chocolate sandwich cookies (crushed): This creates the “dirt” around the graves, adding texture and richness.
- Candy pumpkins: A cute decorative touch that completes the graveyard scene.
Variations
I’m all about making recipes your own, so feel free to adjust the Graveyard Brownies Recipe to fit what you like or what you have on hand. I’ve tried a few twists myself, and it’s fun to switch things up without losing the spooky vibe.
- Variation: Once, I swapped rectangular cookies for gingerbread cookies shaped like little tombstones. It added a warm spice flavor that was a total hit at a Christmas party!
- Variation: Try adding orange or purple sprinkles mixed with the crushed cookies for “dirt” to make it more festive and colorful.
- Variation: Use white chocolate or caramel drizzle over the brownies for an extra layer of flavor that contrasts beautifully with the dark chocolate base.
- Variation: For a vegan or gluten-free twist, select a brownie mix and cookies that meet those dietary needs — the decorating steps remain the same.
How to Make Graveyard Brownies Recipe
Step 1: Bake and Cool Your Brownies
Start by following the package instructions for your favorite brownie mix—this step is key because good brownies are the foundation here. I always grease the pan well to make sure the brownies come out cleanly. Once baked, let them cool completely before cutting into squares. This cooling period is essential to keep the “graveyard” decorations from sliding off later on.
Step 2: Create Tombstone Cookies
While the brownies cool, grab your rectangular cookies — Milano cookies are my go-to because they have a smooth surface and sturdy texture, perfect for decorating. Using black gel icing, carefully write “RIP” on each cookie. Don’t worry about making it perfect; I love how the slight variations add personality to each tombstone. Let the icing set for a few minutes so it doesn’t smudge when you place them.
Step 3: Assemble Your Graveyard
Once your brownies are fully cooled and cut into squares, gently press a tombstone cookie into the top of each brownie piece — I usually angle them slightly for a more realistic graveyard feel. Then, sprinkle crushed chocolate sandwich cookies around the tombstones to create the “dirt.” This adds a lovely texture contrast and makes everything look extra spooky.
Step 4: Add the Final Decorative Touches
Finish by placing candy pumpkins near your tombstones to complete the graveyard scene. I love how these candies bring a pop of color and seasonal charm. After setting everything up, pop your creation in the fridge for about 30 minutes if you want the toppings to firm up a bit before serving. It helps prevent any sliding when you move them.
Pro Tips for Making Graveyard Brownies Recipe
- Cold Brownies are Key: Don’t try to decorate warm brownies; the cookies will slide and the icing won’t set properly.
- Practice Your Lettering: Test the “RIP” writing on parchment paper first to get a feel for the gel icing’s flow.
- Crush Cookies by Hand: Crushing chocolate sandwich cookies in your hands lets you control the chunk size for the perfect “dirt” look.
- Secure Your Decorations: If your tombstones wobble, a tiny dab of icing underneath each cookie acts like glue to keep them in place.
How to Serve Graveyard Brownies Recipe
Garnishes
I like to keep it simple with extra crushed cookie crumbs lightly sprinkled around the serving platter for a creepy “graveyard soil” effect. Sometimes I toss on a few edible glitter sprinkles or sparkly sugar for a magical nighttime vibe. If you’re feeling ambitious, mini marshmallow ghosts or candy eyeballs also add tons of fun personality!
Side Dishes
Pair these Graveyard Brownies with a scoop of vanilla ice cream or a dollop of whipped cream – the creamy contrast is pure bliss. For a party, set out some spiced cider or hot chocolate to keep things cozy and complement the rich chocolate flavor.
Creative Ways to Present
Once, I laid the brownies out on a baking tray lined with crushed oreos and strategically placed candy bones and plastic spider rings to amp up the spooky factor for a Halloween party. Another time, I arranged them on tiers of a cake stand, adding dry ice underneath for a fog effect – it was a showstopper! These little touches make this recipe perfect for festive gatherings.
Make Ahead and Storage
Storing Leftovers
Store leftovers in an airtight container in the refrigerator to keep the cookies crisp and the brownies moist. I usually separate layers with parchment paper to avoid crushing the decorations. The brownies stay fresh for about 4 days — if they last that long!
Freezing
Freezing these brownies is a bit tricky because of the cookie tombstones and candy decorations — I usually freeze just the plain brownies before assembling. Freeze the cut brownies in a single layer on a sheet pan, then transfer to a freezer-safe bag. When you’re ready, thaw completely and add decorations fresh for best results.
Reheating
Reheat leftover brownies gently in the microwave for about 10-15 seconds for a warm, fudgy bite but remove the cookie tombstones first to keep them crisp. Alternatively, serve them cold — I actually like the texture chilled!
FAQs
-
Can I make Graveyard Brownies Recipe from scratch instead of using a box mix?
Absolutely! Feel free to use your favorite homemade brownie recipe if you prefer. Just make sure to let the brownies cool completely before decorating. Sometimes homemade brownies have a slightly different texture than boxed mixes, so just keep that in mind when cutting and assembling.
-
What kind of cookies work best for tombstones?
Rectangular cookies like Milano or even sugar cookie bars work wonderfully because they offer a nice smooth surface for writing and hold up well in the brownies. Avoid overly crumbly cookies since they might break when you press them in.
- Can I use other decorations besides candy pumpkins?
Definitely! Candy eyeballs, gummy worms, mini marshmallow ghosts, or even edible glitter can make the brownies just as festive. It’s your graveyard—get creative with what you have!
-
How do I prevent the cookie tombstones from falling over?
If your tombstone cookies don’t stand up well on their own, try using a small dab of icing underneath to “glue” them into place before sprinkling the crushed cookies around. Also, chilling the brownies before decorating can help solidify everything.
Final Thoughts
I’m always a sucker for recipes that mix fun and flavor, and this Graveyard Brownies Recipe hits both those marks perfectly. It’s such a delight to make — especially with kids or for parties — and I love how each batch looks a little different depending on how the tombstones and “dirt” fall. Give it a try, and I promise you’ll find it becomes a go-to for spooky celebrations or whenever you want to surprise someone with something playful and delicious!
Print
Graveyard Brownies Recipe
- Prep Time: 15 minutes
- Cook Time: 30 minutes
- Total Time: 45 minutes
- Yield: 12 servings
- Category: Dessert
- Method: Baking
- Cuisine: American
Description
Graveyard Brownies are a fun and festive dessert perfect for Halloween or themed parties. These moist brownies topped with cookie tombstones, crushed cookie “dirt,” and candy pumpkins create a spooky graveyard scene that’s both delicious and visually striking.
Ingredients
Brownie Base
- 1 box brownie mix (plus ingredients listed on the box)
Decorations
- 12 rectangular cookies (such as Milano)
- Black gel or chocolate icing for writing
- Crushed chocolate sandwich cookies for “dirt”
- Candy pumpkins for decoration
Instructions
- Prepare Brownie Mix: Follow the package instructions to prepare the brownie batter, combining the mix and any required additional ingredients. Pour the batter evenly into a greased baking pan to ensure easy removal after baking.
- Bake Brownies: Bake the brownies as directed on the box, typically at 350°F (175°C) for 25-35 minutes depending on the pan size and oven. Once baked, allow the brownies to cool completely for easier cutting and decorating.
- Cut Brownies: After cooling, cut the brownies into 12 equal squares to serve as the base for your graveyard scene.
- Create Tombstones: Using black gel or chocolate icing, write “RIP” on each rectangular cookie to mimic tombstones. Be careful to write clearly and neatly for best effect.
- Decorate Brownies: Press each decorated tombstone cookie gently into the top of each brownie square, ensuring it stands upright or is securely placed.
- Add Dirt and Pumpkins: Sprinkle crushed chocolate sandwich cookies around the tombstones on the brownies to simulate dirt. Finally, add candy pumpkins around the “graveyard” scene for a festive touch.
Notes
- You can substitute different types of cookies for tombstones but rectangular shapes work best.
- Allowing brownies to cool completely before decorating prevents icing from melting or sliding.
- Crushed cookies add texture and enhance the graveyard theme visually.
- Use sturdy candy decorations to avoid them sinking into the brownies.
- For extra spooky effect, consider adding gummy worms or edible Halloween-themed decorations.
Nutrition
- Serving Size: 1 brownie
- Calories: 280
- Sugar: 22g
- Sodium: 180mg
- Fat: 12g
- Saturated Fat: 4g
- Unsaturated Fat: 6g
- Trans Fat: 0g
- Carbohydrates: 38g
- Fiber: 2g
- Protein: 3g
- Cholesterol: 25mg


