
If you’re looking for a festive, light, and totally adorable treat this holiday season, you’ve got to try this Green Meringue Christmas Trees Recipe. It’s one of those recipes I stumbled upon and instantly fell in love with because it delivers that perfect crunch on the outside and just the right amount of lightness inside. Plus, it’s super fun to make—like crafting little edible Christmas decorations! Stick with me, and I’ll walk you through the whole process so you nail it yourself.
Why You’ll Love This Recipe
- Festive & Fun: These green meringue trees make your holiday spread look magical and taste heavenly.
- Simple Ingredients: You probably already have everything in your kitchen right now!
- Impressive Presentation: They look bakery-fancy but are surprisingly easy to pipe and bake.
- Make Ahead Friendly: Bake these in advance to free up your holiday baking time without compromising freshness.

Ingredients You’ll Need
Every ingredient here plays its part in creating that perfect airy meringue with vivid green color and a sprinkle of festive cheer. When choosing your supplies, a few little details can make a big difference.

- Egg whites: Room temperature is key for whipping up the best volume and stability in your meringue.
- Cream of tartar: This tiny ingredient is a lifesaver—it helps stabilize your meringue for that perfect peak without collapsing.
- Granulated sugar: Adds sweetness and gives structure to your meringue; adding it slowly is an important step you don’t want to skip.
- Green gel food colouring: Gel works wonders for vibrant color without watering down your meringue mixture.
- Sprinkles: Pick your favorites! They add fun pops of color and texture on top of your Christmas trees.
Variations
I love tweaking this Green Meringue Christmas Trees Recipe depending on the vibe I want — sometimes more classic, sometimes extra playful. Personalizing it makes it even more fun, and you’ll find a variation that feels just right for you.
- Flavor twists: I’ve added peppermint extract once, and the result was like a tiny breath of fresh holiday air that had my family hooked.
- Dietary swaps: You can try natural food colorings if you prefer avoiding gels, but be cautious about adding moisture.
- Decoration ideas: For an elegant touch, swap sprinkles with edible glitter or finely chopped pistachios for a nutty hint.
- Size adjustments: Feel free to pipe mini trees for bite-sized treats or larger for show-stoppers on your dessert table.
How to Make Green Meringue Christmas Trees Recipe
Step 1: Prep and Beat the Egg Whites
Start by preheating your oven to a very low 200°F (95°C) and line your baking sheet with parchment paper to prevent sticking. Then, grab your large mixing bowl and make sure your egg whites are at room temperature — this helps them whip up fluffy and stable. Using a stand or hand mixer with a whisk attachment, beat the egg whites alongside cream of tartar on medium speed until they look frothy, almost like cappuccino foam. This is the base that will help your meringues hold their shape beautifully.
Step 2: Add Sugar Slowly Until Stiff Peaks Form
Now, this is the trick that I learned after a few tries: add your sugar one spoonful at a time. Whisk well between each addition so the sugar dissolves properly. This gradual method ensures your meringue becomes glossy and forms those sturdy, shiny stiff peaks that won’t collapse when you lift the beaters. Don’t rush this step—it’s crucial for the texture and stability of your Christmas trees.
Step 3: Green up the Meringue and Pipe Your Trees
Drop in a few drops of green gel food colouring and gently mix until the color is evenly blended but don’t over-mix or you might lose volume. Transfer the meringue into a piping bag fitted with a large star tip—this makes your trees look ultra festive and textured. Then pipe three dollops stacked on top of each other, going from largest at the bottom to smallest at the top—like a Christmas tree shape! Add sprinkles to decorate each level for that extra holiday sparkle.
Step 4: Bake and Cool for Perfection
Bake your piped meringues for around 45-50 minutes. You’ll know they’re ready when the sides are dry to the touch and the bases peel off cleanly from the parchment. Here’s what I do — turn off the oven but leave the meringues inside overnight or crack the oven door and let them cool for about an hour. This cooling trick keeps them crisp without moisture seeping back in. Once completely cool, you can store or serve.
Pro Tips for Making Green Meringue Christmas Trees Recipe
- Use Room Temperature Eggs: I found that cold eggs take longer to whip and may not reach stiff peaks as reliably.
- Add Sugar Slowly: Don’t rush this part; gradual addition ensures smooth, glossy meringue.
- Low, Slow Baking: Baking at a low temperature prevents browning and keeps your meringue bright green and crisp.
- Avoid Humidity: Meringues don’t do well in humid weather — bake and store on dry days for best results.
How to Serve Green Meringue Christmas Trees Recipe

Garnishes
Personally, I love topping the finished trees with festive rainbow sprinkles, but you can also try silver dragées or tiny edible pearls for a classy holiday touch. The sprinkle colors really pop against the green, making every bite extra joyful!
Side Dishes
These meringue trees go beautifully alongside a cup of rich hot chocolate or spiced mulled wine to balance their sweetness. If you’re serving a dessert platter, pairing them with fresh berries or a tart fruit compote adds a nice contrast, too.
Creative Ways to Present
When I threw my kids’ Christmas party, I arranged the trees on a slate board dusted lightly with powdered sugar “snow” and scattered pine sprigs around for a forest effect. It’s a real showstopper and super simple to pull off for memorable holiday cheer.
Make Ahead and Storage
Storing Leftovers
These meringue trees actually store quite well in an airtight container at room temperature. I recommend keeping them away from humidity to preserve their crispness, and they’ll stay fresh for up to a week.
Freezing
If you want to freeze them, wrap each tree gently in plastic wrap, then place them in a freezer-safe container. They freeze surprisingly well, and I’ve had great success thawing them at room temperature without losing crunch.
Reheating
Since meringues are best enjoyed crisp, reheating isn’t typically needed. But if they soften a bit, popping them in a low oven (150°F) for 5-10 minutes can help restore their crunch. Just keep an eye on them to avoid browning.
FAQs
-
Can I use powdered sugar instead of granulated sugar for the meringue?
Granulated sugar is preferred for this recipe because it dissolves slowly, giving you that smooth, glossy meringue texture. Powdered sugar contains cornstarch which can affect the meringue’s ability to whip properly, so I don’t recommend substituting it here.
-
Why do my meringue Christmas trees crack or weep moisture?
Cracking or moisture usually happens when the oven temperature is too high or if the meringues cool too quickly. Baking at a low temperature and cooling them slowly inside the oven helps prevent this. Also, avoid storing them in humid environments.
-
Can I make these meringue trees without food coloring?
Absolutely! While the green adds festive charm, plain white meringue trees are beautiful on their own. You can also tint them any color you like to match your holiday theme or personal preference.
-
How do I know when the meringues are fully baked?
They’re done when the edges are dry and crisp, and the bottoms lift off the parchment paper cleanly. If you tap them lightly, they should sound hollow—this is a classic sign your meringue is perfectly baked.
-
Can I make the meringue mixture ahead of time before piping?
It’s best to pipe the meringue soon after making it because it can start to deflate if left sitting for too long. Prepare your piping bag and bake right away for the best results.
Final Thoughts
Making these Green Meringue Christmas Trees has become one of my favorite holiday rituals—there’s something so delightful about crafting these elegant yet playful treats. I hope you enjoy the process as much as the sweet results! Once you try this recipe, the bright green trees will definitely earn a spot on your seasonal dessert table. Give it a go and impress your family and friends with these charming little edible masterpieces!
Print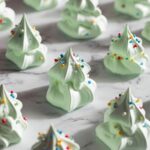
Green Meringue Christmas Trees Recipe
- Prep Time: 30 minutes
- Cook Time: 50 minutes
- Total Time: 2 hours 20 minutes
- Yield: 30 meringues
- Category: Dessert
- Method: Baking
- Cuisine: Western
- Diet: Gluten Free
Description
Delightful and festive Meringue Christmas Trees made by whipping egg whites into stiff peaks, coloring them green, and piping into tree shapes adorned with sprinkles. These crisp and airy treats are perfect for holiday celebrations, requiring slow baking at low temperature and cooling to achieve a delicate texture.
Ingredients
Meringue
- 2 large egg whites, room temperature
- ¼ teaspoon cream of tartar
- 100 g granulated sugar
- Green gel food colouring
- Sprinkles, for decoration
Instructions
- Preheat Oven and Prepare Baking Sheet: Preheat your oven to 200°F (93°C). Line a baking sheet with parchment paper and set aside to ensure the meringues do not stick while baking.
- Beat Egg Whites and Cream of Tartar: In a large mixing bowl, use an electric hand mixer or stand mixer with a whisk attachment to beat the egg whites and cream of tartar on medium speed. Continue beating until the mixture becomes frothy, resembling cappuccino foam.
- Gradually Add Sugar: Slowly add the granulated sugar, one spoonful at a time, mixing well after each addition. Keep beating until the meringue forms stiff, glossy peaks that hold their shape firmly.
- Add Colouring: Add a few drops of green gel food colouring to the meringue. Gently mix until the color is fully incorporated and the mixture is evenly green.
- Pipe the Meringue Trees: Transfer the meringue into a piping bag fitted with a large star tip. Pipe three dollops on top of each other, starting with the largest at the bottom and getting smaller towards the top to create a tree shape. Decorate each meringue with sprinkles while the meringue is still soft.
- Bake the Meringues: Bake the meringues for 45-50 minutes or until the edges are dry and crisp and the bottoms can easily peel away from the parchment paper.
- Cool the Meringues: After baking, turn off the oven and either leave the meringues inside to cool overnight or crack the oven door open and let cool for about 1 hour. Allow the meringues to cool completely before storing to maintain their crisp texture.
Notes
- Ensure egg whites are at room temperature for better volume when whisking.
- Adding sugar slowly is crucial for achieving stiff peaks and avoiding grainy texture.
- The low baking temperature and slow cooling help dry out the meringues without browning them.
- Gel food colouring is preferred over liquid to avoid affecting the meringue’s consistency.
- Store meringues in an airtight container to keep them crisp.
Nutrition
- Serving Size: 1 meringue
- Calories: 25
- Sugar: 5.5 g
- Sodium: 5 mg
- Fat: 0 g
- Saturated Fat: 0 g
- Unsaturated Fat: 0 g
- Trans Fat: 0 g
- Carbohydrates: 6 g
- Fiber: 0 g
- Protein: 1 g
- Cholesterol: 0 mg
