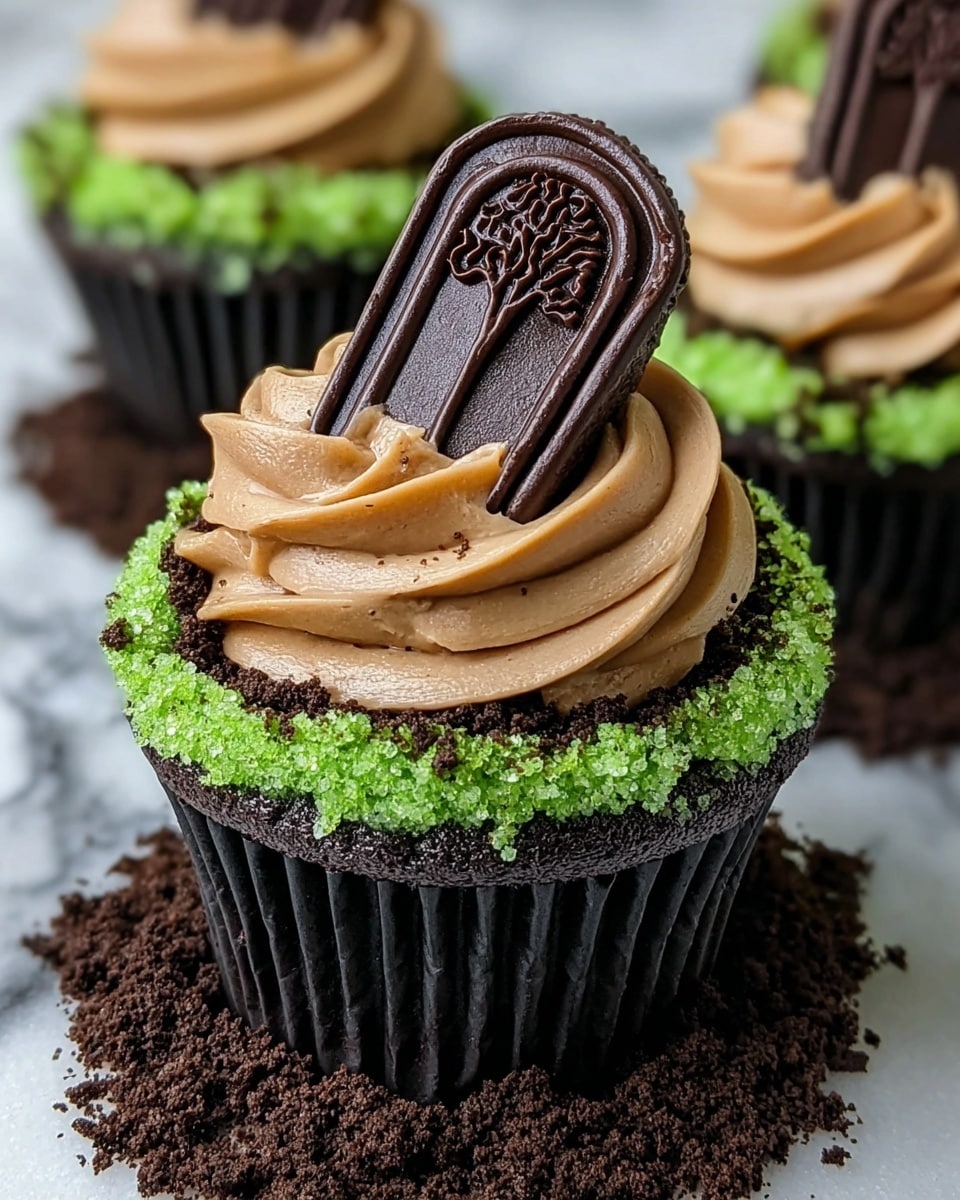
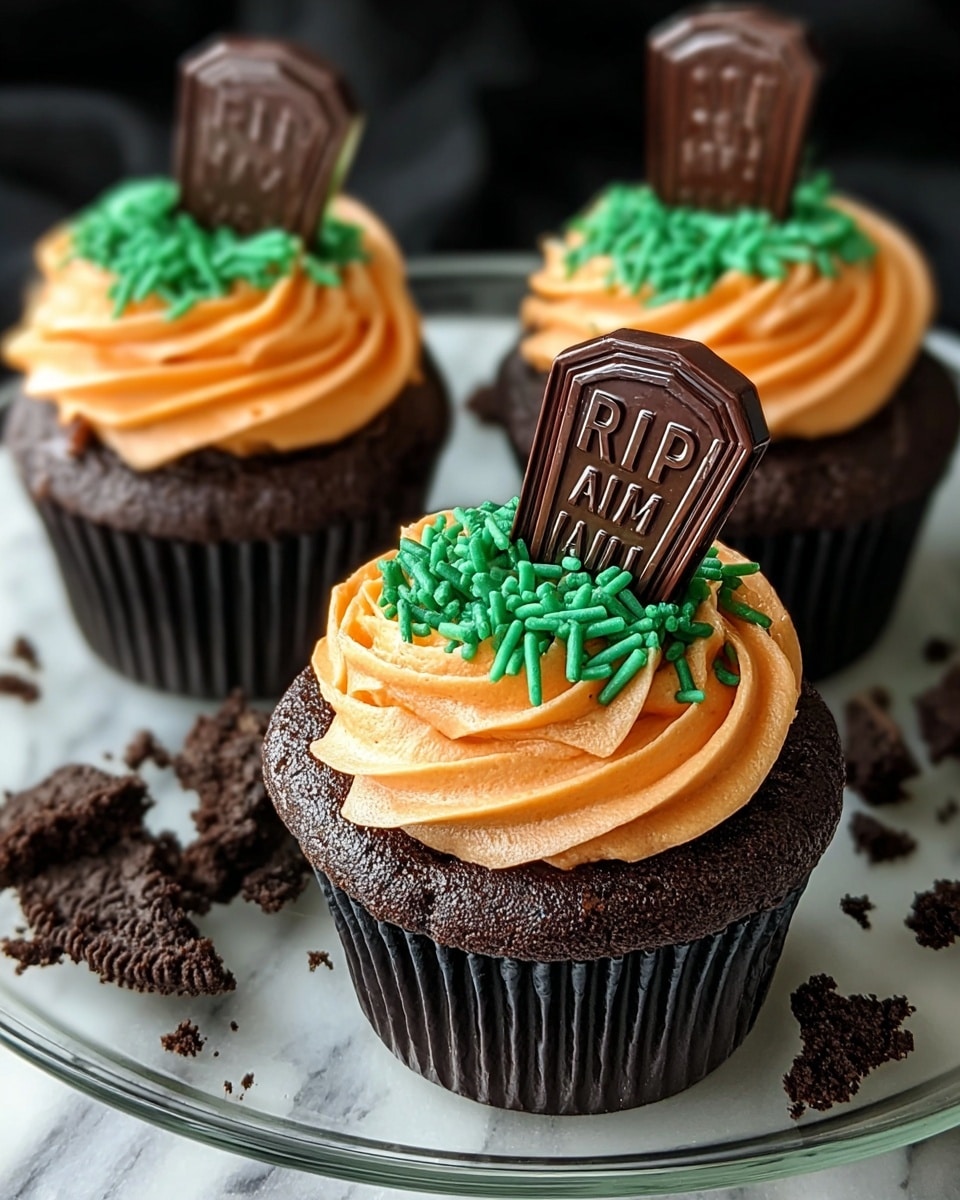
If you’re looking to wow your friends and family this spooky season, I absolutely love sharing this Halloween Graveyard Cupcakes Recipe because it’s not just about the looks—it’s all about that rich chocolatey goodness with a surprise Oreo cheesecake filling that will have everyone begging for more. These cupcakes are a total fan-freaking-tastic way to bring some festive fun to your kitchen, whether you’re a seasoned baker or just diving into Halloween treats.
Why You’ll Love This Recipe
- Delightfully Themed: It’s like a little Halloween party on your plate with edible gravestones and green grass frosting.
- Surprise Filling: The Oreo cheesecake center adds a creamy texture that contrasts the rich chocolate cake perfectly.
- Family-Friendly: Fun to make with kids or friends, and they’ll have a blast decorating.
- Impressively Flavorful: You get deep chocolate notes with just the right blend of sweetness and a touch of spice from the cocoa powder.

Ingredients You’ll Need
The magic of this Halloween Graveyard Cupcakes Recipe really comes from the harmony of classic baking staples paired with clever additions like Biscoff biscuits and Oreos. I always recommend grabbing good quality chocolate and fresh cream cheese for the best taste and texture.
- Lotus Biscoff Biscuits: These make perfect edible “gravestones” that are visually impressive and add a nice crunch.
- Dark Chocolate: Use good-quality dark chocolate for that deeply satisfying chocolate flavor when melted.
- White Chocolate: Just a little melted white chocolate for detail work—adds contrast and a delicate sweetness.
- Baking Spread or Unsalted Butter: Key for moist cupcakes and creamy buttercream—softened is essential for easy mixing.
- Caster Sugar: It dissolves quickly, making your cupcakes super tender and sweet without graininess.
- Eggs: Large eggs work best to bind everything together.
- Milk: Just a touch to keep batter smooth and provide moisture.
- Self-Raising Flour: Helps cupcakes rise gently without a dense crumb.
- Cocoa Powder: Use good-quality unsweetened cocoa powder to get rich color and flavor.
- Baking Powder: A small amount to ensure the perfect rise.
- Full-Fat Cream Cheese: This makes the cheesecake filling luxuriously smooth.
- Icing Sugar: For sweetness in frostings and the cheesecake filling.
- Oreos: Crushed for a bit of crunch and that classic cookie flavor in the filling and on top as “dirt.”
- Vanilla Extract: Just a dash enhances all the flavors and adds warmth.
- Green Food Coloring: To create the grassy buttercream that makes the graveyard scene pop.
Variations
I love that this Halloween Graveyard Cupcakes Recipe is super adaptable—you can tweak it depending on your mood, dietary preferences, or what you have on hand. Experimenting with flavors is half the fun in my kitchen!
- Dairy-Free Option: I once swapped the cream cheese for a vegan cream cheese alternative and used a plant-based butter; the cupcakes still turned out moist and delicious!
- Flavored Frosting: Adding a little coffee or orange extract to the chocolate buttercream gives a fun twist that makes the graveyard theme even spookier.
- Colorful Tombstones: Use different cookie types or even candy bars cut in rectangles to personalize your gravestones and get creative with the look.
- Gluten-Free Version: I’ve used a gluten-free self-raising flour blend in a pinch, and it worked well, just be mindful of baking times—they may vary slightly.
How to Make Halloween Graveyard Cupcakes Recipe
Step 1: Prep & Mix Your Batter
Start by preheating your oven to 140°C Fan/160°C Conventional/325°F and line a cupcake tin with cases. Cream together your softened baking spread (or butter) and caster sugar until it’s light and fluffy—this usually takes about 3-4 minutes with an electric mixer. Adding your eggs one at a time here is super important; it helps keep the batter smooth and prevents it from curdling. Then fold in your self-raising flour, cocoa powder, and baking powder gently to keep that air in the mixture for fluffy cupcakes.
Step 2: Bake & Cool Your Cupcakes
Divide the batter evenly into your cases and bake for 25-30 minutes. You’re looking for a springy top and a toothpick coming out clean. Once out, let your cupcakes cool completely before moving to the filling stage—trust me, this step is worth it for the perfect consistency.
Step 3: Make the Oreo Cheesecake Filling
While the cupcakes cool, mix your cream cheese with icing sugar and crushed Oreos until smooth. This filling is the reveal inside your cupcakes, so I like to keep the Oreos chunky enough for texture but not overpowering. If you want it sweeter, feel free to add a little more icing sugar.
Step 4: Core & Fill the Cupcakes
Carefully core out the center of each cooled cupcake using a small knife or a cupcake corer, then pipe or spoon in the Oreo cheesecake filling. I’ve found that piping helps control the amount, so you get a nice creamy center without it spilling over.
Step 5: Prepare Chocolate Buttercream & Decorate
For the buttercream, beat softened butter until creamy, then gradually add icing sugar and cocoa powder with a splash of milk to keep it smooth. You’ll use this to frost your cupcakes evenly. Next, melt your dark and white chocolate: dark for dipping the biscuit “gravestones,” white for little details if you like to get fancy. Dip the Lotus Biscoff biscuits in dark chocolate, then stick them upright as gravestones. Crushed Oreos create the “soil” around the base, and finally, pipe green-tinted buttercream to look like grass. This last step truly makes the graveyard scene pop!
Pro Tips for Making Halloween Graveyard Cupcakes Recipe
- Don’t Skip Cooling: Always cool cupcakes fully before coring or filling to prevent filling from melting or sliding out.
- Biscoff Biscuit Dip: Dip biscuits in melted dark chocolate only halfway so they harden into great gravestones without being too heavy to stand.
- Buttercream Consistency: If your buttercream feels too thick to pipe grass, add milk a teaspoon at a time for perfect flow.
- Use Fresh Ingredients: Fresh cream cheese and softened butter make all the difference in texture and flavor; don’t rush these steps.
How to Serve Halloween Graveyard Cupcakes Recipe
Garnishes
For garnish, I stick with the crushed Oreos for “dirt” because they add a bit of crunch and enhance the spooky vibe without overwhelming the chocolate flavor. I sometimes add tiny candy bones or spiders if I’m feeling extra festive.
Side Dishes
Pair these cupcakes with a warm pumpkin spice latte or a simple glass of milk. If you’re hosting a Halloween party, a bowl of candy corn or caramel popcorn make great side nibbles alongside for guests to snack on.
Creative Ways to Present
I love arranging the cupcakes on a black platter with some artificial spider webs and little faux skeleton hands reaching from the edges—it’s like a mini graveyard scene in itself! You can also serve them inside mini cauldrons or on tiered cupcake stands decorated with autumn leaves and fake moss for extra atmosphere.
Make Ahead and Storage
Storing Leftovers
I always store leftover cupcakes in an airtight container in the fridge because of the cream cheese filling—the buttercream and cake stay fresh for up to 3 days. Let them come to room temperature before enjoying to soften the buttercream’s texture.
Freezing
Freezing works well if you don’t add the frosting and decorating beforehand. I freeze plain baked and cooled cupcakes wrapped individually, then thaw and decorate on the day you want to serve them. Once frosted, freezing isn’t ideal due to moisture affecting the buttercream texture.
Reheating
Since these cupcakes are best served at room temperature, avoid microwaving. Instead, take them out of the fridge about 30 minutes before serving. If you want them a little warmer, a 10-second zap in the microwave works but watch closely to avoid melting the frosting.
FAQs
-
Can I make the Halloween Graveyard Cupcakes Recipe dairy-free?
Yes! You can substitute butter and cream cheese with plant-based alternatives. Make sure to use dairy-free chocolate and check ingredient labels. The texture will be slightly different but still delicious and festive.
-
How do I prevent the cupcakes from sinking in the middle?
Properly measuring ingredients and not overmixing the batter is key. Also, baking at the right temperature and checking doneness with a toothpick helps. Letting cupcakes cool completely before coring and filling prevents collapsing.
-
What’s the best way to pipe the green grass buttercream?
Using a grass piping tip (#233 or similar) delivers great texture. Practice on parchment paper first, and pipe short bursts close to the cupcake surface to mimic grass blades perfectly.
-
Can I prepare the cupcakes in advance for a party?
Absolutely! Bake and fill the cupcakes a day ahead, refrigerate them covered, and add the buttercream and decorations just before serving to keep the textures fresh and vibrant.
Final Thoughts
This Halloween Graveyard Cupcakes Recipe has a special place in my heart because it blends seasonal fun with flavors everyone loves. I still remember the first time I served them at a family Halloween gathering—they disappeared faster than I expected! If you want simple steps, playful presentation, and a big payoff in taste, these cupcakes deliver. Trust me, once you try making your own edible graveyard, it’ll become a Halloween tradition you’ll look forward to every year.
Print
Halloween Graveyard Cupcakes Recipe
- Prep Time: 30 minutes
- Cook Time: 30 minutes
- Total Time: 1 hour
- Yield: 12 cupcakes (12 servings)
- Category: Dessert
- Method: Baking
- Cuisine: American
Description
Halloween Graveyard Cupcakes are spooky and delicious chocolate cupcakes filled with creamy Oreo cheesecake, topped with luscious chocolate buttercream, and decorated with Biscoff biscuit gravestones, crushed Oreos resembling soil, and vibrant green grass buttercream. Perfect for a festive Halloween party, these cupcakes combine rich flavors and playful decorations that will delight kids and adults alike.
Ingredients
Cupcake Batter
- 175 g baking spread or butter (softened, unsalted)
- 175 g caster sugar
- 3 large eggs
- 2 tbsp milk
- 150 g self-raising flour
- 25 g cocoa powder
- 1/4 tsp baking powder
Oreo Cheesecake Filling
- 115 g full-fat cream cheese
- 15 g icing sugar
- 15 g Oreos (crushed)
- 1/8 tsp vanilla extract
Chocolate Buttercream
- 100 g butter (softened, unsalted)
- 165 g icing sugar
- 35 g cocoa powder
- 1-2 tsp milk
Green Grass Buttercream
- 25 g butter (softened, unsalted)
- 50 g icing sugar
- 1/8 tsp vanilla extract
- green food coloring
Decorations
- 12 Lotus Biscoff biscuits (for gravestones)
- 35 g Oreos (crushed, for soil)
- 30 g white chocolate (melted, for decorating biscuits)
- 150 g dark chocolate (melted, optional for extra decoration)
Instructions
- Preheat Oven: Preheat your oven to 140°C fan / 160°C / 325°F and prepare a cupcake tin by lining it with paper cases.
- Make Cupcake Batter: Cream together softened baking spread or butter and caster sugar until light and fluffy. Add the eggs one at a time, mixing well after each addition. Fold in the self-raising flour, cocoa powder, and baking powder gently to combine without overmixing.
- Bake Cupcakes: Divide the batter evenly among the cupcake cases. Bake in the preheated oven for 25 to 30 minutes or until a skewer inserted into the center comes out clean. Remove from oven and allow to cool completely in the tin before filling.
- Prepare Oreo Cheesecake Filling: In a bowl, mix the full-fat cream cheese, icing sugar, crushed Oreos, and vanilla extract until smooth and combined. Chill if necessary to firm slightly for filling.
- Core and Fill Cupcakes: Using a small knife or cupcake corer, remove the center from each cooled cupcake to create a cavity. Fill each cavity generously with the Oreo cheesecake mixture and replace the tops if possible.
- Make Chocolate Buttercream: Beat softened butter until creamy, then gradually add the icing sugar and cocoa powder, mixing well. Add milk as needed to achieve a smooth, spreadable consistency.
- Make Green Grass Buttercream: Beat the softened butter with icing sugar and vanilla extract until smooth, then add green food coloring until the desired grass shade is reached. Mix well.
- Decorate Cupcakes: Pipe the chocolate buttercream over each cupcake as a base layer. Insert Lotus Biscoff biscuits standing upright to resemble gravestones. Use melted white chocolate to decorate biscuits with spooky faces or names. Sprinkle crushed Oreos around the base of cupcakes to mimic soil. Use a piping bag with a grass tip to pipe the green grass buttercream around the gravestones and on top for a creepy cemetery effect.
Notes
- Use baking spread or unsalted butter for best results in the cupcake batter and buttercream.
- Make sure cupcakes are fully cooled before coring and filling to avoid breaking or melting the filling.
- For more realistic gravestones, use melted white chocolate to detail faces or inscriptions on the Biscoff biscuits.
- Adjust the quantity of milk in buttercream to achieve your desired consistency for piping.
- This recipe yields 12 cupcakes, perfect for a Halloween party or treat for your family.
- Store leftover cupcakes in an airtight container in the refrigerator for up to 3 days.
Nutrition
- Serving Size: 1 cupcake
- Calories: 375
- Sugar: 35g
- Sodium: 150mg
- Fat: 20g
- Saturated Fat: 10g
- Unsaturated Fat: 8g
- Trans Fat: 0g
- Carbohydrates: 44g
- Fiber: 2g
- Protein: 4g
- Cholesterol: 70mg


