
If you’re looking for a fun, spooky, and ridiculously delicious dessert for your Halloween party, I’ve got just the thing for you. This Halloween Graveyard Pudding Cups Recipe is such a crowd-pleaser — it’s easy to make, visually impressive, and tastes like a chocolate lover’s dream come true. I remember the first time I made these; the “graveyards” had everyone giggling and reaching for seconds before we even started the party. Trust me, you’re going to want to keep this recipe handy all spooky season long.
Why You’ll Love This Recipe
- Super Simple: You don’t need to be a pro baker to nail these pudding cups—they come together quickly with just a handful of ingredients.
- Halloween-Ready Presentation: Those “RIP” tombstone cookies and crushed Oreos make a seriously spooky and fun dessert display.
- Creamy Chocolate Goodness: The whipped chocolate mousse is rich yet light, making every spoonful feel like a treat.
- Kid and Adult Friendly: It’s the perfect dessert to delight kids at your party while still satisfying your inner chocoholic.

Ingredients You’ll Need
All the ingredients come together to build both flavor and texture — creamy whipped chocolate mousse layered with crunchy cookie crumbs that look just like dirt in a graveyard. Grab your favorite chocolate wafers and don’t skip on the Oreos for that authentic “graveyard soil” feel.
- Heavy whipping cream: Make sure it’s cold for the best whipping results; this is the base of the mousse.
- Semi-sweet chocolate wafers or chocolate chips: These melt down into silky chocolate for the mousse, so quality matters here.
- Oreo cookies: Crushed up, they create the perfect crunchy, crumbly “dirt.”
- Milano double chocolate cookies: These become your spooky tombstones—sturdy and chocolatey.
- Black frosting or edible marker: Use this to write “RIP” on your tombstone cookies for an extra creepy touch.
- Gummy worms (optional): I love adding these for a whimsical, creepy-crawly effect that’s always a hit with kids.
Variations
I love to tweak this Halloween Graveyard Pudding Cups Recipe depending on who I’m serving and what’s on hand. Feel free to get creative! The base recipe is incredibly forgiving and a great starting point for your own spooky spin.
- Variation: For a dairy-free version, I swap the heavy cream for coconut cream and use dairy-free chocolate chips; works like a charm without losing that creamy texture.
- Variation: I’ve also tried using different cookie types for the “dirt” layer—chocolate graham crackers or chocolate wafer cookies both add a nice twist.
- Variation: To kick up the spooky fun, try mini candy pumpkins or edible eyes on top along with the gummy worms.
How to Make Halloween Graveyard Pudding Cups Recipe
Step 1: Create Your Cookie Tombstones
Start by taking your Milano cookies and writing “RIP” on them with black frosting or an edible marker. I like to use a piping bag with a tiny tip for the frosting so my letters are neat, but the marker works just as well and is even easier. Set these aside—you’ll use them as the graveyard tombstones at the end.
Step 2: Whip the Heavy Cream to Stiff Peaks
Pour your cold heavy whipping cream into a large mixing bowl and start whipping—either with a hand mixer or stand mixer. When I first tried this recipe, getting the cream to stiff peaks without over-whipping was a little intimidating, but once you see those firm peaks hold their shape, you’re golden. This step makes your pudding light and fluffy.
Step 3: Melt the Chocolate
Place your semi-sweet chocolate wafers or chips in a microwave-safe bowl. Microwave them at 50% power for 30 seconds at a time, stirring in between each interval. This keeps the chocolate from burning and helps it melt smoothly. Once mostly melted, set it aside to cool for about 10 minutes. Keeping it from being too hot is crucial so it doesn’t deflate your whipped cream when you mix them.
Step 4: Fold the Chocolate into the Whipped Cream
Slowly add the cooled melted chocolate into the whipped cream. Use a spatula to gently fold it in—take your time here. I learned this trick the hard way: stirring too aggressively knocks out all the air and your mousse will be dense instead of fluffy. When it’s all combined, you’ll have a smooth, light chocolate mousse.
Step 5: Assemble Your Graveyard Cups
Start by crushing the Oreo cookies into fine crumbs—this is your “dirt.” Spoon 3-4 tablespoons of crushed Oreos into the bottom of each 9 oz clear cup to look like soil. Then, add a layer of your whipped chocolate mousse. Repeat once more: crushed Oreos, then mousse, and finally top it all off with a generous layer of crushed Oreos until it reaches the cup’s edge. These layers create the perfect “graveyard” effect.
Step 6: Chill and Decorate
Pop your cups into the fridge for at least 2 hours so the mousse can set properly. Just before serving, gently press a cookie tombstone into the center of each cup. If you’re feeling spooky-fun, tuck some gummy worms peeking out from the “dirt.” Serve chilled, and be ready for the “oohs” and “ahhs” from everyone.
Pro Tips for Making Halloween Graveyard Pudding Cups Recipe
- Chill Your Tools: I always chill my mixing bowl and beaters before whipping the heavy cream to get it to peak faster and hold better.
- Melt Chocolate Gently: Using 50% microwave power prevents chocolate from burning—stirring often stops it from seizing up.
- Fold Gently: Folding preserves the mousse’s airiness, so avoid over-mixing when combining chocolate and whipped cream.
- Make Tombstones Ahead: You can prep your “RIP” cookies a day ahead and store them in an airtight container to save time on party day.
How to Serve Halloween Graveyard Pudding Cups Recipe
Garnishes
I usually keep garnishes simple but spooky—fresh gummy worms are my go-to because kids love the creepy-crawly vibe, but chocolate chips or mini candy pumpkins work great too. Sometimes I use a tiny bit of whipped cream on top to give it a light cloud effect, making the “graveyard” look even more eerie and realistic.
Side Dishes
Pair these pudding cups with heavier Halloween snacks like savory popcorn or cheesy stuffed breadsticks to balance out the sweetness. They also work perfectly as a dessert finale after a hearty fall meal like chili or pumpkin soup.
Creative Ways to Present
I once arranged a whole “cemetery” scene on a large serving tray with crumbled Oreos spread around for “dirt” and added edible sugar spiders and candy bones—I promise your guests will be buzzing about your dessert table for weeks! Serving in individual clear cups helps everyone see the layers and makes it super easy to eat at a party.
Make Ahead and Storage
Storing Leftovers
I usually store leftover Halloween Graveyard Pudding Cups in the fridge covered with plastic wrap or airtight lids for up to 2 days. The layers stay firm and delicious, though the cookie crumbs soften a bit — still tasty but best enjoyed fresh.
Freezing
Freezing isn’t my favorite with this recipe because the whipped mousse texture changes and the cookies get soggy. If you freeze, expect some textural shifts, and let them thaw slowly in the fridge for a few hours before trying.
Reheating
You don’t really want to reheat pudding cups — I recommend serving them cold or at fridge temperature. If you want a more “set” mousse, just keep them refrigerated until serving time.
FAQs
-
Can I make the Halloween Graveyard Pudding Cups Recipe without a mixer?
While a hand or stand mixer makes whipping the cream quicker and easier, you can absolutely use a whisk if you have the arm strength! Just make sure your cream is very cold, and whip it steadily until it holds stiff peaks—this might take longer but it’s doable.
-
What can I use instead of Milano cookies for the tombstones?
If you can’t find Milano cookies, chocolate wafer cookies, rectangular shortbread, or even large gluten-free cookies with a firm texture will work well. The key is to have something sturdy enough to stand in the pudding without collapsing.
-
How far ahead can I prepare these pudding cups?
You can assemble the pudding cups and refrigerate them uncovered (to prevent sogginess) for up to 24 hours before adding the tombstone cookies and gummy worms. For best texture, add the decorations right before serving.
-
Are these pudding cups kid-friendly?
Absolutely! Kids love the fun “graveyard” look and the creamy chocolate mousse. Just watch out if you’re using edible markers or any small decorations that might not be suitable for very young children.
Final Thoughts
I absolutely love how this Halloween Graveyard Pudding Cups Recipe brings a little magic (and mischief) to any party. It’s one of those recipes that feels special without needing a ton of work, and it’s always a hit with my family and friends. If you want a festive treat that’s sweet, creamy, and visually awesome, I can’t recommend this enough. So go ahead, whip up these spooky little cups, and enjoy the fun they bring—your guests will thank you for it!
Print
Halloween Graveyard Pudding Cups Recipe
- Prep Time: 10 minutes
- Cook Time: 0 minutes
- Total Time: 2 hours 10 minutes
- Yield: 6 servings
- Category: Dessert
- Method: No-Cook
- Cuisine: American
Description
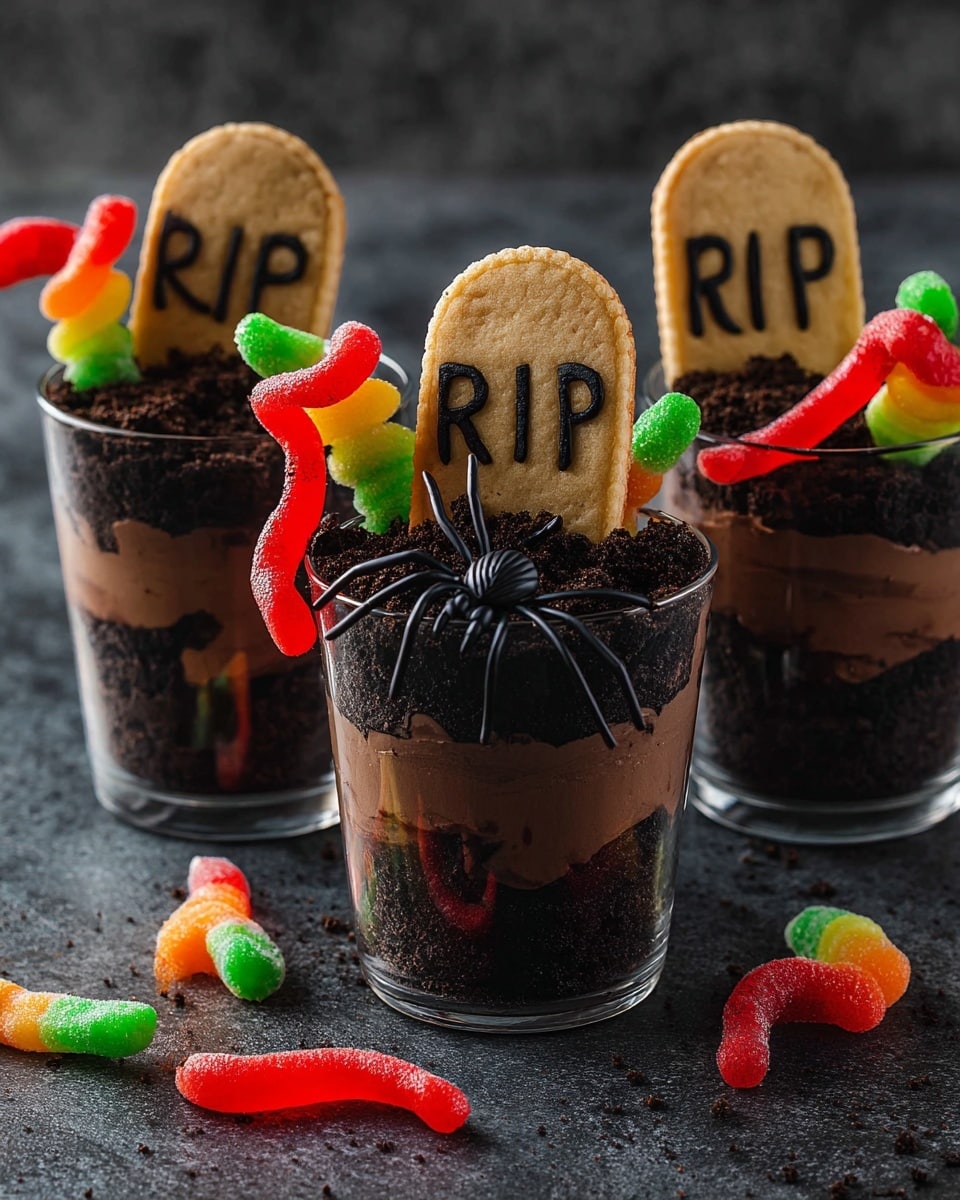
Halloween Graveyard Pudding Cups are a spooky and delicious dessert perfect for Halloween parties. These no-bake mousse cups feature layers of creamy chocolate mousse, crushed Oreo cookie “dirt,” and fun tombstone cookies decorated with “RIP” messages. Gummy worms add an eerie touch to this festive treat.
Ingredients
For the Mousse:
- 2 cups heavy whipping cream
- 6 oz semi-sweet chocolate wafers or chocolate chips
For the Graveyard Decoration:
- 24 Oreo cookies (crushed for cookie crumbs)
- 6 Milano double chocolate cookies
- Black frosting or edible marker (for writing “RIP”)
- Gummy worms (optional, for extra decoration)
Instructions
- Prepare Tombstone Cookies: Use black frosting or an edible marker to write “RIP” on 6 Milano double chocolate cookies. Set these decorated cookies aside to serve as tombstones for your graveyard pudding cups.
- Whip Heavy Cream: In a mixing bowl, whip 2 cups of heavy whipping cream using an electric mixer until stiff peaks form, which means the cream holds its shape firmly when the beaters are lifted.
- Melt Chocolate: Place 6 oz of semi-sweet chocolate wafers or chips in a microwave-safe bowl. Microwave at 50% power for 30 seconds intervals, stirring well between each interval until the chocolate is mostly melted and smooth. Allow it to cool for about 10 minutes to avoid melting the whipped cream.
- Make Chocolate Mousse: Slowly fold the melted chocolate into the whipped cream gently using a spatula, combining without deflating the mousse to maintain a light and airy texture.
- Assemble Layers: Take 6 clear 9 oz cups and add 3-4 tablespoons of crushed Oreo cookie crumbs at the bottom of each cup to resemble dirt.
- Layer Mousse: Spoon a layer of the chocolate mousse over the Oreo cookie crumbs in each cup.
- Repeat Layers: Add another layer of 3-4 tablespoons of crushed Oreo crumbs followed by another layer of mousse, building height and texture in each cup.
- Top the Graveyard: Sprinkle crushed Oreo cookie crumbs on top until the cups reach the edge, creating a dirt-like surface for the graveyard scene.
- Chill Cups: Refrigerate the pudding cups for 2 hours to allow the mousse to set and flavors to meld perfectly.
- Decorate Graveyard: Insert one “RIP” decorated Milano cookie tombstone into the center of each pudding cup. Optionally, add gummy worms around the tombstone for an extra creepy effect.
- Serve: Serve the graveyard pudding cups chilled with extra whipped cream and chocolate if desired for an extra indulgent treat.
Notes
- For a smoother mousse, make sure the melted chocolate has cooled to room temperature before folding it into the whipped cream.
- Be gentle when folding chocolate into the whipped cream to keep the mousse light and fluffy.
- You can substitute Milano cookies with any firm chocolate cookies for tombstones if unavailable.
- Optional gummy worms add a fun Halloween touch but can be omitted for dietary preferences.
- These pudding cups are best served within 24 hours of preparation for maximum freshness.
Nutrition
- Serving Size: 1 pudding cup (approx. 9 oz)
- Calories: 350
- Sugar: 28g
- Sodium: 90mg
- Fat: 25g
- Saturated Fat: 16g
- Unsaturated Fat: 7g
- Trans Fat: 0g
- Carbohydrates: 25g
- Fiber: 2g
- Protein: 4g
- Cholesterol: 90mg


