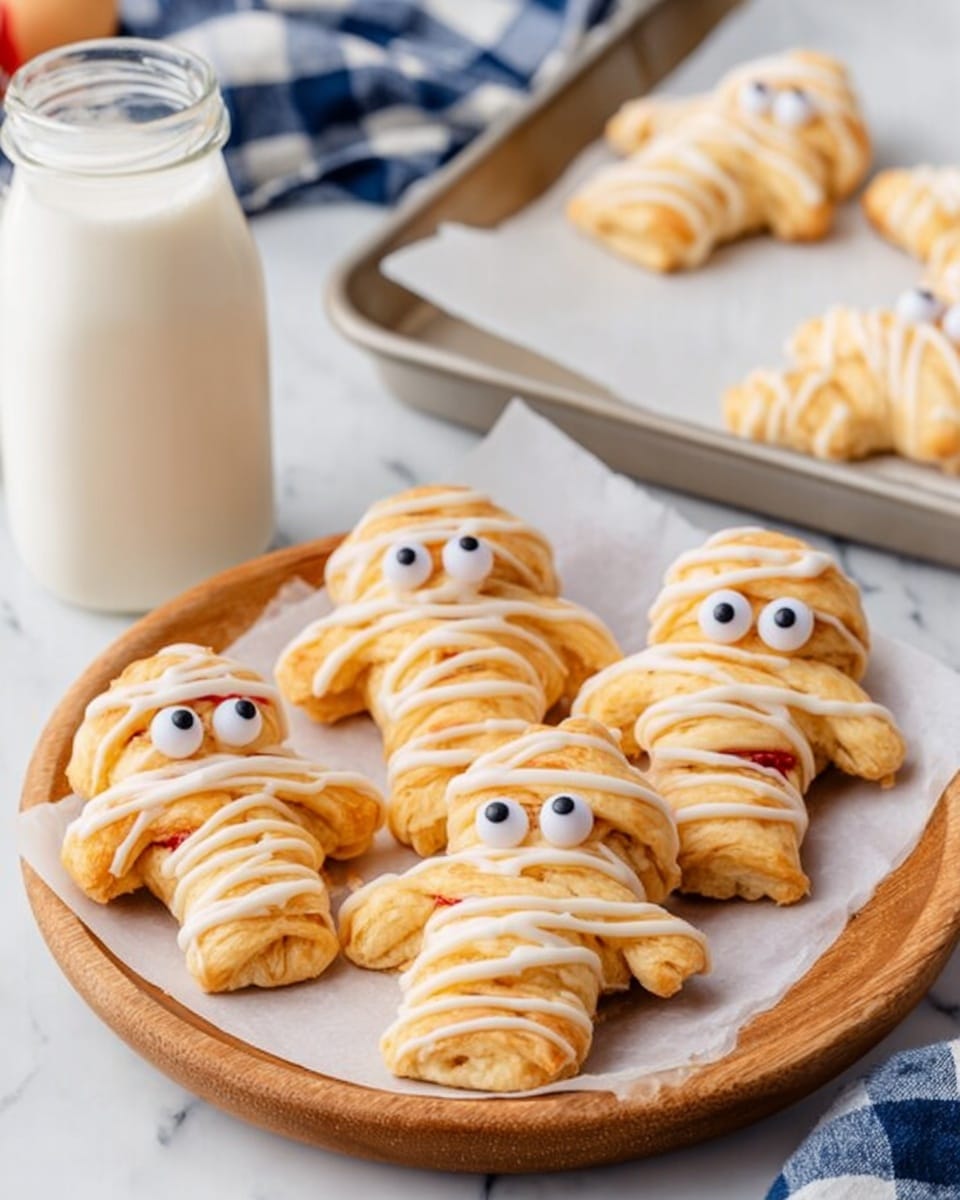
If you’re looking for the perfect spooky treat that’s as fun to make as it is to eat, you’re in for a delight with this Halloween Hand Held Pies Recipe. These little mummified pies are charming, portable, and packed with sweet raspberry goodness that everyone will rave about. I absolutely love how these turn out every single time—crispy crust, oozy jam, and marshmallow drizzle that makes it look like a tiny wrapped mummy. Keep reading, and I’ll walk you through every step to nail these for your next Halloween bash or cozy night in!
Why You’ll Love This Recipe
- Easy and Fun to Make: Using ready-made pie crusts makes this recipe quick without sacrificing flavor or fun.
- Perfect Halloween Vibes: The marshmallow mummy drizzle adds an irresistible festive touch that kids and adults adore.
- Portable Snacks: These hand pies are individually sized, so they’re perfect for parties or lunchboxes.
- Versatility: You can easily swap out fillings or decorations to suit your taste or dietary needs.

Ingredients You’ll Need
Each ingredient in this Halloween Hand Held Pies Recipe is simple but essential to get the perfect flaky texture and vibrant flavors you’re craving. Here’s what you’ll need on hand.
- Ready-made pie crusts: These save so much time and still bake up beautifully flaky; store-bought works like a charm here.
- Raspberry jam: I love how the tartness balances the sweetness of the marshmallow drizzle—feel free to swap in your favorite jam.
- Egg yolk: Beaten egg yolk helps create that golden sheen on the crust, making the pies look irresistibly bakery-quality.
- Mini marshmallows: These melt into the perfect “mummy wraps” for your pies’ finishing touch.
- Powdered sugar (optional): For a light, festive dusting before serving.
Variations
I love making this Halloween Hand Held Pies Recipe my own by switching up fillings or toppings. It’s super easy to get creative here, so don’t be shy to personalize!
- Filling swap: Instead of raspberry jam, try apple pie filling with cinnamon for a warm fall flavor—my family goes crazy over this twist.
- Dairy-free version: Use a plant-based crust and skip the egg wash, brushing with melted coconut oil for that golden look.
- Chocolate drizzle: Melt some dark or white chocolate alongside the marshmallow drizzle for a decadent finish.
How to Make Halloween Hand Held Pies Recipe
Step 1: Prep Your Workspace and Oven
Before you get started, preheat your oven to 375°F. Line a baking sheet with parchment paper so your pies won’t stick and cleanup is a breeze. I always lightly flour my surface to roll out the crust easily without tearing.
Step 2: Cut and Fill Your Pie Shapes
Roll out the pie crusts gently to even them out but keep them cool so they don’t get gummy. Using a gingerbread man cookie cutter (it’s perfect for the spooky hand shape), cut out as many as you can. You’ll want pairs—one to be the pie’s base, the other for the top.
Place half the shapes on your baking sheet, then spoon a small dollop of raspberry jam onto the center of each, leaving around ½-inch borders free. That border is critical for sealing so your filling doesn’t ooze everywhere during baking.
Step 3: Seal and Bake to Perfection
Top each jammed shape with the matching cutout, then press edges firmly together using the tines of a fork. This not only seals but also gives a cute crimped look. Brush each top pie with beaten egg yolk to get that perfect golden crust once baked.
Bake for about 10 minutes, keeping a close eye so they don’t burn—once golden brown, pull the tray out and transfer these to a cooling rack. These pies need to be completely cool before the marshmallow drizzle.
Step 4: Craft the Mummy Marshmallow Drizzle
Microwave mini marshmallows in 15-20 second bursts, stirring between intervals, until melted smooth but not too hot. Let it cool just slightly so it thickens enough to drizzle without running off the pies.
Use a spoon or piping bag to drizzle the marshmallow over each cooled pie, zigzagging to mimic mummy wrappings. Add candy eyes straight onto the sticky marshmallow before it sets. Let the pies cool fully until the drizzle is firm.
Pro Tips for Making Halloween Hand Held Pies Recipe
- Keep Pie Crust Chilled: I learned the hard way that warm dough gets sticky and tears, so keeping it cool helps with easy cutting and folding.
- Don’t Overfill: A little jam goes a long way—too much makes sealing tricky and pies might leak.
- Cool Completely Before Drizzling: If the pies are warm, the marshmallow topping melts away and ruins the look!
- Use a Piping Bag for Control: I started with a spoon, but switching to a piping bag or zip-top bag with a small cut corner gave me cleaner marshmallow lines.
How to Serve Halloween Hand Held Pies Recipe

Garnishes
I like dusting these hand pies lightly with powdered sugar for a bit of extra flair—it also adds a touch of sweetness contrast. Sometimes, I throw in a sprinkle of edible glitter to make them shine, especially for kids’ parties. The candy eyes are a must for that spooky effect and always bring smiles.
Side Dishes
Pair these pies with a cup of steaming hot apple cider or a pumpkin spice latte for a complete fall-themed snack. For a savory balance, I sometimes serve them alongside a batch of roasted pumpkin soup or caramelized onion dip with crackers.
Creative Ways to Present
For Halloween parties, I like arranging these pies on black platters with fake cobwebs and plastic spiders for a spooky vibe. Wrapping each pie individually in parchment tied with orange and black twine makes them perfect party favors or school treats. You could even serve them in mini paper muffin liners to keep them tidy and easy to grab.
Make Ahead and Storage
Storing Leftovers
I store any leftover pies in an airtight container at room temperature for up to two days. The crust stays decent, though the marshmallow topping can soften slightly. Keeping them away from humidity helps a lot to maintain texture.
Freezing
You can freeze these pies before adding the marshmallow drizzle—just seal them in an airtight container or zip-top bag and freeze up to a month. When ready, bake them straight from frozen, adding a few extra minutes, then drizzle with marshmallow once cool for best results.
Reheating
To reheat, pop the pies in a 350°F oven for 5-7 minutes to refresh the flakiness. Avoid microwaving if you want to keep the marshmallow drizzle intact—as it can melt and lose shape. You can always refresh the drizzle afterward if needed.
FAQs
-
Can I make Halloween Hand Held Pies Recipe ahead of time?
Yes! You can prepare and bake the pies a day in advance but wait to drizzle with marshmallow until just before serving to keep the “mummy wraps” fresh and intact.
-
What if I don’t have a gingerbread man cookie cutter?
No worries—any hand-shaped or similarly sized cookie cutter will work, or even a simple circle or rectangle. The idea is to have cute, handheld shapes that are easy to fill and seal.
-
Can I use other fillings besides raspberry jam?
Absolutely! Apple cinnamon, blueberry, peach, or even savory fillings like pumpkin or cheese make great alternatives. Just adjust cooking times if needed.
-
How do I prevent the marshmallow drizzle from melting off?
The key is to make sure the pies are completely cool before drizzling. If they’re warm, the marshmallow melts too much and loses that cute mummy effect.
Final Thoughts
This Halloween Hand Held Pies Recipe holds a special place in my heart because it’s playful, approachable, and always a hit no matter who I share it with. Whether you’re baking with kids, looking for a festive snack, or craving something sweet and nostalgic, this recipe delivers. Give it a try—I promise you’ll be grinning like I do when these little mummy pies come out of the oven golden and adorable!
Print
Halloween Hand Held Pies Recipe
- Prep Time: 20 minutes
- Cook Time: 10 minutes
- Total Time: 45 minutes
- Yield: 10 hand held pies
- Category: Dessert
- Method: Baking
- Cuisine: American
Description
Delightfully spooky Halloween Hand Held Pies featuring raspberry jam filling and a fun mummy-inspired marshmallow drizzle. Perfect for festive gatherings, these mini pies are easy to prepare with ready-made pie crusts and baked to a golden perfection.
Ingredients
Pie Crust
- 2 ready-made pie crusts (1 package)
Filling
- 1/2 cup raspberry jam
Topping
- 1 cup mini marshmallows
- 1 egg yolk, beaten
- Powdered sugar (optional, for dusting)
- Store-bought candy eyes, for decoration
Instructions
- Preheat Oven: Preheat your oven to 375°F (190°C) and line a baking sheet with parchment paper to prevent sticking and allow for easy cleanup.
- Roll Out Dough: On a lightly floured surface, roll out the ready-made pie crusts to smooth and even thickness. You may use homemade crust if preferred for a personal touch.
- Cut Shapes: Using a gingerbread man cookie cutter, cut out as many hand-shaped pies as possible. Ensure to have an even number of shapes since each pie requires a front and back piece.
- Assemble Bases: Place half of the cut-out shapes on the prepared baking sheet to serve as the bottom crusts for the pies.
- Add Filling: Spoon a small amount of raspberry jam into the center of each bottom crust, leaving a border around the edges to allow for sealing.
- Seal Pies: Cover each jam-filled pie with a matching top crust piece. Press down the edges firmly using a fork to seal and prevent filling leakage during baking.
- Brush with Egg: Brush the tops of the sealed pies evenly with the beaten egg yolk to promote a beautiful golden crust once baked.
- Bake: Bake in the preheated oven for about 10 minutes or until the pies are golden brown and cooked through.
- Cool Pies: Remove pies from the oven and transfer to a wire rack to cool completely before adding the marshmallow drizzle.
- Melt Marshmallows: Microwave the mini marshmallows in a microwave-safe bowl in 15-20 second intervals, stirring each time until fully melted and smooth. Let cool slightly so it thickens to a drizzle-able consistency.
- Decorate: Drizzle the melted marshmallow over the cooled pies to mimic mummy bandages. Quickly place candy eyes onto the wet drizzle before it sets for a fun, spooky look.
- Final Cooling: Allow the decorated pies to cool completely to set the marshmallow drizzle before serving.
Notes
- Use homemade pie crust if preferred for a fresher taste and texture.
- Ensure the pies are completely cooled before adding the marshmallow drizzle to prevent it from melting too much.
- You can substitute raspberry jam with other fruit jams like strawberry or apricot based on preference.
- For extra sweetness, dust the finished pies lightly with powdered sugar.
- Store the pies in an airtight container at room temperature for up to 2 days to maintain freshness.
Nutrition
- Serving Size: 1 hand pie
- Calories: 180
- Sugar: 15g
- Sodium: 120mg
- Fat: 8g
- Saturated Fat: 4g
- Unsaturated Fat: 3g
- Trans Fat: 0g
- Carbohydrates: 25g
- Fiber: 1g
- Protein: 2g
- Cholesterol: 20mg


