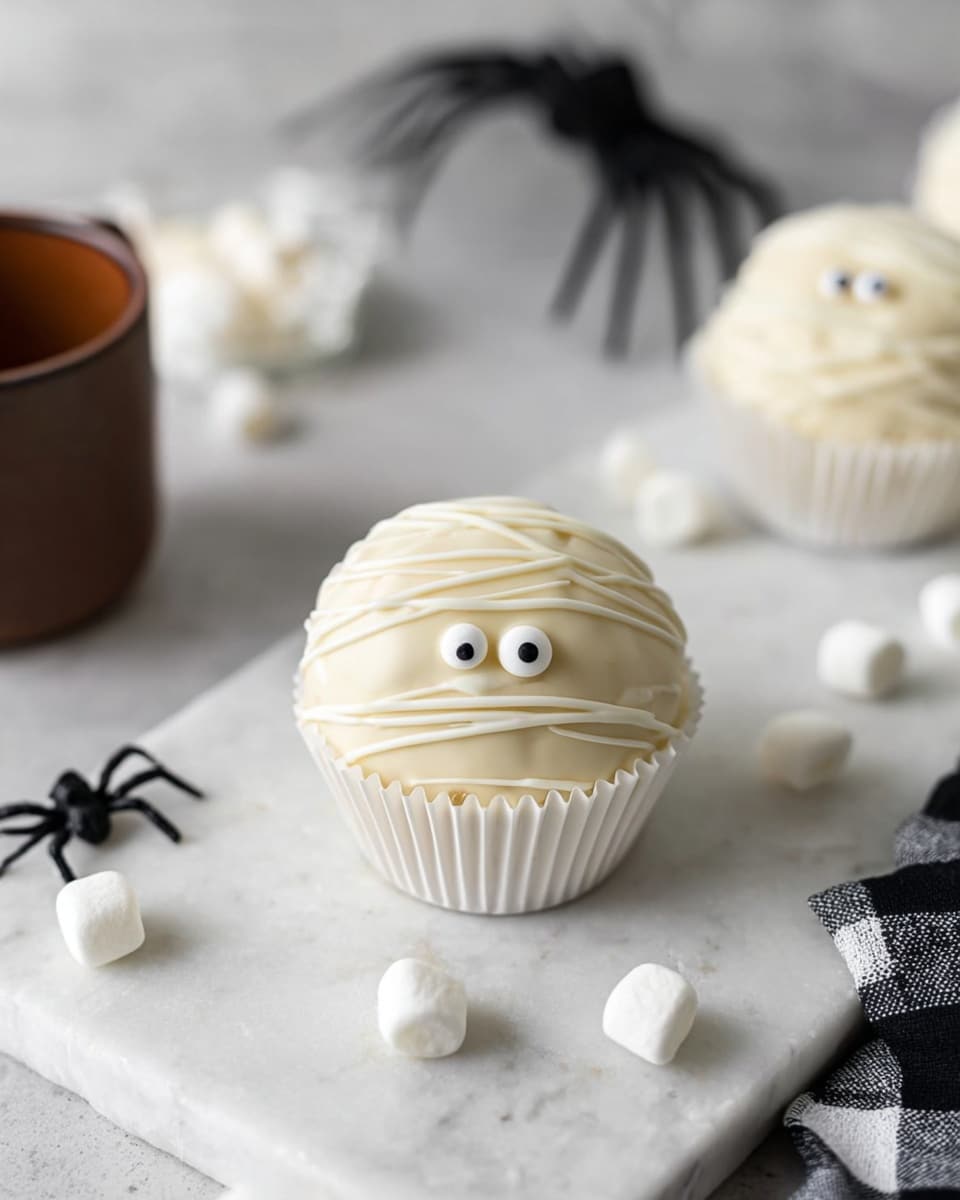
If you’re looking for a fun and festive way to warm up your chilly October nights, you’ve got to try this Halloween Hot Chocolate Bombs Recipe. These little spheres of joy aren’t just cute to look at—they offer a rich, creamy chocolate experience that’ll make your family and friends go wild. When I first tried making them, I was hooked by how magical it was to see the hot chocolate powder and marshmallows burst out as the milk was poured over. Stick with me, and I’ll guide you through every step so your Halloween treats turn out perfectly gooey and delicious!
Why You’ll Love This Recipe
- Festively Fun: These Halloween Hot Chocolate Bombs shine with adorable candy eyes and spooky charm, perfect for kids and adults alike.
- Gooey Chocolate Surprise: The creamy white chocolate shells melt perfectly to reveal a cozy blend of cocoa powder and marshmallows.
- Make-Ahead Friendly: You can prep these bombs in advance — they store beautifully and make last-minute treats a breeze.
- Easy to Customize: You’ll find lots of variations and tips below so you can make them just the way you love.

Ingredients You’ll Need
I like keeping the ingredients straightforward because they work harmoniously to bring that perfect creamy hot chocolate experience, plus they’re easy to find during Halloween season. Using good quality white chocolate makes a difference, especially for the shell, so shop wisely!
- Powdered Sugar: Helps sweeten the hot chocolate mix just right without any graininess.
- Unsweetened Cocoa Powder: I prefer Dutch-process for its smooth flavor and deep color, but use what you have.
- Finely Chopped White Chocolate: This is great for sealing the bombs and creating decorations that melt beautifully.
- Mini Marshmallows: Classic fluffiness that melts to create that heavenly ooze.
- White Chocolate Bark or Tempered White Chocolate: This will form your bomb shells — choose good quality for ease of melting and sturdy shells.
- Store-Bought Hot Chocolate Powder (optional): Use as a shortcut if you prefer not to mix your own cocoa blend.
- Candy Eyes: The cutest detail to make these Halloween themed and super fun.
- Very Hot Milk: Essential for melting your bomb and stirring up that cozy cup of cocoa.
Variations
This Halloween Hot Chocolate Bombs Recipe is super versatile. I love tweaking it depending on the vibe — sometimes making it more indulgent or kid-friendly. Feel free to get creative here because every batch you make can have its own little twist!
- Dark Chocolate Shells: Once, I swapped out the white chocolate for dark chocolate bark, and it gave such a rich, sophisticated taste that my family adored.
- Spiced Hot Cocoa: Adding a pinch of cinnamon or pumpkin spice blends into the cocoa powder mix turns these bombs into an autumn dream.
- Vegan Adaptation: Use dairy-free chocolate and plant milk to make this recipe friendly for your vegan friends and family.
- Surprise Fillers: Mini candy corn or crushed Halloween candy inside add a fun texture and little bursts of sweetness.
How to Make Halloween Hot Chocolate Bombs Recipe
Step 1: Melting the White Chocolate Shell
Start by melting your white chocolate bark slowly, preferably over a double boiler or in short bursts in the microwave. You want it silky smooth, so be patient. I’ve learned the hard way that overheating causes it to seize, so stirring regularly is key. Once melted, use a silicone mold or carefully coat the inside of half-sphere molds with the chocolate, aiming for an even layer about 2-3 mm thick. Chill these shells in the fridge until they’re set but still easy to handle — usually about 10-15 minutes does the trick.
Step 2: Preparing the Hot Cocoa Mix and Filling
While your shells set, mix together powdered sugar and cocoa powder, stirring until fully combined for that homemade hot chocolate magic. In each shell, sprinkle some of this dry mix along with mini marshmallows. Don’t be shy — the more marshmallows, the better the ooey-gooey surprise inside.
Step 3: Sealing the Bombs
Now for the delicate part: sealing. Warm a shallow plate slightly and place the grown edges of your white chocolate shells on it to gently melt and smooth out the edges. Quickly press two halves together to create a sealed ball, holding for a few seconds until you feel them stick. It may take practice, so don’t get discouraged if your first attempts wobble. Pop the sealed bombs back in the fridge to firm up completely for about 15 minutes.
Step 4: Decorating with Candy Eyes
When the bombs are firm, it’s time to get spooky! Use a little extra melted white chocolate as “glue” to stick candy eyes around the bombs — I find using a toothpick makes this super precise. This step turns your hot chocolate bombs into Halloween characters your guests will adore.
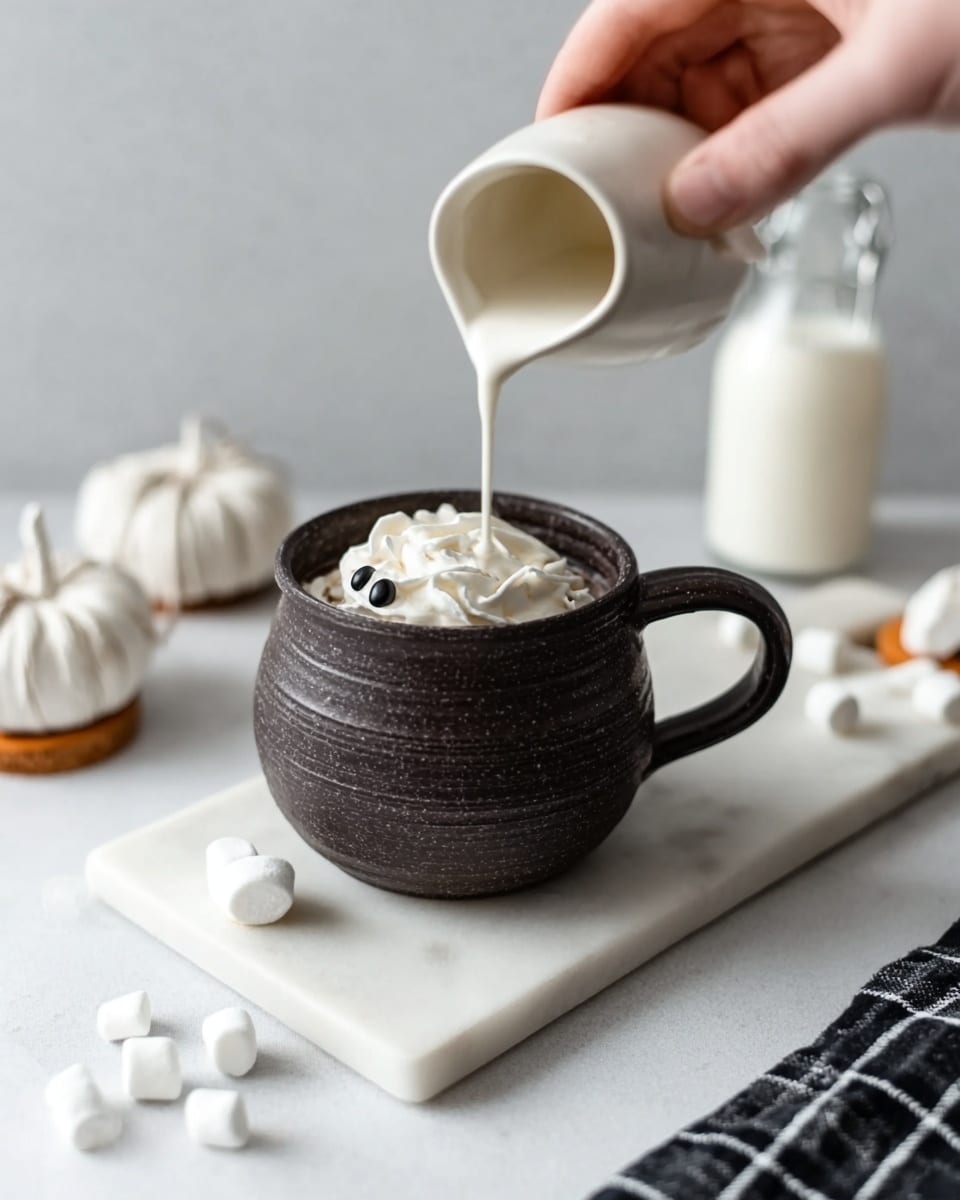
Step 5: Serving up the Magic
Place one bomb in a mug, then pour very hot milk over it. Watching the shell melt away and reveal the marshmallows and cocoa mix is the best part, trust me! Stir well, let the marshmallows soften, and enjoy every warm, cozy sip.
Pro Tips for Making Halloween Hot Chocolate Bombs Recipe
- Temper Your Chocolate: Properly tempered white chocolate sets up with a glossy finish and snaps perfectly — I’ve found it helps prevent cracks.
- Don’t Overfill: Leaving a little space inside the shells helps seal them without spillover; your bombs will look cleaner this way.
- Use Silicone Molds: These make unmolding a breeze and help keep your chocolate shells uniform and thin.
- Work Quickly But Carefully: Chocolate sets fast when chilled, so have your fillings ready before you go to seal the bombs.
How to Serve Halloween Hot Chocolate Bombs Recipe
Garnishes
I love topping the finished hot chocolate with whipped cream, a sprinkle of cinnamon or crushed Halloween-themed sprinkles, and sometimes extra mini marshmallows just for fun. It amps up the festive feeling and makes your mug look like a Halloween party.
Side Dishes
Pair these bombs with buttery sugar cookies shaped like pumpkins or ghost-shaped brownies. For a savory contrast, my family enjoys classic buttery popcorn to nibble on while sipping their cocoa.
Creative Ways to Present
For a Halloween party, I’ve arranged bombs on a tiered stand with orange and purple decorations, adding some faux spider webs for that spooky vibe. Wrapping each bomb in clear cellophane bags with ribbons makes them perfect party favors or gift ideas.
Make Ahead and Storage
Storing Leftovers
I store my leftover Halloween Hot Chocolate Bombs in an airtight container at room temperature, away from heat and humidity. They keep perfectly for up to two weeks, making it easy to enjoy a cozy treat anytime.
Freezing
If you want to prep way ahead, these bombs freeze beautifully. Just place them in a single layer on a tray, freeze until solid, then transfer to a freezer-safe container. When you’re ready to use, thaw at room temperature for a few hours to avoid condensation forming on the chocolate.
Reheating
Since these aren’t reheated per se — you let the hot milk melt the bomb fresh — you don’t need to microwave or reheat the bombs themselves. Just prepare your milk hot when serving for the best melting effect and to keep that silky smooth mouthfeel.
FAQs
-
Can I make the Halloween Hot Chocolate Bombs Recipe without molds?
Yes! While molds make the process smoother, you can pipe or shape the melted chocolate on parchment paper into half-spheres freehand, then carefully assemble them once set. It might be trickier and less uniform but still delicious!
-
What type of white chocolate is best for this recipe?
I recommend using white chocolate baking bark or high-quality tempered white chocolate. These are formulated to melt smoothly and set nicely, giving your hot chocolate bombs a shiny, sturdy shell that won’t easily crack.
-
How long do Halloween Hot Chocolate Bombs last?
Stored in an airtight container at room temperature, they last about two weeks. Keep them away from moisture and heat to maintain their shape and texture.
-
Can I use milk other than cow’s milk for serving?
Absolutely! Almond, oat, soy, or any plant-based milk that heats well will work beautifully—and it’s a great option for dairy-free friends and family.
-
Any tips for sealing the chocolate shells perfectly?
Warm a plate slightly and press the edges of the shells on it to melt just a thin line, then join them immediately. Work quickly but gently to avoid cracks or gaps, and chill right after sealing for best results.
Final Thoughts
I absolutely love how this Halloween Hot Chocolate Bombs Recipe brings a touch of whimsy and warmth to the season. It’s one of those recipes that makes you feel like a kid again, eagerly watching the magic unfold as the bomb melts into a creamy cup of joy. Whether you’re hosting a party or just want a special treat to cozy up with, these are simple enough that you can make them your own and fun enough to delight anyone who tries them. You really don’t need to be a pro chocolatier to pull these off — just a little patience and your favorite Halloween spirit. Give it a go, and let me know how your bombs turn out!
Print
Halloween Hot Chocolate Bombs Recipe
- Prep Time: 20 minutes
- Cook Time: 15 minutes (melting chocolate and setting shells)
- Total Time: 35 minutes
- Yield: 6 hot chocolate bombs
- Category: Beverage
- Method: No-Cook
- Cuisine: American
- Diet: Vegetarian
Description
These Halloween Hot Chocolate Bombs are a festive and fun treat perfect for cozying up on chilly autumn nights. Made with rich white chocolate shells filled with a homemade powdered hot chocolate mix and mini marshmallows, these bombs melt beautifully into hot milk, creating a deliciously creamy and chocolaty beverage with a spooky holiday twist. Complete with candy eyes for a playful Halloween touch, they are easy to make and sure to impress at any seasonal gathering.
Ingredients
Hot Chocolate Filling
- 1/4 cup (40 grams) powdered sugar
- 2 tablespoons (15 grams) unsweetened cocoa powder (preferably Dutch-process)
- 1/4 cup (22 grams) finely chopped white chocolate
- 1/2 cup (30 grams) mini marshmallows
Chocolate Shell
- 2 pounds (907 grams) white chocolate bark or tempered white chocolate
Decoration & Serving
- Candy eyes
- Additional white chocolate or white chocolate bark for sealing
- 1 to 1 1/2 cups (240ml to 355ml) very hot milk per bomb
Instructions
- Prepare the hot chocolate filling: In a bowl, combine the powdered sugar, unsweetened cocoa powder, finely chopped white chocolate, and mini marshmallows. Mix well to evenly distribute all ingredients for the filling.
- Melt the white chocolate: Slowly melt the white chocolate bark or tempered white chocolate using a double boiler or microwave in short intervals, stirring frequently until smooth and completely melted.
- Mold the chocolate shells: Using a silicone half-sphere mold designed for chocolate bombs, carefully spoon or brush the melted white chocolate into each cavity to form an even shell layer. Make sure the walls of the shells are sufficiently thick to hold the filling. Let the shells set at room temperature or refrigerate briefly until firm.
- Fill the chocolate shells: Once the shells are firm, gently remove them from the mold. Fill one half of each shell with approximately 1 to 2 tablespoons of the hot chocolate filling mixture.
- Seal the bombs: Warm a plate or baking sheet and use it to slightly melt the edges of an empty chocolate half-sphere. Quickly press a filled half-sphere onto the melted edge to seal and create a complete sphere. Repeat for all bombs. Allow to set completely.
- Decorate the bombs: Use additional melted white chocolate to attach candy eyes and create Halloween-themed faces or decorations on each bomb. Allow the decorations to set before serving.
- Serve the hot chocolate bombs: Heat milk until very hot (but not boiling). Place one chocolate bomb in a mug and pour 1 to 1 1/2 cups of hot milk over it. Watch the bomb melt and the hot chocolate mix and marshmallows infuse into the milk. Stir gently and enjoy your festive Halloween hot chocolate.
Notes
- Tempering the white chocolate ensures the shells have a nice snap and glossy finish.
- You can substitute store-bought hot chocolate powder for the homemade mix for convenience.
- Carefully melt the chocolate to avoid overheating, which can lead to grainy texture.
- Store the assembled bombs in a cool, dry place, and consume within 1 week for optimal freshness.
- Feel free to customize decorations with colored candy melts or sprinkles for extra fun.
Nutrition
- Serving Size: 1 hot chocolate bomb with milk
- Calories: 320
- Sugar: 28g
- Sodium: 40mg
- Fat: 20g
- Saturated Fat: 13g
- Unsaturated Fat: 6g
- Trans Fat: 0g
- Carbohydrates: 29g
- Fiber: 1g
- Protein: 3g
- Cholesterol: 10mg


