If you’re looking for a show-stopping dessert that perfectly captures the spooky spirit of the season, I’ve got to share this fan-freaking-tastic Halloween Witch Cake Recipe with you. It’s not just a cake; it’s a centerpiece, a conversation starter, and most importantly, it tastes incredible. Whether you’re baking for a kids’ party, a haunted house gathering, or just because you want to indulge your sweet tooth with something festive, this recipe is going to make you look like a kitchen wizard. Trust me, once you try it, you’ll see why it’s become a favorite in my home.
Why You’ll Love This Recipe
- Festively Fun: The witch hat decorations and spooky green frosting make it a Halloween showstopper that kids and adults adore.
- Rich Chocolate Flavor: The melted semisweet chocolate in the batter makes this cake deeply satisfying and moist.
- Moist & Tender: The sour cream and water combination keeps the cake perfectly soft without any dryness.
- Customizable Decorating: You can easily personalize your witch hats and toppings for a unique, creative touch every time.

Ingredients You’ll Need
I’ve found that using quality ingredients makes all the difference here—especially the chocolate and butter. The combination of brown sugar and sour cream gives the cake an irresistible moist texture, while the frosting colors add that perfect Halloween vibe. When shopping, look for fresh eggs and good-quality semisweet chocolate for the best results.
- Butter: Use softened, not melted, for a creamy batter and smooth frosting texture.
- Brown Sugar: Packed brown sugar adds a hint of molasses flavor and moisture.
- Eggs: Large eggs at room temperature help everything mix evenly.
- Semisweet Chocolate: Melting the chocolate adds richness—quality chocolate here pays off.
- Vanilla Extract: Enhances the chocolate’s deep flavors in both the cake and frosting.
- All-Purpose Flour: Provides structure; be sure to measure correctly to avoid dense cake.
- Baking Soda: Makes the cake light and fluffy by giving it lift.
- Salt: Balances the sweetness and intensifies flavor.
- Sour Cream: Adds moisture and a subtle tang that keeps the cake tender.
- Water: Helps loosen the batter for a perfect crumb.
- Confectioners’ Sugar: For that dreamy, sweet frosting base.
- 2% Milk: Adjust to get your frosting consistency just right.
- Gel Food Coloring: Green and black to create spooky, vivid frosting colors.
- Black Candy Coating Disks: Melted for piping adorable witch hats—you’ll love how easy they set!
- Assorted Black Sprinkles, Sanding Sugar, and Pearls: Adds that fun, textured crunch and sparkle.
Variations
I like to switch up the decorations depending on the year or who I’m baking for, which keeps the Halloween Witch Cake Recipe feeling fresh and fun. You can also tweak the frosting colors or try different types of candy for unique twists that still keep the spooky vibe.
- Gluten-Free Option: I once swapped the flour for a gluten-free blend with great results—just make sure it has xanthan gum for structure.
- Vegan Variation: Using flax eggs and dairy-free butter along with a plant-based sour cream substitute worked well when I had a vegan guest.
- Spiced Halloween Cake: Adding a teaspoon of cinnamon or pumpkin pie spice warmed up the flavor beautifully for fall.
- Chocolate Candy Coating Colors: Try purple or orange candy melts for witch hats to match your party colors.
How to Make Halloween Witch Cake Recipe
Step 1: Prep Your Pans and Ingredients
Start by preheating your oven to 350°F and greasing three 8-inch round cake pans. I always line the bottom with parchment then grease again—this little extra step guarantees your layers come out clean and smooth. Also, make sure the butter and eggs are at room temperature before you start; it really helps everything blend perfectly without lumps.
Step 2: Cream Butter and Sugar Thoroughly
In a large bowl, cream the softened butter with the packed brown sugar for 5 to 7 minutes until light and fluffy. You’ll notice how it fluffs up—that’s when you know you’re on the right track. This step is key for a tender crumb, so don’t rush it or skip a powerful mixer if you have one.
Step 3: Add Eggs, Melted Chocolate, and Vanilla
Add your eggs one at a time, beating well after each addition to keep the batter smooth and even. Stir in the melted (and cooled!) semisweet chocolate along with the vanilla extract. I learned the hard way that adding warm chocolate can scramble the eggs, so be sure it cools down first!
Step 4: Combine Dry Ingredients and Alternate Adding with Wet
In a separate bowl, whisk together the flour, baking soda, and salt. Now, alternately add the dry ingredients and sour cream to the chocolate mixture, beating well after each addition. Finally, gradually beat in the water. The alternating helps keep the batter light and prevents overmixing, which could make your cake dense.
Step 5: Bake and Cool Your Cake Layers
Divide the batter evenly into the prepared pans and bake for about 40 to 45 minutes. You’ll know they’re done when a toothpick inserted in the center comes out clean. I usually start checking around 38 minutes just in case. Let the cakes cool for 10 minutes before removing them from the pans, then transfer to wire racks to cool completely—this helps them set perfectly for decorating.
Step 6: Make the Frosting and Prepare Colors
Beat softened butter until smooth, then gradually add confectioners’ sugar, vanilla, salt, and milk until your frosting reaches a spreadable consistency. I find removing 1½ cups of frosting and tinting the rest green makes assembling the cake easier — plus, the contrasting black frosting really pops when it’s time to decorate. For the black frosting, gel food coloring works best for an intense color without watering down your icing.
Step 7: Level, Assemble, and Frost Your Cake
If your cake layers have domed tops, trim them flat with a serrated knife so you get nice, even layers. Place your first cake layer on a serving plate, spread with about ⅔ cup of green frosting, then repeat with the second and third layers. Use the remaining green frosting to cover the top and sides for that spooky, mossy witch effect.
Step 8: Pipe Witch Hats and Decorate
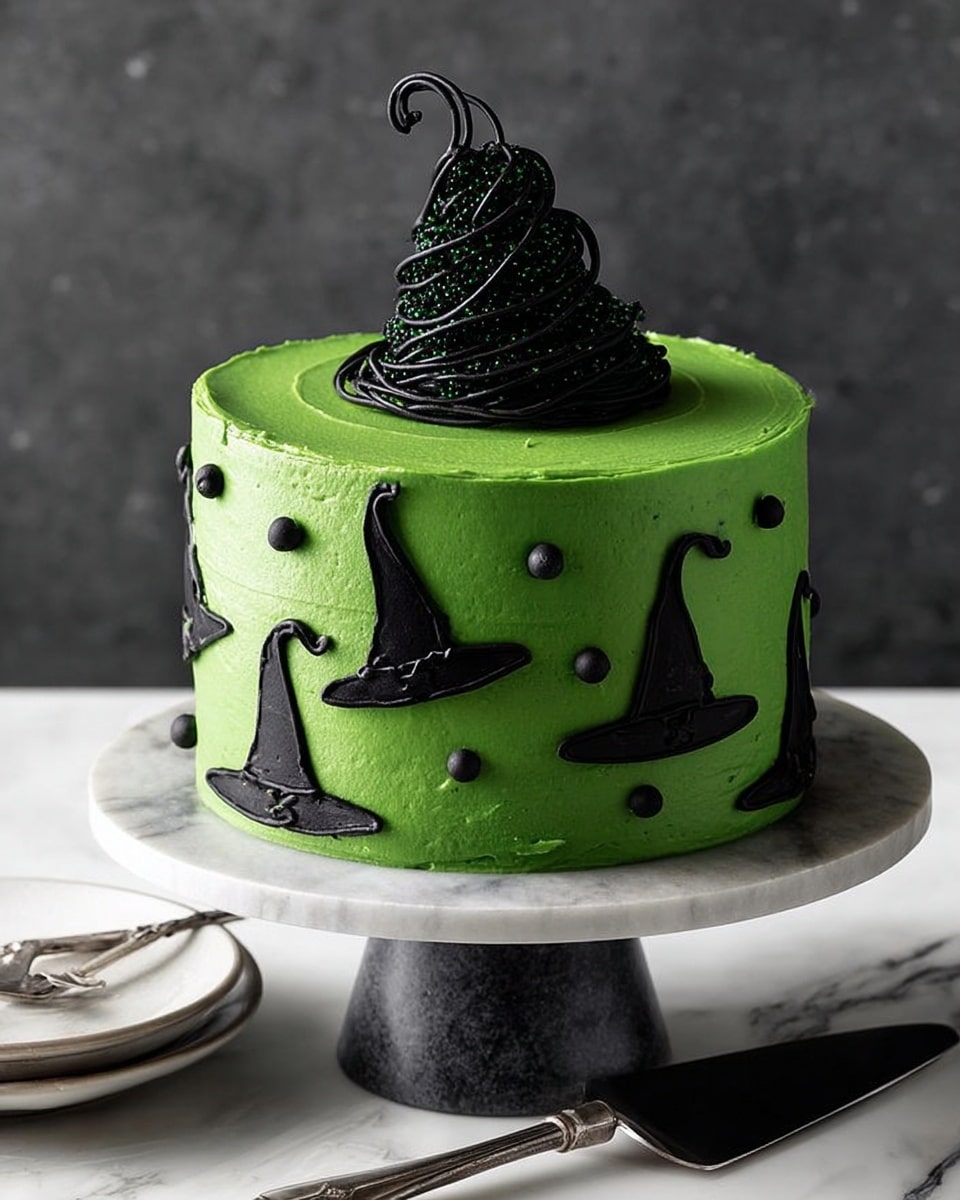
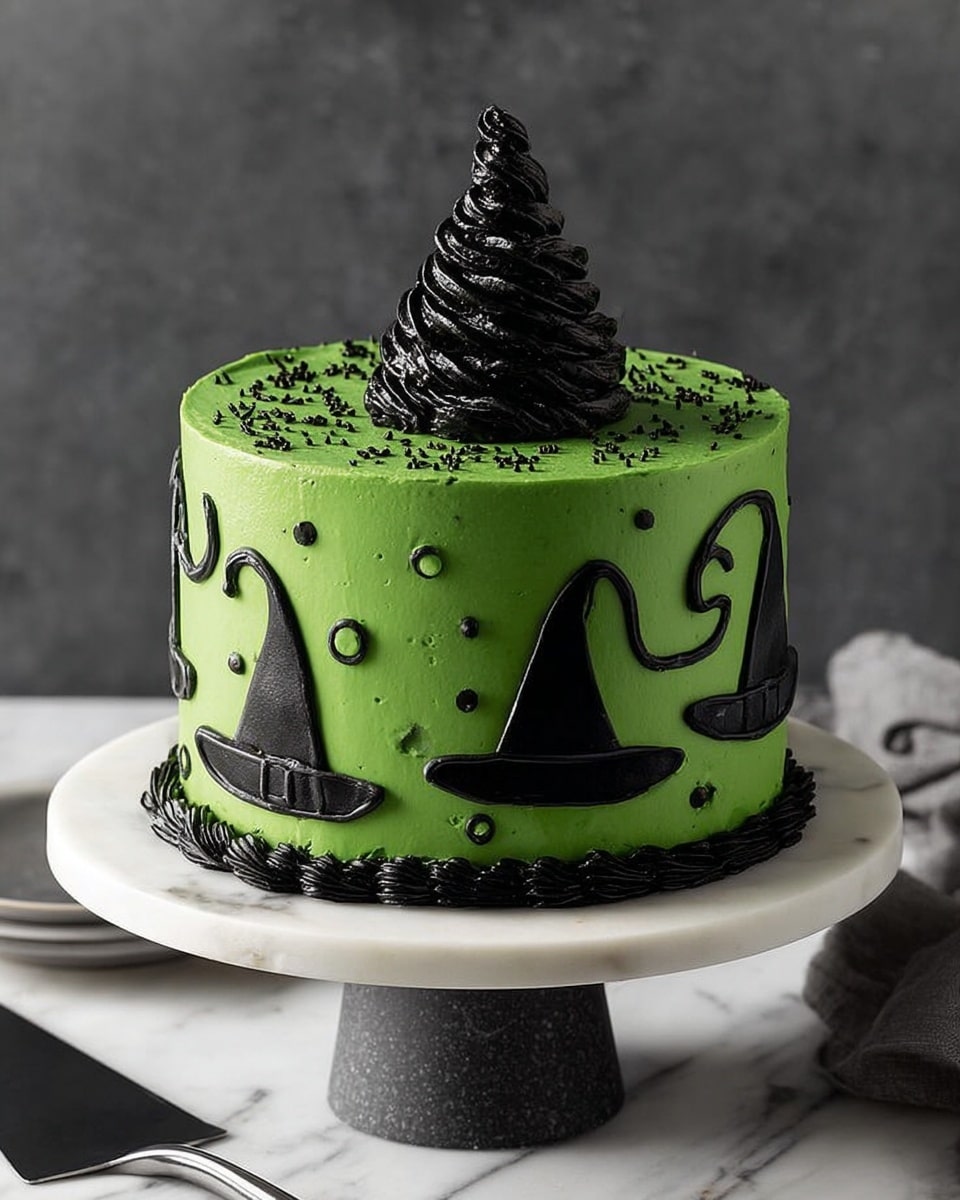
Melt your black candy coating disks and pipe small witch hat shapes onto waxed paper using a piping bag fitted with a tiny round tip. Let them set completely. Then, decorate your cake by piping black frosting with a large star tip onto the top, pressing black pearls and various black sprinkles into the green frosting around the sides, and carefully standing one witch hat on the tip-top of your cake just before serving for maximum effect.
Pro Tips for Making Halloween Witch Cake Recipe
- Chocolate Temperature: Always cool your melted chocolate before adding to the batter to avoid scrambling the eggs.
- Parchment Paper Trick: Double-line your pans—grease, parchment, then grease again—for perfect release without cracks.
- Frosting Consistency: Add milk gradually and err on the side of thicker frosting for easier piping and better hold on decorations.
- Witch Hat Piping: Practice piping on wax paper first and refrigerate hats completely before moving to the cake to prevent breakage.
How to Serve Halloween Witch Cake Recipe
Garnishes
I love to go all out with black pearls, sanding sugar, and spooky sprinkles—it adds just the right amount of texture and sparkle. The green frosting sets such a cool witchy mood that the black decorations really pop. Sometimes I even add little edible glitter or candy eyeballs for an extra creepy-cute touch!
Side Dishes
This cake pairs beautifully with simple sides like homemade whipped cream or vanilla ice cream to balance the rich chocolate. For a party, I’ve served it alongside caramel apples and spiced cider—everyone loved that combo for Halloween festivities.
Creative Ways to Present
One year I placed the cake on a platter lined with faux spider webs and surrounded it with mini pumpkins and dry ice for an eerie effect—total crowd-pleaser! You can also carve out a little hole on top and place a mini LED candle inside one of the witch hats for a glowing lantern look that’s perfect for nighttime Halloween parties.
Make Ahead and Storage
Storing Leftovers
After you’ve enjoyed your slice (or two), wrap any leftovers tightly with plastic wrap and store in the fridge for up to 4 days. I always keep the cake in an airtight container to prevent it from drying out—the sour cream helps keep it moist, but protection is key.
Freezing
I’ve had great success freezing this cake layered and frosted. Just freeze it uncut, tightly wrapped in plastic and foil, for up to 3 months. When you’re ready, thaw it overnight in the fridge. The texture stays surprisingly fresh, though I usually add fresh decorations after thawing to keep things looking sharp.
Reheating
While I don’t typically reheat cake, if you want a warm slice, pop it in the microwave for 10-15 seconds. That little warmth brings out the chocolate flavors beautifully—just don’t overdo it or the frosting might melt!
FAQs
-
Can I make the Halloween Witch Cake Recipe ahead of time?
Absolutely! You can bake the cake layers a day or two before and store them wrapped tightly in the fridge. The frosting and decorations can be done on the day you plan to serve to maintain freshness and the best texture.
-
What if I don’t have candy coating disks for the witch hats?
If you don’t have candy coating disks, you can substitute melted chocolate chips or almond bark. Just be sure to temper it slightly so it hardens well and pipes smoothly. You can also buy candy melts in various colors for extra fun.
-
How do I avoid the cake from being too dense?
Mix the batter gently when adding the dry ingredients and sour cream to avoid overworking the gluten. Also, be sure to measure flour correctly—too much flour can make the cake heavy.
-
Can this cake be made in a bundt pan instead of round pans?
You can, but baking times might vary. A bundt pan is thicker, so expect longer baking—start checking for doneness around 50 minutes. Also, decorating a bundt cake will be different since you lose the multiple layers, but it can still look great with green frosting and witch hats placed around.
Final Thoughts
I absolutely love how this Halloween Witch Cake Recipe turns out every time—moist, chocolaty, and just the right amount of spooky with its fun decorations. When I first tried this recipe, it became an instant hit in my family, and I know you’ll enjoy making and sharing it just as much. It’s the perfect way to bring a little magic into your kitchen this Halloween—demystifying baking one delicious layer and piped witch hat at a time!
Print
Halloween Witch Cake Recipe
- Prep Time: 1 hour 15 minutes
- Cook Time: 40 minutes
- Total Time: 1 hour 55 minutes
- Yield: 16 servings
- Category: Dessert
- Method: Baking
- Cuisine: American
Description
This Halloween Witch Cake is a festive and moist layered chocolate cake perfect for spooky celebrations. Rich with semisweet chocolate and brown sugar, it features a luscious sour cream batter and is frosted with vibrant green and black vanilla buttercream. The cake is decorated with whimsical witch hats made from black candy coating and adorned with sprinkles, making it an eye-catching centerpiece for any Halloween party.
Ingredients
Cake:
- 3/4 cup butter, softened
- 2-1/2 cups packed brown sugar
- 4 large eggs, room temperature
- 6 ounces semisweet chocolate, melted and cooled
- 3 teaspoons vanilla extract
- 3 cups all-purpose flour
- 3 teaspoons baking soda
- 1 teaspoon salt
- 1-1/2 cups sour cream
- 1-1/2 cups water
Frosting:
- 1-1/4 cups butter, softened
- 10 cups confectioners’ sugar
- 3 teaspoons vanilla extract
- 1/4 teaspoon salt
- 1/2 to 2/3 cup 2% milk
- Green and black gel food coloring
- 4 ounces black candy coating disks, melted
- Assorted black sprinkles, sanding sugar and pearls
Instructions
- Prepare pans and preheat oven: Preheat your oven to 350°F. Grease the bottoms and sides of three 8-inch round baking pans and line the bottoms with parchment paper, then grease the parchment to ensure cakes release easily.
- Cream butter and sugar: In a large mixing bowl, cream 3/4 cup softened butter with 2-1/2 cups packed brown sugar until the mixture is light and fluffy, which will take about 5-7 minutes using a mixer.
- Add eggs: Beat in 4 large room temperature eggs one at a time, ensuring each egg is fully incorporated before adding the next to maintain a smooth batter.
- Mix in chocolate and vanilla: Add 6 ounces of melted and cooled semisweet chocolate along with 3 teaspoons of vanilla extract, blending thoroughly into the batter.
- Combine dry ingredients and alternate with wet: In a separate bowl, whisk together 3 cups all-purpose flour, 3 teaspoons baking soda, and 1 teaspoon salt. Add this mixture to the creamed batter alternately with 1-1/2 cups sour cream, beginning and ending with the flour mixture, beating well after each addition.
- Incorporate water: Gradually beat in 1-1/2 cups water to the batter until fully blended, creating a smooth and pourable consistency.
- Bake the cakes: Divide the batter evenly among the prepared pans. Bake for 40 to 45 minutes or until a toothpick inserted into the center of the cakes comes out clean.
- Cool cakes: Allow the cakes to cool in the pans for 10 minutes, then carefully remove them and transfer to wire racks to cool completely.
- Prepare frosting: In a large bowl, beat 1-1/4 cups softened butter until smooth. Gradually add 10 cups confectioners’ sugar, 3 teaspoons vanilla extract, 1/4 teaspoon salt, and enough 2% milk (about 1/2 to 2/3 cup) to reach your desired frosting consistency. Remove 1-1/2 cups of this frosting and set aside.
- Color the frosting: Tint the larger portion of frosting with green gel food coloring until you reach the desired shade of green. Tint the reserved 1-1/2 cups of frosting with black gel food coloring for decorating.
- Level cake layers: If the cake layers have domed tops, use a serrated knife to trim them level for stacking.
- Assemble cake: Place one cake layer on a serving plate and spread with about 2/3 cup of green frosting. Repeat with the second layer and frosting, then place the final cake layer on top.
- Frost cake: Use the remaining green frosting to coat the top and sides of the cake smoothly.
- Create witch hats: Place the melted black candy coating in a piping bag fitted with a small round tip. Pipe witch hat shapes onto waxed paper and let them set until hardened.
- Decorate cake: Top the cake with assorted black sprinkles and sanding sugar. Fill a piping bag fitted with a large star tip with black frosting and pipe decorative stars on top of the cake.
- Final touches: Just before serving, gently stand one witch hat on the top center of the cake. Press additional witch hats and black pearls onto the sides of the cake, adhering them into the frosting for a festive Halloween look.
Notes
- To ensure even baking, try to have all ingredients at room temperature before starting.
- Do not overbeat the batter once the flour is added to prevent a dense cake.
- The witch hats can be made a day ahead and stored in an airtight container at room temperature.
- For a more intense chocolate flavor, substitute semisweet chocolate with bittersweet chocolate if desired.
- Use gel food coloring to avoid thinning out the frosting consistency.
- Leftover cake can be stored covered at room temperature for 2 days, or refrigerated for up to 4 days.
Nutrition
- Serving Size: 1 slice (1/16 of cake)
- Calories: 470
- Sugar: 45g
- Sodium: 320mg
- Fat: 24g
- Saturated Fat: 14g
- Unsaturated Fat: 8g
- Trans Fat: 0.5g
- Carbohydrates: 60g
- Fiber: 2g
- Protein: 5g
- Cholesterol: 90mg


