
If you’re anything like me and crave a delicious, protein-packed treat without the guilt, then this Healthy Peanut Butter Protein Milkshake Recipe is going to be your new best friend. It’s creamy, satisfying, and perfect whether you’re fueling up after a workout or just need a quick, tasty snack. Trust me, once you try this, you’ll keep coming back for more because it hits that perfect balance of indulgence and nutrition.
Why You’ll Love This Recipe
- Super Simple to Make: With just a handful of ingredients and your Ninja Creami, it’s a breeze to whip up.
- Packed with Protein: The vanilla protein powder and peanut butter make it a great post-workout recovery drink.
- Customizable Flavor: You can swap syrups or nut butters to match your mood or dietary needs.
- Creamy & Satisfying Texture: Thanks to oat milk and the freezing process, it’s rich without any dairy.

Ingredients You’ll Need
To get that perfect creamy shake, you’ll want to use quality ingredients that complement each other well. I love using oat milk because it’s naturally sweet and creamy, plus it blends perfectly with the peanut butter and maple syrup.

- Oat Milk: Its subtle sweetness and creamy texture make it perfect for dairy-free shakes.
- Peanut Butter: Go for natural peanut butter without added sugars or oils for a healthy boost.
- Maple Syrup: A natural sweetener that adds depth—we use it instead of refined sugar.
- Vanilla Extract: Just a touch to enhance all the flavors without overpowering.
- Vanilla Protein Powder: Choose a clean, plant-based or whey powder depending on your preference.
- Chocolate Syrup: I recommend a lower-sugar or sugar-free variety to keep it healthy.
Variations
One of my favorite things about this Healthy Peanut Butter Protein Milkshake Recipe is how easy it is to personalize. I’m always tweaking it — sometimes upping the chocolate for a more decadent taste or swapping out ingredients depending on what I have on hand.
- Use Soy Milk: I discovered this trick when I swapped oat milk for soy – you still get a creamy texture but with a higher protein punch.
- Almond Butter Swap: Tried almond butter once and loved the nuttier, lighter flavor it added!
- Cacao Powder Addition: For a richer chocolate twist, sprinkle in some unsweetened cacao powder before freezing.
- Sweetener Alternatives: Maple syrup can be replaced with honey or agave for varied sweetness profiles.
How to Make Healthy Peanut Butter Protein Milkshake Recipe
Step 1: Whisk the Ice Cream Base
Start by whisking together 2 cups of oat milk, 1/4 cup peanut butter, 1/4 cup maple syrup, 1 teaspoon vanilla extract, and 1/4 cup vanilla protein powder until smooth. I usually use a whisk or a fork to break up any peanut butter clumps for a silky base. This step is crucial — if the mixture isn’t smooth here, your milkshake won’t blend evenly later.
Step 2: Freeze the Mixture
Pour the base mixture into your Ninja Creami pint container, smooth the top, and freeze for 12 to 24 hours. I like to prep this the night before so it’s perfectly set the next day. Don’t skip this freezing time — it’s what gives the milkshake its thick, creamy texture.
Step 3: Add Milk and Chocolate Syrup, Then Spin
Once frozen, remove the pint’s lid and add 1/2 cup oat milk and 2-3 tablespoons of lower-sugar chocolate syrup right on top. Tell you, this step flavors the shake just right. Then, pop it into the Ninja Creami and select the milkshake setting. If it seems a bit too thick after the first spin, stir it gently and spin one more time. It melts quickly into that luscious thickness that you’re craving.
Pro Tips for Making Healthy Peanut Butter Protein Milkshake Recipe
- Smooth Base Prep: Make sure to whisk the peanut butter and syrup thoroughly before freezing to avoid gritty texture.
- Freeze Time Matters: Freezing for the full 12+ hours gives you creaminess, but I sometimes go closer to 24 for a thicker shake to scoop like ice cream.
- Double Spin Trick: Don’t hesitate to give your shake a second spin on the milkshake setting—it really perfects the texture.
- Milk Adjustment: If it seems too thick when you re-spin, add a splash more oat milk instead of all at once to keep control of consistency.
How to Serve Healthy Peanut Butter Protein Milkshake Recipe

Garnishes
I love topping mine with a sprinkle of crushed peanuts or a drizzle of extra peanut butter — it just adds that little extra oomph and texture. Sometimes I throw on some dark chocolate shavings too, especially for a treat. You’ll find these simple garnishes make your shake feel like a real dessert without loading on sugar.
Side Dishes
Since this milkshake is already so filling, I usually enjoy it with a light side like fresh fruit or a handful of granola. But if you want a heartier snack, a slice of whole-grain toast with a little almond butter pairs beautifully.
Creative Ways to Present
For birthdays or fun get-togethers, I’ve served this shake in clear jars layered with crushed nuts, a sprinkle of cocoa powder, and a fun colorful straw. It makes for an Instagram-worthy presentation that guests love. You can also freeze it in popsicle molds for a portable treat on hot days.
Make Ahead and Storage
Storing Leftovers
Any leftovers go right back into the Ninja Creami pint container, sealed tightly, and stored in the freezer. I’ve kept mine up to a week without losing flavor or texture, so it’s perfect for prepping ahead or saving a little for later.
Freezing
Freezing the base overnight is the magic step, but you can freeze the milkshake itself too once blended. Just keep it in an airtight container. Before enjoying again, let it sit at room temperature about 10-15 minutes, then add a splash of oat milk and respin.
Reheating
Since this is a cold shake, reheating isn’t really necessary. But if you want it softer, a minute or two at room temp plus a quick respin on the milkshake setting does wonders to restore that drinkable, creamy consistency.
FAQs
-
Can I use other nut butters instead of peanut butter?
Absolutely! Almond butter, cashew butter, or even sunflower seed butter work perfectly in this recipe. Just watch for any variations in sweetness or thickness, and adjust your maple syrup or milk accordingly.
-
What if I don’t have a Ninja Creami – can I make this shake another way?
You sure can! Blend all ingredients except the chocolate syrup, then freeze in a shallow container. Once semi-solid, stir in milk and syrup by hand and blend again briefly. It won’t be quite as silky as with the Ninja Creami, but it’s still delicious.
-
Is this recipe suitable for vegans?
Yes, if you use plant-based protein powder and ensure your chocolate syrup is dairy-free. The oat milk and maple syrup are naturally vegan-friendly.
-
Can I make this milkshake sugar-free?
Definitely! Use a sugar-free chocolate syrup and either omit or reduce the maple syrup to your taste. You might want to add a natural sweetener like stevia or monk fruit if you prefer a sweeter shake.
Final Thoughts
I absolutely love how this Healthy Peanut Butter Protein Milkshake Recipe turned out—it’s become my go-to whenever I want a tasty boost without junk. When I first tried it, I was amazed at how creamy and rich it felt despite being dairy-free and healthy. You’ll enjoy how quick and easy it is to make but still feels like a little indulgence. So next time you want to treat yourself while staying on track, give it a whirl—you might just fall in love like I did!
Print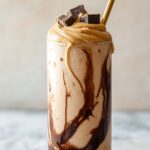
Healthy Peanut Butter Protein Milkshake Recipe
- Prep Time: 10 minutes
- Cook Time: 0 minutes
- Total Time: 12 hours 10 minutes
- Yield: 3 servings
- Category: Dessert
- Method: Blending
- Cuisine: American
- Diet: Vegetarian
Description
This Ninja Creami Protein Milkshake is a creamy, nutritious treat combining oat milk, peanut butter, maple syrup, vanilla protein powder, and chocolate syrup. Perfect for a high-protein, delicious dessert or snack that you can quickly prepare using the Ninja Creami machine.
Ingredients
Ice Cream Base
- 2 cups oat milk
- 1/4 cup peanut butter
- 1/4 cup maple syrup
- 1 teaspoon vanilla extract
- 1/4 cup vanilla protein powder
Milkshake Add-Ins
- 1/2 cup oat milk
- 2-3 tablespoons chocolate syrup (lower-sugar or sugar-free option recommended)
Instructions
- Prepare Ice Cream Base: Whisk together the oat milk, peanut butter, maple syrup, vanilla extract, and vanilla protein powder until smooth and fully combined.
- Freeze Base Mixture: Pour the mixture into a Ninja Creami pint container and freeze for 12 to 24 hours, allowing it to become firm and ready for processing.
- Add Milkshake Ingredients: Remove the lid from the frozen pint container, add 1/2 cup oat milk and 2 to 3 tablespoons of chocolate syrup on top of the frozen base.
- Milkshake Spin: Place the container into the Ninja Creami machine and spin on the milkshake setting to blend the ingredients into a creamy milkshake.
- Stir and Re-spin: Remove the container, stir the milkshake thoroughly, then spin it again on the milkshake setting to achieve the perfect thick milkshake consistency.
- Serve: The milkshake will be thick but will melt quickly into a rich, creamy texture. Enjoy immediately or store as instructed.
Notes
- Tip: Swap oat milk for soy milk to maintain creaminess with added protein.
- Store: Place any leftovers back into a Ninja Creami pint container and freeze for up to one week.
- Serve: Let thaw at room temperature for 10-15 minutes, add a tablespoon of milk, and respin on the milkshake setting to refresh the consistency before serving.
Nutrition
- Serving Size: 1 serving (approx. 1/3 of recipe)
- Calories: 250
- Sugar: 14g
- Sodium: 150mg
- Fat: 11g
- Saturated Fat: 2g
- Unsaturated Fat: 8g
- Trans Fat: 0g
- Carbohydrates: 27g
- Fiber: 3g
- Protein: 13g
- Cholesterol: 0mg


