
If you’ve ever dreamed of a tropical treat that’s creamy, refreshing, and absolutely irresistible, then you’re in for a real delight with this Homemade Coconut Ice Cream Recipe. I absolutely love how this recipe blends the rich flavors of coconut with a silky smooth texture, and best of all, it’s surprisingly easy to make right in your own kitchen. Whether you’re a coconut fanatic like me or just looking to impress your friends with something unique, keep reading — this homemade coconut ice cream is a fan-freaking-tastic dessert you’ll want to make again and again.
Why You’ll Love This Recipe
- No Churn Needed: You don’t need an ice cream maker to get creamy, dreamy results.
- Rich Coconut Flavor: The combo of coconut milk and toasted coconut flakes is pure magic.
- Simple Ingredients: Pantry staples you can find easily, with no weird additives or stabilizers.
- Quick Prep: Takes just 15 minutes to whip together — then the freezer does the rest.

Ingredients You’ll Need
The beauty of this Homemade Coconut Ice Cream Recipe lies in its simple, harmonious ingredients. I always recommend using full-fat coconut milk and cold cream to get that silky texture you crave. Also, choosing toasted shredded coconut adds a wonderful toasted crunch that makes every bite pop.

- Heavy Cream / Whipping Cream: Cold cream whips up light and airy, creating that perfect creamy base.
- Powdered Sugar: Smoothly sweetens without the graininess you might get from regular sugar.
- Vanilla Extract: Adds warmth and depth, balancing the coconut flavor.
- Coconut Milk (Full Fat): The star ingredient for that luscious coconut taste and creamy texture.
- Sweetened Condensed Milk: Gives sweetness and richness, helping the ice cream freeze smoothly.
- Coconut Extract (Optional): Boosts the coconut flavor — I find 1/8 teaspoon just right so it doesn’t overpower.
- Dry Shredded Coconut or Coconut Flakes (Toasted & Unsweetened): Adds texture and a lovely nutty aroma.
Variations
I love making this recipe my own depending on the mood or who’s coming over — and you’ll quickly find it’s a flexible base that welcomes experimentation. Feel free to tweak the sweetness or toss in extras for a fun twist.
- Chocolate Coconut: Add a few tablespoons of cocoa powder to the coconut milk mixture to create a dreamy chocolate-coconut swirl — my family goes crazy for this variation!
- Dairy-Free Version: Substitute the heavy cream with chilled full-fat coconut cream and use a plant-based condensed milk alternative — it still turns out creamy and delicious.
- Tropical Mix-Ins: Stir in chopped pineapple or mango chunks before freezing for a refreshing summer vibe.
- Nutty Crunch: Swap the toasted shredded coconut for chopped macadamia nuts or almonds if you want a different bite.
How to Make Homemade Coconut Ice Cream Recipe
Step 1: Whip That Cream to Perfection
Start by placing your cold heavy cream, powdered sugar, and vanilla extract into a large bowl. Using a hand blender (or stand mixer if you prefer), whip the cream until it doubles in volume and you get those stiff peaks that hold their shape. This whipped cream is your ticket to that luxuriously airy texture that sets homemade ice cream apart from store-bought stuff. Be careful not to overbeat — once stiff peaks form, stop to avoid turning it into butter.
Step 2: Mix the Coconut Base
In a separate bowl, combine your full-fat coconut milk, sweetened condensed milk, and if you’re using it, coconut extract. Stir this mixture until well blended — it should be smooth and fragrant. Keeping everything cold here helps the freezing process go faster later. If you love a more pronounced coconut flavor, don’t hesitate to add up to 1/4 teaspoon of coconut extract, but start small and taste as you go.
Step 3: Gently Fold and Aerate
This part is key — take a couple of scoops of your whipped cream and fold them into the coconut milk mixture first. This helps aerate the mix and makes folding the rest easier. Then, in two batches, fold the coconut mixture into the whipped cream, being super gentle with your spatula to keep as much air in as possible. This folding technique is what gives your ice cream that light, fluffy texture without ice crystals.
Step 4: Add the Toasted Coconut and Freeze
Stir in the toasted shredded coconut — this adds a subtle crunch and toasty flavor that I personally think makes a big difference. Pour the final mixture into a shallow rectangular container, then cover it with cling wrap or baking paper pressed down on the surface to avoid ice crystals. Seal tightly with a lid or foil. Pop it in the freezer for at least 8 hours, but I prefer overnight — patience here really pays off! The cold ingredients freeze faster, helping you get a smooth finish.
Step 5: Rest Before Serving
When you’re ready to enjoy, remove the surface wrap and let the ice cream sit for about 5 minutes at room temperature. This short rest softens the ice cream just enough to scoop perfectly without losing that creamy consistency. Scoop into bowls or cones, grab a spoon, and prepare to swoon over this dreamy coconut goodness.
Pro Tips for Making Homemade Coconut Ice Cream Recipe
- Use Cold Ingredients: I learned early on that keeping the cream and coconut milk chilled speeds up freezing and gives a creamier texture.
- Gentle Folding: Don’t rush folding — gentle turns keep air bubbles intact which means fluffier ice cream.
- Toasting Coconut: Toast your shredded coconut in a dry pan until golden; it adds a layer of flavor that takes this ice cream from good to unforgettable.
- Avoid Ice Crystals: Press cling wrap directly on the surface before freezing to prevent icy patches that can ruin your creamy texture.
How to Serve Homemade Coconut Ice Cream Recipe

Garnishes
When I serve this coconut ice cream, I love topping it with a sprinkle of toasted coconut flakes for extra crunch and visual appeal. Fresh tropical fruits like pineapple chunks or mango slices bring bright, juicy contrast. A drizzle of homemade chocolate sauce or a dusting of cinnamon also works wonders if you want to get a bit fancy!
Side Dishes
This ice cream pairs beautifully with warm desserts. Try serving it alongside a moist banana bread, a slice of pineapple upside-down cake, or even grilled sweet pineapple for a caramelized tropical treat that tastes like summer on a plate.
Creative Ways to Present
For special occasions, I’ve scooped this ice cream into hollowed-out coconut shells—talk about an impressive tropical presentation! You can also create ice cream sandwiches using coconut macaroons or serve the ice cream in crispy waffle cones sprinkled with toasted coconut on the rim for an elegant touch.
Make Ahead and Storage
Storing Leftovers
I usually keep leftovers in an airtight container in the coldest part of my freezer. Make sure to smooth the top and press a piece of cling wrap directly on the ice cream before sealing the lid to avoid freezer burn. This keeps the texture fresh and creamy for up to two weeks.
Freezing
Because this recipe has no churner, freezing overnight is essential for achieving that perfect scoopable texture. I find that freezing longer than 24 hours doesn’t compromise quality, but definitely plan ahead for that eight-hour minimum so the ice cream has enough time to set completely.
Reheating
Unlike savory leftovers, reheating ice cream isn’t really a thing — but letting it sit at room temperature for 5-10 minutes before scooping works like a charm to soften it just enough. If it’s too hard, pop it in for a quick 20-second zap in the microwave, checking often, so you don’t melt it.
FAQs
-
Can I make this Homemade Coconut Ice Cream Recipe without an ice cream maker?
Absolutely! This recipe is designed specifically to be churn-free. By whipping heavy cream and folding in the coconut mixture gently, you create a creamy, airy texture without needing any special equipment.
-
Can I use light coconut milk instead of full fat?
Full-fat coconut milk is best because it provides richness and creaminess. Using light coconut milk might make the ice cream less creamy and could result in ice crystals forming. If you want a lighter option, consider using coconut cream instead but be aware the texture may change.
-
Can I substitute the sweetened condensed milk for a vegan alternative?
Yes, you can find sweetened condensed coconut milk or other plant-based condensed milk substitutes. These alternatives work well to provide sweetness and help with freezing consistency, though the flavor might differ slightly.
-
How do I avoid ice crystals in my coconut ice cream?
Pressing cling wrap directly onto the surface before freezing helps prevent ice crystals from forming. Also, ensure your ingredients are well mixed and fold gently to incorporate air — both these steps help keep the texture smooth.
-
Can I add mix-ins like chocolate chips or nuts?
Definitely! Adding mix-ins like chopped nuts, chocolate chips, or even dried fruits before freezing can add fantastic texture and flavor variety. Just fold them in gently with the coconut flakes in the last step.
Final Thoughts
Honestly, this Homemade Coconut Ice Cream Recipe holds a special place in my heart — it brings a little slice of tropical paradise straight into my kitchen and always puts a smile on my family’s faces. I used to struggle with store-bought coconut ice cream that tasted too artificial or icy, so having this simple, customizable recipe in my repertoire has been a total game-changer. Give it a try, and I promise you’ll be hooked just like I am — creamy, rich, and packed with that irresistible coconut flavor that makes every bite pure happiness.
Print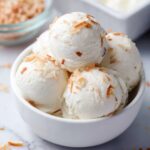
Homemade Coconut Ice Cream Recipe
- Prep Time: 15 minutes
- Cook Time: 0 minutes
- Total Time: 12 hours 15 minutes
- Yield: 10 servings
- Category: Dessert
- Method: No-Cook
- Cuisine: International
- Diet: Vegetarian
Description
This homemade coconut ice cream is a creamy, dairy-rich treat made with heavy cream, full-fat coconut milk, and sweetened condensed milk. Enhanced with a touch of vanilla and optional coconut extract, it features toasted unsweetened shredded coconut for added texture and flavor. The recipe requires no ice cream maker, using whipped cream and gentle folding techniques to achieve a light, airy consistency before freezing for a smooth, indulgent dessert.
Ingredients
Dairy and Liquid Ingredients
- 1.5 cups Heavy Cream/Whipping Cream, cold
- 2 cups Coconut Milk, full fat, cold
- ½ can Sweetened Condensed Milk (about 200 grams from a 400 gram can), cold
- 1 teaspoon Vanilla Extract
- ⅛ teaspoon Coconut Extract (optional)
Sweeteners and Flavors
- ¾ cup Powdered Sugar
Additional Ingredients
- ½ cup Dry Shredded Coconut or Coconut Flakes, toasted and unsweetened
Instructions
- Whip the Cream: In a large bowl, combine the cold heavy cream, powdered sugar, and vanilla extract. Using a hand blender, whip the cream until it doubles in volume and forms stiff peaks, ensuring a light and stable base for the ice cream.
- Mix Coconut Base: In a separate bowl, mix together the cold coconut milk, sweetened condensed milk, and optional coconut extract until well combined, forming the flavorful ice cream base.
- Aerate the Mixture: Take a few scoops of the whipped cream and fold them gently into the coconut milk mixture. This step helps to aerate the mixture, incorporating air for a smoother texture.
- Combine Mixtures: In two batches, fold the coconut milk mixture into the whipped cream using a spatula. Fold gradually and carefully to retain as much air as possible, resulting in a fluffy ice cream mixture.
- Prepare for Freezing: Transfer the mixture into a shallow rectangular container. Smooth the surface, then cover it with a piece of cling wrap or baking paper pressed gently on top to prevent ice crystals from forming.
- Seal and Freeze: Cover the container tightly with a lid, cling wrap, or foil. Freeze for at least 8 hours, preferably overnight, to allow the ice cream to set and develop its creamy texture.
- Serve: Before serving, remove the cling wrap from the surface and let the ice cream rest at room temperature for about 5 minutes to soften slightly for easy scooping. Optionally, sprinkle toasted shredded coconut on top for added texture and flavor.
Notes
- Keeping all liquid ingredients cold helps the ice cream freeze faster and improves texture.
- Coconut extract is quite potent; 1/8 teaspoon adds a subtle flavor, but it can be increased up to 1/4 teaspoon depending on your preference.
- Toasted shredded coconut adds a nice crunch; toast the coconut flakes lightly in a dry pan over medium heat until golden brown.
- This recipe does not require an ice cream maker, making it simple and accessible.
Nutrition
- Serving Size: 1/10 of recipe (~130g)
- Calories: 280
- Sugar: 22g
- Sodium: 35mg
- Fat: 22g
- Saturated Fat: 18g
- Unsaturated Fat: 3g
- Trans Fat: 0g
- Carbohydrates: 17g
- Fiber: 1g
- Protein: 3g
- Cholesterol: 75mg


