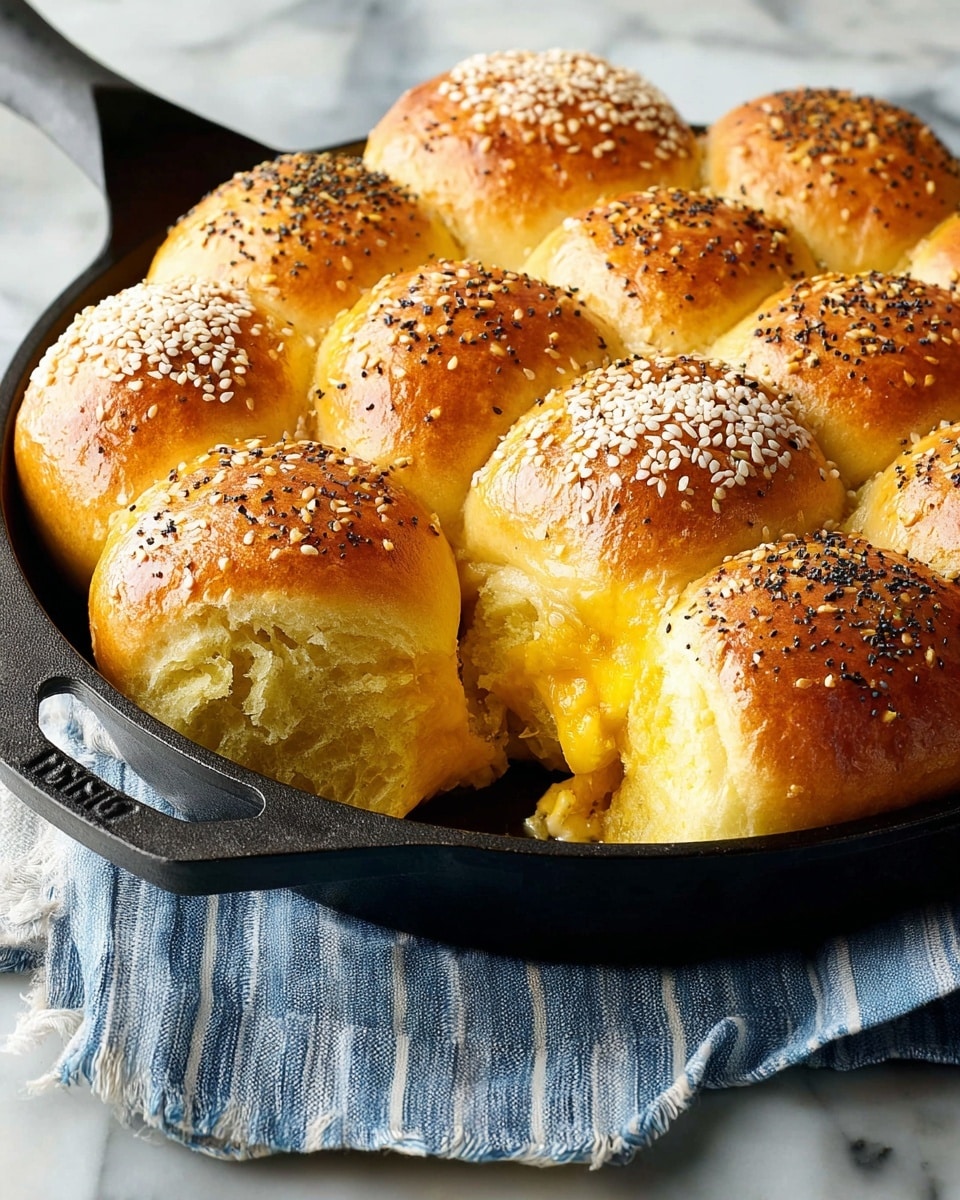
If you’re on the lookout for a bread that’s soft, slightly sweet, and just bursting with fall flavors, you’re going to fall head over heels for this Honey-Squash Dinner Rolls Recipe. I absolutely love how these rolls come out tender and fluffy, with that gentle sweetness from honey and mashed winter squash that makes them perfect for any dinner table. Whether you’re serving up a cozy family meal or bringing bread to a holiday gathering, these rolls are a guaranteed crowd-pleaser — stick around because I’m sharing all the tips to make them perfectly every time!
Why You’ll Love This Recipe
- Naturally Sweet and Moist: The mashed winter squash combined with honey gives the rolls a wonderful sweetness and moistness without needing extra sugar or oil.
- Perfectly Soft and Fluffy: Thanks to the right balance of flour and kneading, these rolls develop a tender crumb that’s easy to tear apart.
- Versatile for Any Meal: Serve them alongside soups, stews, or use them for mini sandwiches – my family goes crazy for how adaptable they are.
- Fun Toppings: Sprinkling seeds like pepitas or sesame on top adds a lovely crunch and a touch of saltiness to balance the sweet dough.

Ingredients You’ll Need
The magic of this Honey-Squash Dinner Rolls Recipe lies in its simple but thoughtfully combined ingredients. Each one plays its part to ensure you get that soft, sweet, and slightly nutty flavor. When shopping, I recommend finding good-quality squash and fresh yeast for the best rise and flavor.
- Active Dry Yeast: This is the key to getting your rolls nice and fluffy – fresh yeast will give you the best rise.
- Salt: Balances the sweetness and enhances flavor.
- Ground Nutmeg: Adds a warm, subtle spice that complements the squash beautifully.
- All-Purpose Flour: The backbone of the dough – fluffier rolls come from the right amount and kneading time.
- 2% Milk: Adds richness without weighing down the dough.
- Butter, cubed: Adds tenderness and a lovely buttery flavor.
- Honey: Provides natural sweetness and a moist crumb.
- Frozen Mashed Winter Squash, thawed: I love the subtle sweetness and moisture this brings; pumpkin or butternut work beautifully.
- Large Egg, lightly beaten: For brushing the tops, helping them brown and giving a slight sheen.
- Poppy Seeds, Salted Pumpkin Seeds (Pepitas), or Sesame Seeds: These give a great textural contrast and a savory note on top.
Variations
I love how adaptable this Honey-Squash Dinner Rolls Recipe is. Over time, I’ve experimented with a few tweaks to customize it based on what we have or what flavors I’m craving—feel free to put your own spin on it!
- Using Different Squashes: Sometimes I swap out the winter squash for pureed sweet potato or pumpkin puree; it changes the flavor slightly but keeps that soft, sweet crumb.
- Gluten-Free Version: I’ve tried using a gluten-free flour blend with added xanthan gum, but you’ll want to knead less and watch the consistency as it’s a bit stickier.
- Seed Toppings: Mix and match your seeds! I love combining sesame and poppy seeds for that pop of crunch and nutty flavor.
- No Milk Option: You can substitute dairy milk with almond milk or oat milk for a dairy-free version; just warm it gently to activate yeast properly.
How to Make Honey-Squash Dinner Rolls Recipe
Step 1: Activate Your Yeast and Mix the Dry Ingredients
Start by mixing the yeast, salt, ground nutmeg, and 3 cups of flour in a large bowl. It’s super important not to add hot liquid directly onto the yeast; I usually heat the milk, butter, and honey gently in a saucepan until it’s around 120°-130°F — slightly warm to the touch, not hot. This keeps your yeast happy and active.
Step 2: Combine Wet and Dry, Then Add Squash
Pour the warm milk, butter, and honey mixture into the dry ingredients and beat on medium speed for about 2 minutes. Then add your thawed mashed squash and beat on high speed for another 2 minutes. Right now, the dough will be sticky – don’t panic! Gradually add the remaining flour, stirring until it forms a soft dough. The texture should be soft but manageable.
Step 3: Knead Until Smooth and Elastic
Turn the dough out onto a floured surface and knead for 6 to 8 minutes until the dough feels smooth and elastic. I find this step so satisfying because you can feel the dough transform — stickiness slowly fades and the texture becomes silky. This kneading helps develop gluten, which is what makes your rolls rise beautifully.
Step 4: First Rise and Punch Down
Place your dough in a greased bowl, turning it once to coat the top lightly with oil. Cover with a clean kitchen towel and let it rise in a warm spot until doubled in size — this takes about an hour. I like to put my bowl near a sunny window or briefly warm my oven (then turn it off) and place the dough inside. After it has risen, punch down gently to remove air bubbles.
Step 5: Shape Rolls and Second Rise
Divide the dough into 24 equal portions and shape each into a ball. Divide these between two greased 9-inch cast-iron skillets or round baking pans. Cover loosely with kitchen towels and let them rise again in a warm place until doubled, about 45 minutes. This second rise gives the rolls their light and fluffy texture.
Step 6: Bake to Golden Perfection
Preheat your oven to 375°F. Before baking, brush the tops of the rolls with the beaten egg — this will give them a beautiful golden shine. Sprinkle your favorite seeds like poppy, pumpkin, or sesame on top. Bake for 20 to 25 minutes until they are a deep golden brown. If you notice the tops are getting too dark, loosely cover with foil during the last 5 to 7 minutes to avoid burning. When baking’s done, transfer rolls to a wire rack to cool slightly — but honestly, they’re best enjoyed warm right away!
Pro Tips for Making Honey-Squash Dinner Rolls Recipe
- Perfect Dough Temperature: Always make sure your liquid is warm but not hot — too hot can kill the yeast, too cold slows the rise. Test it with your wrist, it should feel like a warm bath.
- Kneading Patience: Don’t rush the kneading step; it can be easy to stop too soon, but kneading is what makes these rolls rise light and fluffy.
- Cover Properly During Rising: Use a damp towel or plastic wrap to cover your dough so it doesn’t dry out during rising periods.
- Watch the Bake Time: Ovens vary, so start checking around 18 minutes; overbaking dries the interior – soft rolls are worth pulling out a bit early!
How to Serve Honey-Squash Dinner Rolls Recipe

Garnishes
My go-to garnish is a simple brush of beaten egg before baking, but I swear by the salted pumpkin seeds or pepitas sprinkled on top — they add a delightful crunch and a hint of saltiness that balances the sweet honey and squash perfectly. Poppy seeds or sesame seeds are great if you prefer more subtle textures.
Side Dishes
Pair these rolls with hearty fall soups like butternut squash bisque or creamy tomato basil soup. I also love serving them alongside roasted chicken or a Thanksgiving dinner spread. They’re fantastic with a pat of herb butter or a drizzle of honey butter for extra indulgence.
Creative Ways to Present
For special occasions, I like arranging the rolls in a wreath shape on a large platter, scattering fresh herbs like rosemary or thyme between them for color and aroma. You can also make mini sliders by slicing the rolls and adding your favorite fillings — they’re a hit at holiday parties or potlucks.
Make Ahead and Storage
Storing Leftovers
I store leftover rolls in an airtight container at room temperature for up to 2 days. If you want to keep them fresh longer, wrapping them tightly in foil and placing in a bread box also works well. Just avoid the fridge unless you want stale rolls pretty fast.
Freezing
To freeze, I let the rolls cool completely, then place them in a single layer on a baking sheet and freeze until firm. After that, transfer to a resealable freezer bag. They freeze beautifully and keep their moist texture well for up to 3 months.
Reheating
When I reheat, I like popping the rolls in a 350°F oven wrapped in foil for about 10–12 minutes. This warms them through without drying them out. You can also microwave them under a damp paper towel for about 20 seconds if you’re in a hurry.
FAQs
-
Can I use fresh squash instead of frozen mashed winter squash in this Honey-Squash Dinner Rolls Recipe?
Absolutely! You can roast fresh winter squash (like butternut or acorn) until tender, then mash it before adding to the dough. Just make sure it’s cooled and drained of excess moisture to avoid making the dough too wet.
-
What’s the best way to tell when the rolls are fully baked?
Look for a deep golden-brown color on top, and if you tap the bottom of a roll, it should sound hollow. Also, the internal temperature should reach about 190°F if you want to be precise.
-
Can I make these rolls vegan?
You can! Replace the butter with vegan margarine or coconut oil, use non-dairy milk like almond or oat milk, and swap the egg wash with a mixture of plant-based milk and a little maple syrup for browning.
-
Why is my dough sticky, and how much flour should I add?
The dough should be slightly sticky because of the squash and honey, but not overly wet. Add the last cups of flour gradually, just until you can knead without it sticking excessively to your hands or the surface. Every batch of squash can vary in moisture.
Final Thoughts
This Honey-Squash Dinner Rolls Recipe holds a special place in my kitchen because it combines the comforting flavors of fall with that irresistible homemade bread warmth. My family always looks forward to these rolls, and I hope that once you try them, they’ll become a staple in your home, too. Don’t be intimidated by the process — with a little patience and these tips, you’ll be pulling golden, fragrant rolls from the oven in no time. Happy baking, friend!
Print
Honey-Squash Dinner Rolls Recipe
- Prep Time: 40 minutes plus 1 hour 45 minutes rising time
- Cook Time: 20-25 minutes
- Total Time: 2 hours 45 minutes
- Yield: 24 dinner rolls
- Category: Bread
- Method: Baking
- Cuisine: American
Description
These Honey-Squash Dinner Rolls are soft, slightly sweet, and enriched with mashed winter squash and honey for a unique, tender texture. Perfect for any dinner table, these rolls are lightly seasoned with nutmeg and topped with an assortment of seeds for added flavor and crunch.
Ingredients
Dough Ingredients
- 2 packages (1/4 ounce each) active dry yeast
- 2 teaspoons salt
- 1/4 teaspoon ground nutmeg
- 6 to 6-1/2 cups all-purpose flour
- 1-1/4 cups 2% milk
- 1/2 cup butter, cubed
- 1/2 cup honey
- 1 package (12 ounces) frozen mashed winter squash, thawed (about 1-1/3 cups)
- 1 large egg, lightly beaten
Topping Ingredients
- Poppy seeds, salted pumpkin seeds or pepitas, and sesame seeds (for sprinkling)
Instructions
- Mix dry ingredients: In a large bowl, combine the active dry yeast, salt, ground nutmeg, and 3 cups of all-purpose flour. This will create the base of your dough.
- Heat liquid ingredients: In a small saucepan, gently heat the 2% milk, cubed butter, and honey until the mixture reaches 120°-130°F. It should be warm but not hot to ensure proper yeast activation.
- Combine and beat dough: Add the warm milk mixture to the dry ingredients. Beat on medium speed for 2 minutes. Then add the thawed mashed winter squash and beat on high speed for an additional 2 minutes. Stir in enough of the remaining flour to form a soft, slightly sticky dough.
- Knead the dough: Turn the dough onto a floured surface and knead it until smooth and elastic, about 6-8 minutes. This develops the gluten for a tender bread texture.
- First rise: Place the kneaded dough in a greased bowl, turning once to grease the top. Cover and let it rise in a warm place until doubled in size, approximately 1 hour.
- Shape rolls: Punch down the risen dough and turn it onto a lightly floured surface. Divide the dough into 24 equal-sized balls. Place the balls evenly between two greased 9-inch cast-iron skillets or round baking pans.
- Second rise: Cover the pans with kitchen towels and let the rolls rise in a warm place until doubled, about 45 minutes. This step ensures light, fluffy rolls.
- Prepare for baking: Preheat your oven to 375°F. Brush the tops of the risen rolls with the lightly beaten egg. Sprinkle generously with poppy seeds, salted pumpkin seeds or pepitas, and sesame seeds.
- Bake the rolls: Bake the rolls in the preheated oven for 20-25 minutes until they turn a dark golden brown. If the tops brown too quickly, loosely cover with foil during the last 5-7 minutes to prevent burning.
- Cool and serve: Remove the rolls from the pans and transfer them to wire racks. Serve them warm for the best flavor and texture.
Notes
- Ensure the milk mixture temperature is between 120°-130°F to properly activate the yeast without killing it.
- If you don’t have cast-iron skillets, use round baking pans or any oven-safe dish that will hold the rolls close together for softer sides.
- Rolling the dough into equal-sized balls helps bake the rolls evenly.
- Covering the rolls during the final minutes of baking prevents overbrowning without sacrificing crust crispness.
- These rolls can be stored in an airtight container for up to 3 days and warm well in the oven before serving.
Nutrition
- Serving Size: 1 roll
- Calories: 130
- Sugar: 4 g
- Sodium: 180 mg
- Fat: 4 g
- Saturated Fat: 2.5 g
- Unsaturated Fat: 1.2 g
- Trans Fat: 0 g
- Carbohydrates: 21 g
- Fiber: 1 g
- Protein: 3 g
- Cholesterol: 20 mg


