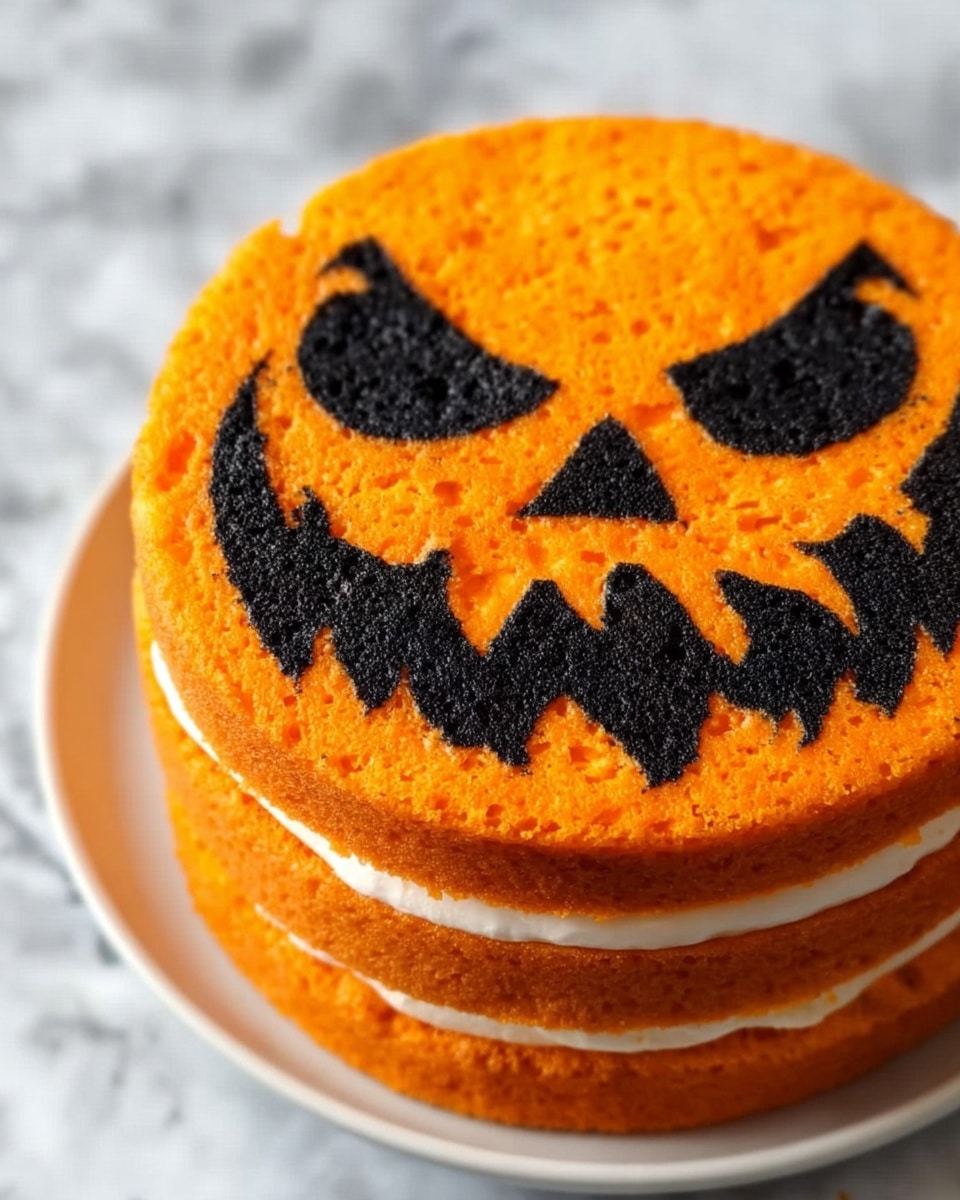
If you’re looking for a fun, festive dessert that will wow your guests this Halloween, I absolutely love sharing my Jack-O-Lantern Cake Recipe. It’s not only adorable with its cute pumpkin face design, but it’s also light, fluffy, and creamy—perfect for celebrating the spooky season with a sweet twist. Trust me, once you try this recipe, you’ll find that it becomes your go-to Halloween treat that everyone asks for again and again.
Why You’ll Love This Recipe
- Festive and Eye-Catching: The Jack-O-Lantern design really steals the show, making it perfect for parties.
- Light and Fluffy Texture: The combination of whipped egg whites and fresh whipped cream creates a melt-in-your-mouth experience.
- Easy to Customize: You can tweak colors and decorations to suit your Halloween vibe or dietary needs.
- Made-Ahead Friendly: This cake keeps well if you seal it right, perfect for prepping in advance.

Ingredients You’ll Need
This recipe balances simple pantry staples with a few kitchen essentials to create a stunning Jack-O-Lantern cake. Fresh eggs and heavy cream are really the stars here—they give that perfect rise and richness that you just can’t fake.
- Egg yolks: They give the cake its tender crumb and rich flavor.
- Sugar: Used for both the cake and whipped cream to sweeten perfectly.
- Vegetable oil: Keeps the cake moist without weighing it down.
- Whole milk: Adds creaminess and helps the batter blend smoothly.
- Vanilla extract: Brings warmth and depth to the flavor—you won’t want to skip it.
- All-purpose flour: The base structure of the cake.
- Cornstarch: Keeps the cake light and tender by reducing gluten.
- Egg whites: Whipped to stiff peaks, these create the airy lift that makes this cake special.
- Vinegar: Stabilizes egg whites when whipped for perfect volume.
- Heavy whipping cream: Whipped with sugar and vanilla to frost and fill the layers beautifully.
- Confectioners sugar: Sweetens the whipped cream without grittiness.
- Dash of salt: Enhances all the flavors.
- Orange food gel (optional): Makes the cake glow like a pumpkin—totally worth it!
Variations
I love how versatile this Jack-O-Lantern Cake Recipe is—you can easily switch things up to fit your dietary needs or style. Play around with different colors or try some fun flavors in the whipped cream. It’s your pumpkin patch to get creative!
- Dairy-Free Option: Swap out the heavy cream for a coconut cream topping—I’ve done this for friends who are lactose intolerant, and it was just as dreamy!
- Chocolate Twist: Adding a bit of cocoa powder to the batter creates a spooky dark pumpkin effect that’s rich and delicious.
- Spiced Pumpkin Flavor: Mix in cinnamon, nutmeg, and pumpkin pie spice into the batter for that classic fall vibe.
- Gluten-Free Version: Substitute the flour with a gluten-free blend and you’ll have everyone enjoying the fun—my nephew has celiac, so I always keep this option in mind.
How to Make Jack-O-Lantern Cake Recipe
Step 1: Prep Your Pan and Design
First things first: preheat your oven to 375°F and grab an 8-inch round pan. Grease it with cooking spray and line it with parchment paper. Here’s a trick I learned—trace your Jack-O-Lantern face on the parchment paper before placing it in the pan. This way, when you pipe your black batter later, you have a perfect guide. I like to cut my parchment so it fits snugly in the pan to avoid slippage.
Step 2: Mix the Egg Yolks and Sugar
Whisk together the six egg yolks with four tablespoons of sugar until smooth and pale. I find that using a hand whisk instead of a mixer here gives better control and a nice silky texture. Don’t toss those egg whites—they’re your secret weapon for fluffiness!
Step 3: Add Oil, Milk, and Vanilla
Pour in your vegetable oil, whole milk, and vanilla extract to the yolk mixture. Continue whisking until the ingredients meld together into a smooth batter. This step keeps your cake moist and flavorful—the foundation of that delicate crumb.
Step 4: Sift and Add Dry Ingredients
Sift in the all-purpose flour and cornstarch to avoid any lumps. I always sift twice just to be sure. Then gently whisk everything together until smooth. This is also the moment to stir in a few drops of orange food gel—this little pop of color makes the cake look like a real Jack-O-Lantern.
Step 5: Whip Those Egg Whites
Using a stand mixer fitted with a whisk attachment, beat the six egg whites until they’re frothy. Then, slowly add the vinegar and sugar while continuing to whip. Your goal is stiff peaks—this is crucial. When I first tried rushing this step, the batter turned too runny and the cake didn’t rise properly. Be patient here, and you’ll be rewarded with incredible fluffiness.
Step 6: Fold Egg Whites into Batter
Now, gently fold the stiff egg whites into the yolk-based batter. This part is all about technique—overmixing will deflate your egg whites, resulting in a thinner batter and a flatter cake. I like to fold with a large spatula, turning the bowl slowly and folding over just until the whites disappear. Your cake’s light texture depends on this step!
Step 7: Create and Freeze the Jack-O-Lantern Face
Set aside about 1/4 cup of this batter and tint it black with food coloring. Spoon it into a piping bag and carefully pipe your Jack-O-Lantern face on the parchment-lined pan using your traced guide. Pop the pan in the freezer for 5-8 minutes so the design firms up. This little chilling step helps keep your face sharp and perfectly shaped during baking.
Step 8: Bake the Jack-O-Lantern Layer
Once frozen, pour the remaining orange batter over the black design, covering it completely. Bake for about 8-9 minutes until the edges turn golden brown. When it’s done, flip the cake out of the pan right away and peel off the parchment—if you wait too long, the design might stick and rip. I’ve learned the hard way that timing here makes all the difference!
Step 9: Bake Additional Cake Layers
Use the rest of your batter to bake two more undecorated cake layers. They’re the perfect base and middle layers to keep that Jack-O-Lantern cake balanced and moist. Let all your layers cool completely before assembling.
Step 10: Whip the Cream
In your clean stand mixer bowl, whip the heavy cream, confectioners sugar, vanilla extract, and a dash of salt until you get stiff peaks. This whipped cream filling is what turns the cake from good to utterly irresistible. I like to whip just enough so it holds shape but isn’t too stiff—soft peaks can be too runny; stiff peaks will hold beautifully between layers.
Step 11: Assemble Your Jack-O-Lantern Cake
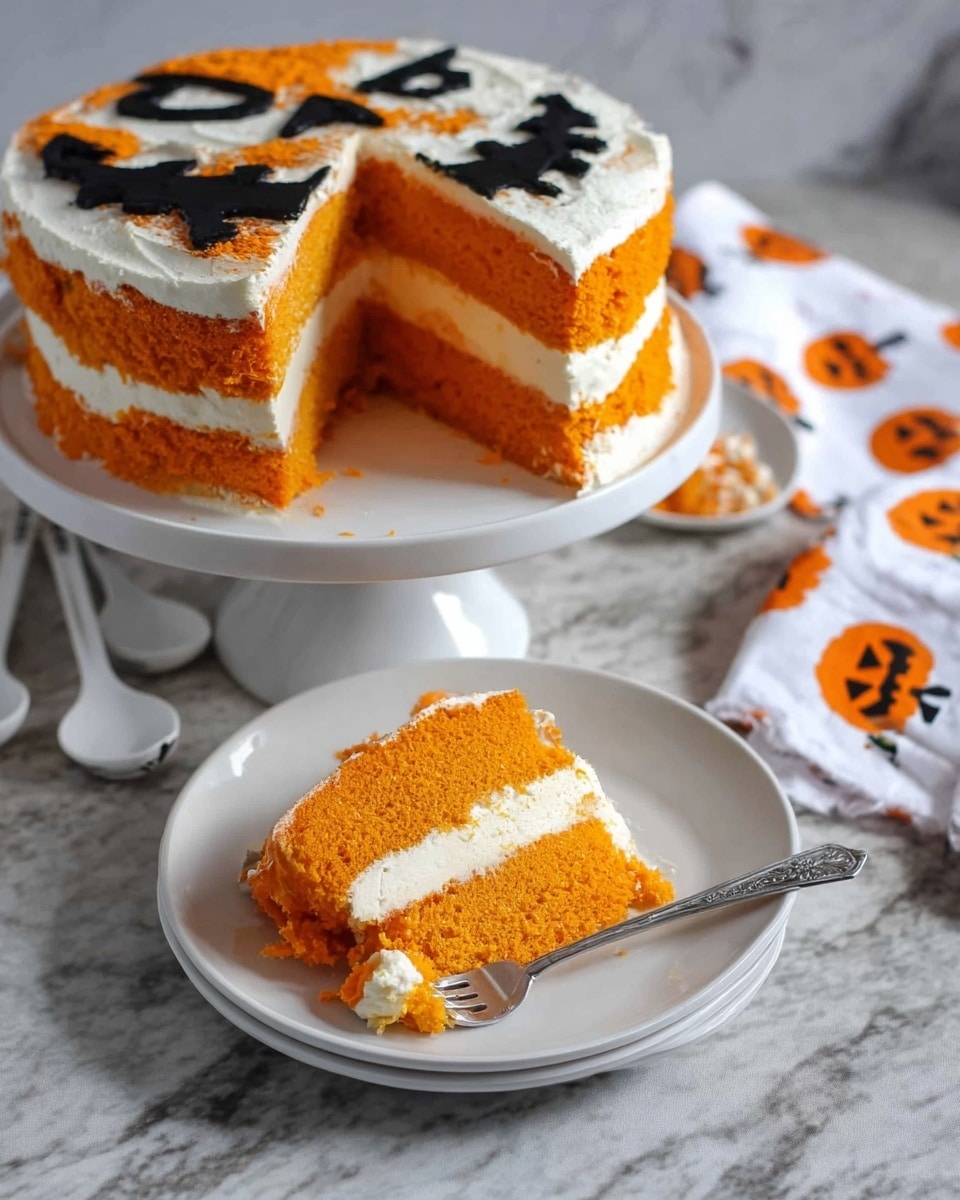
Start with a plain cake layer on your serving plate, pipe or spread an even layer of whipped cream, then place another plain cake layer on top. Repeat once more. Finally, place your Jack-O-Lantern designed cake on top for the big reveal. Chill in the fridge until serving to let everything set nicely.
Pro Tips for Making Jack-O-Lantern Cake Recipe
- Don’t Rush the Egg Whites: Waiting for stiff peaks really makes the difference between a dense cake and a fluffy one.
- Freeze the Design Layer: Chilling before baking keeps your Jack-O-Lantern face crisp and clean.
- Peel Parchment ASAP: Removing the parchment right after baking prevents tearing the design off.
- Fold, Don’t Stir: Folding the egg whites in gently preserves air and volume for a perfectly light cake.
How to Serve Jack-O-Lantern Cake Recipe
Garnishes
I like to keep the garnishes simple so that the Jack-O-Lantern face really shines. A few strategically placed edible gold stars, tiny candy pumpkins around the cake’s base, or even a sprinkle of cinnamon on top of the whipped cream adds a nice cozy touch that’s subtle but festive.
Side Dishes
Pair this cake with light fall-inspired drinks like hot apple cider or a warm chai latte. If you’re serving a full meal, think roasted butternut squash soup or pumpkin-spiced baked goods for a themed spread that complements the dessert perfectly.
Creative Ways to Present
For extra fun, I’ve presented the cake on a rustic wooden platter surrounded by autumn leaves and fairy lights to set a magical mood. Another time, I set each slice on mini orange plates with a dollop of whipped cream and a candy eyeball on top—guests loved the playful, spooky details!
Make Ahead and Storage
Storing Leftovers
I recommend wrapping the assembled cake tightly in plastic wrap and storing it in the fridge. It keeps beautifully for up to 2 days, and the flavors actually meld together better after resting overnight. I’ve noticed the cake stays moist and the whipped cream maintains its fresh texture this way.
Freezing
Freezing the assembled cake isn’t my favorite option because whipped cream can sometimes lose its texture after thawing, but if you need to, freeze the cake layers separately and thaw overnight in the fridge before assembling. This way, the final whipped cream layer stays fresh and fluffy.
Reheating
This cake is best served chilled, so reheating doesn’t really apply. If you bake the layers ahead and want to warm them slightly before assembling, pop them in a warm oven for a few minutes, but I personally prefer assembling cold to preserve the cream’s softness.
FAQs
-
Can I use regular food coloring instead of gel?
You can, but gel food coloring is much more concentrated and won’t thin out your batter as much. I’ve found gels give the most vibrant orange and black colors without affecting texture.
-
What if I don’t have a piping bag?
No worries! You can use a zip-top bag and snip a tiny corner off to pipe the design, or even use a small spoon to carefully place the black batter onto the parchment.
-
How do I know when the cake is done baking?
Look for golden edges and a firm surface. Since this cake is thin, it only needs about 8-9 minutes in the oven. A toothpick inserted should come out clean or with a few moist crumbs.
-
Can I make the whipped cream in advance?
Yes! You can whip the cream a few hours ahead and keep it chilled, but for the best texture, whip it fresh before assembling if possible.
Final Thoughts
There’s something magical about this Jack-O-Lantern Cake Recipe—it’s not just a dessert, but a celebration of the season that’s as fun to make as it is to eat. I remember the first time I surprised my family with this cake; their faces lit up just like the pumpkin on the cake’s surface. If you want to create a memorable Halloween treat that’s as delightful to your eyes as it is to your taste buds, give this recipe a go. You’ll impress everyone with your baking skills and enjoy every delicious bite yourself. Happy baking, friend!
Print
Jack-O-Lantern Cake Recipe
- Prep Time: 20 minutes
- Cook Time: 8-9 minutes per cake layer (approximately 27 minutes total for 3 layers)
- Total Time: 50 minutes
- Yield: 8-12 servings
- Category: Dessert
- Method: Baking
- Cuisine: American
Description
This festive Jack-O-Lantern Cake is a delightful Halloween dessert featuring a vibrant orange sponge cake with a striking black Jack-O-Lantern face design baked right into the top layer. Light, fluffy, and layered with sweet, homemade whipped cream, this cake is perfect for spooky celebrations and is sure to impress your guests with its creative presentation and delicious taste.
Ingredients
For the Cake Batter
- 6 egg yolks
- 4 Tbsp. sugar
- 4 Tbsp. vegetable oil
- 4 Tbsp. whole milk
- 2 tsp. vanilla extract
- 1 cup all purpose flour
- 2 Tbsp. cornstarch
- 6 egg whites
- 1/2 tsp. vinegar
- 4 Tbsp. sugar
- 2-3 drops orange food gel color
- Black food gel color (amount as needed)
For the Whipped Cream
- 2 cups heavy whipping cream
- 5-6 Tbsp. confectioners sugar
- Dash of salt
- 2 tsp. vanilla extract
Instructions
- Prepare the Pan and Design: Preheat the oven to 375°F (190°C). Grease an 8-inch circular cake pan with cooking spray and line it with parchment paper. Draw or trace a Jack-O-Lantern face onto the parchment paper that fits the pan perfectly, then set aside.
- Make the Egg Yolk Mixture: In a bowl, whisk together the 6 egg yolks and 4 tablespoons sugar until smooth and pale. Add the vegetable oil, whole milk, and 2 teaspoons vanilla extract and continue whisking until fully combined.
- Add Dry Ingredients and Color: Sift together the all-purpose flour and cornstarch into the wet mixture. Whisk until the batter is smooth. Add 2-3 drops of orange food gel and mix until evenly distributed.
- Whip the Egg Whites: In the bowl of a stand mixer fitted with a whisk attachment, whisk the 6 egg whites on medium speed until frothy. Slowly add 1/2 teaspoon vinegar and 4 tablespoons sugar while continuing to whisk. Whip until stiff peaks form, which is essential for the cake’s texture.
- Fold Egg Whites into Batter: Gently fold the stiff egg whites into the orange batter using a spatula. Be careful to mix just until the egg whites are evenly incorporated without deflating them, preserving the batter’s lightness.
- Create the Black Batter Design: Remove about 1/4 cup of the batter into a small bowl and dye it black using black food gel color. Place the black batter into a piping bag.
- Pipe the Jack-O-Lantern Face: Pipe the black batter onto the prepared parchment paper in the pan, creating the Jack-O-Lantern face design. Freeze the pan for 5-8 minutes to help the design set.
- Pipe Orange Batter Over Design: Pipe the remaining orange batter evenly over the frozen black design, covering the entire pan.
- Bake the Designed Cake: Bake in the preheated oven for 8-9 minutes, or until the edges are golden brown and a toothpick inserted in the center comes out clean.
- Remove and Cool: Once baked, carefully flip the cake out of the pan and peel off the parchment paper immediately to reveal the Jack-O-Lantern face. Use the remaining batter to bake two more layers of undecorated cake. Allow all cakes to cool completely.
- Prepare Whipped Cream: In a clean stand mixer bowl with a whisk attachment, whip the heavy cream, confectioners sugar, salt, and vanilla extract together until stiff peaks form and the cream is fluffy.
- Assemble the Cake: Place one plain cake layer on a serving plate, pipe or spread a layer of whipped cream on top, then place the second plain cake layer. Repeat the whipped cream layer, and finally top with the decorated Jack-O-Lantern cake layer.
- Chill and Serve: Store the assembled cake in the fridge until serving to keep the whipped cream fresh. For best results, enjoy the cake within a day and keep it tightly wrapped if made ahead.
Notes
- Ensure the egg whites reach stiff peaks to achieve a light and airy cake texture.
- Folding the egg whites gently is crucial to maintain the batter’s volume.
- Use gel food coloring for vibrant and natural-looking colors without affecting batter consistency.
- Remove the parchment paper immediately after baking to avoid tearing the design on the cake.
- The cake is best served fresh but can be stored tightly wrapped in plastic wrap in the refrigerator for up to 2 days.
- Freezing the piped black design before covering with orange batter helps keep the pattern sharp and defined.
Nutrition
- Serving Size: 1 slice (assuming 12 servings)
- Calories: 280 kcal
- Sugar: 18 g
- Sodium: 90 mg
- Fat: 18 g
- Saturated Fat: 10 g
- Unsaturated Fat: 7 g
- Trans Fat: 0 g
- Carbohydrates: 24 g
- Fiber: 0.5 g
- Protein: 5 g
- Cholesterol: 140 mg


