
If you’re looking for a show-stopping festive treat that’s both elegant and adorable, you’re going to absolutely adore this Mini Pavlova Christmas Trees Recipe. I’ve been making these little beauties every holiday season, and they somehow manage to be delicate, sweet, and downright fun all at once. Plus, they’re surprisingly simple to whip up once you get the hang of it. Stick with me, and I’ll walk you through exactly how to get that perfect crisp meringue with a cloud-like cream topping, all decorated like charming Christmas trees. Your family and guests will be begging for seconds!
Why You’ll Love This Recipe
- Festive and Fun: These mini pavlovas are shaped and decorated to look like Christmas trees—so they make a delightful centerpiece for any holiday spread.
- Light yet Decadent: With crisp meringue bases and lush whipped cream, you get a perfect balance of textures that feels fancy but isn’t heavy.
- Impressive but Doable: I love how you can pull this off even if you’re not a baking pro—piping tips and baking trick included to make it stress-free.
- Customizable Decorations: You get to decorate with pistachio crumbs, fresh raspberries, and silver cachous—so you can get creative and personalize your trees.

Ingredients You’ll Need
These ingredients come together to create that classic pavlova texture—crispy shell with a marshmallow-center—and the festive toppers make all the difference. Be sure to use good-quality eggs and fresh cream for the best results.

- Free-range egg whites: Room temperature eggs whip up better and create more volume for those fluffy meringues.
- Caster sugar: Fine sugar dissolves evenly, helping you get that smooth, glossy meringue.
- White vinegar: Adds acidity that stabilizes the egg whites and keeps the pavlova from collapsing.
- Cornflour: An essential ingredient that keeps the center soft while the outside crisps up nicely.
- Sunbeam Australian pistachios: Ground to crumbs, these add beautiful color and a nutty crunch for your garnish.
- Thickened cream: For whipping that luscious topping—make sure it’s well-chilled so it whips up nice and stiff.
- Pure icing sugar: Sweetens the cream just enough without weighing it down.
- Rosewater: A little pinch of floral magic that takes the cream to another level—totally optional but highly recommended.
- Silver cachous, raspberries, freeze-dried raspberry powder, and strawberries: Fresh and festive garnishes that bring these mini pavlova trees to life.
Variations
I love giving this recipe a little twist to suit different tastes or make it easier for me when I’m short on time. Feel free to play around with flavors and decorations to make it your own—it’s all about having fun and embracing the holiday spirit.
- Chocolate Mini Pavlovas: I once dusted cocoa powder into the meringue mixture for a chocolaty version that still held the classic texture—rich and festive.
- Nut-Free Version: If you have allergies, just skip the pistachio crumbs and use grated white chocolate or crushed freeze-dried berries instead for color and crunch.
- Flavor Swaps: Swap rosewater for vanilla or orange blossom water in the cream for a subtle change that adds depth.
- Size Adjustments: I’ve made larger pavlova trees when expecting crowd—just adjust baking time accordingly and remember that smaller ones bake faster and are cuter!
How to Make Mini Pavlova Christmas Trees Recipe
Step 1: Prep Your Baking Sheets and Oven
Start by preheating your oven to 100°C fan-forced (120°C conventional). It’s a low and slow bake that’s crucial for perfect pavlova. Grease two large oven trays lightly, then place baking paper sheets on them. Mark four 4.5cm circles on each—these are your guides for piping the meringue mounds. Flip the paper so the marked side is down; this keeps ugly pencil marks off your pavlovas. Trust me, this little hack makes your trees look flawless.
Step 2: Whip the Meringue to Stiff Perfection
With an electric mixer, beat those room-temp egg whites until you get soft peaks. Then slowly add caster sugar, one tablespoon at a time, making sure it dissolves after each addition—this prevents grainy meringues. Once glossy and thick, gently fold in white vinegar and cornflour. This combo helps the pavlova stay crisp outside but soft inside, which is exactly what you want. I learned the hard way that rushing this step leads to cracks or less fluffiness, so patience is key.
Step 3: Pipe Your Meringue Mini Christmas Trees
Scoop a quarter of your meringue into a piping bag fitted with a 1cm plain nozzle. Pipe small, neat mounds onto your baking trays, using those circles as a guide. These are the tree bases. Then, with the remaining meringue, switch to a piping bag with a 0.5cm fluted nozzle. Starting at the base of each mound, pipe three rows of small vertical layers that wrap around, building the “branches” of your tree. This part always feels like sculpting, and it’s surprisingly relaxing. The detail really makes a difference!
Step 4: Bake and Cool with Care
Bake the pavlovas for 50 minutes to 1 hour until their edges are crisp but not browned. I find the sweet spot is when they peel slightly off the paper and feel firm on the edges but still a bit soft in the middle. Then, very important: turn the oven off, but keep the door slightly ajar and let them cool slowly inside. This prevents cracking from temperature shock—a straight takeaway from my early attempts!
Step 5: Prepare Pistachio Crumbs and Whipped Cream
While your pavlovas cool, blitz the pistachios in a small food processor until you get fine crumbs—think soft sandy texture, not powder. Then whip the thickened cream with icing sugar and rosewater until it holds just-firm peaks. I like mixing in rosewater because its subtle floral notes elevate the whole dessert without overpowering it. Fill a small piping bag with a portion of this cream for decorating.
Step 6: Decorate Your Mini Pavlova Christmas Trees
Pipe little cream dots around the tops of your trees—these help the silver cachous stick nicely. Then sprinkle on your silver cachous, fresh raspberries, and some freeze-dried raspberry powder for that dusting of festive color. Finally, garnish with the pistachio crumbs. I also serve these with extra strawberries and the remaining whipped cream alongside for anyone who wants to pile it on. The contrast of the green pistachio, red berries, and silver sprinkles truly makes these trees pop on the table!
Pro Tips for Making Mini Pavlova Christmas Trees Recipe
- Slow Sugar Addition: Pour the sugar in slowly and make sure it dissolves completely to avoid gritty texture.
- Keep Oven Door Ajar: Cooling the pavlovas in the turned-off oven prevents cracking from sudden temperature changes.
- Use Piping Guides: Don’t skip marking circles on baking paper—it helps keep your mini trees uniform and neat.
- Egg Whites at Room Temp: I learned that cold egg whites don’t whip as well, so plan to let them sit on the counter for 30 minutes before starting.
How to Serve Mini Pavlova Christmas Trees Recipe

Garnishes
I like to stick with silver cachous (those shiny little balls), fresh raspberries, and freeze-dried raspberry powder for that festive sparkle and color contrast. The pistachio crumbs add a lovely nutty note and an unexpected green hint that really completes the “Christmas tree” look. Plus, serving with freshly sliced strawberries and a dollop of leftover whipped cream takes them over the top.
Side Dishes
These little trees are a dessert star on their own, but if I’m pairing, I like light options—think a fresh fruit salad or a citrusy sorbet to balance the sweetness. A cup of strong espresso or a bright sparkling wine also pairs beautifully for those holiday celebrations.
Creative Ways to Present
For parties, I’ve arranged several mini pavlova trees on a large platter decorated with edible glitter and extra pistachio crumbs as “grass.” Another year, I placed each tree on mini cake stands with a dusting of powdered sugar “snow.” These little presentation tricks make the dessert a real conversation piece and bring out that festive joy.
Make Ahead and Storage
Storing Leftovers
If you happen to have leftovers—though trust me, it’s rare—they store best unassembled. Keep the meringue trees in an airtight container at room temp to avoid humidity making them soggy. Whipped cream should be stored separately in the fridge and whipped fresh before serving again.
Freezing
I don’t recommend freezing assembled pavlova trees because the whipped cream and fresh berries don’t freeze well. However, you can freeze the baked meringue shells in an airtight container for up to a month—just thaw them completely at room temperature before decorating.
Reheating
Since pavlovas are best served at room temperature or slightly chilled, reheating isn’t necessary. If your meringues feel a bit soft, a quick 5-minute blast in a low oven (90°C / 195°F) can crisp them up again—but be careful they don’t brown or melt.
FAQs
-
Can I make the mini pavlova shells ahead of time?
Absolutely! You can bake the meringue bases a day or two in advance and store them in an airtight container at room temperature. Just keep them away from moisture to maintain their crispness. Finish assembling with cream and toppings just before serving.
-
What if I don’t have rosewater?
No worries at all! Rosewater adds a gentle floral note, but you can substitute with vanilla extract or orange blossom water, or simply omit it. The whipped cream will still taste delicious.
-
How do I prevent my pavlova from cracking?
Slowly cooling the pavlovas by leaving the oven door slightly ajar after baking is the best way to reduce cracking. Avoid rapid temperature changes and don’t open the oven door too early during baking.
-
Can I use a regular oven instead of fan-forced?
Yes, you can use a conventional oven—just set it to 120°C as per the recipe. Fan-forced ovens circulate air more efficiently, so the temperature is slightly lower to avoid overcooking.
-
What’s the best way to decorate mini pavlova Christmas trees?
I like to pipe small dots of whipped cream to “glue” on silver cachous and berries, and sprinkle pistachio crumbs last for a natural “pine needle” look. Feel free to get creative with edible glitter or different berries as well!
Final Thoughts
This Mini Pavlova Christmas Trees Recipe is hands-down one of my favorite holiday treats because it’s charming, delicious, and has that magical wow-factor that makes celebrations memorable. I remember the first time I made them—I was nervous about the meringue, but the end result was so rewarding that now it’s a must on my Christmas table every year. I promise, once you try it, you’ll enjoy the simple joy of creating these sweet little masterpieces as much as everyone enjoys eating them. Give it a go, and happy holidays!
Print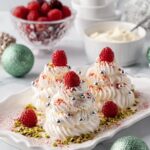
Mini Pavlova Christmas Trees Recipe
- Prep Time: 20 minutes
- Cook Time: 1 hour
- Total Time: 1 hour 20 minutes
- Yield: 8 servings
- Category: Dessert
- Method: Baking
- Cuisine: Australian
- Diet: Gluten Free
Description
These Mini Pavlova Christmas Trees are a festive and elegant dessert perfect for holiday celebrations. Made from light and airy meringue shaped into small tree forms, topped with whipped cream, pistachio crumbs, and vibrant decorations like raspberries, silver cachous, and freeze-dried raspberry powder, they make a visually stunning centerpiece that’s both delicious and gluten-free.
Ingredients
Meringue
- 6 free-range egg whites, at room temperature
- 1 1/2 cups caster sugar
- 1 tsp white vinegar
- 3 tsp cornflour
Decoration
- 1/4 cup Sunbeam Australian Pistachios
- 300ml thickened cream
- 1 tsp pure icing sugar
- 1 tsp rosewater
- Silver cachous (silver edible balls) for decorating
- Raspberries
- Freeze-dried raspberry powder
- Strawberries, to serve
Instructions
- Preheat and prepare trays: Preheat your oven to 100°C fan-forced (120°C conventional). Grease two large oven trays. On two sheets of baking paper, mark four 4.5cm circles each, leaving space between each circle. Place the sheets marked side down onto the prepared trays.
- Make the meringue: Using an electric mixer, beat the egg whites until soft peaks form. Gradually add the caster sugar, one tablespoon at a time, ensuring it dissolves each time before adding more. Add the white vinegar and cornflour, then beat until the mixture is fully combined, glossy, and holds stiff peaks.
- Pipe the meringue trees: Transfer one quarter of the meringue mixture into a large piping bag fitted with a 1cm plain nozzle. Pipe small mounds of meringue onto the marked circles on the trays as bases. Place the remaining meringue into another piping bag fitted with a 0.5cm fluted nozzle. Starting at the base of each mound, pipe three rows of small vertical layers around to create the shape of Christmas trees.
- Bake the meringues: Bake the meringues in the oven for 50 minutes to 1 hour, or until the edges are crisp but not colored. After baking, turn off the oven and leave the pavlovas to cool inside with the door slightly ajar to prevent cracking.
- Prepare pistachio crumbs: Place the pistachios in a small food processor and pulse until they become fine crumbs, suitable for sprinkling.
- Whip the cream: Using an electric mixer, beat the thickened cream with the icing sugar and rosewater until just-firm peaks form.
- Decorate the pavlova trees: Put one quarter of the whipped cream into a small piping bag fitted with a small plain nozzle. Pipe little rounds of cream onto the meringue trees to act as glue for the decorations. Decorate the trees with silver cachous, fresh raspberries, and a sprinkle of freeze-dried raspberry powder. Finally, sprinkle the pistachio crumbs on top and serve the pavlovas with strawberries and the remaining cream on the side.
Notes
- Ensure egg whites are at room temperature for better volume when whipping.
- Allow the pavlovas to cool slowly in the oven to avoid cracks.
- Piping the cream onto the trees before decorating helps the toppings stick well.
- You can substitute pistachios with another nut if preferred, but it will alter the flavor slightly.
- Store leftover pavlovas in an airtight container to maintain crispness.
Nutrition
- Serving Size: 1 mini pavlova tree
- Calories: 210 kcal
- Sugar: 24 g
- Sodium: 15 mg
- Fat: 9 g
- Saturated Fat: 5 g
- Unsaturated Fat: 3 g
- Trans Fat: 0 g
- Carbohydrates: 28 g
- Fiber: 1.5 g
- Protein: 3 g
- Cholesterol: 40 mg


