
I absolutely love sharing this Mongolian Chicken Recipe with friends because it hits all the right notes: sweet, savory, a little spicy, and irresistibly sticky. When I first tried making this dish at home, I was amazed at how restaurant-quality it tasted with such simple ingredients and a straightforward process. It s one of those recipes that feels fancy but is honestly perfect for a weeknight dinner or anytime you want a delicious crowd-pleaser.
You’ll find that this Mongolian Chicken Recipe comes together surprisingly fast, making it ideal when you’re craving big flavor but short on time. Plus, the balance of crispy chicken coated in a luscious sauce is something my family goes crazy for every single time. I ve tweaked a few steps over the years to keep the chicken juicy and the sauce perfectly glossy – and I can t wait to share those with you!
Why You’ll Love This Recipe
- Quick and Easy: This Mongolian Chicken Recipe comes together in about 25 minutes, perfect for busy nights.
- Flavor Packed: The sweet-savory sauce with hints of ginger and garlic will have everyone asking for seconds.
- Versatile Cooking: Whether you fry or air fry the chicken, the crispy texture and flavor are spot on.
- Family Favorite: This recipe is a hit with kids and adults alike – a guaranteed crowd-pleaser.

Ingredients You’ll Need
Each ingredient in this Mongolian Chicken Recipe plays a key role in creating that perfect balance of crispy chicken and flavorful sauce. I always recommend using fresh garlic and ginger to really amp up the aroma, and choosing boneless, skinless chicken thighs keeps the meat tender and juicy.
- Chicken thighs: Juicier and more forgiving than breast meat, they stay tender even with frying.
- Cornstarch: Essential for that crispy coating; can be swapped with potato starch if needed.
- Vegetable oil: A neutral oil helps fry the chicken perfectly without overpowering flavors.
- Garlic: Fresh minced garlic adds pungent, aromatic depth.
- Red chili peppers: Use these for a touch of heat-optional based on your spice preference.
- Ginger slices: Fresh ginger adds a subtle zing and brightness to the sauce.
- Hoisin sauce: Provides sweetness and complexity to the Mongolian sauce.
- Soy sauce: Adds umami and saltiness to balance the sweetness.
- Brown sugar: Enhances the caramelized flavor in the sauce.
- Sesame oil: Just a few teaspoons to finish add a nutty aroma and richness.
- Cornstarch slurry: Thickens the sauce perfectly for that glossy finish.
- Green onions: Fresh and chopped, they add a pop of color and freshness as garnish.
Variations
I love to mix things up sometimes with this Mongolian Chicken Recipe depending on what s in my pantry or what my family s craving. Feel free to personalize it – this dish is forgiving and works well with minor tweaks!
- Use chicken breasts: If you prefer leaner meat, breasts can be used, just be careful not to overcook to avoid dryness.
- Add vegetables: Toss in bell peppers, broccoli, or snap peas for extra color and nutrition.
- Adjust spice level: I sometimes add extra sliced chili or a dash of chili flakes to turn up the heat.
- Gluten-free swap: Use tamari or coconut aminos instead of soy sauce for a gluten-free version.
How to Make Mongolian Chicken Recipe
Step 1: Make the Cornstarch Slurry
Start by mixing 2 tablespoons of cornstarch with 1 cup of water in a small bowl until completely smooth. This slurry will thicken your sauce beautifully without lumps, so take a moment to stir until it s silky. Set this aside; you ll add it to the sauce later when cooking.
Step 2: Prepare and Coat the Chicken
Dice the chicken thighs into roughly 1.5-inch pieces – this size crisps up perfectly and makes it easy to eat. Don t pat the chicken dry here; the slight moisture helps the cornstarch stick better for that amazing crispy coating. Toss the chicken pieces in half a cup of cornstarch until they re all evenly coated; add a little more if a few pieces need it.
Step 3: Cook the Chicken
You have two great options to get that perfect crispiness: stove or air fryer. If you re frying on the stovetop, heat vegetable oil over medium-high heat and cook the chicken in batches until golden on all sides, about 6-8 minutes. Drain on a wire rack to keep them crisp. If you prefer the air fryer for a lighter version, spray the basket lightly, lay the pieces in a single layer, and air fry at 400°F for 10-14 minutes, shaking halfway to ensure even cooking.
Step 4: Make the Sauce
Lower the heat to medium and add sliced ginger, minced garlic, and optional red chili peppers to the pan (use the same pan if frying stovetop for those yummy drippings). Sauté quickly, just about 10 seconds until fragrant-you’ll smell that amazing ginger-garlic aroma releasing. Then stir in hoisin sauce, soy sauce, brown sugar, and sesame oil. Give the cornstarch slurry a quick stir to recombine and add it into the pan. Keep stirring gently until the sauce thickens and becomes glossy, which usually takes a couple of minutes.
Step 5: Combine Chicken and Sauce
Return the crisped chicken to the sauce and toss everything thoroughly so each piece is coated in that delicious glaze. Once coated, remove from heat immediately to keep the chicken crispy and the sauce perfectly clingy. Transfer to a serving dish and sprinkle with chopped green onions and extra chili slices if you like a bit more heat.
Pro Tips for Making Mongolian Chicken Recipe
- Coating Moisture: I ve learned that not drying the chicken beforehand helps the cornstarch stick better, leading to crunchier bites.
- Batch Frying: Fry chicken in small batches to avoid overcrowding the pan for crispier results.
- Sauce Thickness: Add cornstarch slurry gradually and stir constantly-you want a glossy sauce that isn t too thick or too runny.
- Fresh Aromatics: Use fresh ginger and garlic instead of powders; they make all the difference in flavor and aroma.
How to Serve Mongolian Chicken Recipe

Garnishes
Personally, I always finish this dish with a sprinkle of chopped green onions and some thinly sliced red chili peppers for color and a little extra zing. The fresh green onions add a bright pop that cuts through the richness of the sauce beautifully.
Side Dishes
I love serving this Mongolian Chicken with fluffy steamed jasmine rice to soak up all that saucy goodness. Sometimes I switch it up with garlic noodles or even roasted broccoli and snap peas on the side for a vegetable boost. It s very versatile and pairs well with so many sides.
Creative Ways to Present
For special occasions, I like to plate this dish in a shallow bowl topped with crunchy fried shallots and a drizzle of toasted sesame seeds. Another fun idea is to serve it over a bed of buttery mashed cauliflower for a low-carb twist that looks as pretty as it tastes.
Make Ahead and Storage
Storing Leftovers
Once cooled, I keep leftovers in an airtight container in the fridge for up to 3 days. The sauce stays flavorful, but the chicken may soften a bit, which is totally fine for next-day meals.
Freezing
I ve frozen this Mongolian Chicken successfully by packing it in freezer-safe containers. When thawed overnight in the fridge, it reheats nicely, though the texture of the chicken is best fresh or refrigerated rather than frozen.
Reheating
To bring leftovers back to life, reheat in a skillet over medium heat-this revives some of the crispiness. Microwaving works in a pinch but can make the chicken a bit soggy, so I reserve that for the easiest cleanup days.
FAQs
-
Can I use chicken breasts instead of thighs in this Mongolian Chicken Recipe?
Yes, you can substitute chicken breasts, but be mindful that they cook faster and can dry out more easily. I recommend cutting them into even pieces and watching the cooking time closely to keep them tender.
-
Is it okay to skip the frying step and just cook the chicken in the sauce?
While you can cook the chicken directly in the sauce, you ll miss out on that desirable crispy texture. Coating and frying the chicken first really sets this Mongolian Chicken Recipe apart by creating delicious contrast and coating the chicken evenly with sauce.
-
How spicy is this recipe and can I adjust the heat?
This recipe has a mild to moderate spice level when you include the red chili peppers. You can easily adjust it by adding or reducing the number of chilies, or leaving them out altogether if you prefer a milder dish.
-
Can I make this Mongolian Chicken Recipe ahead of time?
Absolutely! You can prep and cook the chicken a few hours ahead and reheat gently before serving. Just keep in mind the chicken crisps up best right after frying, so reheating slightly softens it but the sauce remains delicious.
Final Thoughts
This Mongolian Chicken Recipe holds a special place in my kitchen because it s one of those reliably delicious dishes that turns dinner into a little celebration. I love the way the crisp chicken contrasts with the sticky, flavorful sauce and how simple it is to pull together. If you ve been searching for a takeout favorite to master at home, give this recipe a shot – I promise you ll be proud and your taste buds will thank you.
Print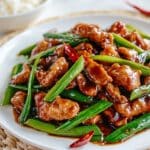
Mongolian Chicken Recipe
- Prep Time: 15 minutes
- Cook Time: 10 minutes
- Total Time: 25 minutes
- Yield: 6 servings
- Category: Main Dish
- Method: Frying
- Cuisine: Asian
Description
This flavorful Mongolian Chicken recipe features tender, juicy chicken thighs coated in cornstarch and cooked to a crispy golden perfection, then tossed in a savory and slightly sweet hoisin-soy sauce with ginger, garlic, and optional chili peppers. Perfect for a quick weeknight dinner served with rice or noodles.
Ingredients
Chicken and Coating
- 2 lb skinless, boneless chicken thighs
- 1/2 cup cornstarch (or as needed, or substitute with potato starch)
Oil for Cooking
- 2/3 cup vegetable oil (or any neutral oil)
Sauce
- 4 cloves garlic, minced
- 2 red chili peppers, sliced (optional)
- 10 slices ginger
- 8 tablespoons hoisin sauce
- 4 tablespoons regular soy sauce
- 4 tablespoons brown sugar
- 4 teaspoons sesame oil
Cornstarch Slurry
- 2 tablespoons cornstarch (or substitute with potato starch)
- 1 cup water
Optional Garnishes
- 2 green onions, finely chopped
- 2 red chili peppers, sliced
Instructions
- Make the cornstarch slurry: In a small bowl, mix 2 tablespoons cornstarch with 1 cup water until smooth. Set aside.
- Prepare the chicken: Dice the chicken thighs into 1.5-inch pieces (about 4-6 pieces per thigh). Do not pat the chicken dry, as the moisture helps the cornstarch stick.
- Coat the chicken: In a large mixing bowl, toss the diced chicken with ½ cup cornstarch until evenly coated. Add more cornstarch if needed to ensure all pieces are well coated.
- Cook the chicken: Stovetop Option: Heat vegetable oil in a large pan or wok over medium-high heat. Fry the chicken in batches for 6-8 minutes until golden brown on both sides. Remove and drain excess oil on a wire rack or paper towel-lined plate. Air Fryer Option: Lightly spray the air fryer basket with oil. Place coated chicken pieces in a single layer without overlapping. Lightly spray the chicken with oil. Air fry at 400°F for 10-14 minutes until crispy and golden, shaking halfway through for even cooking.
- Make the sauce: Reduce heat to medium. In the same pan used for frying (if cooking stovetop), add the ginger, garlic, and optional red chili peppers. Sauté for about 10 seconds until fragrant.
- Combine the sauce ingredients: Add hoisin sauce, soy sauce, brown sugar, and sesame oil to the pan. Stir well. Stir the cornstarch slurry again, then pour it into the pan. Mix until the sauce is smooth and begins to simmer and thicken.
- Combine chicken and sauce: Add the cooked chicken to the sauce and toss until the chicken is evenly coated. Remove from heat.
- Serve: Transfer to a serving dish and garnish with green onions and additional red chili slices if desired. Enjoy!
Notes
- You can substitute chicken thighs with boneless, skinless chicken breasts if preferred.
- If cornstarch is unavailable, potato starch is a suitable substitute.
- Adjust the amount of red chili pepper to control the spice level.
- This dish pairs perfectly with steamed rice, noodles, or your favorite vegetables.
Nutrition
- Serving Size: 1 serving
- Calories: 533 kcal
- Sugar: 20 g
- Sodium: 1067 mg
- Fat: 33 g
- Saturated Fat: 5 g
- Unsaturated Fat: 26 g
- Trans Fat: 1 g
- Carbohydrates: 33 g
- Fiber: 2 g
- Protein: 30 g
- Cholesterol: 83 mg


