I’m super excited to share this spooktacular treat with you: Monster Mash Halloween Brownies (Kids Recipe) Recipe. These brownies aren’t just your everyday chocolate fix—they’re a playful mash-up of spooky monster designs that kids adore and adults secretly love too. You’ll find that making these brownies is half the fun, especially if you have young helpers in the kitchen. Trust me, the smiles and “oohs” when you bring out these cute and creepy brownies are totally worth the effort.
Why You’ll Love This Recipe
- Kid-Friendly Fun: Your little ones will love helping decorate these fun monster brownies, making baking a joyful experience.
- Deliciously Moist: These brownies are rich and fudgy with a great balance of dark and white chocolate chips that melt in your mouth.
- Colorful and Festive: Vibrant frostings and licorice decorations turn simple brownies into Halloween eye-catchers you’ll want to show off.
- Great for Parties: These monster brownies are perfect for schools, family gatherings, or a fun Halloween treat at home.

Ingredients You’ll Need
Getting your ingredients right will make the difference between ordinary and monster-mash-awesome brownies. This recipe combines classic brownie staples with colorful frosting and playful decorations that kids find irresistible.
- All-purpose flour: Provides just enough structure without making the brownies cakey—stick to 75 grams for the perfect fudgy bite.
- Unsweetened cocoa powder: Gives a deep chocolate flavor that kids and adults love alike.
- Granulated sugar: Measures out sweetness to balance the rich chocolate.
- Unsalted butter: Using unsalted ensures you control the salt; melting it helps mix ingredients smoothly.
- Dark chocolate: Melting this with butter creates an extra luscious texture and flavor layer.
- Large eggs: They’re the binder that helps hold your brownies together—room temperature eggs mix best.
- White chocolate chips: Add sweet pockets of creaminess and cute contrast to the deep chocolate base.
- Dark chocolate chips: More chocolatey bites that keep the texture exciting.
- American buttercream frosting: A smooth, creamy base to color and pipe your Halloween designs.
- Cocoa powder (for frosting): Turns some frosting into decadent black for spooky details.
- Milk: Helps adjust frosting consistency for smooth piping.
- Food gels (black, teal, yellow, red, purple, pink): Needed for bright, vibrant frosting colors—gel colors give stronger shades without watering down your frosting.
- Licorice roll: A fun, edible decoration that turns brownies into creepy spiders and monsters with “hair” or legs.
Variations
I love how this Monster Mash Halloween Brownies (Kids Recipe) Recipe invites creativity, so don’t hesitate to put your own spin on it. Whether you want it dairy-free for the little allergen-sensitive monsters or swapping chocolate types, this recipe’s easily adaptable.
- Dairy-Free Version: I’ve replaced butter with coconut oil and used dairy-free chocolate chips—still moist and delicious!
- Nutty Monsters: Try adding chopped nuts to the batter for a crunchy surprise—my nieces go crazy for walnuts in theirs.
- Go Gluten-Free: Swap all-purpose flour for a gluten-free blend; just ensure it has xanthan gum to keep the texture just right.
- Alternative Decorations: If licorice isn’t your thing, pretzel sticks make excellent spider legs, and candy eyeballs work great for monster eyes.
How to Make Monster Mash Halloween Brownies (Kids Recipe) Recipe
Step 1: Prep Your Frostings with Fun Colors
Before diving into the batter, I like to split the buttercream frosting into seven portions. This way, you can mix in your food gels early and let the colors settle—trust me, it makes piping super easy. For example, mix teal and yellow gels for that perfect green frosting for Frankenstein, add cocoa powder and black gel for that spooky black frosting, and mix red, purple, and pink gels for eye-catching accents. Having these ready-to-go makes decorating a breeze once the brownies are baked.
Step 2: Making the Fudgy Brownie Base
Preheat your fan-forced oven to 175°C (340°F) and line a baking tin (32 cm x 24 cm) with parchment paper sprayed with non-stick spray. Melt the butter and dark chocolate in short bursts in the microwave, stirring frequently until smooth. Then stir in sugar and whisk it well before adding the eggs one at a time, ensuring everything is glossy and combined. Next, sift in your cocoa powder and flour and gently fold with a spatula to avoid overmixing—this makes the brownies tender. Lastly, fold in both white and dark chocolate chips for those irresistible pockets of melty goodness.
Step 3: Bake and Chill to Perfect Texture
Pour your batter into the prepared pan and bake for about 30 minutes. When a skewer inserted in the center comes out with moist crumbs but not wet batter, you’re spot-on! Here’s what I learned—resist the urge to overbake. Once out of the oven, let the brownies cool at room temperature for an hour, then chill them in the fridge for an hour. This step is key because it firms up your brownies, making them much easier to cut into perfect squares without crumbling.
Step 4: Cut and Decorate Your Monster Mash
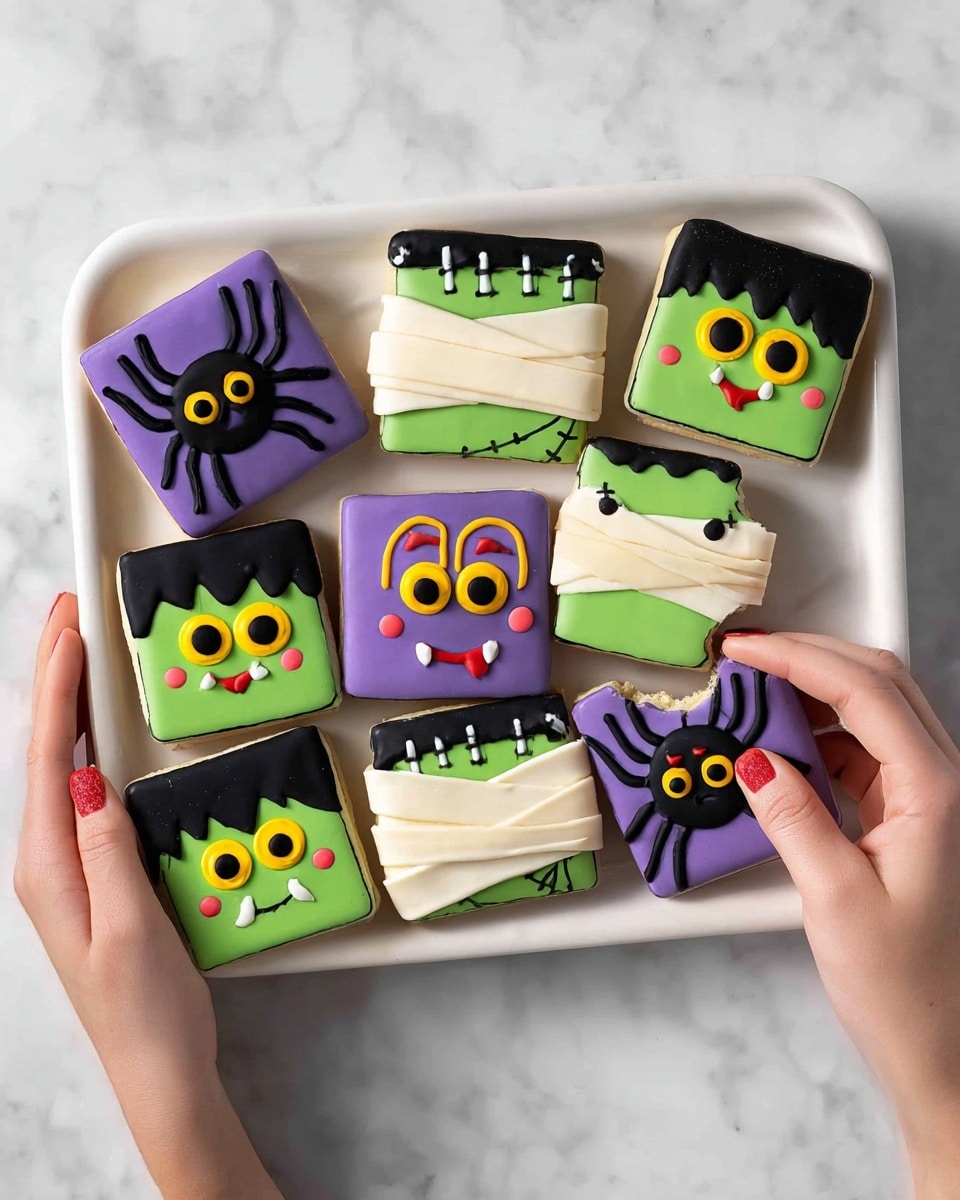
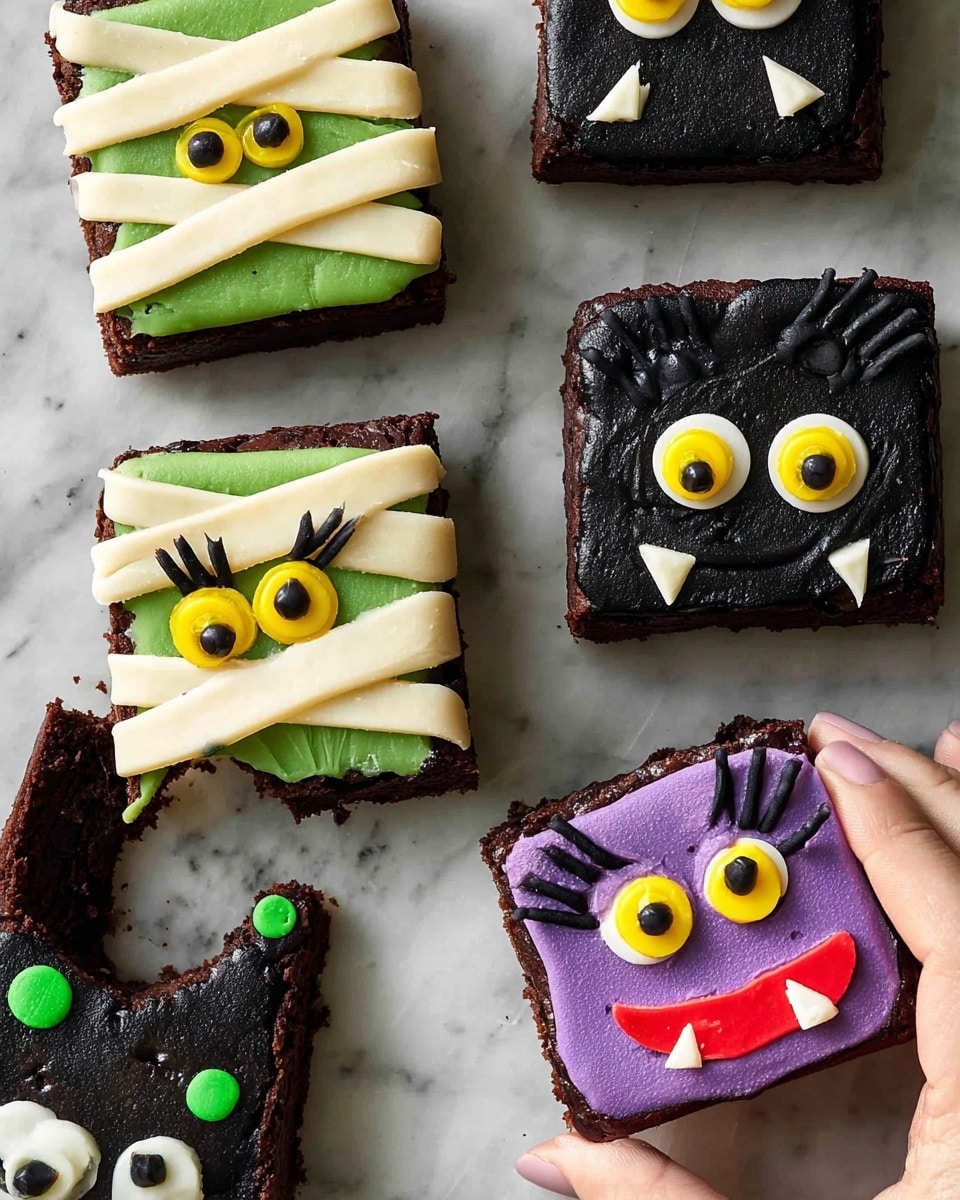
Using a 2½-inch square cookie cutter, cut out 12 brownie squares to transform into Frankenstein, mummies, spiders, and Dracula monsters. It’s seriously fun to pipe the various colored frostings and add licorice “legs” or “hair.” I like to start with Frankenstein by piping green frosting squares, smoothing it with a spatula, then adding eyes, mouths, and stitches—my kids adore helping with this part! For the mummies, pipe pale yellow lines across to resemble wraps, and don’t forget those big spooky eyes. Spider brownies get their creepy purple frosting base and licorice legs, and Dracula’s widow’s peak and vampire fangs seal the deal. The best advice here? Take your time, have fun, and let the kids get creative too.
Pro Tips for Making Monster Mash Halloween Brownies (Kids Recipe) Recipe
- Prepare Frostings Early: Mixing and chilling your colored frostings ahead of time saves tons of stress while decorating.
- Don’t Overbake: The brownies should still be fudgy in the center when you pull them out; this helps them stay moist after chilling.
- Use a Sharp Cutter: A cookie cutter works best to get clean brownie squares; I keep a damp cloth nearby to wipe crumbs from the cutter between cuts.
- Chill Before Decorating: This makes your brownies firm and stops frosting from melting—it’s a game changer.
How to Serve Monster Mash Halloween Brownies (Kids Recipe) Recipe
Garnishes
My go-to garnishes include those sharp-edged squared licorice pieces. They are perfect for creating spider legs or Frankenstein’s hair spikes. Sometimes I add tiny candy eyes to the frosting details for an extra cute, creepy effect—kids love spotting those little additions!
Side Dishes
I usually pair these brownies with simple vanilla ice cream or a glass of cold milk—the perfect combo to balance the richness. For Halloween parties, pumpkin spice cupcakes or caramel apples make fun companion desserts to keep the spooky theme going strong.
Creative Ways to Present
For a Halloween spread, try arranging the monster brownies on a platter surrounded by edible eyeballs and candy corn. I even like to place them on black or orange cupcake liners for a colorful presentation. Wrapping individual brownies in clear cellophane tied with festive ribbons makes them lovely party favors too.
Make Ahead and Storage
Storing Leftovers
I store leftover Monster Mash Halloween Brownies in an airtight container in the fridge for up to three days. Make sure to bring them to room temperature for about 30 minutes before serving so the fudgy texture and rich flavors shine through once again.
Freezing
Yes, you can freeze these brownies! I find wrapping each brownie square individually in plastic wrap and then placing them in a freezer bag works best. When you’re ready, thaw them overnight in the fridge—just avoid freezing decorated brownies with frosting as the texture changes once thawed.
Reheating
If you want to lightly warm a brownie before serving, pop it in the microwave for 10-15 seconds. This softens the chocolate chips inside without melting the frosting too much, making every bite taste freshly baked.
FAQs
-
Can kids safely help with this Monster Mash Halloween Brownies (Kids Recipe) Recipe?
Absolutely! This recipe is designed with kids in mind. The decorating part especially is a safe and creative activity where little ones can pipe frosting and add licorice decorations under supervision. Just handle the oven and hot chocolate melting yourself or with adult help.
-
What if I don’t have all the food gel colors?
No worries! You can mix your own shades by combining gel colors you do have or use natural food coloring alternatives. Alternatively, try simple frosting colors like classic white, chocolate brown, and black, then use candy or sprinkles for decoration.
-
How do I prevent the frosting from melting on the brownies?
Chilling your brownies thoroughly before frosting is key. Cold brownies help the frosting keep its shape and avoid melting. Also, pipe the frosting in a cool room and consider refrigerating after decorating to set everything firmly.
-
Can I prepare the frosting ahead of time?
Yes! In fact, I recommend preparing and coloring your frosting a day ahead and storing it covered in the fridge. Before use, bring frosting to room temp and give it a quick stir or whip to restore the perfect piping consistency.
Final Thoughts
This Monster Mash Halloween Brownies (Kids Recipe) Recipe holds a special place in my kitchen memories—it’s the go-to Halloween treat that turns baking into a festive family event. The mix of simple ingredients with fun decorations makes everyone, from kids to adults, excited to get involved. If you want to impress your little ghouls and goblins with a dessert that’s as delicious as it is playful, this recipe will not disappoint. I can’t wait for you to try it and watch your kitchen fill with laughter and chocolatey delight!
Print
Monster Mash Halloween Brownies (Kids Recipe) Recipe
- Prep Time: 1 hour 30 minutes
- Cook Time: 30 minutes
- Total Time: 2 hours 15 minutes
- Yield: 12 brownies
- Category: Dessert
- Method: Baking
- Cuisine: American
Description
These Monster Mash Halloween Brownies are a fun and festive treat perfect for kids. Featuring rich, fudgy brownies topped with colorful American buttercream frosting in spooky designs like Frankenstein, Mummy, Spider Monster, and Dracula, these brownies bring a playful Halloween twist to a classic dessert. Made with dark and white chocolate chips, and decorated with vibrant gel colors and licorice, these brownies are both delicious and visually exciting for holiday celebrations.
Ingredients
Brownies
- 1/2 cup (75 g) all-purpose flour
- 3/4 cup (75 g) unsweetened cocoa powder
- 1 1/2 cups (300 g) granulated sugar
- 1 1/4 cups (300 g) unsalted butter, melted
- 1 1/2 cups (300 g) dark chocolate, melted
- 6 large eggs
- 1 cup (200 g) white chocolate chips
- 1 cup (200 g) dark chocolate chips
Frosting
- 1 1/4 batches American buttercream frosting
- 1/4 cup (20 g) cocoa powder
- 2 tbsp milk
- 10 drops black food gel
- 3 drops teal food gel + 3 drops yellow food gel (Green frosting)
- 2 drops yellow food gel (Light yellow frosting)
- 5 drops yellow food gel (Yellow frosting)
- 10 drops red food gel (Red frosting)
- 10 drops purple food gel + 5 drops pink food gel (Purple frosting)
Decorations
- 20 cm roll of licorice
Instructions
- Prepare Frosting Colors: Divide the prepared American buttercream frosting into seven portions. Mix green food gel and yellow food gel into two portions for green frosting. Add cocoa powder, milk, and black food gel to one portion for black frosting. Color the remaining portions as follows: one light yellow (2 drops yellow gel), half portion yellow (5 drops yellow gel), half portion red (10 drops red gel), one portion purple (10 drops purple + 5 drops pink gel), leaving one portion white.
- Preheat Oven and Prepare Pan: Preheat the fan-forced oven to 175°C (340°F). Spray a 32 cm x 24 cm baking tin with non-stick spray and line the bottom with parchment paper; set aside.
- Melt Butter and Chocolate: Place unsalted butter and dark chocolate in a microwave-safe bowl. Microwave in 20-second intervals, stirring with a spatula between, until melted and smooth.
- Mix Brownie Batter: Whisk in granulated sugar until combined. Add eggs and whisk until fully incorporated. Fold in cocoa powder and flour with a spatula until no streaks remain. Stir in white and dark chocolate chips until evenly distributed.
- Bake Brownies: Pour batter into the prepared baking tray and bake for 30 minutes or until a toothpick inserted comes out with moist crumbs. Remove and let cool for 1 hour at room temperature, then refrigerate for an additional hour to chill.
- Cut Brownies: Use a 2 ½ inch square cookie cutter to cut out 12 brownie squares.
- Decorate Frankenstein Brownies: Using a piping bag fitted with Wilton #8 tip, pipe a green frosting square border around six brownies and smooth with a small offset spatula. Reserve three. With Wilton #3 tip, pipe eyes, monobrow, mouth, and stitches using black frosting. Pipe yellow frosting inside eyes and black pupils. Insert small licorice pieces at the sides as bolts.
- Decorate Mummy Brownies: On three green-frosted brownies, pipe light yellow frosting lines across to mimic bandages using Wilton 2B tip. Use black frosting with #3 tip for eye rounds, yellow frosting inside eyes, then fill pupils with black frosting.
- Decorate Spider Monster Brownies: Pipe a purple frosting border with Wilton #8 tip around the remaining three brownies and smooth. Pipe black smile with #3 tip and red fangs. Frost green eyes with #3 tip and add long licorice pieces on sides as spider legs.
- Decorate Dracula Brownies: Using two piping bags with Wilton #8 tips, pipe a widow’s peak using black frosting and fill remaining area with white frosting on the last three brownies. Follow mummy brownie eye decoration steps for eyes and spider mouth decoration for mouth.
- Storage: Store brownies in an airtight container in the fridge for up to three days. Allow to thaw for 30 minutes before serving.
Notes
- Store brownies in an airtight container in the refrigerator for up to three days.
- Thaw brownies for about 30 minutes at room temperature before serving to soften the frosting.
- Use gel food colors for vibrant frosting colors that mix well into buttercream.
- Microwave chocolate and butter in short increments to avoid burning.
- Allow brownies to chill completely for easier cutting and decorating.
Nutrition
- Serving Size: 1 brownie (approx. 85g)
- Calories: 420
- Sugar: 38g
- Sodium: 120mg
- Fat: 27g
- Saturated Fat: 15g
- Unsaturated Fat: 10g
- Trans Fat: 0.2g
- Carbohydrates: 44g
- Fiber: 5g
- Protein: 5g
- Cholesterol: 110mg


