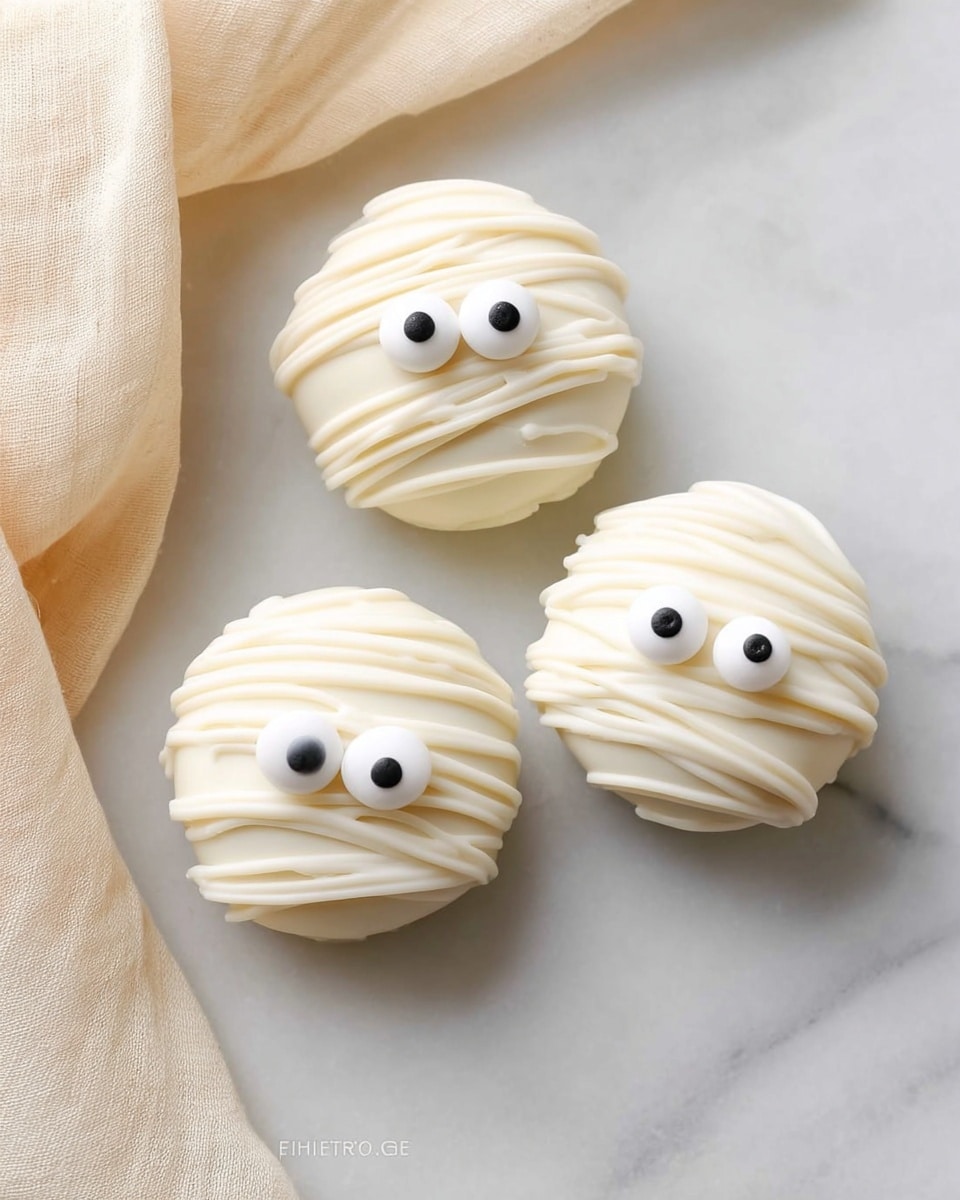
If you’re looking for a fun, adorable, and downright tasty treat for Halloween (or frankly any time you want to impress your friends), this Mummy Oreo Balls Recipe is an absolute must-try. I first made these for a party, and trust me—everyone went crazy over them! The perfect balance of creamy, crunchy, and sweet wrapped up in a cute little mummy design makes these little bites legendary in my house.
Why You’ll Love This Recipe
- Super Simple: Only 4 main ingredients means you can whip these up in no time.
- No-Bake Delight: No oven required—perfect for busy days or little helpers in the kitchen.
- Kid-Friendly Fun: Decorating these mummy balls is a blast for kids and adults alike.
- Perfect for Parties: They’re as tasty as they are adorable—guaranteed crowd-pleasers.

Ingredients You’ll Need
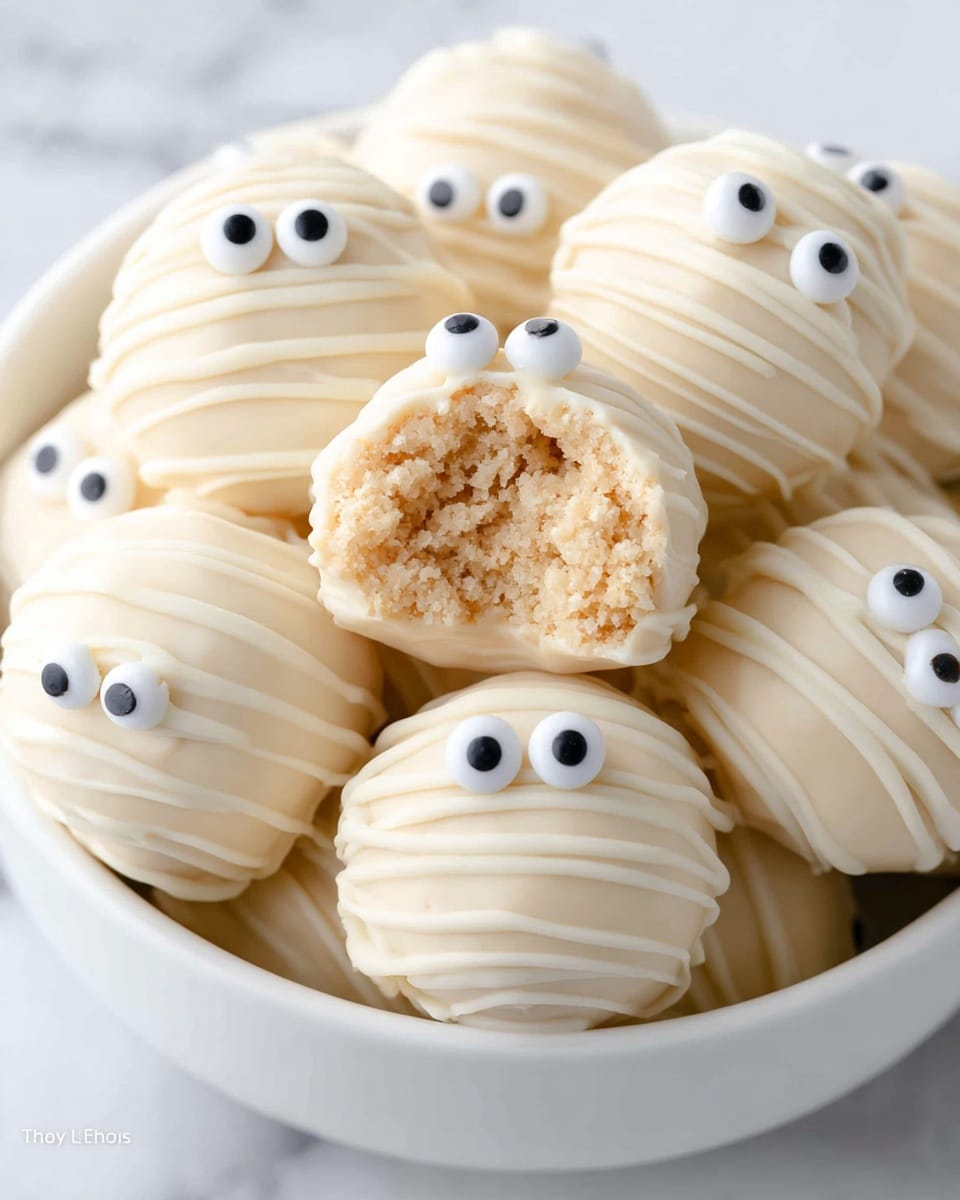
This Mummy Oreo Balls Recipe is all about simple, quality ingredients that transform into something magical when combined. Using golden Oreos gives these treats a fun twist from the traditional chocolate Oreo, and the cream cheese helps bind everything together into a smooth, creamy center that’s simply irresistible.
- Golden Oreos: I love using the golden variety here because they make the mummy theme pop and add a subtle vanilla twist.
- Cream Cheese: Make sure it’s softened to room temperature for easy mixing and a silky texture.
- Vanilla Candy Melts or Dipping Wafers: These make the perfect white chocolate “bandages” around the mummy balls; melting them gently is key.
- Candy Eyes: These little guys bring the mummy to life—they’re easy to find in craft or baking stores around Halloween.
Variations
I like to keep things pretty classic with this Mummy Oreo Balls Recipe, but one of the best parts is how easy it is to get creative. Feel free to mix it up depending on your preferences or what you have on hand—these mummies are super forgiving!
- Chocolate Oreo Variation: Swapping golden Oreos for classic chocolate ones creates a richer flavor and darker mummy wrapping.
- Flavored Cream Cheese: Try using strawberry or pumpkin spice cream cheese during fall for a seasonal twist that surprises everyone.
- Colored Candy Melts: Instead of white, use orange or green melts to create different spooky effects for Halloween.
- Nut-Free Version: This recipe is naturally nut-free, making it a great allergy-friendly option for gatherings.
How to Make Mummy Oreo Balls Recipe
Step 1: Crush Those Cookies
Start by pulsing your golden Oreos in a food processor until they become a really fine crumb. If you don’t have a food processor, pop them in a ziplock bag and crush with a rolling pin — just make sure to get them as fine as possible so they bind well with the cream cheese.
Step 2: Mix in Cream Cheese
Pour your ultra-fine crumbs into a large bowl, then add the softened cream cheese. Stir or use a sturdy spoon until the mixture feels smooth and combined — no big crumbs should remain. This step really sets the stage for that creamy, melt-in-your-mouth filling you’ll adore.
Step 3: Shape the Mummy Balls
Using a cookie scoop or tablespoon, scoop out the mixture and roll it gently between your palms to form smooth, even balls about 1 inch in diameter. I like to line these up on parchment paper, then pop them in the freezer for about 30 minutes to firm up — this helps them hold their shape when dipped.
Step 4: Dip in White Chocolate
Once your Oreo balls are chilled, melt your vanilla candy melts according to package instructions. Using a fork, gently place each ball on top (don’t poke through), dip, and cover fully with melted chocolate. Tap off any excess on the side of the bowl before setting them back on the parchment paper.
Step 5: Add the Mummy Details
Pour any leftover melted candy into a plastic baggie and snip a tiny corner. Drizzle thin “bandage” lines over each coated Oreo ball. Before the drizzle sets, stick two candy eyes on each ball (if the chocolate hardens fast, use a dab of melted candy on the back of each eye to stick them better). Refrigerate for 15-20 minutes to allow everything to set.
Pro Tips for Making Mummy Oreo Balls Recipe
- Soft Cream Cheese Only: Using cream cheese straight from the fridge makes mixing messy and lumps in your balls. Let it soften first!
- Don’t Skimp on Freezing Time: Chilling the balls before dipping is key to avoiding melty, broken treats.
- Use a Fork for Dipping: Keeping the balls resting on the fork (not poked through) helps maintain their round shape perfectly.
- Work Quickly with Candy Melts: If your chocolate starts hardening too fast while decorating, just warm it briefly again to keep that perfect drizzle consistency.
How to Serve Mummy Oreo Balls Recipe
Garnishes
I usually keep it simple with candy eyes for this recipe because they’re so fun and bring the mummy character to life. Sometimes I add a tiny sprinkle of edible glitter for a little sparkle, or even a pinch of orange sanding sugar around for an extra festive pop.
Side Dishes
These mummy balls pair wonderfully with a cup of hot cocoa or a chilled glass of milk. For parties, I set them alongside a fresh fruit platter to balance the sweetness. They are also divine next to pumpkin spice cupcakes for a complete Halloween spread.
Creative Ways to Present
For a party, I love arranging these Mummy Oreo Balls on a black or orange platter scattered with mini pumpkins and autumn leaves. You can also place them in cute Halloween-themed cupcake liners or stack them on a tiered dessert stand for extra presentation points. My kids once helped me string a “spooky buffet” sign and it made the whole vibe magical!
Make Ahead and Storage
Storing Leftovers
I usually store leftover mummy balls in an airtight container in the fridge. They keep nicely for up to a week, giving you plenty of time to enjoy or share with neighbors. Be sure to let them come to room temperature a bit before serving to get that creamy center back.
Freezing
Freezing works great if you want to prepare these well ahead of time. Just freeze the balls on a parchment-lined tray first, then transfer to a freezer-safe container or bag. They’ll keep up to 3 months and thaw quickly in the fridge overnight—perfect for last-minute treats!
Reheating
There’s no need to warm these Mummy Oreo Balls to enjoy them—though if you prefer softer centers, just let them sit out a few minutes or gently warm for 10-15 seconds in the microwave. Just avoid overheating or the chocolate shell might get melty and slick.
FAQs
-
Can I use regular chocolate instead of candy melts for the mummy wrapping?
Yes, you can! Just be sure to use white chocolate or vanilla-flavored melting chocolate for that classic mummy look. Candy melts are popular because they melt smoothly and reset quickly, but white chocolate works well if you temper it properly or use high-quality chips.
-
How do I keep the candy eyes stuck to the balls?
If the melted chocolate starts to harden before you add the eyes, pop a small drop of melted chocolate on the back of each eye before pressing onto the candy-coated ball. This acts like edible glue and keeps them firmly in place.
- Can I make these without a food processor?
Absolutely! Place the Oreos in a sealed plastic bag and gently crush them with a rolling pin until crumbly. It might take a little longer, but the texture will still be perfect.
- Can I add flavors to the cream cheese?
For sure! A dash of vanilla extract or a hint of pumpkin spice works beautifully for fall-themed treats. Just don’t add too much liquid so the mixture stays firm enough to roll into balls.
Final Thoughts
I truly love making this Mummy Oreo Balls Recipe because it’s simple, playful, and brings out the kid in me every time. Plus, nothing beats that satisfying crunch followed by creamy sweetness! Whether you’re baking with your kids or just want an adorable treat for guests, these mummies never disappoint. Give them a try—you’ll feel like a dessert superhero in your own kitchen!
Print
Mummy Oreo Balls Recipe
- Prep Time: 20 minutes
- Cook Time: 0 minutes
- Total Time: 50 minutes
- Yield: 14 Oreo balls
- Category: Dessert
- Method: No-Cook
- Cuisine: American
- Diet: Vegetarian
Description
These Mummy Oreo Balls are a spooky and delicious Halloween treat made with a creamy Oreo cream cheese center coated in a hard vanilla candy melt shell. With just four simple ingredients, this no-bake dessert is easy to prepare and perfect for kids to help with. The candy eyes and drizzled chocolate add a fun mummy appearance, making them an irresistible festive snack.
Ingredients
Oreo Ball Base
- 20 Golden Oreos
- 4 ounces cream cheese (softened to room temperature)
Coating and Decoration
- 10 ounces vanilla candy melts or dipping wafers
- 1 package candy eyes
Instructions
- Prepare Baking Sheet: Line a large baking sheet with parchment paper and set aside to place the Oreo balls after shaping.
- Make Oreo Crumbs: Pulse the Golden Oreos in a food processor until finely ground to create a crumbly texture for the base mixture.
- Combine with Cream Cheese: In a large mixing bowl, stir together the Oreo crumbs and softened cream cheese until well combined and smooth, forming a dough-like consistency.
- Form Balls: Using a cookie scoop, form about 1-inch balls. Roll each between your palms until smooth and uniform. Place them on the prepared parchment-lined baking sheet.
- Freeze to Set: Transfer the baking sheet with the Oreo balls into the freezer for 30 minutes to help them firm up for easier dipping.
- Melt Candy Coating: According to the package directions, melt the vanilla candy melts in a microwave-safe bowl or double boiler until smooth.
- Dip in Chocolate: Using a fork, dip each Oreo ball one at a time into the melted white chocolate, turning to fully coat. Tap off excess coating on the bowl edge. Make sure the balls rest on top of the fork without piercing.
- Place Back on Sheet: Return the coated Oreo balls to the parchment-lined baking sheet.
- Decorate with Drizzle and Eyes: Pour remaining melted chocolate into a zip-top bag, cut a small hole in a corner, and drizzle over the balls to create mummy wrap details. Affix two candy eyes on each ball. If chocolate hardens, use a dot of melted chocolate to stick the eyes securely.
- Chill to Set: Place the decorated Oreo balls into the refrigerator for 15-20 minutes to allow the chocolate coating and decorations to fully set.
- Serve and Enjoy: Once set, serve these festive mummy treats for a fun Halloween dessert experience.
Notes
- This recipe requires no baking, making it quick and simple to prepare.
- The hard chocolate shell contrasts delightfully with the creamy Oreo and cream cheese center.
- These Oreo balls can be stored in the refrigerator for up to a week.
- Let children participate in rolling and decorating to add to the festive fun.
Nutrition
- Serving Size: 1 Oreo ball
- Calories: 111 kcal
- Sugar: 7 g
- Sodium: 86 mg
- Fat: 6 g
- Saturated Fat: 2 g
- Unsaturated Fat: 3 g
- Trans Fat: 0 g
- Carbohydrates: 13 g
- Fiber: 1 g
- Protein: 1 g
- Cholesterol: 9 mg


