If you’re craving a classic dessert that tastes like autumn in every bite, you’re going to adore this No Bake Pumpkin Pie Recipe. It’s creamy, perfectly spiced, and incredibly easy to whip up—no oven required! Whether you’re short on time or just want a fuss-free treat, this pie hits the spot every time. Stick around and I’ll walk you through why this no bake pumpkin pie recipe is a game changer, along with some tips so your pie turns out perfectly smooth and flavorful.
Why You’ll Love This Recipe
- No Oven Needed: Perfect for when you want pumpkin pie without heating up the kitchen.
- Creamy & Smooth Texture: The filling comes out velvety, creamy, and fabulously spiced every time.
- Super Quick Prep: Assemble in minutes, let it chill, and you’re ready to serve a delicious dessert.
- Family Favorite: I discovered this trick at a family gathering, and now it’s a requesting tradition!

Ingredients You’ll Need
Each ingredient in this no bake pumpkin pie recipe plays a role in creating that classic pumpkin flavor and luscious creaminess. You’ll want to use quality pumpkin puree and fresh spices for the best results. Here’s a quick rundown of what to grab before we start.
- Pumpkin Puree: Use canned pumpkin puree labeled 100% pumpkin, NOT pumpkin pie filling which is already sweetened and spiced.
- Sweetened Condensed Milk: This adds sweetness and helps create a smooth, rich filling.
- Vanilla Extract: A splash of vanilla brings warmth and depth to the pie flavor.
- Ground Cinnamon, Nutmeg, and Ginger: These spices give that classic pumpkin pie spice blend—feel free to adjust to your taste.
- Pie Crust: A graham cracker crust or a traditional pie crust works wonderfully here—just choose what you prefer or have on hand.
- Whipped Topping: For an easy and light finishing touch that everyone loves.
Variations
I love how versatile this no bake pumpkin pie recipe is. Once you have the basics down, you can make it your own with a few tweaks here and there. You’ll find it’s fun to experiment—plus your friends and family will appreciate a fresh twist!
- Dairy-Free Version: I replaced sweetened condensed milk with coconut condensed milk and used a dairy-free crust once—just as creamy and festive!
- Spice It Up: Add a pinch of cloves or allspice if you like your pumpkin pie a little bolder; it really elevates the flavor.
- Gingersnap Crust: Swap out the graham cracker crust for a gingersnap crust for extra zing and texture.
- Mini Pies: I’ve made individual cups using small tart shells—perfect for parties or portion control.
How to Make No Bake Pumpkin Pie Recipe
Step 1: Prepare Your Pie Base
Start with your crust—whether you’re using a store-bought graham cracker crust or a traditional pastry crust, make sure it’s chilled and ready. If you’re making it yourself, press the crust firmly into your pie dish and pop it in the fridge to set while you mix the filling. This step ensures your crust stays crisp and doesn’t get soggy once filled.
Step 2: Whisk the Filling
In a large bowl, combine pumpkin puree, sweetened condensed milk, vanilla extract, and your pumpkin pie spices. I always start with cinnamon, nutmeg, and ginger, then taste and adjust if I want a little more kick. Whisk until the mixture is smooth and silky, with no lumps. This is the heart of your pie, so take a moment to make sure it’s perfect!
Step 3: Pour and Chill
Pour your luscious pumpkin filling into the chilled crust. Smooth the top with a spatula to get that beautiful even layer. Now, here’s the magic: cover it with plastic wrap and let it chill in the fridge for at least 4 hours—overnight is even better. The filling sets up firm yet creamy without any baking.
Step 4: Garnish and Serve
Just before serving, spread a thick layer of whipped topping or your favorite whipped cream substitute on top. If you’re feeling fancy, a sprinkle of cinnamon or a few pecans adds a lovely finishing touch. Slice and enjoy the best no bake pumpkin pie you’ve ever tasted.
Pro Tips for Making No Bake Pumpkin Pie Recipe
- Use Room Temperature Ingredients: I learned that allowing the pumpkin puree and sweetened condensed milk to come to room temp makes mixing smoother and helps the filling set evenly.
- Don’t Skip the Chill Time: This filling needs ample time—rushing it is the only way it won’t firm up properly, so overnight chill is my go-to.
- Taste Your Filling: Before chilling, do a quick taste test and adjust spices or sweetness to fit your personal preference.
- Pick the Right Crust: A sturdy graham cracker crust is my favorite because it holds up beautifully without baking and pairs perfectly with pumpkin.
How to Serve No Bake Pumpkin Pie Recipe
Garnishes
I love topping this pie with a generous cloud of whipped cream—it’s light and balances the rich filling just right. Toasted pecans or a drizzle of caramel sauce adds a little crunch and extra sweetness that’s irresistible. Sometimes, I even dust a tiny bit of cinnamon or pumpkin pie spice on top for a pretty, fragrant finish.
Side Dishes
This pie pairs wonderfully with vanilla ice cream or a simple cup of strong coffee, especially on chilly evenings. For a full fall dessert spread, I like to serve it alongside spiced nuts, candied yams, or even a fresh apple salad to lighten things up.
Creative Ways to Present
For gatherings, I’ve served this no bake pumpkin pie recipe in clear glass trifle bowls layered with gingersnap crumbs and whipped cream for a stunning, layered parfait effect. Mini pies or even no bake pumpkin pie shooters in small jars make adorable individual servings that guests love!
Make Ahead and Storage
Storing Leftovers
Once sliced, I store leftover pumpkin pie tightly covered with plastic wrap or in an airtight container in the fridge. It keeps well for 3 to 4 days, and honestly, sometimes I think the flavors deepen after a day or two.
Freezing
I’ve frozen leftover pie wrapped securely in foil and plastic wrap, and thawed it overnight in the fridge. While the texture softens slightly, it’s still delicious, especially if you add fresh whipped topping after thawing.
Reheating
This is a no bake pie, so reheating isn’t necessary or recommended. If you prefer it warm, a few minutes at room temperature does the trick, or serve it cold straight from the refrigerator—it’s equally tasty both ways!
FAQs
-
Can I use fresh pumpkin instead of canned puree?
Yes, you can! Just cook and puree fresh pumpkin until smooth before measuring. Remember fresh pumpkin can be a bit wetter than canned, so you may need to adjust the filling consistency slightly by adding a bit less sweetened condensed milk.
-
Will the pie firm up without gelatin or eggs?
Absolutely! The sweetened condensed milk combined with chilling time helps the filling set perfectly firm without any gelatin or eggs. Just make sure to chill the pie for at least 4 hours before slicing.
-
Can I make this pie ahead for a party?
Definitely! This pie is fantastic for make-ahead occasions since it needs to chill for several hours. Prepare it the day before your event, and keep it refrigerated until serving for the best texture and flavor.
-
What crusts work best with this no bake pumpkin pie recipe?
I recommend a graham cracker crust, which is quick and complements pumpkin perfectly—but a traditional or gluten-free pie crust works just as well. Just ensure the crust is sturdy enough to hold the creamy filling without crumbling.
Final Thoughts
This no bake pumpkin pie recipe holds a special place in my heart for its ease and deliciousness. I remember the first time I made it for a last-minute holiday gathering—it was a total hit and saved me from scrambling with the oven! You’ll love how simple it is, and once you try it, I bet it’ll become your go-to pumpkin dessert. So grab your ingredients, whip it up, chill, and enjoy a slice of fall magic anytime you want!
Print
No Bake Pumpkin Pie Recipe
- Prep Time: 20 minutes
- Cook Time: 40 minutes
- Total Time: 60 minutes
- Yield: 8 servings (1 9-inch pie)
- Category: Dessert
- Method: Baking
- Cuisine: American
Description
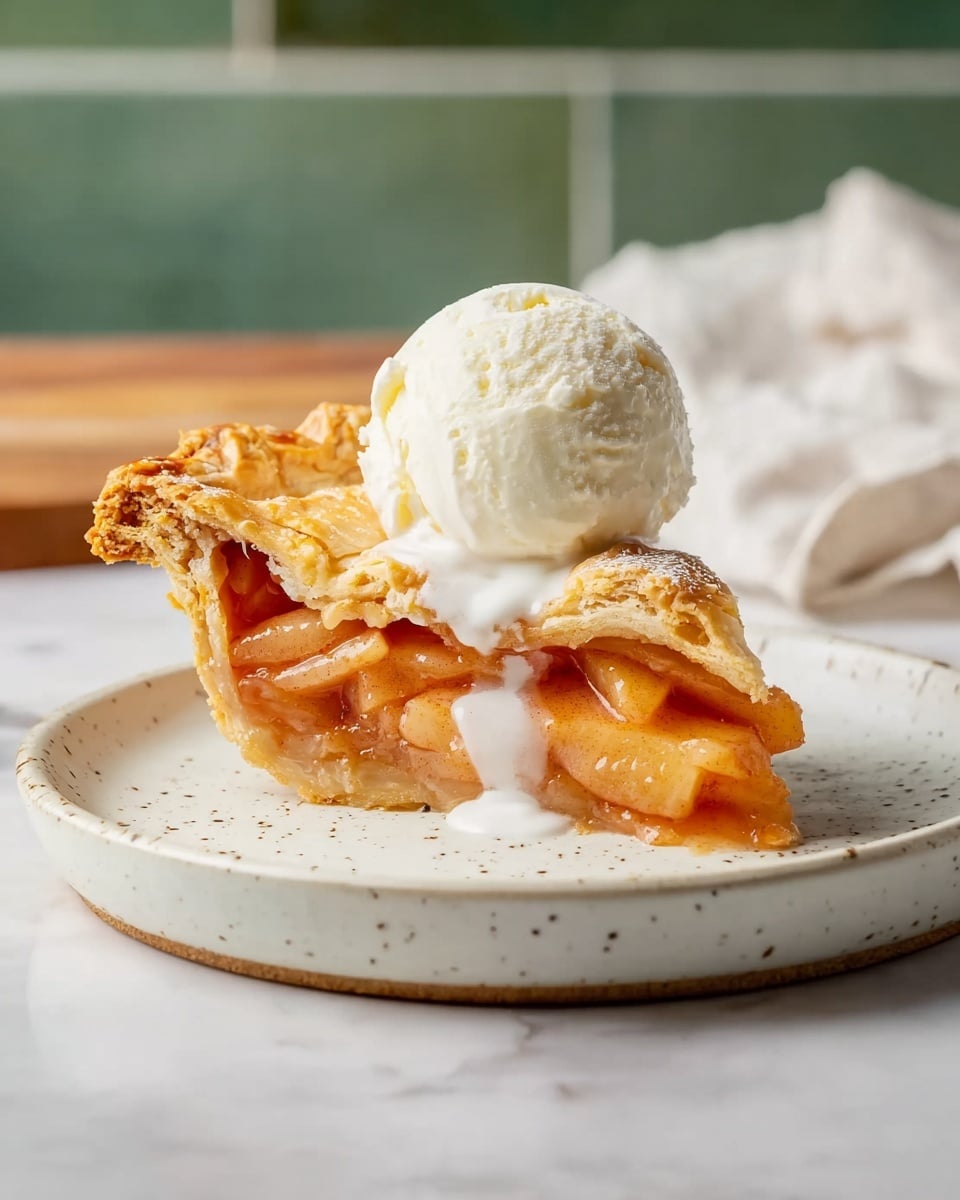
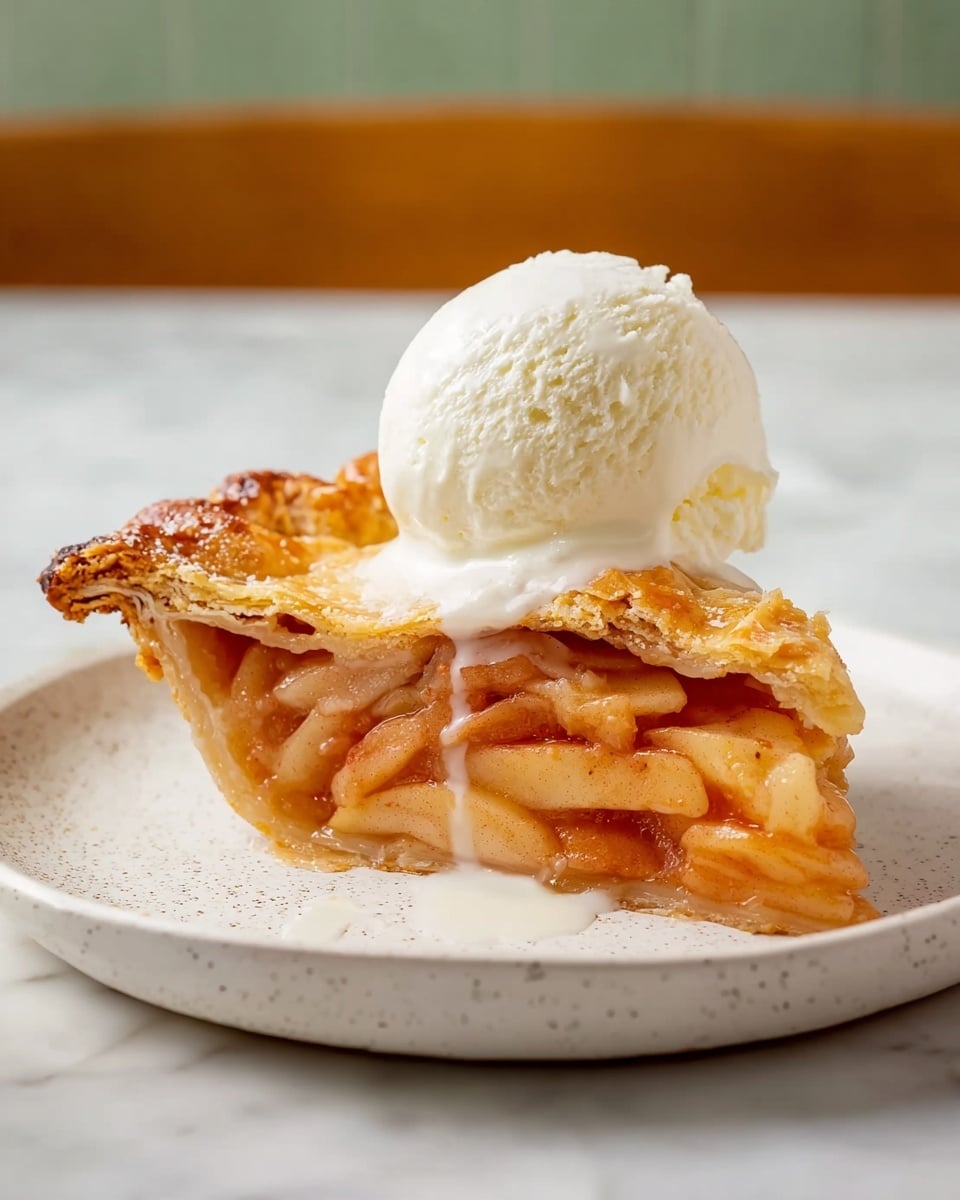
This classic Easy Apple Pie features a buttery double-crust pastry filled with thinly sliced apples layered with cinnamon sugar, baked to golden perfection. It’s a warm and inviting dessert perfect for fall or any time you crave a comforting homemade pie.
Ingredients
Pie Crust
- 1 (14.1 ounce) package pastry for a 9-inch double-crust pie
Filling
- 6 cups thinly sliced apples
- 0.75 cup white sugar, or more to taste
- 1 teaspoon ground cinnamon
- 1 tablespoon butter
Egg Wash
- 1 egg
- 1 tablespoon water
Instructions
- Prepare Ingredients: Gather all ingredients needed for the pie. Preheat your oven to 450 degrees F (230 degrees C) to get it ready for baking.
- Line Pie Dish: Place one of the pastry crusts into a 9-inch pie dish, pressing it firmly against the dish to fit properly. Set the second crust aside for later.
- Mix Cinnamon Sugar: In a small bowl, combine 3/4 cup white sugar with 1 teaspoon ground cinnamon. Add extra sugar if your apples are particularly tart to balance the flavor.
- Layer Apples: Arrange the thinly sliced apples evenly over the bottom crust in the pie dish, sprinkling each layer with the cinnamon-sugar mixture to infuse flavor throughout.
- Add Butter: Dot small pieces of the tablespoon of butter over the top layer of the apples to add richness and moisture to the filling as it bakes.
- Cover with Top Crust: Place the second pastry crust over the apple filling. Trim any excess dough and flute the edges by pinching them to seal the pie well, preventing leaks during baking.
- Apply Egg Wash: Beat the egg with 1 tablespoon of water to create an egg wash. Brush this over the top crust for a beautiful golden finish. Cut several small slits in the crust to allow steam to escape safely while baking.
- Bake Initially: Place the pie on the lowest oven rack and bake at 450 degrees F (230 degrees C) for 10 minutes. This initial high heat helps set the crust and activate browning.
- Reduce Heat and Continue Baking: Lower the oven temperature to 350 degrees F (175 degrees C) and bake for an additional 30 to 35 minutes, until the crust is golden brown and the filling is bubbling.
- Cool and Serve: Remove the pie from the oven and let it cool slightly. Serve warm or cold as desired for a delicious dessert experience.
Notes
- This apple pie recipe is incredibly simple yet yields a warm, comforting dessert with layers of cinnamon-spiced apples and a flaky double crust.
- Adjust sugar quantity depending on the tartness of your apples to achieve a perfect balance of sweetness.
- Be sure to cut slits in the top crust to allow steam to escape and prevent the pie from bursting.
- Serve with vanilla ice cream or whipped cream for an extra indulgent treat.
Nutrition
- Serving Size: 1 slice (1/8 of pie)
- Calories: 249 kcal
- Sugar: 29 g
- Sodium: 128 mg
- Fat: 9 g
- Saturated Fat: 3 g
- Unsaturated Fat: 0 g
- Trans Fat: 0 g
- Carbohydrates: 42 g
- Fiber: 3 g
- Protein: 2 g
- Cholesterol: 4 mg


