
If you’re on the hunt for a simple yet incredibly flavorful festive bread, you’re going to adore this No-Knead Cranberry Walnut Bread Recipe. I absolutely love how this bread combines the tart sweetness of cranberries with the crunch of walnuts, all tied together in a tender, rustic loaf you don’t even have to knead. Trust me, once you try this, you’ll keep coming back to it — it’s perfect for Thanksgiving or any cozy occasion where you want a little homemade magic without a ton of fuss.
Why You’ll Love This Recipe
- No Kneading Required: Perfect for anyone intimidated by bread-making; simply mix, wait, and bake.
- Burst of Flavor: The combination of tart cranberries and crunchy walnuts makes every bite uniquely delicious.
- Rustic, Artisan Look: The Dutch oven baking method creates a beautiful golden crust you’ll be proud to slice.
- Hands-Off Rise Time: Letting the dough rest for 18 hours develops complex flavors with minimal effort on your part.

Ingredients You’ll Need
These ingredients come together beautifully — simple pantry staples that give you a wonderfully textured bread with bursts of cranberry tartness and nutty crunch from walnuts. A touch of orange zest brightens the flavor and makes this loaf feel truly special.

- Active dry yeast: Essential for that perfect rise, and don’t forget to proof it with warm water and a sprinkle of sugar for best results.
- Warm water: Around 110–115°F is ideal to activate the yeast without killing it; I use a kitchen thermometer to be sure.
- Granulated sugar: Helps feed the yeast for a fluffy rise and adds slight sweetness.
- Kosher salt: Balances the sweetness and enhances all the flavors.
- Bread flour: Higher protein content gives this bread structure and chew without needing kneading.
- Dried cranberries: Adds a lovely tart burst that contrasts brilliantly with the dough’s subtle sweetness.
- Dried walnuts: Roughly chopped for texture and earthy depth; fresh walnuts make all the difference.
- Honey: Adds natural sweetness and helps with a beautiful golden crust.
- Orange zest: Bright citrus notes bring a festive twist that pairs perfectly with cranberries.
Variations
I love tweaking this No-Knead Cranberry Walnut Bread Recipe depending on the season or what’s in my pantry. The beauty of no-knead bread is how forgiving it is — you can really make it your own.
- Swap Nuts: My family isn’t always big on walnuts, so I’ve swapped in pecans or almonds with great results for different crunch and flavor profiles.
- Fresh Fruit Twist: For a summer version, I once added dried apricots along with cranberries — delicious and slightly sweeter.
- Gluten-Free Option: Making this gluten-free is tricky because of the flour type, but using a high-protein gluten-free blend and adding xanthan gum can work; just expect a denser loaf.
- Herb Upgrade: Experiment with fresh rosemary or thyme if you want a savory depth alongside the fruit and nuts – it’s a lovely twist.
How to Make No-Knead Cranberry Walnut Bread Recipe
Step 1: Activate Your Yeast
Start by dissolving the active dry yeast and sugar in warm water (110–115°F). It takes about 10 minutes for the mixture to foam up—that’s your sign the yeast is happy and alive. If it doesn’t foam, don’t worry! Start over with fresh yeast. Getting this right is crucial for good rise and texture.
Step 2: Mix the Dough
In a large bowl, whisk together the bread flour and kosher salt. Pour in the yeast mixture and add the honey. Mix just until no dry flour remains — don’t overdo it. Then gently fold in the dried cranberries, chopped walnuts, and fresh orange zest. The dough will be sticky and wet, which is exactly what you want to trap steam during baking.
Step 3: Let It Rest (The Magic Happens Here)
Cover the bowl tightly with plastic wrap without touching the dough and let it rest at room temperature for about 18 hours. This long ferment develops incredible flavor and a perfect chewy texture. I’ve done this twice with less time, but 18 hours always gives the best results. This part is hands off, so take advantage by prepping the rest of your meal!
Step 4: Shape Your Loaf
After the dough has risen and looks bubbly, transfer it to a generously floured surface. Flour your hands too, then carefully fold the edges inward to shape a rough ball. Be gentle to preserve those precious air bubbles — they make the crumb light and airy. Place the dough on a floured piece of parchment paper, smooth side up. Cover with plastic wrap and let it rest for 30 minutes. This little second rise makes shaping easier and bakes better.
Step 5: Heat Up Your Dutch Oven
While the dough rests, place your Dutch oven with the lid inside your oven and preheat to 450°F for 30 minutes. This is key for creating the steamy environment that bakes the bread to crispy perfection.
Step 6: Bake to Golden Perfection
Score an X or any design you like on the dough’s surface — this helps it expand during baking. Carefully remove the hot Dutch oven from the oven, then lift the parchment paper with your dough and place it inside. Cover with the lid and bake for 30 minutes without peeking. After 30 minutes, remove the lid to let the crust brown for another 8–10 minutes. When it’s a deep golden brown and your kitchen smells like heaven, it’s done!
Step 7: Cool Before You Cut
Remove the bread from the Dutch oven by lifting the parchment paper, and transfer it to a wire rack. Let it cool completely before slicing. I know, it’s tempting to cut while warm, but patience pays off with a cleaner slice and better texture.
Pro Tips for Making No-Knead Cranberry Walnut Bread Recipe
- Warm Water Accuracy: I always check the water temperature with a thermometer to make sure it’s not too hot or cold — this helps your yeast bloom perfectly every time.
- Flour Your Surface Well: The dough is sticky, so don’t be shy with the flour when shaping, but also avoid over-flouring, which can dry out the crust.
- Steaming is Key: Using a Dutch oven traps steam to develop the crust; skip this and you’ll lose that signature artisan texture.
- Don’t Rush the Rise: I’ve learned rushing the dough or cutting it too soon affects flavor and crumb — patience is your best friend here.
How to Serve No-Knead Cranberry Walnut Bread Recipe

Garnishes
When I slice into this bread, I like to spread a pat of room temperature butter, or for a holiday twist, some creamy goat cheese pairs beautifully with its flavors. A drizzle of honey on top is an extra special touch that my family goes crazy for.
Side Dishes
This bread pairs wonderfully alongside soups, especially butternut squash or creamy tomato bisque, as well as charcuterie boards with cheeses and cured meats — perfect for Thanksgiving or cozy nights in.
Creative Ways to Present
For holiday gatherings, I love slicing this bread and arranging it in a festive basket lined with a colorful napkin. Adding sprigs of fresh rosemary or cranberries around the basket makes it feel extra special and inviting.
Make Ahead and Storage
Storing Leftovers
I usually store leftover slices in a paper bag folded closed or wrapped loosely with a kitchen towel at room temperature. This method keeps the crust crispy longer, unlike sealed plastic which softens it quickly.
Freezing
To freeze, I wrap the bread well in aluminum foil, then place it inside a resealable freezer bag. It keeps beautifully for up to 3 months. When you’re ready, just thaw at room temperature — no need to thaw in the fridge.
Reheating
I reheat slices in a toaster oven or regular oven at around 350°F for 5–8 minutes. This revives the crust’s crunchiness and warms the inside while preserving the texture perfectly.
FAQs
-
Can I use all-purpose flour instead of bread flour?
You can substitute all-purpose flour, but your bread might be a little less chewy and rise less because bread flour has higher protein content, which lends better structure. Still, it’ll be tasty and rustic!
-
My dough didn’t rise — what went wrong?
The yeast might have been old, the water temperature too hot or cold, or the environment too chilly for fermentation. Try proofing your yeast with the warm water and sugar before mixing the dough to check for activity.
-
Can I shorten the rising time?
While you can reduce rising to 12–16 hours, the flavor and texture develop best with a full 18-hour rise. Shorter rising times might cause a denser loaf lacking depth.
-
Why do I need a Dutch oven?
The Dutch oven traps steam released from the wet dough, which is essential to form a crisp, golden crust and airy interior. Baking without it usually results in a dryer, less crusty loaf.
Final Thoughts
This No-Knead Cranberry Walnut Bread Recipe holds a special place in my kitchen — it’s easy enough for any home baker yet feels like a real culinary centerpiece. I love how the flavors deepen over time, and how the whole house fills with that amazing fresh-baked aroma. Give it a try, and I’m sure it’ll become one of your favorite traditions too, whether for Thanksgiving or just because you deserve something delicious without the fuss.
Print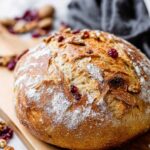
No-Knead Cranberry Walnut Bread Recipe
- Prep Time: 15 minutes
- Cook Time: 40 minutes
- Total Time: 19 hours 25 minutes
- Yield: 12 slices
- Category: Bread
- Method: Baking
- Cuisine: American
- Diet: Vegetarian
Description
This Thanksgiving Cranberry Walnut Bread is a delightful no-knead artisan loaf that combines tart dried cranberries, crunchy walnuts, and zesty orange flavor. Baked in a Dutch oven for a perfect crust, this bread is fluffy inside with a beautiful golden-brown exterior, making it an ideal festive treat or accompaniment for holiday meals.
Ingredients
Wet Ingredients
- ½ teaspoon active dry yeast
- 1 ½ cups warm water (110 to 115 degrees F)
- 1 teaspoon granulated sugar
- 1 tablespoon honey
- 1 tablespoon orange zest
Dry Ingredients
- 2 teaspoons Kosher salt
- 3 cups bread flour, plus 2 tablespoons (plus more for dusting)
- ¾ cup dried cranberries
- ½ cup dried walnuts, roughly chopped
Instructions
- Prepare the yeast mixture: Dissolve the active dry yeast and granulated sugar in 1 ½ cups of warm water (110 to 115°F). Let it sit for 10 minutes or until it becomes foamy. If it doesn’t foam, discard and start over to ensure yeast is active.
- Combine dry ingredients: In a large bowl, whisk the bread flour with the Kosher salt to evenly distribute the salt throughout the flour.
- Mix dough: Add the yeast mixture and honey to the dry ingredients. Stir until no pockets of flour remain, avoiding over-mixing. Then fold in dried cranberries, chopped walnuts, and orange zest until just combined. The dough will be very sticky and wet, which is expected.
- First rise: Cover the bowl tightly with plastic wrap, ensuring it doesn’t touch the dough, and let it rest on your countertop at room temperature for 18 hours. This long fermentation allows the dough to develop flavor and texture.
- Shape the dough: After 18 hours, the dough will be very sticky and wet. Transfer it carefully to a well-floured surface and coat it with flour. Gently fold the edges toward the center to form a ball, being careful not to deflate the trapped air pockets. Flip smooth side up and reshape if necessary. Place it on a lightly floured parchment paper.
- Second rise: Cover the dough loosely with plastic wrap and let it rest at room temperature for 30 minutes to puff slightly.
- Preheat Dutch oven: Meanwhile, place a 5 to 6 quart Dutch oven with the lid inside your oven and preheat to 450°F for 30 minutes to ensure it’s thoroughly hot.
- Score the dough: Using a sharp knife or razor blade, score an X or decorative pattern on the surface of the dough to allow controlled expansion during baking.
- Bake covered: Carefully remove the hot Dutch oven from the oven. Using the parchment paper, lift and transfer the dough into the hot pot. Cover tightly with the lid and bake for 30 minutes without opening to trap steam and encourage a crisp crust.
- Bake uncovered: Remove the lid and continue baking for 8 to 10 minutes until the crust is a deep golden brown and crisp.
- Cool and serve: Lift the bread out using the parchment paper and let it cool completely on a wire rack before slicing to finish the cooking process and avoid gummy texture. Enjoy your festive cranberry walnut bread!
Notes
- Allow the dough to rise for a full 18 hours to develop the best flavor and texture. A minimum of 12 hours can work but may be less flavorful and dense.
- The sticky, wet dough consistency is intentional and necessary for steam formation inside the Dutch oven, resulting in a beautiful crust.
- A Dutch oven is essential for this recipe; it traps steam to create the perfect crust while baking.
- Store bread in a semi-open paper bag to maintain a crusty exterior, similar to bakery storage methods.
- For freezing, wrap the bread in aluminum foil then place inside a freezer-safe resealable bag. It will keep up to 3 months. Thaw at room temperature before slicing.
Nutrition
- Serving Size: 1 slice (approx. 1/12th of loaf)
- Calories: 180
- Sugar: 6g
- Sodium: 360mg
- Fat: 4.5g
- Saturated Fat: 0.5g
- Unsaturated Fat: 4g
- Trans Fat: 0g
- Carbohydrates: 32g
- Fiber: 2g
- Protein: 5g
- Cholesterol: 0mg


