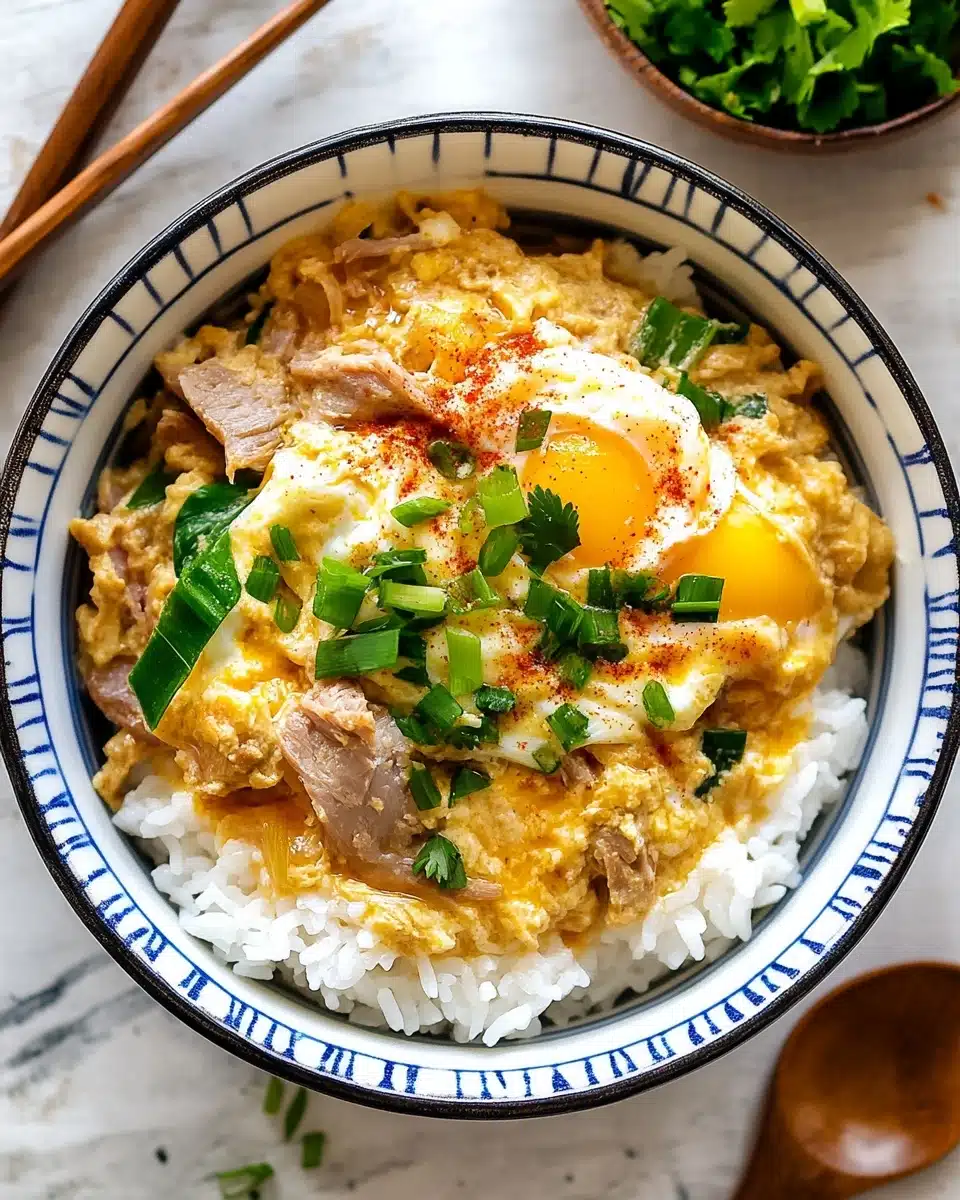
Oh, let me spill the delicious beans about Oyakodon (Chicken and Egg Rice Bowl)! This comforting Japanese classic is my go-to recipe when I crave something simple yet deeply satisfying. It’s a hearty bowlful of tender chicken and just-set eggs simmered in a savory broth, topping a bed of fluffy rice. The delightful marriage of flavors makes every bite a joy, and it’s ready in no time! Let’s dive in and bring a taste of Japan to your kitchen.
Why You’ll Love This Recipe
- Quick and Easy to Prepare: Despite its complex flavors, the dish comes together rapidly, making it perfect for busy weeknights.
- A One-Bowl Wonder: It’s your complete delicious meal in one bowl, with protein, carbs, and all the umami punch you dream of.
- Customizable: Easy to tweak with available ingredients or dietary preferences without losing its delightful essence.
- Authentic Flavors: Transport yourself to Japan with just a spoonful of this delightful concoction.

Ingredients You’ll Need
Creating this delightful Oyakodon (Chicken and Egg Rice Bowl) is a breeze with a handful of pantry staples and a few fresh ingredients. Each component lends its own unique flavor and texture to the dish, ensuring a well-rounded and satisfying meal.
- ½ onion (4 oz, 113 g): Adds sweet and subtle flavor, softens with cooking to meld beautifully with the broth.
- 10 oz boneless, skinless chicken thighs: Juicy and quick-cooking, perfect for soaking up all the rich flavors.
- 1 Tbsp sake: Enhances the chicken’s juiciness, adding depth to the overall flavor.
- 3-4 large eggs: The heart of the dish, offering a creamy texture and rich taste.
- ½ cup dashi: The backbone of umami in the seasoning, crucial for the authentic taste.
- 2 Tbsp soy sauce, 2 Tbsp mirin, and 2 tsp sugar: These seasonings create a perfect balance of savory and sweet.
- Cooked Japanese short-grain rice: The base, providing a soft, comforting canvas for the toppings.
- Mitsuba or green onions: A fresh garnish that adds a pop of color and subtle herbaceousness.
- Shichimi togarashi and Japanese sansho pepper: Optional heat and spice for those who love an extra kick.
Variations
One of the beauties of Oyakodon is its adaptability. It’s incredibly easy to tweak this recipe to fit different ingredients, dietary requirements, or personal tastes while maintaining its comforting essence.
- Vegetarian/Vegan: Substitute the chicken with a plant-based alternative and use an egg substitute like JUST Egg to recreate the classic texture.
- Extra Spicy: Turn up the heat by adding extra shichimi togarashi or a splash of sriracha for a spicy twist.
- Rich and Creamy: Stir in a small knob of butter before serving to enhance the richness of the dish.
How to Make Oyakodon (Chicken and Egg Rice Bowl)
Step 1: Prepare the Ingredients
Start by slicing the onion and trimming any extra bits from the chicken thighs. Cut the chicken into square pieces using the sogigiri technique, which ensures even cooking and rich flavor absorption. Sprinkle with sake and let it marinate for five minutes. Meanwhile, prepare the dashi seasoning by combining dashi, soy sauce, mirin, and sugar until the sugar dissolves.
Step 2: Cook the Chicken and Onions
In a medium frying pan, spread the onions and pour the prepared seasonings over them. Bring this mix to a gentle simmer over medium heat, then add the marinated chicken. Let it cook and absorb the flavors until the chicken is just done and the onions are tender.
Step 3: Add the Eggs
Pour two-thirds of the beaten eggs over the chicken and onions, allowing them to cook gently at medium heat. This technique ensures a tender, marbled effect where the whites and yolks cook separately. For a silkier finish, add the remaining eggs once the first batch has almost set. Cook to your liking, remembering that runny yolks are a hallmark of traditional oyakodon.
Step 4: Serve and Enjoy
Spoon the delicious mixture onto a bowl of steaming Japanese short-grain rice. Garnish with chopped mitsuba or green onions for freshness, plus a sprinkle of shichimi togarashi or sansho pepper for an extra hint of zing. Serve immediately while it’s warm and inviting.
Pro Tips for Making Oyakodon (Chicken and Egg Rice Bowl)
- Egg Technique: To achieve that perfect marbled effect, make sure to drizzle the eggs rather than pour them all at once.
- Onion Thickness: Slice your onions thinly for even cooking and to allow them to absorb the savory dashi flavors.
- Right Heat: Maintain a gentle simmer to perfectly poach the eggs and infuse the chicken with rich flavors.
- Mitsuba Freshness: Add the mitsuba or green onions just before serving to keep their color vibrant and taste fresh.
How to Serve Oyakodon (Chicken and Egg Rice Bowl)
Garnishes
Garnishes not only add beauty but also enhance flavors. Try a sprinkle of shichimi togarashi for spicy heat, or Japanese sansho pepper for a zesty finish. Fresh mitsuba gives it an herby lift, while thinly sliced green onions add a pop of color and mild bite.
Side Dishes
Pair your Oyakodon with a light miso soup or a side of pickled vegetables for a truly authentic Japanese experience. A crisp salad of greens and carrot delivers texture contrast and refreshes the palate between those beautiful bites.
Creative Ways to Present
Presentation ideas can be as simple or elaborate as your heart desires. Serve the Oyakodon in deep donburi bowls for an authentic touch, or in wide dishware to show off the beautiful marbled eggs and vibrant greens atop the rice.
Make Ahead and Storage
Storing Leftovers
Store any leftovers in an airtight container, keeping them fresh in the refrigerator for up to 2–3 days. Ensure the Oyakodon is completely cooled before sealing it to prevent condensation.
Freezing
While it’s best enjoyed fresh, you can freeze Oyakodon for later enjoyment. Simply portion it into freezer-safe containers, making sure to leave some space at the top for expansion during freezing.
Reheating
To reheat, thaw the Oyakodon overnight in the refrigerator if frozen. Heat it gently over a low flame until warmed through, adding a splash of water to the pan if needed to keep it moist.
FAQs
-
Can I make Oyakodon without dashi?
Yes, while dashi brings that authentic umami flavor, you can substitute it with chicken or vegetable broth. This might alter the taste slightly, but it’ll still be delicious!
-
How can I ensure the eggs are perfectly cooked?
The key to perfect eggs is gentle heat and timing. Add the eggs when the liquid is simmering and cook them gently until they are just set.
-
What rice works best with Oyakodon?
Japanese short-grain rice is ideal due to its stickiness and ability to complement savory toppings. It holds up beautifully under the rich sauce and toppings.
-
Can I use chicken breast instead of thighs?
Of course! Chicken breast can be a leaner option, but take care not to overcook it as it can become dry. Adjust the cooking time accordingly to keep it tender.
Final Thoughts
I hope you’re as excited as I am to try this Oyakodon (Chicken and Egg Rice Bowl) at home. It’s a simple, delightful taste of Japan that’ll warm both your heart and your belly. Don’t wait too long—grab those ingredients and start cooking! You won’t regret a single bite.
Print
Oyakodon Recipe
- Prep Time: 15 minutes
- Cook Time: 10 minutes
- Total Time: 25 minutes
- Yield: 2 servings
- Category: Main Course
- Method: Stovetop
- Cuisine: Japanese
Description
Oyakodon is a classic Japanese rice bowl featuring tender chicken and soft-cooked eggs simmered in savory dashi-based broth, served over steamed short-grain rice. This comforting dish combines umami-rich flavors with a delicate texture, making it a perfect quick and satisfying meal for lunch or dinner.
Ingredients
For the Seasonings
- 1/2 cup dashi (Japanese soup stock)
- 2 Tbsp soy sauce
- 2 Tbsp mirin
- 2 tsp sugar
For the Main Ingredients
- 1/2 onion (4 oz, 113 g; peeled)
- 10 oz boneless, skinless chicken thighs (or plant-based meat substitute)
- 1 Tbsp sake (or substitute with Chinese rice wine, dry sherry, or omit)
- 3-4 large eggs (50 g each without shell; vegan options include JUST Egg)
For Serving
- 2 servings cooked Japanese short-grain rice (about 1 2/3 cups / 250 g cooked rice)
- 4 sprigs mitsuba (or green onion/scallion)
- Shichimi togarashi (optional)
- Japanese sansho pepper (optional)
Instructions
- Gather all ingredients. Prepare all your ingredients as outlined, ensuring the rice is cooked separately according to your preferred method, and the mise en place is ready for a smooth cooking process.
- Prepare the seasonings. In a bowl or measuring cup, combine ½ cup dashi, 2 Tbsp soy sauce, 2 Tbsp mirin, and 2 tsp sugar. Mix until the sugar dissolves completely.
- Slice the onion and chop herbs. Slice the peeled onion lengthwise into ¼ inch (6 mm) pieces. Chop mitsuba or scallion into ½ inch (1.3 cm) pieces for garnishing.
- Prepare the chicken. Trim excess fat and connective tissue from the chicken thighs. Cut into strips ¾–1 inch (2–2.5 cm) wide, then slice against the grain into ¾–1 inch (2–2.5 cm) squares. Transfer to a bowl and sprinkle with 1 Tbsp sake. Let marinate for 5 minutes.
- Crack and prepare the eggs. Crack 3-4 eggs into a bowl. Using chopsticks, cut through the whites 5–6 times to create small clumps, avoiding mixing yolks with whites. This creates a marbled effect with contrasting colors.
- Cook the chicken and onions. In a medium frying pan (about 10 inches), add the sliced onions in a single layer. Pour the seasoning mixture over the onions and turn on medium heat, bringing to a simmer. Add chicken on top, distribute evenly, and cook uncovered for 5 minutes until chicken is no longer pink and onions are tender. Flip chicken halfway through cooking.
- Add the first two-thirds of eggs. Once the chicken is cooked, increase heat to medium. Drizzle two-thirds of the beaten eggs in a circular pattern around the chicken, avoiding over the edges. Keep the heat at simmer; cover briefly if needed to help whites set.
- Add remaining eggs and garnish. When eggs are just set but still slightly runny, pour the remaining one-third of eggs into the center and over the edges. Sprinkle mitsuba or scallion on top. Cook on medium-low until the eggs are to your desired consistency, ideally still slightly runny for authentic texture. Add extra yolks or beaten yolk for presentation if desired.
- Serve. Spoon the hot chicken and egg mixture over steamed rice in individual bowls. Drizzle with pan sauce and garnish with additional herbs. Serve immediately, optionally with shichimi togarashi or sansho pepper for added flavor.
Notes
- Ensure the eggs are just slightly runny for the authentic oyakodon texture and flavor.
- Use fresh, high-quality chicken thighs for better flavor.
- If using a larger pan or multiple servings, cook in batches to maintain dish integrity.
- This dish is best enjoyed immediately but can be stored in airtight containers for up to 2-3 days in the refrigerator.
Nutrition
- Serving Size: 1 bowl (about 400 g)
- Calories: 537 kcal
- Sugar: 11 g
- Sodium: 1197 mg
- Fat: 13 g
- Saturated Fat: 4 g
- Unsaturated Fat: 8 g
- Trans Fat: 0.1 g
- Carbohydrates: 50 g
- Fiber: 1 g
- Protein: 42 g
- Cholesterol: 414 mg


