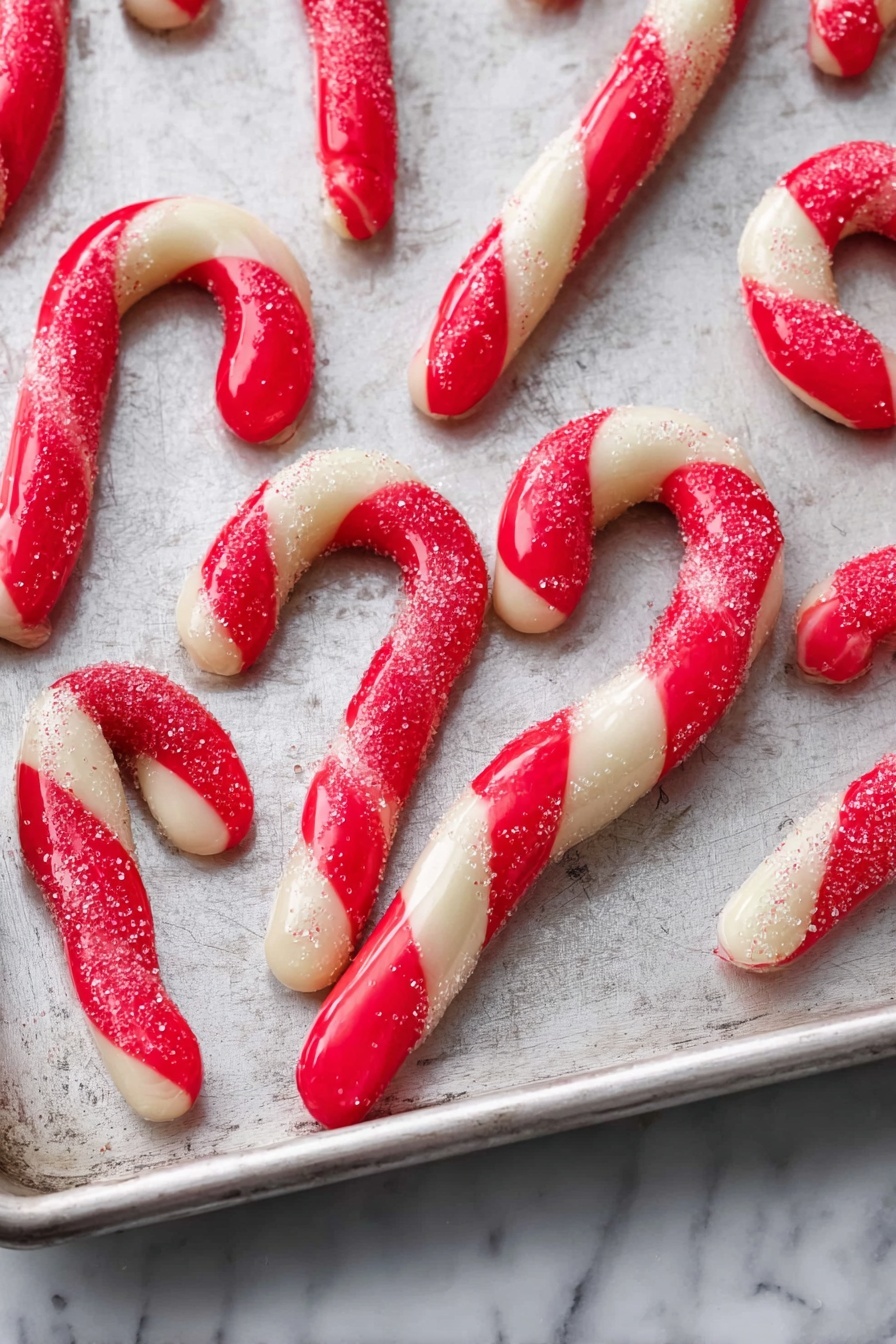
If you’ve been dreaming of festive treats that taste like the holidays in every bite, then you’re in for a real treat. I’m excited to share my all-time favorite Peppermint Candy Cane Cookies Recipe that not only look adorable with their classic red and white twist, but they also burst with refreshing peppermint flavor. Whether you’re baking for a cozy get-together or need a charming gift, these cookies are sure to steal the show—and your heart—just like they did mine the first time I tried them!
Why You’ll Love This Recipe
- Delightfully Festive: The candy cane shape and peppermint flavor make it perfect for holiday celebrations.
- Easy to Make: With straightforward steps, even beginners can nail these cookies with confidence.
- Perfect Texture: These cookies are crisp around the edges but stay tender inside—something I’ve learned to master after some trial and error.
- Make Ahead Friendly: Dough can chill overnight, making your baking schedule smooth and stress-free.

Ingredients You’ll Need
For me, the magic of this Peppermint Candy Cane Cookies Recipe lies in the balance of rich, buttery dough and refreshing peppermint. Using quality ingredients really makes a difference, and picking a good peppermint extract gives the cookies that authentic, cool kick.
- Unsalted Butter: Room temperature is key here to get a smooth dough; salted butter can throw off your flavor balance.
- Granulated Sugar: This gives just the right sweetness without overpowering the peppermint.
- Peppermint Extract: I recommend a strong, pure extract for that unmistakable holiday taste.
- Vanilla Extract: Adds warmth and depth to the overall flavor profile.
- Baking Powder: Helps the cookies rise just enough for a light texture.
- Kosher Salt: Enhances the sweetness and flavors—don’t skip it!
- Large Egg: Acts as a binder and adds richness.
- All-Purpose Flour: Make sure to measure it properly for the best consistency—spoon in your cup and level it off with a knife.
- Liquid Red Food Coloring: Gives the dough that festive candy cane red—gel color works well too.
- Egg White: For a glossy wash that helps sugar stick beautifully.
- Sparkling Sugar: Adds a mesmerizing sparkle and subtle crunch on top.
Variations
I love how versatile this Peppermint Candy Cane Cookies Recipe is. Feel free to play around and make it your own—I’ve had a blast customizing these cookies with different flavors and toppings, and I bet you will too.
- Chocolate Peppermint: Add a tablespoon of cocoa powder to the dough for a twist, and sprinkle mini chocolate chips before baking—my family absolutely adores this variation.
- Gluten-Free: Swap in a trusted gluten-free flour blend; the cookie texture stays nice and tender.
- Without Food Coloring: Skip the red food coloring for a more subtle, natural look—the peppermint flavor still shines.
- Extra Crunchy: Sprinkle crushed candy cane pieces on top before baking for a festive crunch.
How to Make Peppermint Candy Cane Cookies Recipe
Step 1: Cream Butter and Sugar with Peppermint Magic
Start by placing your softened butter, granulated sugar, peppermint extract, vanilla extract, baking powder, and salt right into your stand mixer bowl. Beat them together on medium speed until you see a smooth, creamy paste that clings slightly to the bowl sides—that’s when you know they’re perfectly combined. Don’t forget to scrape down the sides before adding the egg, so everything mixes evenly. Then beat in the egg until fully absorbed. Getting this base right is what makes your cookies melt-in-your-mouth good.
Step 2: Flour Power and Color Divides
Next, add the flour gradually, mixing on low speed until you see no more streaks of flour—just watch out not to overmix or you’ll risk tough cookies. Once the dough comes together, divide it into two equal halves. Now, here’s the fun part—you’ll add the liquid red food coloring to one half and mix gently until the color is uniformly distributed. The other half stays pure white, making your candy cane stripes pop perfectly.
Step 3: Chill Out
Pat both dough halves into disks and wrap them tightly with plastic wrap. This rest in the fridge for at least 3 hours—or better yet, overnight—is what firms up the dough and makes it so much easier to roll and shape. Trust me, skipping this step leads to frustration trying to handle sticky dough, and nobody wants that.
Step 4: Roll, Twist, and Shape Those Candy Canes
When you’re ready to bake, prepare your baking sheet lined with parchment or a silicone mat. Take the chilled dough straight from the fridge; it should be firm but pliable—if it feels too hard, let it sit a few minutes on the counter to soften slightly, but not long enough to get sticky. Pinch off a 1-inch chunk of the white dough and roll it into a 5-inch rope. Do the same with the red dough, making sure both ropes are about the same length. Place them side by side and twist gently together to mimic that iconic candy cane stripe. Transfer the twisted ropes to your baking tray, then gently curve one end to form the candy cane hook. Repeat with the rest of the dough, spacing the cookies at least 2 inches apart so they have room to spread.
Step 5: Egg White Wash and Sparkling Sugar Glam
Whisk the egg white together with a tablespoon of water until it’s foamy and brush this lightly over every cookie—this step is a game-changer because it helps the sparkling sugar stick beautifully and adds a subtle shine. Sprinkle the sparkling sugar generously on top, and these cookies instantly go from charming to downright dazzling.
Step 6: Bake and Cool to Perfection
Pop your tray into a preheated 350°F (175°C) oven and bake for 8 to 10 minutes. You’re looking for just a hint of golden brown at the edges—that means they’re perfectly crisp but still tender in the center. Let the cookies cool right on the baking sheet for about 10 minutes before transferring them to a wire rack to cool completely. This little patience pays off big time in texture.
Pro Tips for Making Peppermint Candy Cane Cookies Recipe
- Room Temperature Butter Matters: It cream together much easier, creating a better texture than cold butter.
- Don’t Overmix Flour: Mix just until flour disappears for tender cookies, or they might turn dense.
- Chill Dough Properly: This controls spreading and makes shaping the ropes much easier—trust me, this little step spared me many frustrated afternoons.
- Handle Dough Gently: If dough gets too soft, pop it back in the fridge a few minutes before rolling for the best results.
How to Serve Peppermint Candy Cane Cookies Recipe

Garnishes
I usually keep it simple with a sprinkle of sparkling sugar before baking—it adds that frosty sparkle. Sometimes, for an extra festive look, I dip one end in melted dark chocolate and wrap a tiny peppermint candy around it. It’s become a fun tradition in my kitchen that your guests will surely notice and love.
Side Dishes
These cookies pair beautifully with a glass of cold milk, hot cocoa, or a warm cup of coffee spiked with a hint of cinnamon. For holiday brunches, I love serving them alongside mini peppermint mocha lattes or spiced chai teas for that cozy vibe.
Creative Ways to Present
For gifting, I like arranging these cookies in a clear jar lined with red tissue paper, then tied with a festive ribbon. At parties, I’ve placed them standing upright in white mugs alongside candy canes and holiday-themed napkins—instantly turning snacking into a festive experience.
Make Ahead and Storage
Storing Leftovers
I keep leftover cookies fresh by storing them in an airtight container at room temperature. They stay perfectly chewy and crisp for up to two weeks, which is great when you’re busy with holiday hustle and bustle.
Freezing
If you want to prep in advance, the cookie dough freezes beautifully already shaped into logs or even after baking. Just wrap well in plastic wrap and place in a freezer bag. When you’re ready, thaw dough overnight in the fridge before shaping or bake frozen cookies a couple of minutes longer.
Reheating
To warm up cookies without losing their crispness, I pop them in a 300°F oven for 3-5 minutes. Microwave reheating tends to make them too soft, so the oven method is my go-to for maintaining that fresh-baked texture.
FAQs
-
Can I use peppermint oil instead of peppermint extract in this Peppermint Candy Cane Cookies Recipe?
Absolutely! Just be cautious because peppermint oil is usually more concentrated, so you’ll want to use less—start with half the amount and adjust to taste. It can really enhance that fresh peppermint flavor, but too much can be overpowering.
-
Why do I need to chill the dough for the Peppermint Candy Cane Cookies Recipe?
Chilling firms up the dough, making it easier to handle, shape, and prevents the cookies from spreading too much during baking. It also helps the flavors meld for that wonderful peppermint punch.
-
Can I make these cookies without food coloring?
You definitely can! The cookies will still taste delicious without the red coloring, but they won’t have the classic candy cane look. If you prefer natural dyes, you might try using beet powder or freeze-dried raspberry powder to get a red hue.
-
How long will these cookies stay fresh?
Stored in an airtight container at room temperature, these Peppermint Candy Cane Cookies can stay fresh and tasty for one to two weeks, which is great for holiday gifting or enjoying gradually.
Final Thoughts
This Peppermint Candy Cane Cookies Recipe has become a heartwarming tradition in my kitchen. There’s something truly joyful about hand-twisting those red and white ropes while the peppermint scent fills the air—and the cookies themselves never disappoint with their crisp edges and tender centers. I really hope you’ll give this recipe a try and experience the festive magic firsthand. Trust me, once you do, your family and friends will be asking for these cookies year after year, just like mine do!
Print
Peppermint Candy Cane Cookies Recipe
- Prep Time: 20 minutes
- Cook Time: 10 minutes
- Total Time: 3 hours 30 minutes
- Yield: 36 cookies
- Category: Dessert
- Method: Baking
- Cuisine: American
Description
These festive Candy Cane Cookies are a delightful peppermint-flavored treat perfect for the holiday season. Featuring a striking red and white twisted dough, these buttery cookies offer a crisp texture and a refreshing minty taste, making them a charming addition to any holiday cookie platter.
Ingredients
Cookie Dough
- 1 cup (2 sticks, 8 ounces) unsalted butter, at room temperature
- 1 cup (200 g) granulated sugar
- 1 1/2 teaspoons peppermint extract
- 1 teaspoon vanilla extract
- 1 teaspoon baking powder
- 1/2 teaspoon kosher salt
- 1 large egg
- 2 3/4 cup (385 g) all-purpose flour
- 1 teaspoon liquid red food coloring
Topping
- 1 egg white
- 2 tablespoon sparkling sugar
Instructions
- Mix Dough: Place the butter, sugar, peppermint extract, vanilla extract, baking powder, and kosher salt into the bowl of a stand mixer. Beat until a paste forms and clings to the side of the bowl. Scrape down the sides and beat in the egg until fully absorbed. Add the flour and mix until just combined with no dry streaks remaining.
- Color Dough: Divide the dough in half and remove one half. Carefully add the liquid red food coloring to the remaining dough in the mixer bowl. Mix on low speed until the color is evenly distributed.
- Chill Dough: Pat each dough half into a disk, wrap separately in plastic wrap, and refrigerate for at least 3 hours or overnight to firm up.
- Prepare Baking Sheet: Line a baking sheet with parchment paper or a silicone baking mat to prevent sticking and promote even baking.
- Shape Cookies: Remove dough from refrigerator; it should be firm but malleable. Pinch off a 1-inch piece of white dough and roll it into a 5-inch rope. Repeat with a piece of red dough so both ropes are equal length. Twist the ropes together and curve the top to form a candy cane shape. Place on the baking sheet, spacing cookies about 2 inches apart. Repeat with remaining dough.
- Apply Egg Wash: Beat the egg white with 1 tablespoon water until foamy. Brush each candy cane cookie with the egg white wash, then sprinkle sparkling sugar on top for sparkle and texture.
- Bake: Bake in a preheated oven at 350°F (175°C) for 8 to 10 minutes, or until the edges are just lightly golden brown.
- Cool: Allow cookies to cool on the baking sheet for 10 minutes before transferring to a wire rack to cool completely.
- Store: Store cooled cookies in an airtight container at room temperature for up to two weeks to maintain freshness.
Notes
- Peppermint-flavored red and white dough creates a visually appealing and delicious holiday cookie.
- Ensure dough is firm but pliable when shaping to prevent cracking.
- Use liquid red food coloring for vibrant color without compromising dough consistency.
- Chilling the dough overnight enhances flavor development and texture.
Nutrition
- Serving Size: 1 cookie
- Calories: 111 kcal
- Sugar: 6 g
- Sodium: 36 mg
- Fat: 5 g
- Saturated Fat: 3 g
- Unsaturated Fat: 2 g
- Trans Fat: 0 g
- Carbohydrates: 14 g
- Fiber: 0 g
- Protein: 2 g
- Cholesterol: 24 mg


