
If you’ve ever tried making sushi at home, you know that the rice can make or break the whole experience. It’s not just about the fish or the fillings – the base is crucial. That’s why I’m so excited to share with you my Perfect Sushi Rice Recipe. I’ve perfected this over time, and I promise you’ll get that sticky, flavorful, glossy rice every single time. Stick with me, and I’ll guide you through the process with tips I’ve picked up along the way!
Why You’ll Love This Recipe
- Reliable Results: Whether you use a rice cooker or stovetop, this method works every time.
- Perfect Balance: The sushi vinegar blend gives just the right mix of sweetness and tanginess to make your rice shine.
- Simple Ingredients: You’ll only need basic pantry staples, which means no complicated shopping trips.
- Great for Beginners: Step-by-step guidance makes mastering sushi rice approachable and fun.

Ingredients You’ll Need
All of these ingredients come together to create that classic sushi rice texture and flavor you crave. Make sure to use proper sushi rice (short-grain rice) — it’s the key player here. The sushi vinegar adds that signature tang and gentle sweetness that really brings the rice to life.

- Sushi Rice: Use Japanese short-grain rice for the best sticky, plump texture that clings together perfectly.
- Water: The right amount of water is critical to cooking the rice just right — too much or too little will change the texture.
- Rice Vinegar: This vinegar is mild and slightly sweet, making it perfect for sushi rice seasoning.
- Sugar: You need a touch to balance the acidity of the vinegar and give the rice that subtle sweetness.
- Salt: Enhances the flavor and rounds out the vinegar and sugar mixture beautifully.
Variations
I love to keep the classic sushi rice recipe simple, but I know everyone’s taste buds are a bit different. Feel free to tweak the seasoning or water ratios to suit your preferences or the equipment you have at home!
- Vinegar Flavor: Sometimes I swap out part of the rice vinegar for apple cider vinegar for a slightly fruitier note — it’s a happy accident I discovered one day and enjoy often.
- Sugar Substitutes: If you’re avoiding refined sugar, try honey or maple syrup in small amounts; it’ll sweeten the rice while giving it a unique flavor twist.
- Cooking Equipment: Beginners will love using a rice cooker for foolproof results, while stovetop cooking lets you sharpen your technique and control the texture precisely.
- Brown Sushi Rice: For a healthier option, you can experiment with brown short-grain rice, but note the texture will be less sticky and the cooking times longer.
How to Make Perfect Sushi Rice Recipe
Step 1: Rinse Your Rice Thoroughly
This is the most important step that many people overlook! Rinse your sushi rice under cold running water, swirling it gently with your hand until the water runs clear. This removes excess starch that can make your rice gummy — I used to skip this step and ended up with clumps that were way too sticky. Using your hand in a circular motion speeds things up and ensures every grain is rinsed perfectly.
Step 2: Soak the Rice
After draining the rinse water well, soak the rice in your cooking vessel (whether that’s a rice cooker bowl or a pot) with the appropriate amount of water—1 ½ cups plus 1 tablespoon if using a rice cooker, or 1 ⅜ cups for stovetop. I’ve found that letting the rice soak for 30 minutes is a game-changer — it allows the grains to absorb water evenly and results in perfectly cooked rice every time.
Step 3: Cook the Rice to Perfection
If you’re using a rice cooker: Simply start the cooking process, or pick the “sushi rice” mode if your cooker has it. When the cycle finishes, resist the urge to open the lid — leaving it closed for 10-15 minutes lets the rice steam and finish cooking evenly.
For stovetop cooking: Bring the pot to a boil with the lid on, then reduce heat to the lowest setting and let it cook for 8 minutes without lifting the lid. Afterward, remove the pot from heat but keep the lid on for another 10-15 minutes. This resting time traps steam and makes sure your rice is tender and fluffy. Remember, patience here is your friend!
Step 4: Make the Sushi Vinegar
While the rice is cooking, heat rice vinegar, sugar, and salt in a small saucepan just until it boils. Then turn off the heat and stir until all the sugar dissolves. This mixture is magic — it gives sushi rice its signature balance. I always taste it before mixing, adjusting sugar or salt to suit my mood.
Step 5: Season and Cool the Rice
Transfer your hot rice to a large bowl and drizzle the sushi vinegar all over. Now is the time to gently fold and mix the rice with a wooden spoon or rice paddle. Don’t mash the rice — the goal is to coat every grain evenly while keeping that soft texture. Cover the bowl with a damp tea towel to keep it from drying out and let it cool to room temperature before using.
Pro Tips for Making Perfect Sushi Rice Recipe
- Use Cold Water for Rinsing: This helps remove excess starch without starting any cooking process prematurely.
- Avoid Stirring While Cooking: It may be tempting, but lifting the lid or stirring during cooking disrupts the steam and ruins the texture.
- Use a Wooden Spoon or Paddle: I find this prevents crushing the rice grains and helps gently fold in the vinegar.
- Serve Fresh: Sushi rice is best used the same day — store leftovers properly but avoid using cold rice for sushi rolls.
How to Serve Perfect Sushi Rice Recipe

Garnishes
I enjoy sprinkling toasted sesame seeds or finely sliced nori strips on top of the rice for a subtle crunch and umami pop. Fresh chopped scallions or thinly sliced pickled ginger can add a refreshing bite that brightens the rice’s flavor.
Side Dishes
Pair your sushi rice with classic sides like miso soup, edamame, or a crisp seaweed salad. These complement the rice without overpowering it — and trust me, the balance makes every bite sing.
Creative Ways to Present
For parties, I’ve formed the rice into small balls (temari sushi) topped with colorful fish slices or veggies — guests love the bite-sized artfulness. You can also layer the rice in clear bowls for vibrant poke bowls or sushi bowls topped with your favorite proteins and veggies.
Make Ahead and Storage
Storing Leftovers
I’ve learned that sushi rice loses its ideal texture once refrigerated — it tends to turn hard and dry, which isn’t great for rolling sushi. However, if you have leftovers, store them in an airtight container in the fridge for up to three days to use in other dishes like poke bowls or fried rice.
Freezing
To be honest, I don’t usually freeze sushi rice because the texture changes too much when thawed. If you need to freeze, spread the rice out on a tray to freeze quickly and store in a sealed bag, but expect best results fresh.
Reheating
When reheating leftover sushi rice for bowls or fried rice, sprinkle a little water over the rice and microwave it covered to help steam it back to softness. Avoid reheating for sushi rolls themselves though — fresh is always best!
FAQs
-
Can I use regular long-grain rice for sushi?
Short answer: no. Sushi rice requires Japanese short-grain rice because of its sticky texture that’s crucial for making sushi hold together. Long-grain rice tends to be fluffy and dry, so it won’t stick well for rolling or shaping.
-
Why do I need to rinse sushi rice so much?
Rinsing removes the excess surface starch that can make cooked rice overly sticky or gummy. Washing until the water runs clear ensures each grain remains distinct yet sticky enough for sushi.
-
Can I prepare sushi rice ahead of time?
It’s best to use sushi rice the same day you cook it since refrigeration hardens it and affects texture. If you must prepare in advance, keep it sealed and at room temperature wrapped in a damp towel, but timely use is key.
-
What’s the ideal sushi vinegar ratio?
My go-to ratio is ¼ cup rice vinegar, 2 tablespoons sugar, and 1 teaspoon salt. This balance offers a mild tang with gentle sweetness, but feel free to adjust slightly to taste.
Final Thoughts
Making perfect sushi rice is honestly one of the most rewarding kitchen skills you can develop. When I first nailed this recipe, it transformed my sushi nights from a bit of a mess to a fun and delicious experience my whole family loves. I know you’ll enjoy the process and the results just as much. So grab that sushi rice and give this recipe a go — your homemade sushi rolls will thank you!
Print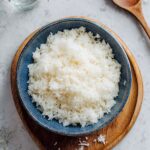
Perfect Sushi Rice Recipe
- Prep Time: 40 minutes
- Cook Time: 10 minutes
- Total Time: 1 hour 50 minutes
- Yield: 4 servings (enough for 4-8 sushi rolls)
- Category: Side Dish
- Method: Stovetop
- Cuisine: Japanese
- Diet: Gluten Free
Description
Learn how to make perfect sushi rice every time with this detailed recipe featuring two cooking methods: rice cooker and stovetop. This essential recipe includes rinsing, soaking, cooking, and seasoning the rice with a sweet and salty sushi vinegar, resulting in the ideal sticky and flavorful rice for sushi rolls and poke bowls.
Ingredients
Sushi Rice
- 1 1/2 cups sushi rice
- 1 1/2 cups + 1 tablespoon water (if using rice cooker method)
- 1 3/8 cups (330ml) water (if using stovetop method)
Sushi Vinegar
- 1/4 cup rice vinegar
- 2 tablespoons sugar
- 1 teaspoon salt
Instructions
- Rinse Rice: Place the sushi rice in a large bowl and wash it under running cold water until the water runs clear. Use your hand to move the rice in a circular motion to speed up the rinsing process.
- Drain Rice: Carefully drain the water using a sieve or gently pouring off the water to remove excess starch from the rice.
- Cook Sushi Rice in a Rice Cooker: Place the rinsed rice along with 1 ½ cups plus 1 tablespoon of water into the rice cooker bowl. Let the rice soak for 30 minutes before starting the cooking process. Select the “sushi rice” setting if available and start cooking. Once finished, turn off the rice cooker and leave the rice to rest, covered with the lid, for an additional 10-15 minutes without opening the lid.
- Cook Sushi Rice on the Stovetop: Place the rinsed rice and 1 ⅜ cups (330ml) water in a pot and soak for 30 minutes. Cover with a lid, bring to a boil over medium heat, then reduce the heat to the lowest setting and cook for 8 minutes without lifting the lid. Remove from heat and let the rice sit, covered, for 10-15 minutes to finish steaming.
- Make Sushi Vinegar: While the rice cooks, combine rice vinegar, sugar, and salt in a small saucepan. Heat until just boiling, then remove from heat and stir until all sugar dissolves to create the sushi vinegar seasoning.
- Season Rice: Transfer the cooked rice into a large bowl. Immediately pour the hot sushi vinegar over the rice and gently toss and fold to combine the seasoning evenly without mashing the rice grains.
- Cool Rice: Cover the bowl with a damp tea towel to prevent drying and let the rice cool at room temperature until it reaches a suitable temperature for sushi-making.
- Serve: Use the prepared sushi rice as the base for sushi rolls like California or Maki rolls, or incorporate into poke bowls and other Japanese dishes.
Notes
- For beginners, the rice cooker method is recommended for consistent results.
- The rice-to-water ratio varies: 1:1.25 for rice cooker (adjust according to your rice cooker manual), and 1:1.1 for stovetop method (both measured in US cups).
- 1 ½ cups (300g) uncooked sushi rice yields about 4-5 thick California rolls or 7-8 medium Maki rolls, sufficient for 2-4 people depending on appetite.
- Always use freshly cooked sushi rice for sushi; refrigerated leftover rice hardens and is no longer suitable for sushi but can be repurposed in poke bowls or fried rice.
- Store leftovers in an airtight container in the fridge for up to three days.
Nutrition
- Serving Size: ½ cup cooked sushi rice (about 115g)
- Calories: 160
- Sugar: 3 g
- Sodium: 220 mg
- Fat: 0.2 g
- Saturated Fat: 0 g
- Unsaturated Fat: 0.2 g
- Trans Fat: 0 g
- Carbohydrates: 36 g
- Fiber: 1 g
- Protein: 3 g
- Cholesterol: 0 mg


