
If you’re on the hunt for a sweet treat that’s as delightful to look at as it is to eat, you’ve got to try my Pink White Chocolate Fudge Recipe. This fudge is creamy, sweet, and has the prettiest pink hue that will brighten up any dessert table or afternoon snack. I love this recipe because it’s super simple, quick to whip up, and feels a little fancy without a ton of fuss. Let me walk you through every delicious detail so you can make this fan-freaking-tastic fudge at home easily!
Why You’ll Love This Recipe
- Effortlessly Elegant: You’ll impress guests with a vivid pink fudge that looks and tastes like a treat from a boutique chocolatier.
- Quick and Easy: From start to finish, this fudge comes together in about 30 minutes, perfect for last-minute dessert cravings.
- Customizable Fun: Whether you want to add sprinkles or dried cherries, the recipe welcomes your personal touch.
- Kid-Friendly Cooking: You and your little chefs will enjoy making and shaping the fudge — it’s a great kitchen activity!

Ingredients You’ll Need
Choosing the right chocolate and sweetened condensed milk is the secret to smooth, rich fudge. The pink gel food coloring adds that stunning pop of color without watering down the texture. Here’s what you’ll want to have ready:
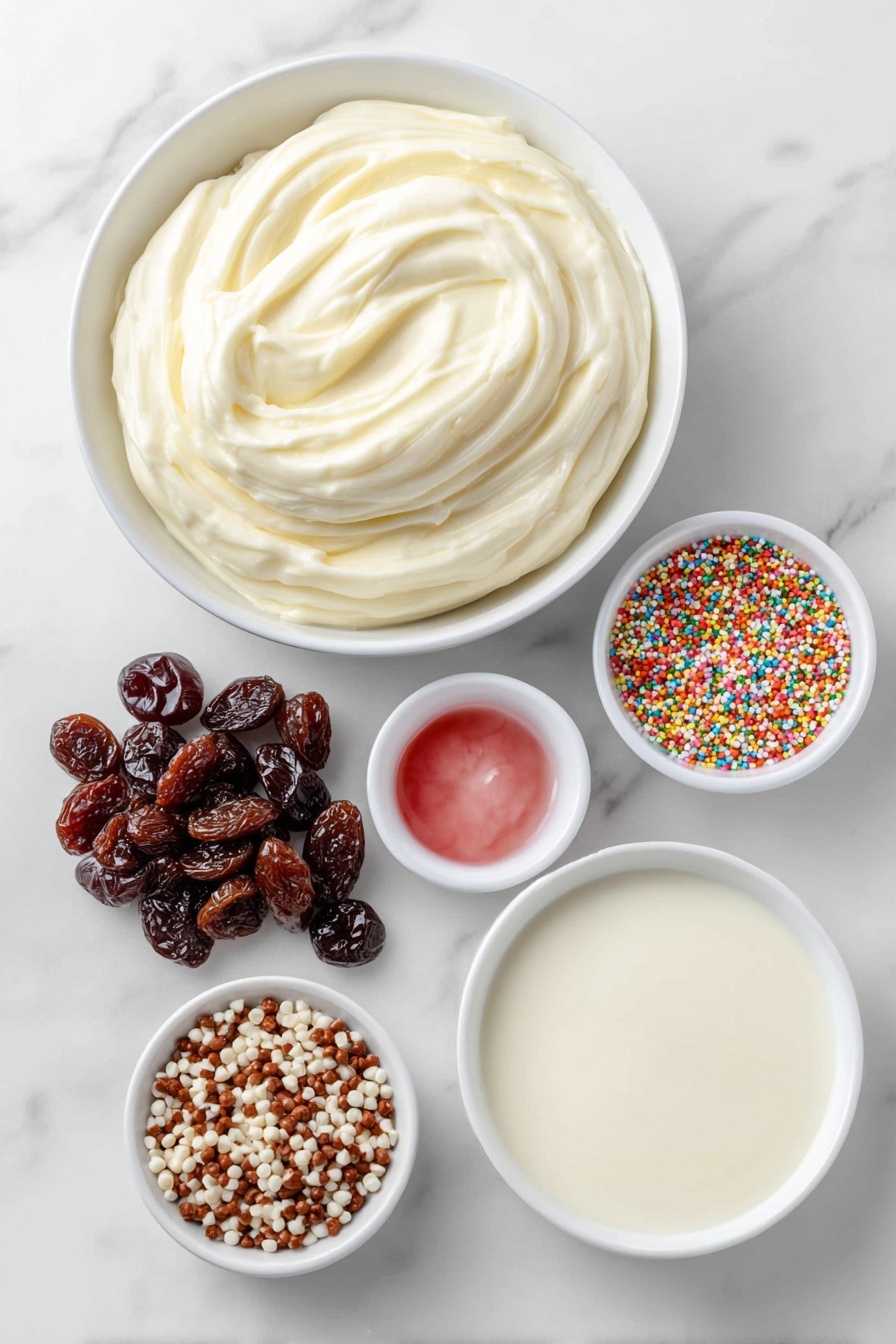
- White chocolate melting wafers or high-quality chopped white chocolate: Melting wafers are convenient since they melt easily, but good-quality chopped chocolate works beautifully too—just chop it finely to ensure even melting.
- Sweetened condensed milk: This delivers a creamy sweetness and makes the fudge set just right without being overly dense.
- Pink gel food coloring: A little goes a long way here; gel colors give you vibrant pink without adding liquid, preserving the fudge’s perfect texture.
- Sprinkles (optional): Adds cute color and crunch — my family loves to sneak these in.
- Dry cherries (optional): I discovered adding these brings a tart contrast that pairs perfectly with the sweet white chocolate.
Variations
This Pink White Chocolate Fudge Recipe is a fantastic canvas for your creativity. I love experimenting, so here are some variations I’ve tried or thought of that you might enjoy too.
- Cherry and Pistachio Twist: I’ve mixed in chopped pistachios along with dried cherries for a lovely textural contrast and festive look—it’s a hit at holiday gatherings.
- Vanilla Bean Infusion: Adding a tiny scrape of vanilla bean makes the fudge taste super luxurious without overshadowing that white chocolate flavor.
- Ombre Pink Effect: I discovered a fun way to make the fudge look extra special by only partially swirling the pink into the white chocolate base, creating an ombre or marbled effect.
- Dairy-Free Version: Swap out sweetened condensed milk for a coconut condensed milk alternative, then use dairy-free white chocolate to make it vegan-friendly.
How to Make Pink White Chocolate Fudge Recipe
Step 1: Prep Your Pan Like a Pro
Start by lining a 9×9 inch pan with parchment paper, making sure the paper overhangs on two sides. This little trick makes removing the fudge a breeze once it’s set, and you won’t risk any cracks or crumble when you cut it.
Step 2: Melt the Magic
If you’re using regular white chocolate bars, chop them finely so they melt evenly and quickly. Combine your chocolate and sweetened condensed milk in a large microwave-safe bowl. Microwave the mixture in 20 to 30-second bursts, stirring well after each interval. I found it only took about two rounds to melt everything smoothly, but stirring is key—it helps residual heat finish the melting without scorching.
Step 3: Add That Perfect Pink Glow
Once smooth, add a few drops of pink gel food coloring to the mixture. For a cute ombre effect, I like to only partially stir the coloring in, leaving some white areas. It gives the fudge a fun, swirled look that’s almost too pretty to eat (almost!).
Step 4: Customize and Set
This is your chance to fold in optional extras like dried cherries or sprinkles. I love how the tart cherry sweetness plays off the creamy white chocolate. Pour the mixture into your lined pan, smoothing the top gently with a spatula. Pop it in the fridge for at least an hour, or until it’s firm and easy to cut.
Step 5: Cut and Serve with Style
Once firm, it’s time for the fun part—cutting! I use a heart-shaped cookie cutter to make cute individual pieces. To avoid squishing the fudge or hurting your hands, place a kitchen towel over the cutter, then press gently but firmly. You’ll get perfect shapes with minimal effort. Now, serve and enjoy all those “wow” moments!
Pro Tips for Making Pink White Chocolate Fudge Recipe
- Even Melting: Stirring well after each microwave burst helps prevent hot spots and ensures your white chocolate melts silky-smooth.
- Don’t Overmix Pink Coloring: For that pretty swirl or ombre effect, be gentle mixing so the colors play well together instead of blending completely.
- Use Parchment Paper Overhang: This little extra makes removing your fudge sheet simple and clean with no cracks.
- Cut with Care: Putting a towel over your cookie cutter before pressing makes cut shapes crisp and saves your fingers from discomfort.
How to Serve Pink White Chocolate Fudge Recipe

Garnishes
I love topping my fudge with a few playful sprinkles or crushed freeze-dried raspberries for a tart burst and extra color. Sometimes, a light dusting of edible glitter adds a whimsical touch that my kids adore during parties.
Side Dishes
Serve alongside a fresh berry salad or a simple cup of mint tea to balance the sweetness. It’s also fantastic with warm coffee or a glass of cold milk for a classic indulgence.
Creative Ways to Present
For special occasions, I arrange fudge hearts on a pretty platter with edible flowers or in colorful cupcake liners. Another fun way is to stack them as a fudge tower for a sit-down dessert centerpiece that sparks conversation.
Make Ahead and Storage
Storing Leftovers
I keep leftover fudge in an airtight container in the fridge, layering parchment or wax paper between pieces to prevent sticking. It stays deliciously fresh for up to two weeks, which means you can savor it slowly or share with friends.
Freezing
If you want to prepare this fudge ahead of time or keep extras longer, freezing works really well. I wrap individual pieces in plastic wrap and then place them in a freezer-safe bag. Thaw them in the fridge overnight when you’re ready to enjoy, and they taste just as creamy as fresh.
Reheating
Typically, fudge is best enjoyed cool or at room temperature. However, if your pieces feel a bit too firm from the fridge or freezer, leave them on the counter for 10-15 minutes before serving—they soften slightly but keep their shape without melting.
FAQs
-
Can I use regular white chocolate instead of melting wafers?
Absolutely! Just be sure to chop it finely to help it melt evenly and smoothly. Melting wafers are designed for easy melting, but high-quality white chocolate bars work wonderfully if chopped small and melted carefully.
-
How do I get the pink color without affecting fudge texture?
Use gel food coloring, not liquid. Gel colors are concentrated, so just a few drops will give you vibrant, even color without adding moisture that could change the fudge’s texture.
-
Can I add nuts or other mix-ins?
Yes! I’ve had great results adding dried cherries, and you can experiment with chopped nuts like pistachios or almonds. Just fold them in after melting but before pouring into the pan for even distribution.
-
How long does the fudge last?
Stored properly in an airtight container in the fridge, it keeps for about two weeks. You can also freeze it for longer storage, just thaw before enjoying.
Final Thoughts
This Pink White Chocolate Fudge Recipe is such a delightful surprise every time I make it—both in flavor and how joyful it makes everyone around me. It’s quick enough for weekday treats and pretty enough for parties, which means you get all the joy with none of the fuss. I honestly encourage you to give it a go (I promise you’ll be hooked) and share your versions with anyone who loves a little sweet happiness. Happy fudge making, friend!
Print
Pink White Chocolate Fudge Recipe
- Prep Time: 10 minutes
- Cook Time: 10 minutes
- Total Time: 1 hour 20 minutes
- Yield: 12 servings
- Category: Dessert
- Method: No-Cook
- Cuisine: American
Description
This Pink White Chocolate Fudge Recipe is a delightful and easy-to-make treat featuring creamy white chocolate and sweetened condensed milk with a pop of pink color. Perfect for special occasions or gifting, this fudge is smooth, rich, and customizable with optional dried cherries and sprinkles for added texture and flavor.
Ingredients
Main Ingredients
- 20 ounces white chocolate melting wafers or high-quality chopped white chocolate
- ½ cup + 1 tablespoon sweetened condensed milk
- Pink gel food coloring (a few drops)
Optional Ingredients
- Sprinkles
- Dry cherries
Instructions
- Prepare the Pan: Line a 9×9 inch pan with parchment paper, ensuring it overhangs on two sides. This will allow easy removal of the fudge once set.
- Chop Chocolate (if needed): If using regular white chocolate, chop it finely into small pieces to ensure even melting in the microwave.
- Combine Ingredients: In a large microwave-safe bowl, mix the white chocolate pieces or wafers with the sweetened condensed milk.
- Microwave and Stir: Heat the mixture in 20 to 30 second increments in the microwave. Stir thoroughly after each interval until the chocolate is fully melted and smooth. Typically, two intervals suffice, but ensure stirring well between sessions since residual heat aids melting.
- Add Color: Stir in a few drops of pink gel food coloring. For an ombre effect, leave part of the mixture white and partially blend the pink to create color variation.
- Add Optional Mix-ins: If desired, gently fold in dried cherries and sprinkles for added flavor and texture.
- Set the Fudge: Pour the chocolate mixture into the prepared pan and refrigerate for about 1 hour, or until fully set and firm.
- Cut into Shapes: Once hardened, use a heart-shaped cookie cutter to cut the fudge into shapes. To ease cutting and protect your hands, place a kitchen towel over the cutter and press gently but firmly.
- Serve: Arrange the fudge pieces on a serving platter and enjoy this sweet, creamy treat.
Notes
- Make sure to use high-quality white chocolate for the best texture and flavor.
- Microwave times may vary depending on your appliance; melt chocolate gradually to avoid burning.
- You can customize the fudge with different colors or mix-ins like nuts or dried fruits.
- Store leftovers in an airtight container in the refrigerator to maintain freshness.
Nutrition
- Serving Size: 1 piece (about 1.5 oz)
- Calories: 180
- Sugar: 18g
- Sodium: 30mg
- Fat: 10g
- Saturated Fat: 6g
- Unsaturated Fat: 3g
- Trans Fat: 0g
- Carbohydrates: 22g
- Fiber: 0.5g
- Protein: 2g
- Cholesterol: 10mg


