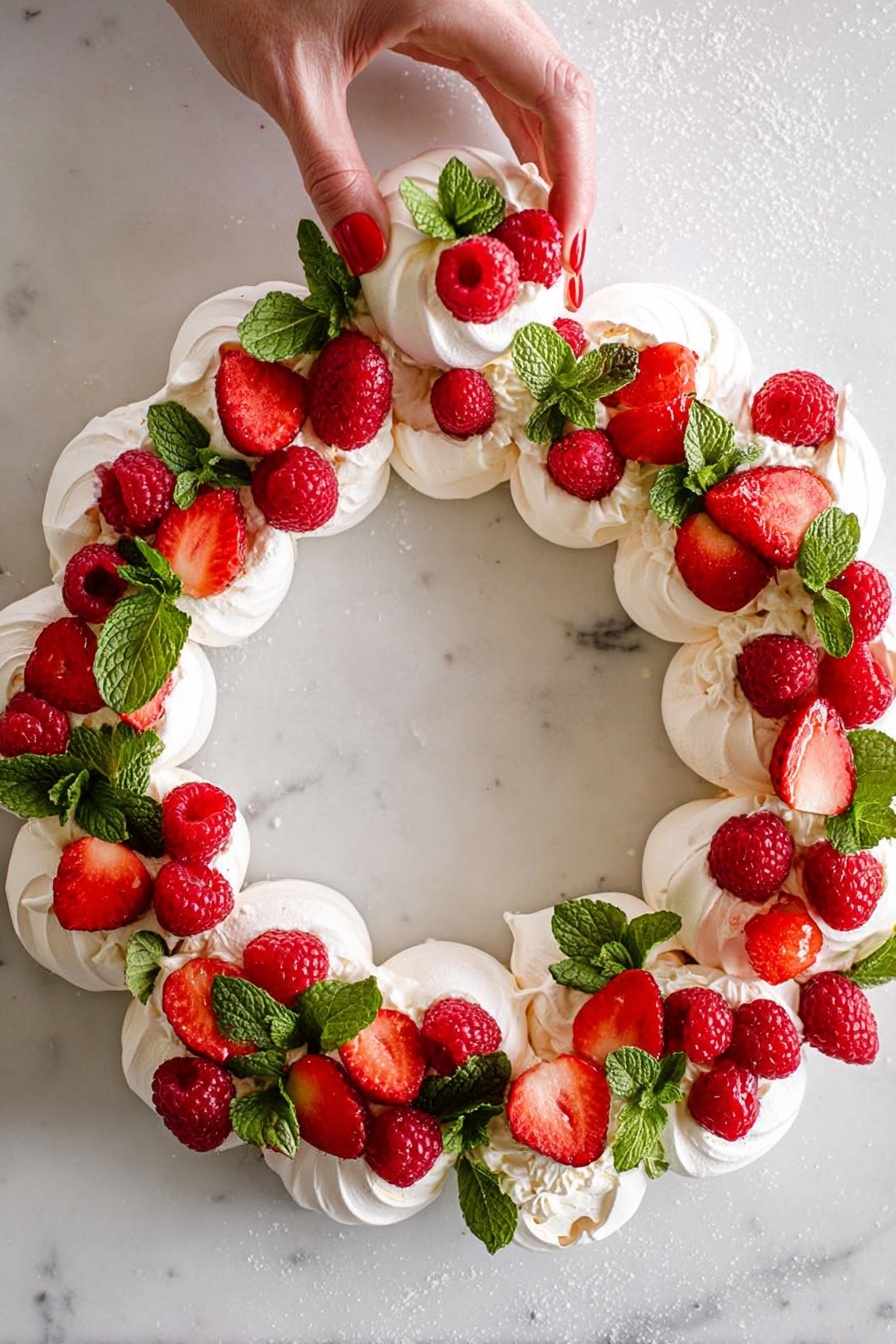
If you’re looking for a dessert that’s as stunning to behold as it is delicious, you have to try this Pull Apart Pavlova Wreath with Fresh Fruit Recipe. It’s a playful twist on the classic pavlova, perfect for sharing – you’ll get these beautiful meringue “knots” to pull apart and enjoy with whipped cream and juicy berries. Trust me, once you try this, it becomes my go-to party showstopper.
Why You’ll Love This Recipe
- Simple Ingredients: Using pantry staples you likely already have makes it easy to whip up anytime.
- Fun and Interactive: Pull apart meringues add a playful, shareable element to dessert time.
- Light Yet Indulgent: The airy meringue pairs perfectly with fresh fruit and lightly sweetened cream for a balanced finish.
- Impress Your Guests: It’s a visual showstopper that’s surprisingly easy to make – big wow, minimal stress!

Ingredients You’ll Need
This Pull Apart Pavlova Wreath with Fresh Fruit Recipe comes together from a few simple, fresh ingredients that play so nicely together. I always like to use fresh egg whites and make sure my cream is cold before whipping it up – it makes a big difference in texture and taste.

- Egg whites: Extra-large and fresh give you the best volume for that fluffy, glossy meringue.
- Icing sugar (powdered sugar): Sifted, to avoid lumps and help stabilize the meringue’s glossy finish.
- Cornstarch: Adds that signature pavlova marshmallow-y inside texture.
- Vanilla extract: A splash to add warm, sweet aroma to both meringues and cream.
- Heavy cream (whipping cream): Cold to whip easily into soft peaks, balancing out the sweetness with creamy smoothness.
- Fresh fruit (berries): I love using a mix of strawberries, blueberries, and raspberries for color and tartness.
- Fresh mint: Adds a lovely bright contrast and a refreshing hint among the sweet flavors.
Variations
I love making this Pull Apart Pavlova Wreath with Fresh Fruit Recipe my own by swapping out fruits or adding little flavor twists. It’s such a versatile recipe that you can easily customize it for any season or dietary preference.
- Fruit swaps: For autumn, I often use poached pears and pomegranate seeds for a festive spin I know my family adores.
- Dairy-free version: I’ve replaced the cream with coconut whipped cream a few times, and it works beautifully with the berries.
- Chocolate hints: Sometimes I drizzle melted dark chocolate over the wreath before serving for an extra indulgent touch.
How to Make Pull Apart Pavlova Wreath with Fresh Fruit Recipe
Step 1: Prepare Your Oven and Parchment
Start by preheating your oven to a low 90°C (195°F). This low temperature is key to getting that soft, marshmallowy inside with a crisp shell on the outside. Line two baking sheets with parchment paper – I usually prepare two because the meringues are small but you want space between each one.
Step 2: Whip the Egg Whites to Stiff Peaks
In a stand mixer bowl fitted with the whisk attachment, beat the egg whites until foamy. Then gradually add the sifted icing sugar bit by bit while continuing to beat. You’re aiming for a glossy, bright white meringue that forms stiff peaks when you lift the beaters – this can take up to 8 minutes. Patience here really pays off.
Step 3: Fold in Cornstarch and Vanilla
Once you have stiff peaks, gently fold in the cornstarch and vanilla extract with a rubber spatula. This gives the pavlova that classic texture and extra flavor magic.
Step 4: Shape Your Meringues
Pipe or spoon small mounds of the meringue (about 5cm in diameter) onto your prepared baking sheets, leaving at least 5cm between each one. Use a teaspoon to make a small dent in the center of each – this is where the cream will nestle later. This little trick was a game-changer for me when I first made this recipe, making each piece easy to dollop without sliding off.
Step 5: Low and Slow Bake
Bake the meringues for 60 minutes at 90°C, then turn off the oven and leave the trays inside to cool completely – about 2 hours. This slow cooling helps prevent cracks and keeps the inside blissfully soft. I usually leave them in while I prepare the rest of the meal or clean up the kitchen – no rush here!
Step 6: Whip the Cream and Assemble
Whip your cold heavy cream with the icing sugar and vanilla until medium-stiff peaks form. Then gently spoon or pipe the cream onto each meringue “knot”. Finally, pile on your fresh fruit and scatter a few mint leaves for a fresh pop of color and aroma. Arrange the pavlovas in a circular wreath shape on a large platter or board – this is where the “pull apart” fun begins.
Step 7: Serve and Enjoy
Bring your Pull Apart Pavlova Wreath with Fresh Fruit Recipe to the table and watch everyone delight in breaking off their own sweet, flaky pavlova morsels with cream and berries. I absolutely love the communal vibe this dessert brings to any gathering!
Pro Tips for Making Pull Apart Pavlova Wreath with Fresh Fruit Recipe
- Egg Whites at Room Temperature: I learned that letting egg whites sit out for 30 minutes before whipping helps them reach stiff peaks faster and higher.
- Use a Clean, Grease-Free Bowl: Any residual oil can stop the egg whites from whipping properly—trust me, I’ve fallen into this trap!
- Slow Cooling is Key: Don’t rush removing the meringues from the oven. Letting them cool slowly in the turned-off oven keeps them from cracking.
- Pipe with Confidence: If your meringue is too runny to pipe, you might have added sugar too quickly; beat patiently and sift sugar well next time to avoid this.
How to Serve Pull Apart Pavlova Wreath with Fresh Fruit Recipe

Garnishes
I love garnishing the pavlova wreath with a combination of fresh berries like strawberries, blueberries, and raspberries because they add vibrant color and that perfect burst of tartness. Fresh mint leaves are my go-to to add a refreshing aroma and a beautiful contrast. Sometimes, I toss a little edible flower on top for extra prettiness, especially when serving guests.
Side Dishes
This dessert is rather rich and sweet, so I like to keep side dishes light. A crisp green salad or a refreshing cucumber mint cooler pairs wonderfully if you’re serving it as part of a larger meal. For smaller gatherings, this pavlova wreath shines perfectly all on its own with just coffee or tea.
Creative Ways to Present
For holiday celebrations, I’ve arranged the wreath on a rustic wooden board and added twinkling fairy lights around it – it instantly gives a warm, festive vibe. Another fun idea is to serve it with little ramekins of extra whipped cream and fruit sauces so guests can customize their bites. I even once made mini individual wreaths for a bridal shower, which was a big hit!
Make Ahead and Storage
Storing Leftovers
I usually store leftover meringues separately from the whipped cream and fruit in an airtight container at room temperature. Meringues can get chewy if refrigerated, so keep them dry and cool but not cold. If you’ve already assembled the wreath, enjoy it the same day for best texture.
Freezing
If you want to prep ahead, you can freeze the unfilled meringue rounds in a single layer on a tray, then transfer them to a freezer bag once solid. When ready to serve, thaw at room temperature and assemble with fresh cream and fruit. I’ve found that freezing works great to save time on the big day!
Reheating
Meringues don’t really reheat well because their crisp shell can soften and become sticky. I recommend enjoying leftovers just as they are, perhaps freshening the cream by whipping a little more to spoon on top. That way, you keep that delightful pavlova contrast intact.
FAQs
-
Can I make the meringue wreath ahead of time?
Absolutely! You can bake the meringue rounds ahead of time and store them in an airtight container at room temperature for a couple of days. Just add the whipped cream and fresh fruit right before serving to keep everything fresh and crisp.
-
What fruits work best for this pavlova wreath?
Berries like strawberries, blueberries, raspberries, and blackberries are my personal favorite. They provide a nice balance of sweet and tart and hold up well on the cream. You can also experiment with kiwi, passionfruit, or even stone fruits in season.
-
Why is my meringue sticky or weeping?
This usually happens if the sugar isn’t fully dissolved or if the meringue is stored in a humid environment. Make sure to sift your sugar and whip the meringue long enough until glossy and stiff peaks form. Also, store the finished meringues in a dry place.
-
Can I use a hand mixer instead of a stand mixer?
Yes! A hand mixer works fine, though it may take a bit longer to reach stiff peaks. Just be patient and make sure your bowl and beaters are clean and dry for the best results.
-
How do I prevent cracks in my pavlova?
Cracking often happens if meringues cool too quickly or the oven temperature is too high. Baking low and slow, then letting the meringues cool in the turned-off oven helps keep them intact and beautifully smooth.
Final Thoughts
I absolutely love this Pull Apart Pavlova Wreath with Fresh Fruit Recipe because it brings friends and family together around something fun and delicious. The way the airy meringue combines with sweet cream and fresh fruit never gets old, and it’s so satisfying to see everyone pulling apart a piece and savoring it bite by bite. I highly recommend giving it a try for your next celebration or just because – you won’t regret it!
Print
Pull Apart Pavlova Wreath with Fresh Fruit Recipe
- Prep Time: 25 minutes
- Cook Time: 1 hour
- Total Time: 3 hours 25 minutes
- Yield: 15 servings
- Category: Dessert
- Method: Baking
- Cuisine: Australian/New Zealand
- Diet: Gluten Free
Description
This Pull Apart Pavlova Wreath is a stunning and delicious dessert featuring delicate meringue nests baked to perfection, whipped cream, and fresh seasonal fruits arranged in an elegant wreath shape. It’s perfect for special occasions and gatherings, combining crispy exteriors with soft, marshmallowy interiors topped with sweetened cream and vibrant berries.
Ingredients
For the Meringue
- 6 extra-large egg whites
- 2 cups icing sugar / powdered sugar, sifted
- 2 tbsp cornstarch
- 1 tsp vanilla extract
For the Pavlova Wreath
- 3 cups heavy cream / whipping cream
- 1 cup icing sugar / powdered sugar, sifted
- 1 tsp vanilla extract
- Fresh fruit (berries such as strawberries, blueberries, raspberries)
- Fresh mint leaves
Instructions
- Preheat oven and prepare baking sheets: Preheat the oven to 90°C (195°F) and line two baking sheets with parchment paper to prevent sticking.
- Beat egg whites: In the bowl of a stand mixer fitted with the whisk attachment, beat the egg whites until foamy to start building volume and air into the mixture.
- Add icing sugar and beat to stiff peaks: Gradually add the sifted icing sugar while continuing to beat until the mixture turns bright white, becomes voluminous, and stiff peaks form when the beaters are lifted, which may take up to 8 minutes.
- Add cornstarch and vanilla: Gently fold in the cornstarch and vanilla extract to the meringue mixture and whip just until fully combined, improving texture and stability.
- Shape the meringue: Pipe or spoon small mounds of meringue approximately 5cm in diameter onto the prepared baking sheets, ensuring to leave around 5cm space between each. Use a teaspoon to create a small dent in the center of each mound to hold the cream later.
- Bake and cool: Place the baking sheets in the oven and bake the meringues for 60 minutes at low temperature, then turn off the oven and allow the meringues to cool completely inside for approximately 2 hours. This slow cooling helps to prevent cracking and ensures a crisp exterior.
- Arrange the wreath: Once cooled, carefully remove the meringue nests from the baking sheets and arrange them in a wreath shape on a large serving platter or board.
- Whip cream: Whip the heavy cream with the sifted icing sugar and vanilla extract together until medium-stiff peaks form, ensuring the cream is light and fluffy but holds shape.
- Assemble and decorate: Spoon the whipped cream onto each meringue nest, filling the dent, and decorate the wreath beautifully with fresh berries and mint leaves for color and freshness.
- Serve: Serve immediately for best texture and enjoyment.
Notes
- Ensure egg whites are at room temperature before beating for best volume.
- Sift icing sugar to avoid lumps and create a smooth meringue.
- The low baking temperature is crucial to dry the meringues gently without browning.
- Cool meringues completely in the oven to prevent cracking caused by rapid temperature changes.
- Use fresh seasonal fruits to decorate for optimal flavor and aesthetics.
- For a gluten-free dessert, confirm that your powdered sugar and cornstarch are gluten-free.
- Whip cream just to medium-stiff peaks to avoid overbeating which can cause separation.
Nutrition
- Serving Size: 1 slice (approx. 1/15 of wreath)
- Calories: 190 kcal
- Sugar: 22 g
- Sodium: 20 mg
- Fat: 9 g
- Saturated Fat: 6 g
- Unsaturated Fat: 2 g
- Trans Fat: 0 g
- Carbohydrates: 25 g
- Fiber: 1 g
- Protein: 2 g
- Cholesterol: 40 mg
