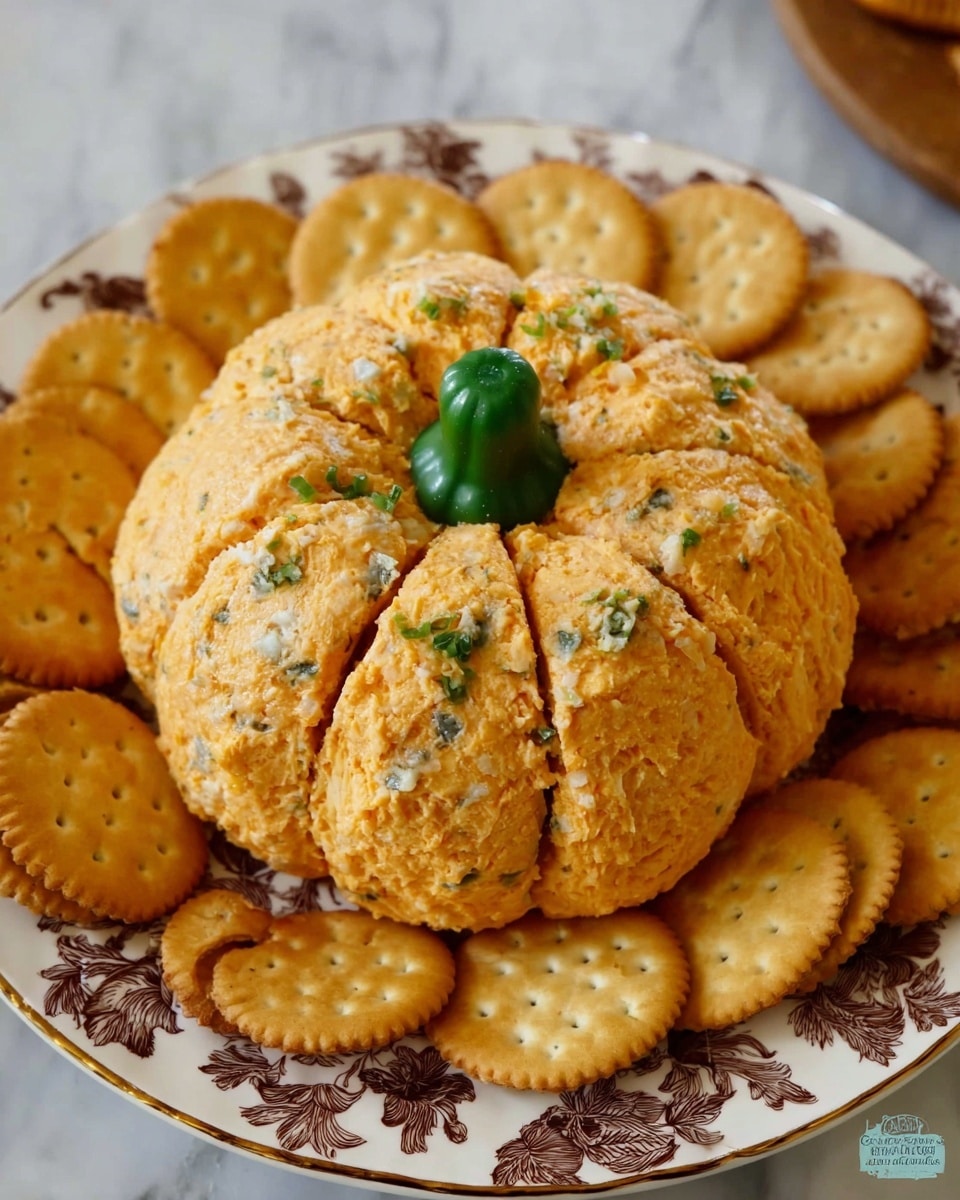
If you’re looking for a festive, crowd-pleasing appetizer that’s as fun to make as it is to eat, you’re in for a treat with this Pumpkin-Shaped Cheeseball Recipe. I absolutely love how this cheeseball not only tastes amazing with its creamy ranch and sharp cheddar goodness, but it also doubles as a charming centerpiece for any fall gathering or holiday party. Trust me, once you try this, you’ll wonder how you ever served a cheeseball any other way!
Why You’ll Love This Recipe
- Perfect Seasonal Flair: It’s shaped like a pumpkin—how perfect is that for fall and Thanksgiving celebrations?
- Super Simple to Make: Just mix, shape, and chill—no fancy techniques needed.
- Ridiculously Tasty: Cream cheese, ranch, sharp cheddar, and fresh veggies make every bite a crowd favorite.
- Fun Presentation: The rubber band trick creates those classic pumpkin ridges that impress every time.

Ingredients You’ll Need
The combination of creamy cheeses, zesty ranch seasoning, and fresh veggies really makes all the flavors pop in this Pumpkin-Shaped Cheeseball Recipe. Beyond taste, these ingredients come together with just the right texture and color, helping you craft that perfect pumpkin look. I find it’s best to use a good quality ranch mix to really enhance the flavor.
- Cream cheese (block): Softened to room temperature for an easy mix.
- Vegetable cream cheese (tub): Adds extra creaminess and smooth texture.
- Hidden Valley Spicy Ranch mix: Gives it that signature bold ranch flavor with a little kick; regular ranch works too.
- Green onions: Use mostly the green parts for mild flavor and a bit of color.
- Red pepper: Finely diced, plus save the stem for the pumpkin top—it doubles as a natural decoration.
- Sharp cheddar cheese: Shredded and divided to mix inside and coat outside for taste and texture.
Variations
I love how versatile this Pumpkin-Shaped Cheeseball Recipe can be. You can easily customize it to match your family’s tastes or dietary preferences. Here’s a few tweaks that have worked well for me over the years—feel free to experiment and make it yours.
- Make it spicy: I’ve added a dash of cayenne or chopped jalapeño for those who love a little heat—it’s a total crowd-pleaser at game day.
- Swap cheeses: Using pepper jack instead of sharp cheddar gives a nice flavorful twist, or even smoked gouda for something unique.
- Make it vegetarian-friendly: This recipe is naturally vegetarian, but you can amp up the veggies with some finely chopped olives or roasted red peppers mixed in.
- Gluten-free prep: Pair it with gluten-free crackers or veggie sticks and you’re all set for guests with dietary restrictions.
How to Make Pumpkin-Shaped Cheeseball Recipe
Step 1: Mix Your Cheeses and Flavorings
Start by softening your block cream cheese to room temperature—this is key for a smooth, easy blend. Then, using an electric or stand mixer, combine the block cream cheese and vegetable cream cheese until creamy and well mixed. Next, stir in the ranch seasoning, sliced green onions, finely diced red pepper, and half of your shredded cheddar cheese. Mixing by hand works too, but I find a mixer saves time and ensures even distribution. The mixture should be flavorful and a little chunky from the veggies.
Step 2: Shape and Coat Your Cheeseball
Lay out a large sheet of plastic wrap and sprinkle about 1/4 cup of shredded cheddar on it—this will help prevent sticking. Next, form your cheese mixture into a ball on top of the cheese-covered wrap. Then sprinkle the remaining shredded cheddar all over the outside of the ball, coating it evenly. Wrap it up tightly with cling wrap, making sure it’s well-sealed with two layers if you can—it helps keep everything intact during the shaping process.
Step 3: Create The Pumpkin Shape
Here’s the fun part! Wrap four large, wide rubber bands evenly spaced around the cheeseball. I usually double-wrap each rubber band to make sure it’s tight enough to create those deep pumpkin ridges we all love. The key is firm pressure without squeezing too hard and pushing cheese out. The cling wrap underneath protects the shape and keeps things tidy.
Step 4: Chill and Set
Pop your wrapped cheeseball into the fridge for at least two hours—overnight is even better. This resting time not only lets the flavors meld beautifully but also firms up the ball so it holds its pumpkin shape perfectly. When you’re ready to serve, carefully cut off the rubber bands and remove the cling wrap.
Step 5: Add the Stem and Serve
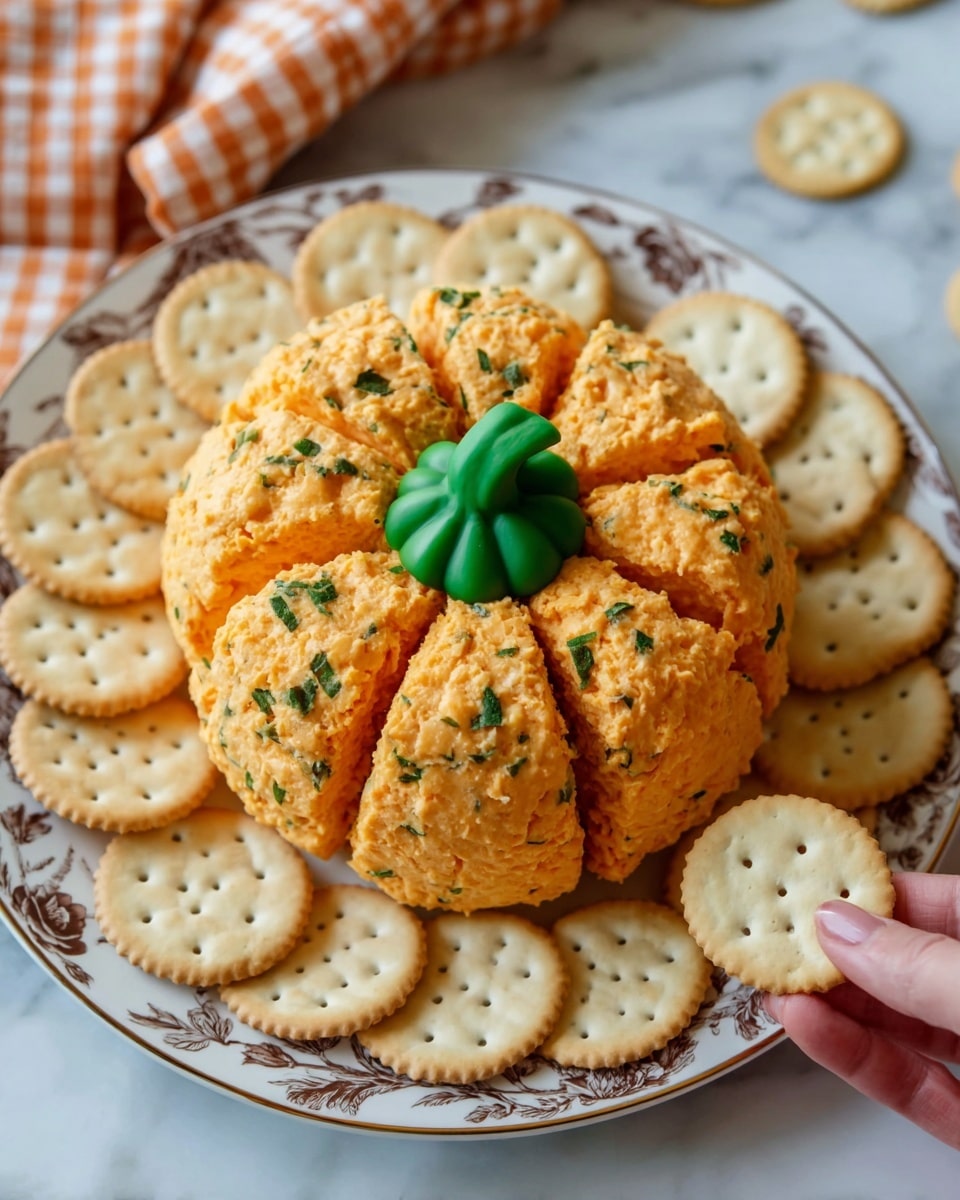
Grab that saved red pepper stem and gently poke it into the top center of your pumpkin for the final charming touch. It looks so authentic and adds a pop of fresh color. Serve your cheesy masterpiece with buttery crackers or crisp veggies—everyone will go crazy for this adorable yet delicious appetizer.
Pro Tips for Making Pumpkin-Shaped Cheeseball Recipe
- Room Temperature Cheeses: Take extra care to soften both cream cheeses fully; this ensures a silky, easy-to-mix base.
- Rubber Band Trick: Double wrap your rubber bands so the indentations are well-defined but don’t burst the cheeseball.
- Chilling Time: The longer it chills, the more the flavors marry and hold together, so don’t rush this part!
- Clean Work Surface: Sprinkle some shredded cheddar on your plastic wrap first to keep the cheeseball from sticking while you shape it.
How to Serve Pumpkin-Shaped Cheeseball Recipe
Garnishes
I’m a big fan of keeping it simple with the garnishes here. The red pepper stem really makes it feel authentic and festive, so I always save it. Sometimes, I add a sprinkle of finely chopped fresh parsley around the base for a little greenery and extra pop. If I’m feeling fancy, toasted pumpkin seeds scattered nearby add crunch and a fun seasonal flair.
Side Dishes
Because this cheeseball is rich and flavorful, I like pairing it with crunchy, buttery crackers and an array of fresh veggies like cucumber slices, carrots, and celery sticks. Sourdough or pita chips are also excellent choices. For a full spread, serve alongside a charcuterie board filled with cured meats, nuts, and fruit for a fall party everyone will love.
Creative Ways to Present
Once, I even placed the pumpkin cheeseball inside a hollowed-out small pumpkin for a dramatic centerpiece that had guests photographing their food. Another time, I arranged mini pumpkins and fall leaves around it for a rustic autumn buffet. You can get really creative here—just have fun making it the star of your party table.
Make Ahead and Storage
Storing Leftovers
Leftover cheeseball? No problem! I wrap it tightly in plastic wrap again and store it in the fridge. It holds up well for 3 to 4 days, and the flavor actually deepens as it sits. Just be careful when unwrapping so you don’t lose that beautiful pumpkin shape.
Freezing
Freezing a cheeseball can be a little tricky because of texture changes, but I’ve done it when I needed to prep ahead. I freeze it fully wrapped in plastic, then place in a freezer bag. When thawed in the fridge overnight, I find it’s best to remove the cheddar coating and refresh it by re-coating with fresh shredded cheese before serving.
Reheating
This cheeseball is best served cold, so reheating isn’t usually necessary. If you want a softer texture, allow it to sit at room temperature for about 20 minutes before serving. This helps the flavors bloom and makes it easier to spread without losing that delightful pumpkin shape.
FAQs
-
Can I make the Pumpkin-Shaped Cheeseball Recipe dairy-free?
While this recipe relies heavily on cream cheese and cheddar for its signature flavor and texture, you can experiment with dairy-free alternatives like vegan cream cheese and shredded vegan cheese. Keep in mind the texture might vary, and the shape might be a bit softer, so chilling time is especially important.
-
How long can I prepare the cheeseball in advance?
You can make the cheeseball up to 24 hours before your event. This actually works in your favor, as the flavors meld and intensify while chilling. Just keep it tightly wrapped and refrigerated until serving.
-
What can I use instead of rubber bands to shape the pumpkin?
If you don’t have rubber bands, kitchen twine tied gently around the cheeseball at four points also works well. Just be sure it’s snug enough to create indentations without squeezing too much cheese out.
-
Can I add other mix-ins to the cheeseball?
Absolutely! Finely chopped nuts, bacon bits, or herbs can add interesting texture and flavor. Just keep in mind that too many wet ingredients may affect the cheeseball’s firmness and shape.
Final Thoughts
I discovered this Pumpkin-Shaped Cheeseball Recipe years ago when I wanted a festive twist on a classic party appetizer, and it quickly became a fall staple for me and my family. I love how easy it is to make, how absolutely delicious it tastes, and the way it transforms any gathering into a celebration. Honestly, it’s one of those recipes you’ll find yourself making over and over because it just works—and guests keep asking for it. So go ahead and give it a try; I promise it’ll be your new favorite seasonal showstopper!
Print
Pumpkin-Shaped Cheeseball Recipe
- Prep Time: 10 minutes
- Cook Time: 0 minutes
- Total Time: 2 hours 10 minutes
- Yield: 8 servings
- Category: Appetizer
- Method: No-Cook
- Cuisine: American
Description
This festive Pumpkin-Shaped Cheeseball is a creamy, flavorful appetizer perfect for Thanksgiving gatherings. Made with a blend of cream cheeses, ranch seasoning, green onions, red pepper, and sharp cheddar, it’s shaped and decorated to resemble a pumpkin, making it both delicious and visually appealing. Serve with buttery crackers for a delightful party snack.
Ingredients
Cheese Ball Mixture
- 8 ounce block cream cheese, softened to room temperature
- 8 ounce tub vegetable cream cheese
- 2 Tablespoons Hidden Valley Spicy Ranch mix (or regular ranch)
- 3 green onions, sliced (green parts only, can use whites if preferred)
- 1 red pepper, finely diced (save the stem)
- 2 cups shredded sharp cheddar cheese, divided use
Instructions
- Mix Cream Cheeses: Using an electric or stand mixer, combine the 8-ounce block of softened cream cheese and the 8-ounce tub of vegetable cream cheese until smooth and well blended.
- Add Seasoning and Vegetables: Stir in 2 tablespoons of Hidden Valley Spicy Ranch mix, sliced green onions, finely diced red pepper, and 1 cup of shredded sharp cheddar cheese into the cream cheese mixture until everything is evenly incorporated.
- Prepare Plastic Wrap and Cheese Base: Spread out a large sheet of plastic wrap and sprinkle about 1/4 cup of the shredded cheddar cheese onto it to act as a base for the cheeseball.
- Shape the Cheeseball: Place the cheese ball mixture onto the shredded cheddar cheese on the plastic wrap, then top and cover the mixture with the remaining shredded cheddar cheese, pressing gently so the cheese adheres evenly on all sides.
- Wrap and Shape Pumpkin: Wrap the cheeseball tightly with two layers of cling wrap to keep it secure. Then, use four large and wide rubber bands (or kitchen twine) wrapped around the ball to create indentations that mimic the ribs of a pumpkin. Double wrap each rubber band for deeper ridges without squeezing out the mixture.
- Chill the Cheeseball: Refrigerate the wrapped cheeseball for at least two hours, preferably overnight. This step chills it thoroughly and helps the mixture firm up while retaining its pumpkin shape.
- Unwrap and Decorate: When ready to serve, carefully cut off the rubber bands and remove the cling wrap. Gently push the saved red pepper stem into the top of the cheeseball to create the pumpkin stem.
- Serve: Present the pumpkin-shaped cheeseball with your favorite buttery crackers for scooping and enjoying this festive appetizer.
Notes
- This cheeseball gets creamier and more flavorful the longer it chills, so overnight refrigeration is best.
- If you prefer a milder flavor, use regular ranch seasoning instead of spicy ranch mix.
- The rubber bands create pumpkin-like ridges, but feel free to adjust the number or tightness to preference.
- Serve with butter crackers or crisp veggies for a crowd-pleasing party snack.
- Not suitable for lactose intolerant individuals due to cheese content.
Nutrition
- Serving Size: 1 serving
- Calories: 230 kcal
- Sugar: 3 g
- Sodium: 787 mg
- Fat: 15 g
- Saturated Fat: 10 g
- Unsaturated Fat: 4 g
- Trans Fat: 0 g
- Carbohydrates: 7 g
- Fiber: 1 g
- Protein: 13 g
- Cholesterol: 50 mg


