
If you’re looking for a cookie that’s as stunning as it is delicious, you’re going to want to try this Red Velvet Rose Cookies Recipe. These delicate little rosettes are not only a feast for the eyes but also melt-in-your-mouth soft with that signature red velvet flavor. I absolutely love how they come out every time — perfect for gifting, special occasions, or just treating yourself to a bit of elegance in cookie form. Stick around, and I’ll walk you through every step to make sure your roses bloom beautifully in your oven!
Why You’ll Love This Recipe
- Beautiful Presentation: The piped rosette shape really wows guests and looks professionally done without the fuss.
- Soft, Melt-in-Your-Mouth Texture: This cookie stays soft yet holds its shape, a tricky balance I’ve perfected here.
- Classic Red Velvet Flavor: The cocoa and buttermilk combo gives that nostalgic red velvet taste you love inside a cookie.
- Versatile and Fun to Decorate: Whether you want to sandwich them with buttercream or enjoy them straight, these cookies are super adaptable.

Ingredients You’ll Need
These ingredients come together to create the perfect balance between a tender crumb and that iconic red velvet flavor. I always recommend using quality ingredients because they make a difference that you can taste — especially the buttermilk and cocoa powder.

- Shortening: I prefer shortening here over butter for that classic soft, tender texture that doesn’t spread too much.
- White sugar: Granulated sugar to sweeten things up without overpowering the cocoa.
- Eggs: These add structure and richness; adding them one at a time helps ensure smooth mixing.
- Vanilla extract: A splash really enhances the overall flavor, making it richer and more complex.
- Buttermilk: This is key for that tangy softness and tender crumb, plus it reacts perfectly with cocoa.
- Red gel food coloring: Gel colors give a vibrant color without messing up the dough consistency.
- All-purpose flour: The base for your cookie’s structure, sifted with cocoa for an even mix.
- Unsweetened cocoa powder: Make sure to use a good-quality cocoa powder — natural cocoa works best for true red velvet flavor.
- Salt: Just enough to balance the sweetness and enhance the chocolate notes.
Variations
I love that you can tweak this Red Velvet Rose Cookies Recipe to suit your mood or the occasion. Whether you want to go dairy-free or add a little flair, there’s room to play here.
- Dairy-Free Version: I swapped buttermilk for a mix of almond milk and lemon juice with great success—just let it sit for 5 minutes before mixing.
- Flavor Twist: Adding a teaspoon of espresso powder amplifies the cocoa flavor, a trick I discovered after many iterations; it makes them taste like a fancy bakery treat.
- Color Variations: Try pink or purple gel food coloring for Valentine’s or Easter; the rose shape still steals the show.
- Filling Ideas: My family goes crazy for sandwiching these cookies with marshmallow buttercream, but cream cheese frosting or white chocolate ganache works beautifully too.
How to Make Red Velvet Rose Cookies Recipe
Step 1: Cream the Shortening and Sugar Until Fluffy
Start by preheating your oven to 350°F (175°C). In your stand mixer, cream together the shortening and sugar until the mixture is light and fluffy—this usually takes about 2 to 3 minutes on medium speed. I’ve found that really getting this step right sets a great texture base for the cookies.
Step 2: Add Eggs, Vanilla, Buttermilk, and Food Coloring
Add the eggs one at a time, mixing on medium-low speed to keep everything emulsified nicely. Then turn the mixer to low and pour in the vanilla, buttermilk, and red gel food coloring. Stir until just combined. The gel color really makes these cookies pop, so don’t be shy with it!
Step 3: Combine Dry Ingredients and Incorporate into Wet Mixture
In a separate bowl, whisk together the flour, cocoa powder, and salt. With your mixer still on low speed, slowly add the dry ingredients to the wet mixture. The dough might feel a bit dry at this stage—that’s normal. If needed, add up to 1/4 cup more buttermilk, but no more than that, to get a soft yet pipeable dough.
Step 4: Pipe Out Your Rosettes
Here’s the fun part! Fit a piping bag with a 1M or 2D tip (the classic star tips), and place very small amounts of dough to create individual rosettes on parchment-lined baking sheets. Start piping from the center and swirl outward to form that perfect rose shape. Don’t worry if you don’t get it perfect on the first try — practice makes perfect, and they still taste delicious even if the rose looks a little wild.
Step 5: Bake and Cool
Bake for 6-8 minutes. When the edges start to set but the tops still look a bit wet, pull them out. This is intentional — they will firm up as they cool, leaving you with an irresistibly tender cookie. Allow them to cool completely on the baking sheet before moving them.
Step 6: Assemble Cookie Sandwiches (Optional)
For a show-stopping dessert, spoon about 1 tablespoon of marshmallow buttercream onto the bottom of one cookie, then gently press another cookie on top to create a sandwich. The contrast of the creamy filling and tender rose cookies is unbeatable.
Pro Tips for Making Red Velvet Rose Cookies Recipe
- Mix Ingredients Carefully: I learned that mixing dry ingredients in slowly on low speed prevents tough cookies. Patience here makes a huge difference!
- Practice Piping Rosettes: If you’re new to piping, try a few rosettes on scrap parchment first to get comfortable with the pressure and motion.
- Use Gel Food Coloring: Gel colors won’t thin out your dough like liquid food coloring does, so your cookies keep their shape beautifully.
- Don’t Overbake: These cookies look underdone when perfect—if you bake until dry, they’ll lose that tender texture that makes them special.
How to Serve Red Velvet Rose Cookies Recipe

Garnishes
I usually keep the cookies simple because their rose shape and rich color are the stars. But if you want to dress them up, a light dusting of powdered sugar or edible glitter adds an elegant shimmer. I’ve also garnished with tiny edible rose petals for a truly romantic touch during holidays.
Side Dishes
I love pairing these cookies with a hot cup of coffee or a classic milk latte—the subtle tannins from coffee balance the slight cocoa tang perfectly. For a party, try serving alongside a cheese board with mild cheeses to contrast the sweetness.
Creative Ways to Present
For Valentine’s Day or Mother’s Day, I’ve arranged these cookies in a bouquet-style gift box with a ribbon, which instantaneously elevates the gift. You can also place them on tiered dessert trays with fresh berries and flowers for bridal showers or afternoon teas—people always comment on how charming and elegant they look.
Make Ahead and Storage
Storing Leftovers
I store leftover cookies in an airtight container at room temperature for up to 3 days. I like to separate layers with parchment paper to keep the rosettes intact and prevent sticking. They stay soft but won’t get soggy, which can happen if they’re sealed too tightly while warm.
Freezing
Freezing works beautifully for this Red Velvet Rose Cookies Recipe. I individually freeze the piped, baked cookies on a baking sheet first, then transfer them to a freezer bag or container. They keep well for up to 2 months. When you want to enjoy them, let them thaw at room temperature—no need to heat.
Reheating
If you prefer your cookies a little warm, pop them in a 300°F oven for about 3-5 minutes. Keep a close eye on them so they don’t dry out — I like them just warmed enough to soften the buttercream if sandwiched, making each bite extra indulgent.
FAQs
-
Can I use butter instead of shortening for this Red Velvet Rose Cookies Recipe?
You can substitute butter, but keep in mind the texture will be a bit different—the cookies may spread more and be less tender. I prefer shortening for its ability to keep the cookies soft and help the rosettes hold their shape beautifully.
-
Why do the cookies look wet when they come out of the oven?
This is completely normal for these cookies! They finish baking and set as they cool. This helps keep that soft, delicate texture instead of drying out into a crispy cookie.
-
Can I use liquid food coloring instead of gel?
Gel food coloring is best here because it adds vibrant color without thinning your dough. Using liquid food coloring might make the dough runnier, causing the rosettes to lose shape.
-
How long do Red Velvet Rose Cookies last?
Stored in an airtight container at room temperature, they last about 3 to 4 days while still tasting fresh. For longer storage, freezing is your friend!
Final Thoughts
I can’t tell you how many times I’ve made this Red Velvet Rose Cookies Recipe for parties or just a cozy night in — every single time, they get rave reviews and requests for seconds. I love that they’re fancy enough to impress but simple enough that even novice bakers can nail them with a little practice. So go ahead, whip up a batch, and share these sweet little roses with people you love — I promise, you’ll smile every time you pull them out of the oven!
Print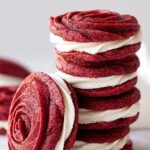
Red Velvet Rose Cookies Recipe
- Prep Time: 10 minutes
- Cook Time: 8 minutes
- Total Time: 18 minutes
- Yield: 8 servings (approximately 16 cookies, making 8 sandwiches)
- Category: Dessert
- Method: Baking
- Cuisine: American
- Diet: Vegetarian
Description
These Red Velvet Rose Cookies are delicate, beautifully piped rosettes with a soft, moist texture and a hint of cocoa. They’re finished with a luscious marshmallow buttercream filling for an elegant cookie sandwich that’s perfect for special occasions or everyday indulgence.
Ingredients
Cookies
- 2/3 cup shortening
- 1 3/4 cups white sugar
- 2 eggs
- 1 teaspoon vanilla extract
- 1/4 cup buttermilk (plus up to 1/4 cup more if needed)
- 1 teaspoon red gel food coloring
- 2 cups all-purpose flour
- 1/2 cup unsweetened cocoa powder
- 1/2 teaspoon salt
Filling
- About 1 tablespoon marshmallow buttercream per sandwich
Instructions
- Preheat oven: Heat your oven to 350°F (175°C) and prepare parchment-lined baking sheets for the cookies.
- Cream shortening and sugar: Using a stand mixer, cream the shortening and sugar together until light and fluffy for a smooth base.
- Add eggs: Add eggs one at a time on medium-low speed to ensure they are fully incorporated without curdling the mixture.
- Add wet ingredients: Turn mixer to low and add vanilla extract, buttermilk, and red gel food coloring, mixing gently until uniform in color.
- Combine dry ingredients: In a separate bowl, whisk together the all-purpose flour, unsweetened cocoa powder, and salt.
- Mix dry into wet: With the mixer on low, gradually add the dry ingredients into the wet mixture, blending until just combined. Add up to an additional 1/4 cup of buttermilk if the dough feels too dry, but do not exceed this amount.
- Pipe the cookies: Transfer the dough into a piping bag fitted with a large star tip (1M or 2D). Pipe small rosettes onto the prepared parchment-lined baking sheets, spacing them slightly apart.
- Bake: Bake the cookies in the preheated oven for 6 to 8 minutes. Don’t worry if the cookies look slightly wet in the center when done; this is expected.
- Cool: Allow the cookies to cool completely on the baking sheet to set their shape and texture.
- Assemble sandwiches: Spread about 1 tablespoon of marshmallow buttercream on the bottom side of one cookie, then gently press another cookie on top to form a sandwich.
Notes
- Use gel food coloring for vibrant color without altering dough consistency.
- The dough should be soft enough to pipe but not too wet; add extra buttermilk cautiously.
- Baking time is short; watch carefully to avoid overbaking.
- Allow cookies to cool completely before sandwiching to prevent melting the filling.
- Marshmallow buttercream can be homemade or store-bought for convenience.
Nutrition
- Serving Size: 1 cookie sandwich (2 cookies with filling)
- Calories: 250
- Sugar: 20g
- Sodium: 120mg
- Fat: 12g
- Saturated Fat: 6g
- Unsaturated Fat: 5g
- Trans Fat: 0g
- Carbohydrates: 30g
- Fiber: 2g
- Protein: 2g
- Cholesterol: 40mg


![Vegan Chicken Noodle Soup [Stove, Instant Pot, Crockpot] Recipe](https://recipeta.com/wp-content/uploads/2025/09/0_0-1757167273366-768x960.jpeg)


