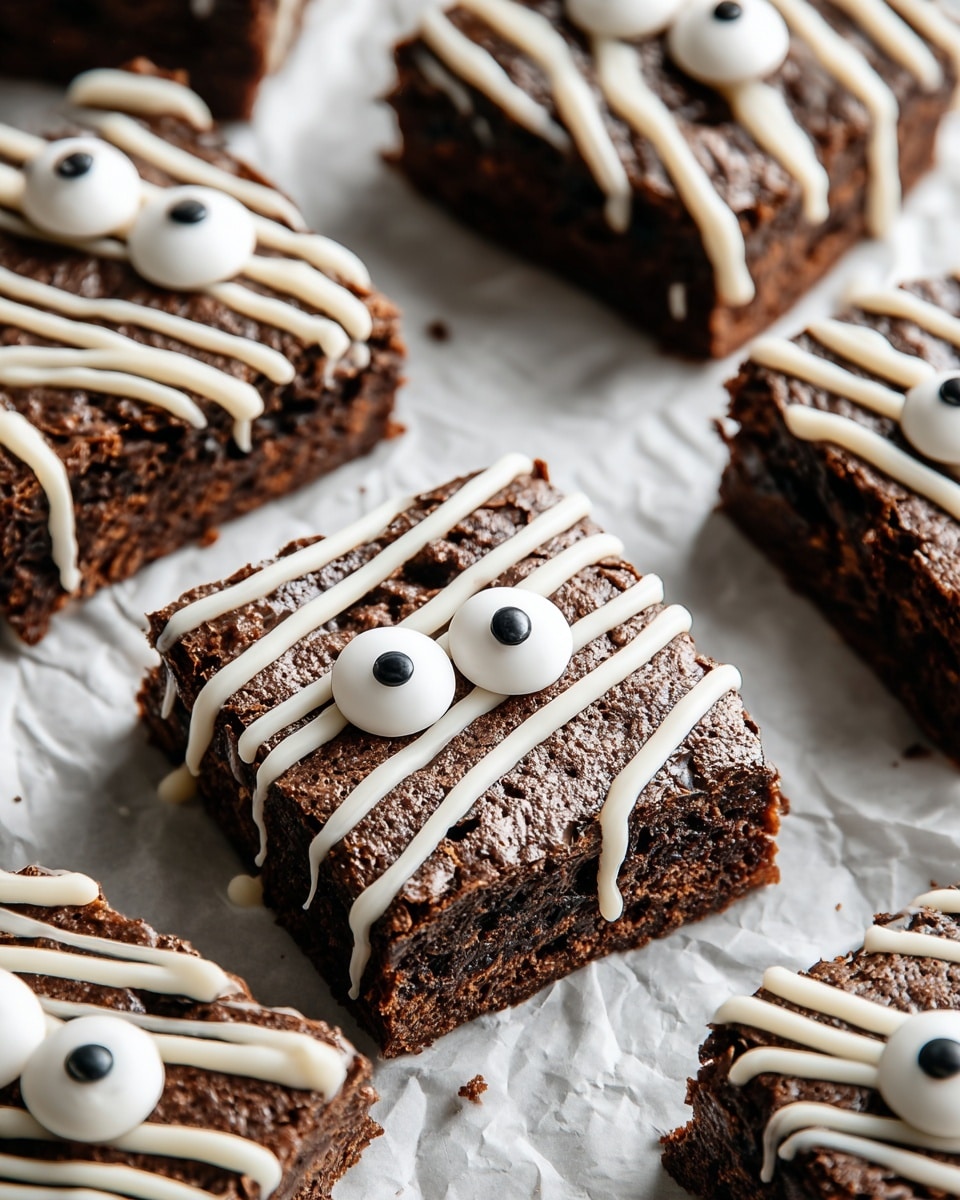
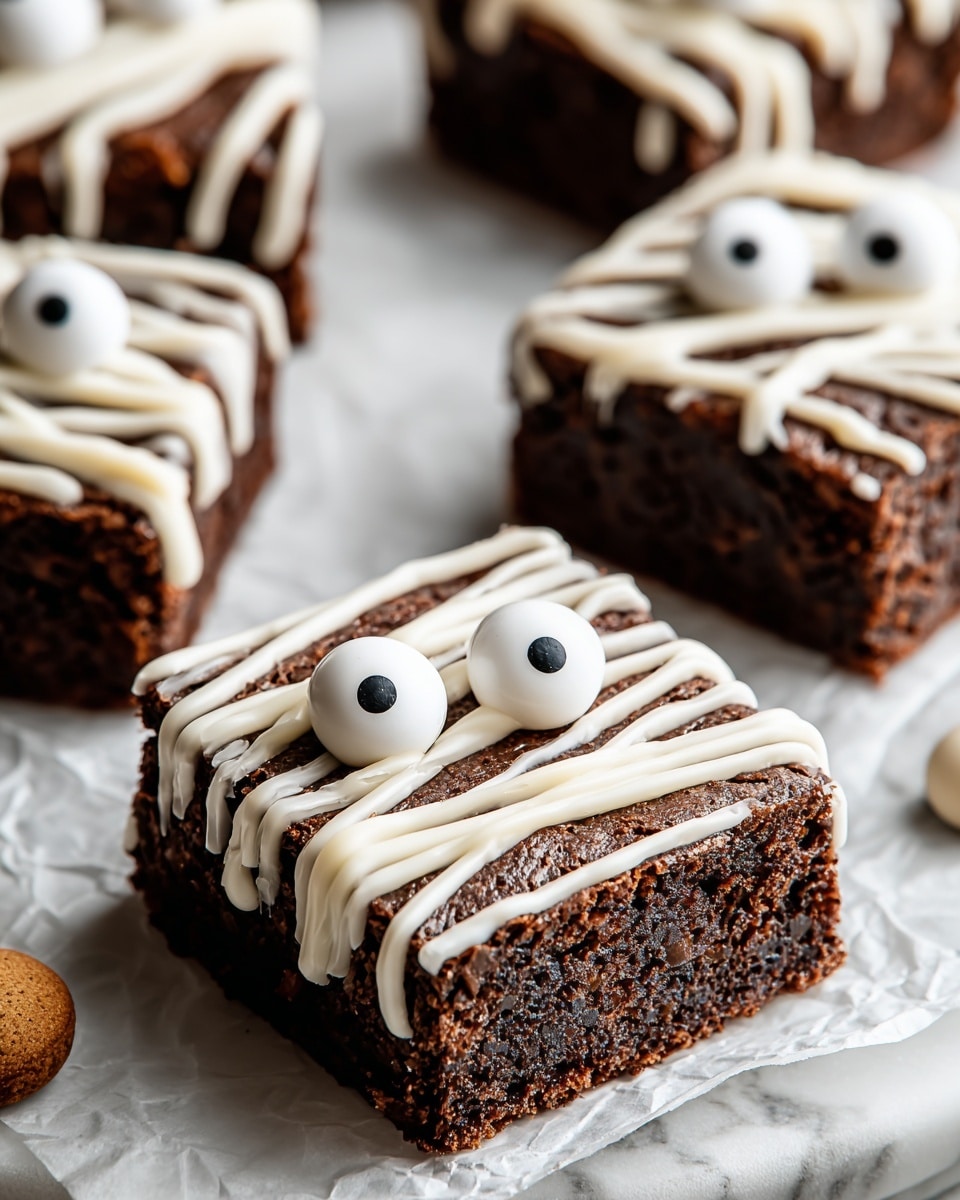
If you’re looking to add a fun and festive twist to your dessert table this Halloween, I have just the thing for you — my Spooky Mummy Brownies Recipe is an absolute showstopper! These brownies are incredibly easy to make but look so impressively spooky, with cute little candy eyes peeking out from white chocolate bandages. Perfect for parties, school events, or just a cozy night in, you’ll find that this recipe brings both charm and rich chocolatey goodness in every bite. Stick with me, and I’ll walk you through it all, sharing my best tips to get that mummy look just right.
Why You’ll Love This Recipe
- Quick and Easy: Using a boxed brownie mix speeds up prep without sacrificing chocolatey flavor.
- Fun Presentation: The white chocolate “bandages” and candy eyes turn simple brownies into festive treats.
- Kid-Friendly: Kids love helping decorate these spooky mummies, making baking extra fun.
- Perfect for Parties: They’re great bite-sized treats that vanish quickly at any Halloween gathering.

Ingredients You’ll Need
This recipe is all about keeping things simple but effective. The trusty boxed brownie mix forms the rich base, while a handful of white chocolate chips add just the right touch for those spooky bandages. Oh, and don’t forget the candy eyes — they’re the star of the show and bring these mummy brownies to life.
- Brownie mix: Choose your favorite boxed mix or homemade equivalent for a fudgy base.
- White chocolate chips: These melt smoothly and pipe well, making weaving those “bandages” so much easier.
- Candy eyes: You can find these at most baking aisles or online, and trust me, they’re worth the extra step.
Variations
One of the things I love about this Spooky Mummy Brownies Recipe is how easy it is to tweak. Whether you’re feeding a crowd or want a dairy-free option, you can customize it without losing that Halloween charm.
- Gluten-Free Option: I’ve swapped in a gluten-free brownie mix before, and the mummy effect stays just as cute without compromising taste.
- Dark Chocolate Drizzle: If white chocolate isn’t your thing, try dark chocolate for a more dramatic “bandage” look — my friends couldn’t get enough of it!
- Peanut Butter Twist: Adding peanut butter chips into the brownie mix gives a surprise nutty flavor that pairs beautifully with the sweet eyes and drizzle.
- Mini Versions: I once made these as mini brownie bites on a cookie sheet for bite-sized snacks — perfect for kid parties or sipping hot cocoa.
How to Make Spooky Mummy Brownies Recipe
Step 1: Bake Your Brownies
Start by preparing your brownie mix exactly according to the box instructions. I find using a greased baking pan helps the brownies come out cleanly and keeps edges from sticking — and trust me, no one likes a broken mummy! Bake them on time, and be sure to let them cool completely before moving on to decorating. If you skip this step, the white chocolate drizzle melts right off, and that defeats the whole spooky look.
Step 2: Cut Into Squares
Once cooled, cut your brownies into neat squares. These are your mummy “bodies,” so keeping them uniform makes decorating easier and the final result more adorable. I use a serrated knife and a gentle sawing motion to avoid crumbling — helps keep the edges sharp for that crispy brownie bite.
Step 3: Melt and Pipe the White Chocolate
Pop those white chocolate chips in a microwave-safe bowl and melt them in short bursts — 20 seconds at a time — stirring between each until smooth. Patience here is key to avoid burning. Transfer the melted chocolate to a piping bag or a small plastic sandwich bag with a tiny corner snipped off. Now comes the fun part: drizzle the chocolate over the brownie squares in a zigzag or crisscross pattern to mimic mummy bandages. Don’t worry about perfection — uneven stripes just add to the spooky charm!
Step 4: Add Candy Eyes and Let Set
Before the white chocolate sets, place two candy eyes near the top center of each brownie to give your mummy its signature look. If the chocolate starts to harden, you can gently press them in again with a dab of extra melted chocolate. Then, let everything sit at room temperature until the white chocolate is fully set, or pop the tray in the fridge for quicker results. These little details make all the difference and always impress my guests.
Pro Tips for Making Spooky Mummy Brownies Recipe
- Use Room Temperature Brownies: Cooling brownies fully ensures the white chocolate holds nicely on top without melting away.
- Melt Chocolate Slowly: Microwaving in short increments with stirring prevents burning and keeps your drizzle shiny and smooth.
- Be Creative With Piping: If you want thicker bandages, add layers of drizzle after the first one sets slightly.
- Eye Placement: Hold candy eyes in place with a dab of melted chocolate if they won’t stick at first, avoiding a messy look.
How to Serve Spooky Mummy Brownies Recipe
Garnishes
I like to keep it simple here since the brownies themselves are the star, but if you want to jazz things up, sprinkle some edible glitter or colored sugar around the plate for a magical Halloween vibe. A little orange zest on the side adds a subtle zing that balances the richer brownie flavors, especially if you’re serving adults.
Side Dishes
These brownies pair well with a scoop of vanilla ice cream or a dollop of whipped cream to contrast the sweet, fudgy texture. For a Halloween party, I love serving them alongside pumpkin spice hot chocolate or a blood-red berry punch for that spooky edge.
Creative Ways to Present
Once, I arranged these mummy brownies on a large serving platter lined with fresh autumn leaves and little plastic spiders for a creepy-cute display. You can also individually wrap each brownie in cellophane with a Halloween ribbon for take-home favors that guests adore. Thematically shaped plates or cupcake liners also elevate the presentation with minimal effort.
Make Ahead and Storage
Storing Leftovers
I usually keep leftover mummy brownies in an airtight container at room temperature for up to 3 days. Just make sure the container is sealed well so the brownies don’t dry out. The chocolate bandages hold up well and still look great the next day.
Freezing
If you want to prep in advance, freeze the baked brownies (without the drizzle and eyes) wrapped tightly in plastic wrap, then placed in a freezer bag. When you’re ready to serve, thaw fully, decorate with the white chocolate and candy eyes, and set as directed. I find this works perfectly and keeps the brownies fresh for up to 2 months.
Reheating
These brownies taste great at room temperature or slightly warmed. If reheating, I pop a brownie in the microwave for about 10 seconds — enough to warm it through but not melt the decorations! This keeps the bandages intact and the chocolate nicely set.
FAQs
-
Can I make the white chocolate drizzle ahead of time?
Yes! You can melt and pipe the white chocolate onto a sheet of parchment paper and let it harden. Then gently peel off and place onto brownies, but I find piping directly onto the brownies while the chocolate is warm gives the best “bandage” look and sticks well.
-
What if I can’t find candy eyes?
No worries! You can make your own eyes using tiny dots of melted dark chocolate on white chocolate discs or even use mini chocolate chips placed with a dab of frosting. The key is a contrasting color to create that eye-catching effect.
-
Can I use homemade brownies for this recipe?
Absolutely! I often make this recipe with my classic homemade fudgy brownie recipe. Just be sure your brownies are fully cooled and firm enough to hold the chocolate drizzle and candy eyes without crumbling.
-
How long do Spooky Mummy Brownies last?
Stored in an airtight container at room temperature, they stay fresh for about three days. Refrigeration can extend this to 5 days but may slightly change the texture of your brownies and chocolate bandages.
Final Thoughts
I absolutely love how this Spooky Mummy Brownies Recipe brings a playful spirit to a classic dessert. When I first made these with my kids, we all laughed so much adding the candy eyes and piping the “bandages.” It’s such a simple idea that turns dessert time into a Halloween highlight. I really hope you try this with your family or friends and experience those moments of fun and delight — nothing beats that shared joy over a plate full of festive treats that taste as good as they look!
Print
Spooky Mummy Brownies Recipe
- Prep Time: 15 minutes
- Cook Time: 30 minutes
- Total Time: 45 minutes
- Yield: 12 servings
- Category: Dessert
- Method: Baking
- Cuisine: American
Description
These Spooky Mummy Brownies are a fun and festive treat perfect for Halloween parties. Made from a box brownie mix and decorated with melted white chocolate to resemble mummy bandages and candy eyes for a creepy effect, they are easy to make and delightful for all ages.
Ingredients
Brownie Base
- 1 box brownie mix (including required ingredients as per box instructions)
Decorations
- 1/2 cup white chocolate chips
- Candy eyes (12 pieces)
Instructions
- Prepare Brownies: Follow the instructions on the brownie mix box to prepare the batter. Pour the batter into a greased baking pan, spreading it evenly.
- Bake Brownies: Bake the brownies as directed on the box. Once baked, allow them to cool completely before handling to ensure clean cuts.
- Cut Brownies: Cut the cooled brownies into 12 equal squares for serving.
- Melt White Chocolate: Melt the white chocolate chips gently using a double boiler or microwave in short bursts, stirring frequently until smooth.
- Pipe Mummy Bandages: Transfer the melted white chocolate into a piping bag or a plastic bag with a small tip cut off. Drizzle the melted chocolate in a zigzag pattern over each brownie square to mimic mummy bandages.
- Add Candy Eyes: Place two candy eyes on each brownie while the chocolate is still wet to secure them in place.
- Set Chocolate: Allow the white chocolate to set completely before serving to avoid smudging the decorations.
Notes
- You can substitute the brownie mix with homemade brownies if preferred.
- If white chocolate chips are unavailable, white candy melts can be used as an alternative.
- For cleaner drizzle lines, chill the melted chocolate slightly before piping.
- Store brownies in an airtight container at room temperature for up to 3 days.
Nutrition
- Serving Size: 1 brownie square (approx. 60g)
- Calories: 220 kcal
- Sugar: 18g
- Sodium: 120mg
- Fat: 11g
- Saturated Fat: 6g
- Unsaturated Fat: 3g
- Trans Fat: 0g
- Carbohydrates: 29g
- Fiber: 1g
- Protein: 2g
- Cholesterol: 20mg


