
If you’re a fan of all things sweet, soft, and a little bit festive, you’re going to adore this Strawberry Kiss Cookies Recipe. These cookies are the perfect blend of funfetti cheer, creamy softness, and that iconic burst of strawberry from the Hershey’s Ice Cream Cone Kisses pressed right on top. I absolutely love how these turn out every time — soft, fluffy, and a little bit magical. Stick with me because I’m about to share all the tips and tricks I’ve picked up to make these cookies nothing short of fabulous!
Why You’ll Love This Recipe
- Super Soft Texture: Thanks to the cream cheese addition, these cookies stay dreamy-soft and tender.
- Easy Ingredients: Using a funfetti cookie mix means less prep without sacrificing that homemade touch.
- Show-Stopping Presentation: Those strawberry kisses make every cookie look like a little edible Valentine.
- Quick and Simple: You can whip up a batch in under an hour, perfect for last-minute celebrations or sweet cravings.

Ingredients You’ll Need
The beauty of this Strawberry Kiss Cookies Recipe is that the ingredients come together effortlessly, yet deliver a rich and festive flavor. The funfetti sugar cookie mix creates a bright, colorful base while cream cheese keeps things luxuriously soft. I recommend grabbing good quality Hershey’s Strawberry Ice Cream Cone Kisses—they’re the star players here!
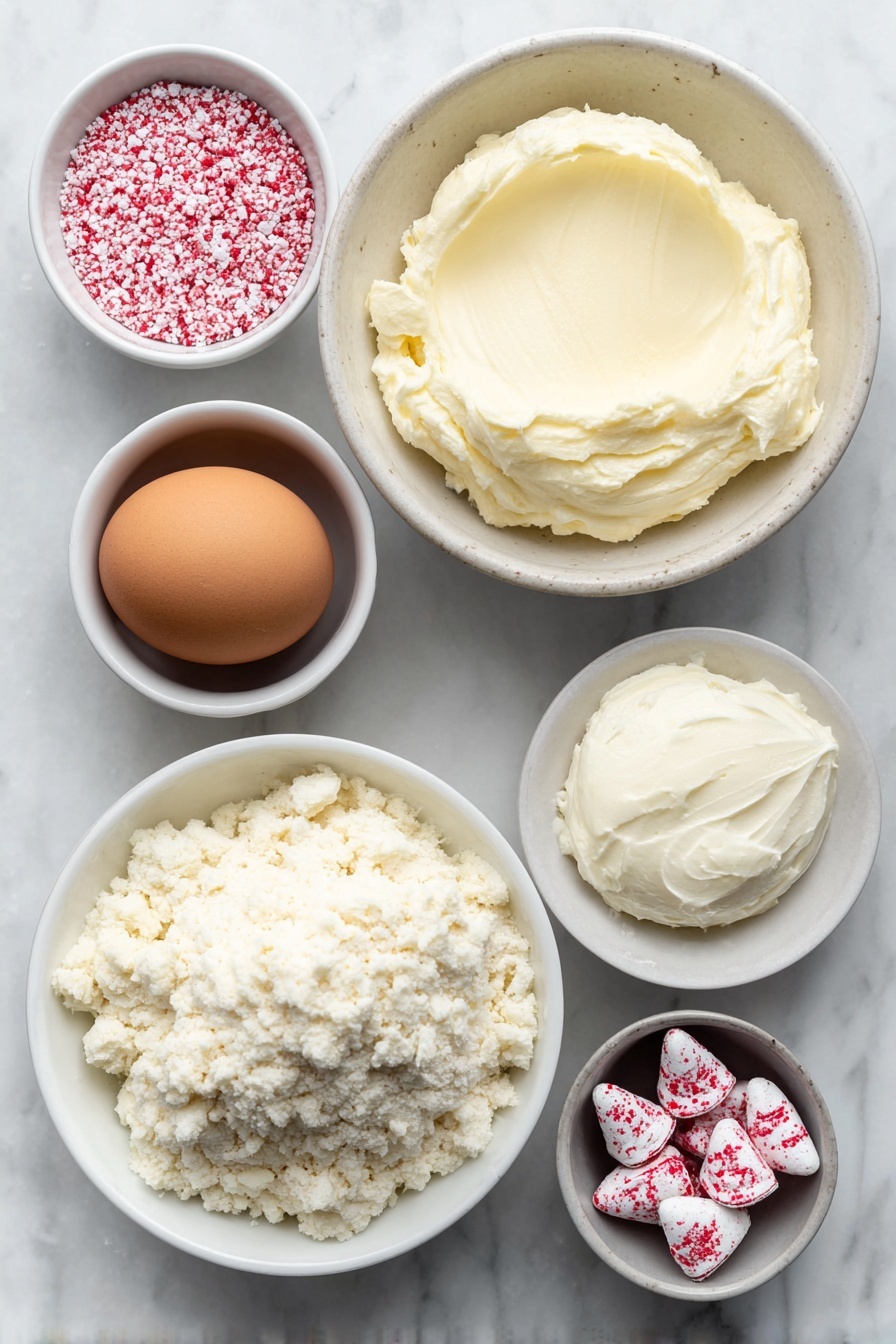
- Funfetti sugar cookie mix: Look for one with sprinkles included to add that cheerful pop of color.
- Cream cheese: Softened to room temperature for easy mixing and that unbeatable moist texture.
- Egg: Helps bind everything together just right.
- Pink or white sanding sugar/non-pareils: Adds a festive sparkle that also keeps the dough from sticking to your hands.
- Hershey’s Strawberry Ice Cream Cone Kisses: These special kisses melt slightly and give every bite a fun strawberry twist.
Variations
I love how easy it is to tailor this Strawberry Kiss Cookies Recipe to different tastes or occasions—feel free to get creative and make it your own. Whether you want to make it gluten-free, dial up the strawberry flavor, or even add some extra sparkly toppings, this recipe welcomes all kinds of delicious tweaks.
- Gluten-Free Version: Use a gluten-free funfetti cookie mix—I’ve tried this swap, and it works wonderfully without losing softness.
- Extra Strawberry Boost: Mix in finely chopped freeze-dried strawberries or a bit of strawberry extract into the dough for an added berry punch.
- Color Themes: Swap the sanding sugar colors for other holidays—green and red for Christmas or orange and black for Halloween just as easily.
- Vegan Adaptation: Replace egg with a flax egg and use dairy-free cream cheese; results aren’t quite the same but still seriously tasty.
How to Make Strawberry Kiss Cookies Recipe
Step 1: Mix Your Dough to Soft Perfection
Start by preheating your oven to 375°F and lining a baking sheet with parchment paper to keep cookies from sticking. Then, grab a large bowl and combine the funfetti sugar cookie mix, softened cream cheese, and one large egg. I like to mix these with a sturdy spoon or my hands until a soft dough forms—don’t worry if it’s sticky, that’s totally normal thanks to the cream cheese.
Step 2: Shape and Sugar-Coat Your Cookies
Pour your sanding sugar or non-pareils into a shallow bowl—this is what you’ll roll your dough balls in to give them a festive, sparkly finish. Using a 1½ tablespoon cookie scoop (or just a regular spoon), scoop out dough balls and roll them in the sugar. Then, shape each into a smooth ball—this helps them bake up evenly and look picture-perfect.
Step 3: Rest If Sticky, Then Bake
If your dough feels way too sticky to handle, don’t panic—just pop it into the fridge for 30 to 60 minutes. This chilling step makes rolling much easier and keeps your cookies from spreading too much during baking. After chilling, place your dough balls on the parchment-lined baking sheet, spacing them about 1½ inches apart so they have room to puff up beautifully.
Step 4: Bake and Top with Delicious Strawberry Kisses
Bake the cookies for 8 to 12 minutes—watch for set edges while the centers still look soft. This is key to keeping that tender texture we all crave. Once they’re out of the oven, let them cool for 3 to 5 minutes but act quickly: gently press a Hershey’s Strawberry Ice Cream Cone Kiss right in the center of each cookie. This way, the kisses soften just enough but stay mostly intact, adding that perfect strawberry surprise in every bite.
Step 5: Cool and Enjoy (or Sneak a Warm Bite!)
Let the cookies cool completely if you want the kiss to firm up nicely—this makes them easier to stack or gift. Or, if you can’t resist, dig in while they’re still warm for a melty, gooey strawberry center experience. Either way, you’re in for a real treat.
Pro Tips for Making Strawberry Kiss Cookies Recipe
- Cream Cheese at Room Temp: I discovered this trick when I started making cheesecake—soft cream cheese blends smoothly, preventing lumps and giving you a silky dough.
- Chill If Sticky: Dough can be sticky because of the cream cheese; chilling it makes rolling easier and cookies neater, so don’t skip this step if needed.
- Timing the Kisses: For a perfectly shaped kiss on top, wait just a few minutes after baking so the cookie is soft but not completely cooled—press them in gently.
- Use Parchment Paper: It prevents sticking and keeps your baking sheet clean, making cleanup a breeze.
How to Serve Strawberry Kiss Cookies Recipe

Garnishes
I often sprinkle a little extra sanding sugar over the cookies after baking just to add a subtle sparkle that catches the light—so pretty! Occasionally, I add tiny edible glitter stars or heart-shaped sprinkles for occasions like Valentine’s Day, which my family goes crazy for. These garnishes make your cookie platter feel extra festive and fun.
Side Dishes
These cookies shine on their own, but if you’re serving a whole spread, I love pairing them with a simple vanilla milkshake or a delicate cup of green tea to balance sweetness. They also go beautifully alongside fresh fruit or a light cream cheese dip for guests who want a little variety.
Creative Ways to Present
For birthdays or parties, I’ve layered these Strawberry Kiss Cookies in clear jars, alternating with layers of crushed freeze-dried strawberries and pink sugar. It looks stunning and everyone loves the surprise layers. Another idea is to arrange them on a heart-shaped platter with fresh strawberries and mint leaves to amp up the Valentine’s vibe.
Make Ahead and Storage
Storing Leftovers
I store leftover Strawberry Kiss Cookies in an airtight container at room temperature, layered between parchment paper to prevent sticking. They stay soft and flavorful for up to 3 days, which is perfect because they rarely last that long in my house!
Freezing
If I want to prep ahead, I freeze the unbaked dough balls rolled in sugar on a tray first, then transfer them to a freezer bag. When I’m ready, I bake them straight from frozen, adding a minute or two onto the baking time. This method saves me so much time and maintains that fresh-baked taste.
Reheating
To enjoy leftovers warm, I pop a couple cookies in the microwave for about 10 seconds—just enough to soften the centers again without melting the kisses too much. It feels like fresh-baked magic every time!
FAQs
-
Can I use regular chocolate kisses instead of strawberry?
Absolutely! Regular Hershey’s Kisses will work fine, but you’ll miss that fun strawberry flavor that makes these cookies special. If you prefer classic chocolate or just want to experiment, go for it—just expect a different taste experience.
-
Why is cream cheese added to this cookie recipe?
Cream cheese adds moisture and a tender crumb to the cookies, keeping them soft and slightly tangy. I used to struggle with cookies turning out dry, but adding cream cheese was a game changer for soft, melt-in-your-mouth results.
-
How do I prevent the kisses from melting too much?
Letting the cookies cool for a few minutes before pressing in the kisses helps keep them from sinking or melting completely. If you press them in right away, they’ll melt more and spread over the cookie top, which is also tasty but less pretty.
-
Can I make these cookies dairy-free?
Yes, you can try dairy-free cream cheese and vegan cookie mixes, though texture and flavor might vary slightly. I recommend testing a small batch first to make sure you love the results.
Final Thoughts
This Strawberry Kiss Cookies Recipe is one of those delightful little treats that can brighten your day or make any celebration feel extra special. I love how straightforward it is, yet the results always impress my family and friends. If you try it, I bet you’ll find yourself coming back to this recipe whenever you want a soft, sweet cookie with a lovely strawberry surprise inside. Trust me—baking these feels like a warm hug in cookie form, and sharing them? Even better.
Print
Strawberry Kiss Cookies Recipe
- Prep Time: 10 minutes
- Cook Time: 8-12 minutes
- Total Time: 48 minutes
- Yield: 16-18 cookies
- Category: Dessert
- Method: Baking
- Cuisine: American
Description
Strawberry Kiss Cookies are soft, delightful Valentine’s treats featuring Funfetti sugar cookie dough combined with cream cheese and topped with Hershey’s Strawberry Ice Cream Cone Kisses. These cookies boast a tender texture with a playful sprinkle coating and a luscious strawberry-flavored chocolate center, perfect for sharing during festive occasions or anytime you crave a sweet, charming dessert.
Ingredients
Cookie Dough
- 1 (16 oz) bag Funfetti sugar cookie mix
- 4 oz cream cheese, softened
- 1 large egg
Coating and Topping
- ½ cup pink or white sanding sugar or non-pareils
- 18 Hershey’s Strawberry Ice Cream Cone Kisses
Instructions
- Preheat Oven: Preheat your oven to 375°F and line a baking sheet with parchment paper to prevent sticking and facilitate easy cleanup.
- Mix Dough: In a large bowl, combine the Funfetti sugar cookie mix, softened cream cheese, and the egg. Mix them thoroughly until a soft, cohesive dough forms, ensuring the cream cheese is evenly incorporated for softness.
- Prepare Coating: Pour the pink or white sanding sugar or non-pareils into a shallow bowl, creating an easy-to-roll coating for the cookie dough balls.
- Shape Cookies: Using a 1½ tablespoon scoop, portion out the dough, then roll each scoop into a smooth ball. Coat each ball by rolling it in the sanding sugar or non-pareils.
- Chill Dough (If Needed): If the dough feels too sticky to handle, place it in the refrigerator and chill for 30 to 60 minutes to firm up, making it easier to roll and shape.
- Arrange on Baking Sheet: Place the coated cookie dough balls onto the prepared baking sheet, spacing them about 1½ inches apart to allow spreading during baking.
- Bake Cookies: Bake in the preheated oven for 8 to 12 minutes until the edges are set but the centers remain soft, maintaining a tender texture.
- Add Kisses: Remove the cookies from the oven and let them cool for 3 to 5 minutes. Then, gently press a Hershey’s Strawberry Ice Cream Cone Kiss into the center of each cookie, allowing the chocolate to soften slightly but retain shape.
- Cool and Serve: Allow the cookies to cool completely to set the Kiss firmly, or enjoy them warm with a soft, melted center.
Notes
- Use room temperature cream cheese for smooth and easy mixing with the dough.
- If dough is sticky, chilling it helps in easier handling and rolling.
- Coating your hands with sanding sugar can prevent sticking while shaping.
- For firmer Kisses, let the cookies cool slightly before pressing the chocolate in.
- Press Kisses immediately after baking if you prefer a softer, melted chocolate center.
Nutrition
- Serving Size: 1 cookie
- Calories: 150
- Sugar: 12g
- Sodium: 110mg
- Fat: 7g
- Saturated Fat: 3.5g
- Unsaturated Fat: 2g
- Trans Fat: 0g
- Carbohydrates: 20g
- Fiber: 0.5g
- Protein: 2g
- Cholesterol: 20mg


