If you’re looking for a dessert that screams cozy autumn vibes and hits every note of sweet, buttery, and warmly spiced, you’re going to want to bookmark The Great Pumpkin Pie Recipe. I absolutely love how this recipe brings together a rich pumpkin filling with just the right balance of spices, nestled in a flaky crust that bakes up golden and irresistible. Whether you’re baking for a crowd or just craving something special, this recipe is a fan-freaking-tastic way to celebrate fall flavors and impress without stress. Stick around—I’m sharing all the secrets to make your pumpkin pie unforgettable.
Why You’ll Love This Recipe
- Perfectly Balanced Flavors: The blend of spices with mellow pumpkin creates a filling that’s warm but not overwhelming.
- Simple Steps, Incredible Results: You’ll find that this recipe comes together easily, even if you’re new to pie baking.
- Always a Crowd-Pleaser: My family goes crazy for this dessert, and guests always ask for the recipe.
- Make Ahead Friendly: You can prepare the filling and crust ahead of time, making holiday baking a breeze.

Ingredients You’ll Need
Getting the ingredients right is the key to nailing The Great Pumpkin Pie Recipe. I love using fresh, high-quality pumpkin puree and fresh spices to really elevate the flavor. Here’s a quick heads-up on what makes each ingredient shine in this pie.
- Pumpkin Puree: Use plain canned pumpkin puree for the best consistency; avoid pumpkin pie filling, which contains added sugar and spices.
- Evaporated Milk: Adds creaminess without making the filling too runny; a classic pumpkin pie secret I swear by.
- Eggs: These help set the filling so you get that smooth, custardy texture you want in the pie.
- Brown Sugar: Adds depth and richness compared to regular white sugar; it caramelizes beautifully when baked.
- Spices: Cinnamon, ginger, nutmeg, and cloves work together to create that signature pumpkin pie warmth.
- Pie Crust: Whether you buy pre-made or head to your trusty homemade crust is up to you; buttery and flakey is the goal.
Variations
One thing I love about The Great Pumpkin Pie Recipe is how easy it is to customize to suit your taste or dietary needs. Whether you want a nutty crust, less sugar, or even a vegan twist, there’s a way to make it yours.
- Ginger-Extra Variation: I sometimes add a pinch more ginger or use crystallized ginger bits for zesty bursts that really brighten the flavor.
- Gluten-Free Crust: I swapped in a gluten-free pie crust mix once, and honestly, no one noticed the difference at all.
- Vegan Pumpkin Pie: I’ve successfully replaced eggs with flax eggs and used coconut milk instead of evaporated milk for a vegan spin—still creamy and delicious!
- Less Sweet Option: If you prefer less sugar, just dial back the brown sugar by a couple of tablespoons; the spices will still shine through beautifully.
How to Make The Great Pumpkin Pie Recipe
Step 1: Prep Your Crust with Love
Start by preheating your oven to 425°F (220°C). If you’re using a store-bought crust, unroll it gently into your pie dish, and poke a few holes with a fork to prevent bubbling. For homemade crust, make sure it’s well-chilled before rolling it out so it stays flaky and easy to handle.
Step 2: Whisk Together the Filling
In a large bowl, combine the pumpkin puree, evaporated milk, eggs, brown sugar, salt, and the combination of warm spices—cinnamon, ginger, nutmeg, and cloves. Whisk it until the mixture is smooth and thoroughly blended. The spices are what give this pie its character, so don’t skimp!
Step 3: Pour and Bake
Pour the filling into your prepared crust and spread it evenly. Bake at 425°F for 15 minutes—this initial high heat helps set the crust edges—and then reduce the temperature to 350°F (175°C) and bake for another 40–50 minutes until the filling is just set but still slightly jiggly in the center. A toothpick inserted near the edge should come out clean. I learned that it’s better to err on the side of underbaking just a little; it firms up as it cools.
Step 4: Cool Completely Before Serving
This part is super important—let your pie cool completely on a wire rack for at least 2 hours. The filling needs time to set up, and patience here means cleaner slices. When I first rushed this step, my pie was a gooey mess, so trust me on this one.
Pro Tips for Making The Great Pumpkin Pie Recipe
- Use Fresh Spices: I always grind fresh nutmeg for a punch of flavor that store-bought pre-ground just can’t match.
- Don’t Overbake: Keep an eye during the last 10 minutes to prevent a cracked filling—it happens if it dries out.
- Chill Your Pie: My game-changing trick is to let it chill overnight if you can—it makes slicing easier and flavors meld beautifully.
- Crust Shield: If your crust edges brown too fast, cover them with foil halfway to keep everything perfectly golden.
How to Serve The Great Pumpkin Pie Recipe
Garnishes
I love topping my pumpkin pie with a dollop of freshly whipped cream spiked just a bit with vanilla and a pinch of cinnamon. Sometimes I add a sprinkle of toasted pecans for crunch, which really takes it to the next level. If you want to get really indulgent, a drizzle of maple syrup or a scoop of vanilla bean ice cream can’t be beat.
Side Dishes
This pie pairs beautifully with warm mulled cider or a cup of spiced chai tea. For a broader meal, I often serve it after a light roasted turkey dinner or alongside a hearty butternut squash soup—it’s like autumn in every bite.
Creative Ways to Present
I’ve had fun presenting The Great Pumpkin Pie Recipe in mini tart shells for individual servings at gatherings. It feels fancy but is so simple. Another favorite is to swirl in a ribbon of cream cheese frosting just before baking for a marbled effect that wows visually and flavor-wise.
Make Ahead and Storage
Storing Leftovers
Leftover pumpkin pie keeps beautifully in the fridge covered tightly with foil or plastic wrap—I’ve kept slices fresh for up to 4 days and it still tastes amazing. Pro tip: bring it to room temperature before serving so the flavors and texture really shine.
Freezing
I’ve frozen fully baked pumpkin pie wrapped tightly in plastic wrap and foil, and it holds up well for up to 2 months. When I’m ready to enjoy, I thaw it in the refrigerator overnight and warm it slightly in a low oven to refresh the crust.
Reheating
To reheat leftover pie, I like to pop individual slices in a 350°F oven for about 10 minutes. This gently warms the filling without making it soggy and crisps the crust edges back up for a delightful bite.
FAQs
-
Can I use fresh pumpkin instead of canned for The Great Pumpkin Pie Recipe?
Absolutely! You can roast and puree fresh pumpkin, like sugar pumpkins, for an even fresher flavor. Just be sure to cook out the moisture thoroughly by simmering or baking the puree so your filling isn’t watery.
-
How do I prevent the crust from getting soggy in The Great Pumpkin Pie Recipe?
One method I swear by is blind baking the crust for about 10 minutes before adding the filling. Also, baking at a higher temperature for the first 15 minutes helps set the crust and keep it crisp.
-
What’s the best way to know when The Great Pumpkin Pie Recipe is fully baked?
The filling should be mostly set but still have a slight jiggle in the middle when you gently shake the pie dish. Overbaking can cause cracks, so it’s better to check early and let it finish by resting.
-
Can I make The Great Pumpkin Pie Recipe in advance?
Yes! You can prepare the pie a day ahead, refrigerate it fully covered, and serve chilled or warmed. The flavors actually deepen overnight, making it taste even better.
Final Thoughts
I discovered The Great Pumpkin Pie Recipe years ago, and it quickly became a holiday tradition in my house. There’s just something magical about that spiced pumpkin filling paired with a buttery crust that feels like a warm hug on a chilly day. I hope you enjoy making it as much as I do—no matter your skill level, this pie is truly approachable and incredibly rewarding. So cozy up your kitchen, crank your favorite autumn playlist, and get ready for a slice of pumpkin pie heaven you and your loved ones won’t stop talking about.
Print
The Great Pumpkin Pie Recipe
- Prep Time: 15 minutes
- Cook Time: 45 minutes
- Total Time: 1 hour 5 minutes
- Yield: 8 servings (serves 8-10)
- Category: Dessert
- Method: Baking
- Cuisine: American
Description
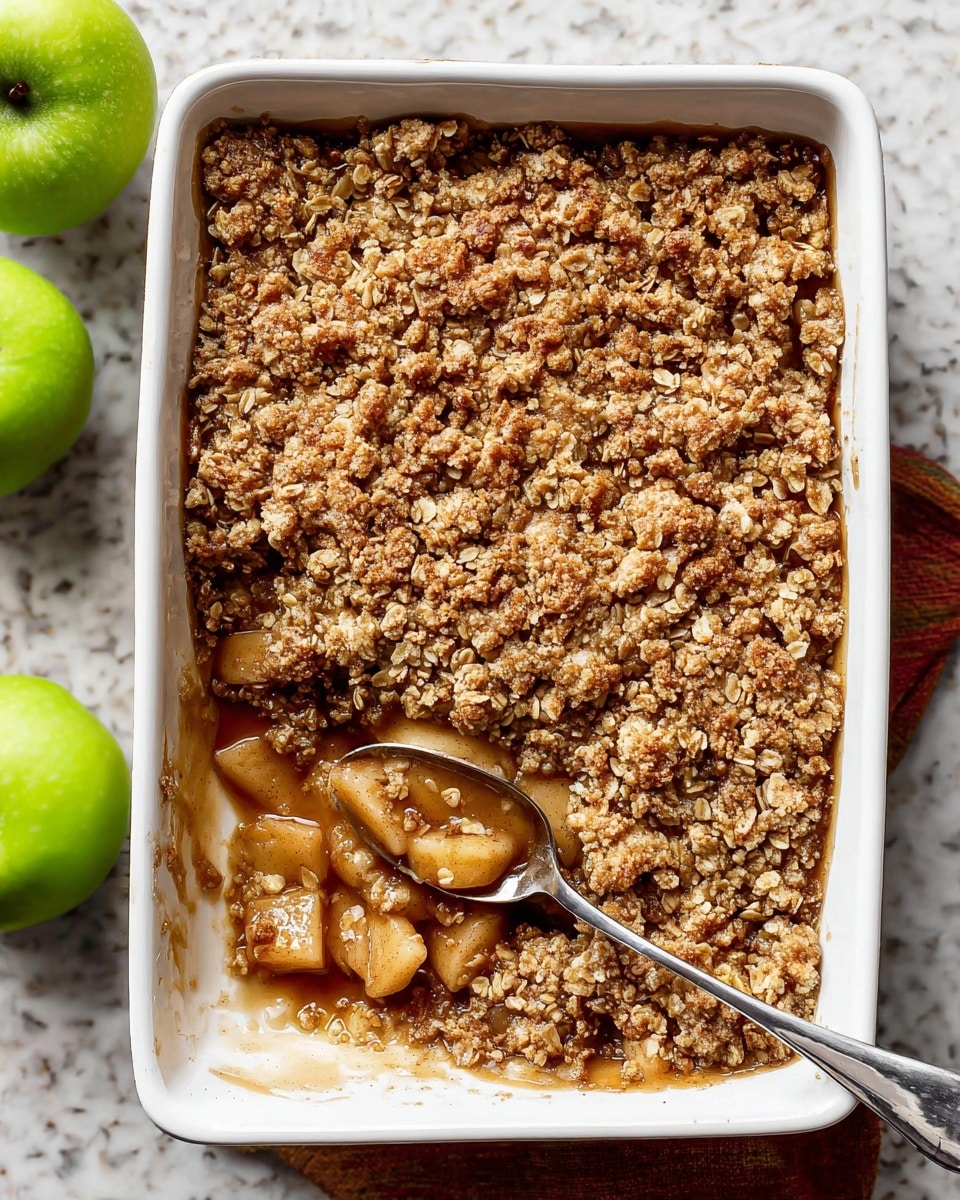
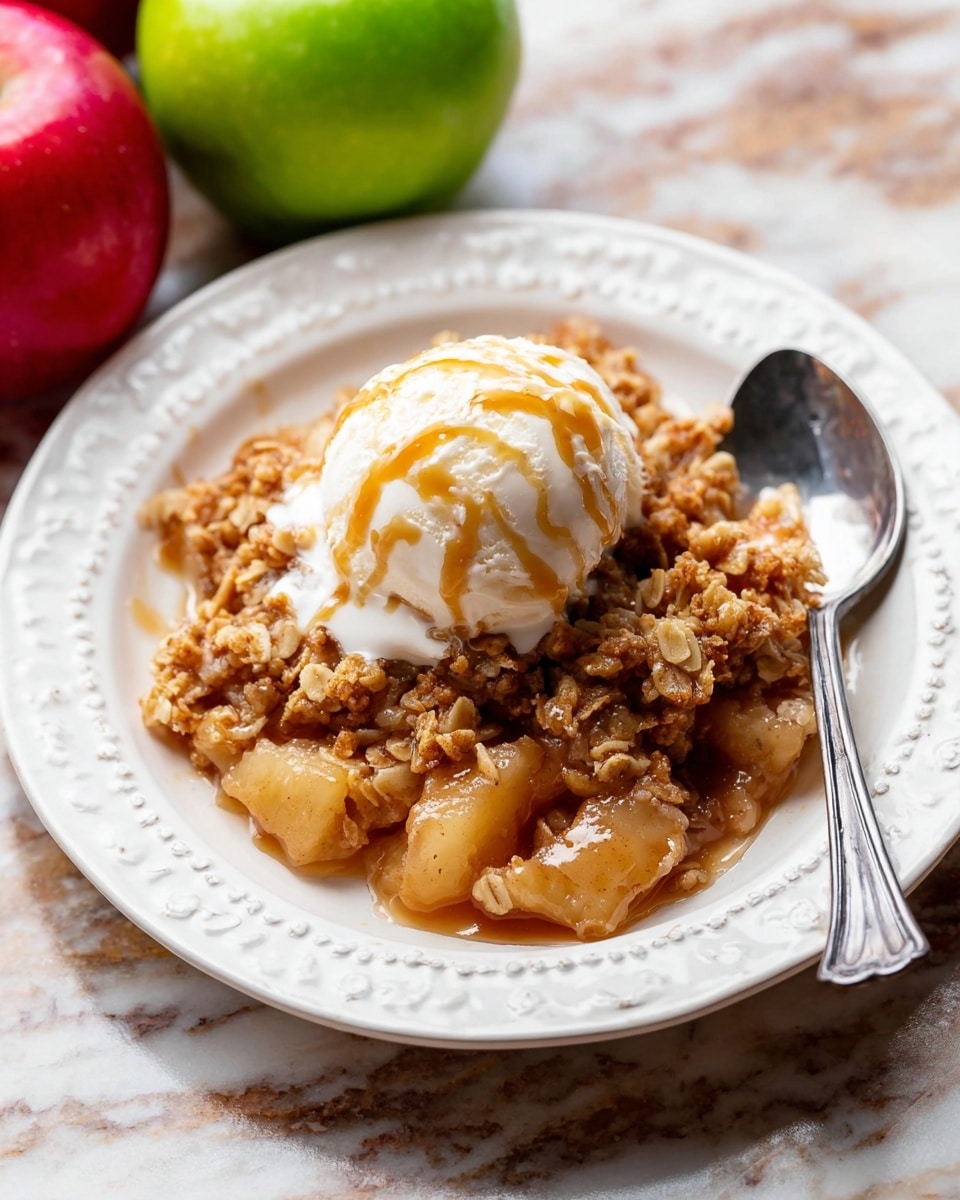
Classic Apple Crisp is a warm, comforting dessert featuring tender cinnamon-spiced apples topped with a buttery, crunchy oat and brown sugar crumble. Perfect for any occasion, this easy-to-make dessert pairs wonderfully with salted caramel and vanilla ice cream for a delicious treat.
Ingredients
Filling
- 8 medium peeled apples, cut into 1-inch chunks that are 1/4 – 1/2 inch thick (about 10 cups, or 1200g chunks)
- 1/2 cup (100g) packed light or dark brown sugar
- 1/4 cup (31g) all-purpose flour (spooned & leveled)
- 1 teaspoon pure vanilla extract
- 1 teaspoon ground cinnamon
- 1/2 teaspoon ground nutmeg
- 1/4 teaspoon salt
Topping
- 3/4 cup (94g) all-purpose flour (spooned & leveled)
- 3/4 cup (150g) packed light or dark brown sugar
- 1 teaspoon ground cinnamon
- 1/2 cup (8 Tbsp; 113g) unsalted butter, cold and cubed
- 1 cup (85g) old-fashioned whole rolled oats
Optional for Serving
- Salted caramel
- Vanilla ice cream
Instructions
- Preheat and Prepare Pan: Preheat your oven to 350°F (177°C). Lightly grease a 9×13-inch baking pan or any 3.5-4-quart baking dish to prevent sticking.
- Prepare Filling: In a large bowl, combine the peeled and chopped apples with 1/2 cup brown sugar, 1/4 cup flour, vanilla extract, ground cinnamon, ground nutmeg, and salt. Mix thoroughly to evenly coat the apple chunks. Spread this mixture evenly into the prepared baking pan.
- Make Topping: In a medium bowl, whisk together 3/4 cup flour, 3/4 cup brown sugar, and 1 teaspoon ground cinnamon. Cut in the cold, cubed unsalted butter using a pastry cutter or fork, until the mixture is crumbly and resembles coarse crumbs. Stir in the rolled oats until combined.
- Assemble and Bake: Evenly sprinkle the oat topping over the apple filling in the baking pan. Place the pan in the preheated oven and bake for 45 minutes or until the topping is golden brown and the fruit juices are bubbling around the edges.
- Cool and Serve: Remove the apple crisp from the oven and place it on a wire rack. Allow it to cool for at least 5 minutes. Serve warm, at room temperature, or cold. Enhance the serving by adding salted caramel drizzle and vanilla ice cream if desired.
- Storage: Cover any leftovers tightly and refrigerate for up to 5 days to maintain freshness.
Notes
- This classic apple crisp combines warm gooey cinnamon apples with a buttery brown sugar oat topping for a perfect balance of flavors and textures.
- You can prepare the filling and topping separately ahead of time and store them in the fridge for up to a day before baking.
- The crisp can be frozen before baking; cover tightly and bake from frozen by adding extra baking time.
- For an intensified flavor, use a mixture of tart and sweet apples like Granny Smith and Fuji or Honeycrisp.
Nutrition
- Serving Size: 1 slice (approx. 1/8th of recipe)
- Calories: 320
- Sugar: 26g
- Sodium: 90mg
- Fat: 12g
- Saturated Fat: 7g
- Unsaturated Fat: 4g
- Trans Fat: 0g
- Carbohydrates: 50g
- Fiber: 4g
- Protein: 2g
- Cholesterol: 30mg


