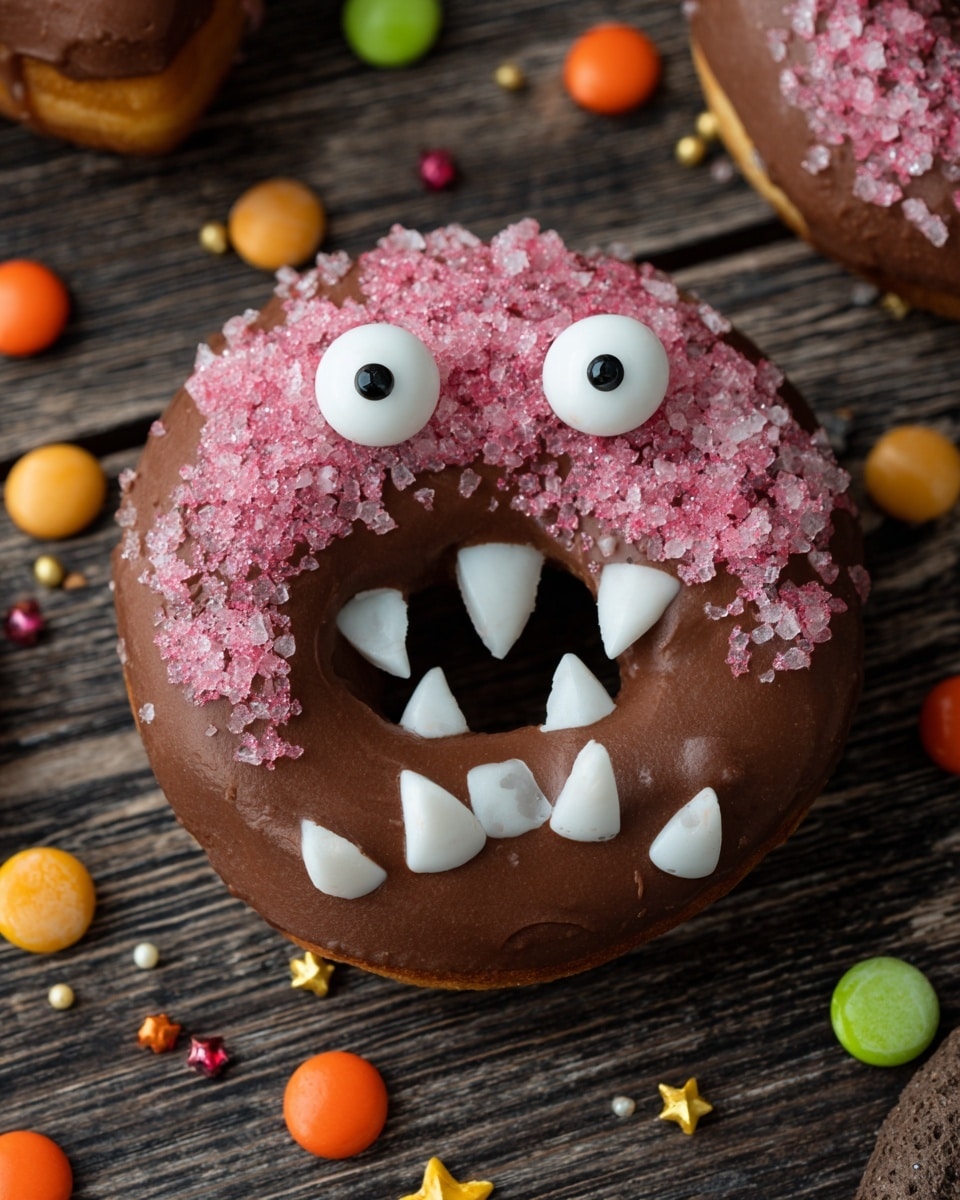
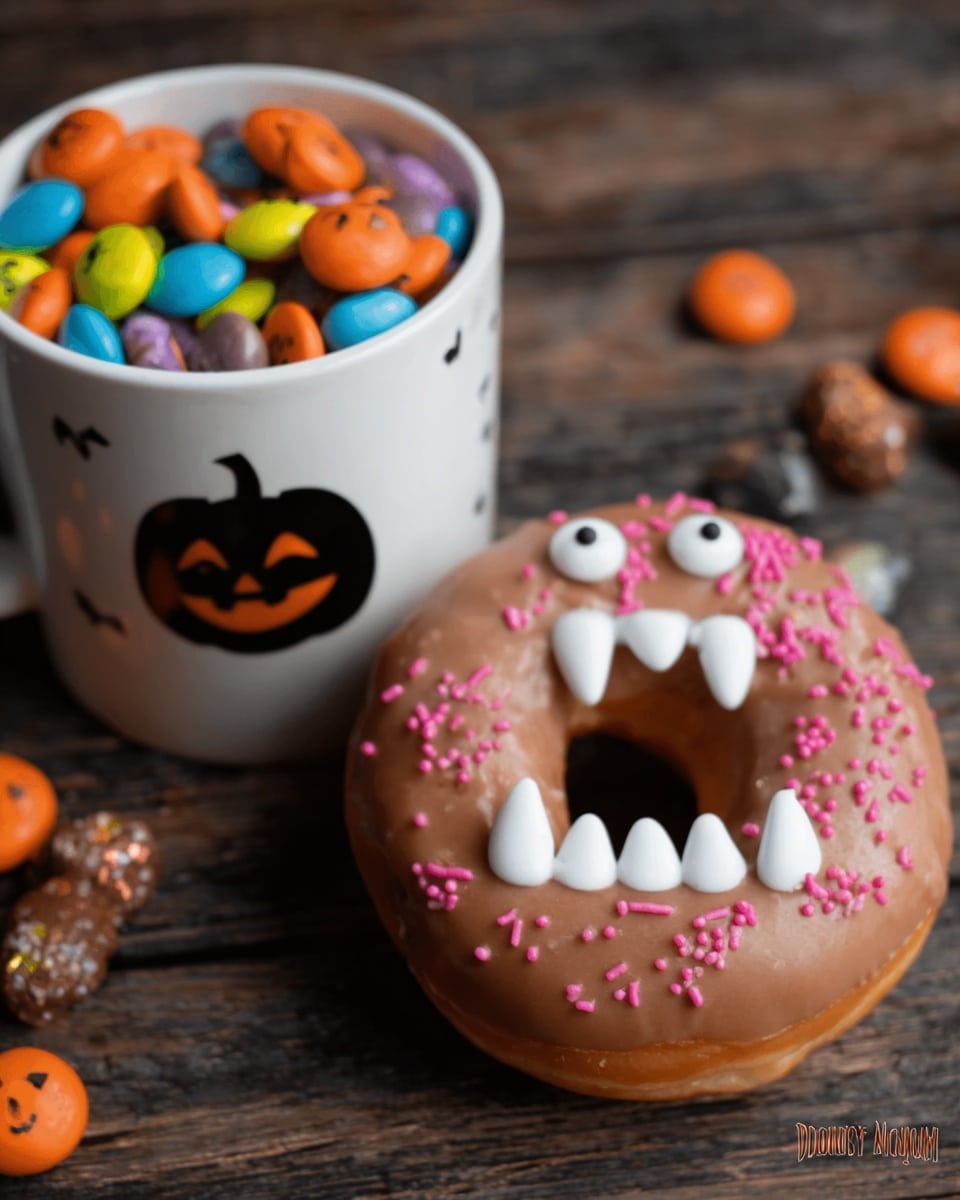
Halloween just got a whole lot yummier with this fan-freaking-tastic Vampire Donuts Recipe! If you love doughnuts that are fluffy, sweet, and just a little bit spooky, you’re going to adore these. Think tender doughnut rings dipped in a rich cocoa glaze with playful candy eyes and little vampire fangs—you can’t help but smile when you bite into one. I’m excited to share exactly how to make these creepy-cute treats come to life in your kitchen!
Why You’ll Love This Recipe
- Perfect Fluffy Texture: These donuts come out airy and soft, thanks to the double rise and homemade dough.
- Delicious Cocoa Glaze: The chocolate glaze is smooth and rich but not too sweet — balancing the donut perfectly.
- Fun & Festive: Decorating with candy eyes and vampire fangs turns these donuts into adorable Halloween stars.
- Great for All Skill Levels: I used to struggle with yeast dough, but this step-by-step makes it easy and fun!

Ingredients You’ll Need
These ingredients come together beautifully for the lightest, fluffiest donuts with that signature vampire twist. Plus, everything is easy to find at your local grocery store, so you won’t need any mysterious baking supplies.
- Whole milk: Using whole milk gives the dough richness and helps with a tender crumb.
- Granulated sugar: Divided so some sweetens the dough and some feeds the yeast.
- Salt: Just enough to enhance flavor without overpowering.
- Butter: Adds creaminess and keeps the donuts moist.
- Warm water: Helps activate the yeast for a better rise.
- Dry active yeast: The magic behind the fluffy rise — make sure it’s fresh and alive.
- Eggs: Room temperature eggs blend better into the dough.
- All-purpose flour: Provides the structure; you’ll knead this to the perfect consistency.
- Vegetable oil: For frying — neutral oil with a high smoke point works best.
- Powdered sugar: For the glaze base; smooth and sweet.
- Cocoa powder: Adds that lovely chocolate depth to the glaze.
- Milk or water: Mixed into the glaze to thin it out for dipping.
- Vanilla extract: Just a hint of warmth to elevate the glaze.
- Candy eyes: The spooky eyes bring these donuts to life!
- Fall leaf sprinkles: Festive and colorful for that extra Halloween look.
- Funfetti sprinkles and red sanding sugar: Add texture and fun pops of color to the glaze.
Variations
I love customizing this Vampire Donuts Recipe depending on the mood or who I’m sharing them with. It’s fun to switch up sprinkles or try alternative glazing flavors. Feel free to make this recipe your own! Here are a few ideas I’ve played around with:
- Gluten-Free Version: I swapped out regular flour for a gluten-free blend once, and while the texture tweaked slightly, they were still delicious and perfect for gluten-sensitive friends.
- Spiced Cocoa Glaze: Adding a pinch of cinnamon or pumpkin spice to the glaze gave the donuts a cozy fall vibe that my family adored.
- Vegan Adaptation: Using plant-based milk and a flax egg worked surprisingly well; just be gentle with the dough as it’s a little softer.
- Fun Decoration Themes: Beyond vampires, I’ve used candy bat wings or ghost eyes for Halloween variety—kids love the surprise!
How to Make Vampire Donuts Recipe
Step 1: Warm and Flavor Your Milk
Start by heating 1 ½ cups of the whole milk in a medium saucepan over medium heat just until it begins to simmer. Be patient and don’t let it boil—it’s what creates that rich, creamy base with butter and sugar melted in. Once it’s off the heat, stir in ½ cup of granulated sugar, the salt, and butter until everything is melted and smooth. This mixture is like the warm hug your dough will love!
Step 2: Activate Your Yeast
Pour the warm water into a small bowl and add 1 tablespoon of granulated sugar along with your yeast packets. Stir gently and set it aside for 5 minutes. The yeast should bloom—meaning it’ll foam and bubble up nicely. This step might feel a little magical, but it’s crucial for that airy rise we want. If it doesn’t bubble, your yeast might be old, so try fresh packets!
Step 3: Mix, Knead, and Rise
In the bowl of a stand mixer fitted with a dough hook, combine the yeast mixture and your warm milk/butter mixture. Crack in your room-temperature eggs and start beating everything together. Then gradually add flour—start with 1 cup and mix in, followed by the remaining flour, one cup at a time. Don’t overmix; just incorporate until it forms a dough. Turn it out on a floured surface and knead for 5 minutes until it’s smooth and elastic. Trust me, the kneading is where the magic happens! Put the dough into a greased bowl, cover it, and let it rise in a warm spot until doubled; usually about 60 to 90 minutes.
Step 4: The Second Rise and Shape
After the first rise, punch down your dough gently (I usually give it a few good pushes with my fist), cover it again, and let it rise another 60 minutes. Then roll it out to about 1-inch thick on a lightly floured surface. Use a donut or biscuit cutter to create your rings, and a smaller cutter for the centers. I like to save the centers—they fry up like mini donut holes, which are always a hit with my family!
Step 5: Fry and Cool the Donuts
Heat at least 2 inches of vegetable oil in a deep pot or fryer to 350°F. Don’t crowd the pan; fry one or two donuts at a time. Use a metal spatula to gently lower them in and fry about 1 minute per side until golden brown. Drain on a cooling rack set over a baking sheet (this keeps your donuts crisp and not soggy). The smell here always gets me—it’s one of those delicious moments when you know you’re almost there!
Step 6: Make the Glaze and Decorate
Sift together powdered sugar and cocoa powder, then slowly stir in milk and vanilla until you have a smooth, pourable glaze. Dip each donut on one side and set it back on a wire rack to harden the glaze. While it’s still wet, sprinkle funfetti, sanding sugar, and those iconic fall leaf sprinkles. The final touch is folding the plastic vampire fangs and placing one in each donut hole to create the “mouth,” then adding two candy eyes above. It’s silly, sweet, and so much fun.
Pro Tips for Making Vampire Donuts Recipe
- Proofing Yeast Properly: Always check your yeast blooms within 5 minutes; this saves you from wasted effort if the yeast is inactive.
- Don’t Overflour While Kneading: Use just enough to keep dough from sticking—too much flour can make the donuts dense, which I’ve learned the hard way!
- Oil Temperature Matters: Use a candy thermometer to keep your oil at 350°F for perfectly golden and not greasy donuts.
- Dip Donuts While Warm: Glazing donuts slightly warm but not hot helps the glaze set better without sliding off.
How to Serve Vampire Donuts Recipe
Garnishes
My go-to garnishes for these Vampire Donuts are funfetti sprinkles and red sanding sugar—it adds just the right bit of sparkle and whimsy for Halloween. The candy eyes and plastic fangs really complete the look. Plus, I like adding colorful fall leaf sprinkles to bring an autumnal vibe. It’s such a crowd-pleaser, especially at parties!
Side Dishes
Pair these donuts with a hot cup of spiced apple cider or a rich, dark roast coffee to balance their sweetness. If you’re hosting a Halloween brunch, serve alongside pumpkin muffins or a simple fruit salad to keep things light but festive.
Creative Ways to Present
One Halloween, I arranged the Vampire Donuts on a platter with edible “blood” made from raspberry sauce drizzles, adding cobweb spun candy around. Setting the donuts on a black lace tablecloth brought the spooky vibe up a notch. You can also personalize each donut with name tags or add mini vampire hats for kids—so much fun!
Make Ahead and Storage
Storing Leftovers
I usually store leftover Vampire Donuts in an airtight container at room temperature. They’re best eaten within 1-2 days as they start to lose their fresh, fluffy texture after that. Before sealing, make sure the glaze is fully set to avoid sticky messes.
Freezing
If I want to keep some donuts for longer, I freeze them before glazing—wrapped tightly in plastic wrap, then in a freezer bag. When ready, I thaw at room temperature and then dip in the glaze fresh. This method keeps the texture and flavor intact much better than freezing after glazing.
Reheating
To reheat, I pop a donut in the microwave for about 10-15 seconds—just enough to warm without melting the glaze completely. You can also heat them briefly in a toaster oven for a bit of crispness on the outside. Freshly fried is best, but this keeps the magic alive on day two!
FAQs
-
Can I make Vampire Donuts Recipe without a stand mixer?
Absolutely! While a stand mixer with a dough hook makes kneading easier, you can mix the ingredients in a large bowl and knead the dough by hand on a floured surface. It might take a bit more elbow grease, but the results will be just as delicious.
-
What if my yeast doesn’t foam during proofing?
If your yeast doesn’t foam, it may be expired or the water temperature was too hot or cold. Use warm water around 105-115°F and fresh yeast for best results. Without properly proofed yeast, the dough won’t rise well.
-
Can I bake these instead of frying?
While baking is possible, frying gives these donuts their signature golden crust and fluffy texture. If you want to bake, try brushing the donuts with melted butter and bake at 375°F for 12-15 minutes, but expect a slightly different texture.
-
How do I prevent donuts from soaking up too much oil?
Keeping the oil at a steady 350°F helps prevent greasy donuts. Also, avoid overcrowding the fryer so the temperature doesn’t drop. Draining the donuts on a wire rack rather than paper towels helps keep them crisp.
-
What decorations can I use if I don’t have vampire fangs?
If plastic vampire fangs aren’t handy, you can use red licorice slices, candy canes snapped in half, or even piped red icing for the vampire mouth effect. Get creative and have fun with what you have around!
Final Thoughts
This Vampire Donuts Recipe has become one of my favorite Halloween baking adventures. I love how it takes a classic treat and turns it delightfully spooky with fun decorations and that rich cocoa glaze. Every year, my family goes crazy for these, and honestly, I find myself sneaking a few bites whenever I can. I highly recommend you try making these donuts for your next festive gathering—you’ll enjoy both the process and the sweet, creepy results. Happy Halloween baking, my friend!
Print
Vampire Donuts Recipe
- Prep Time: 30 minutes
- Cook Time: 3 minutes 2 seconds
- Total Time: 2 hours 33 minutes 2 seconds
- Yield: 24 donuts
- Category: Dessert
- Method: Frying
- Cuisine: American
Description
These Vampire Donuts are a fun and spooky Halloween treat made from a soft yeast dough fried to golden perfection, then dipped in a rich cocoa glaze and decorated with candy eyes, vampire fangs, and colorful sprinkles to create a playful vampire face. Perfect for festive celebrations or themed parties, these donuts combine classic flavors with whimsical decorations for a delightfully eerie dessert.
Ingredients
Dough Ingredients
- 2 cups whole milk, divided
- ½ cup plus 3 tablespoons granulated sugar, divided
- ½ teaspoon salt
- ½ cup butter
- 1 ½ cups warm water (warm tap water is fine)
- 2 packages (0.25 ounce each, 0.5 ounce total) dry active yeast
- 2 eggs, at room temperature
- 9 cups all-purpose flour, plus additional for kneading
Frying and Glaze Ingredients
- Vegetable oil for frying
- 3 cups powdered sugar
- ½ cup cocoa powder
- ¼ cup milk or water
- 2 teaspoons vanilla extract
Decorations
- Candy eyes
- Fall leaf sprinkles
- Funfetti, assorted bead-shaped sprinkles
- Red sanding sugar
- Plastic vampire fangs
Instructions
- Heat Milk Mixture: In a medium saucepan, heat 1 ½ cups of the whole milk over medium heat just until it begins to simmer. Remove from heat and stir in ½ cup granulated sugar, salt, and butter until melted and combined. Set aside to cool slightly.
- Bloom Yeast: Pour warm water into a small bowl, add 1 tablespoon granulated sugar and the two packets of dry active yeast. Stir and let it sit for 5 minutes until the yeast foams and bubbles, indicating it is active.
- Mix Wet Ingredients: In the mixing bowl of a stand mixer, combine the yeast mixture with the milk and butter mixture. Add the eggs and beat together using an electric mixer until well incorporated.
- Add Flour: Add 1 cup of flour and mix with the dough hook attachment. Gradually add the remaining flour 1 cup at a time, mixing just until all flour is incorporated and the dough begins to form.
- Knead Dough: Turn the dough onto a floured surface and knead for about 5 minutes until smooth and elastic, adding flour as needed to prevent sticking.
- First Rise: Place the dough in a well-greased large bowl, cover with a clean kitchen towel, and let it rise in a warm place until doubled in size, about 60 to 90 minutes.
- Second Rise: Punch down the dough, cover again, and let it rise a second time for 60 minutes to develop flavor and texture.
- Shape Donuts: Roll the dough out on a clean counter to about 1-inch thickness. Use a donut cutter or biscuit cutter to cut out donut shapes and a smaller cutter to remove the centers.
- Prepare for Frying: Place the cut donuts and centers on large cookie sheets and set aside while preparing the oil for frying.
- Heat Oil: Add vegetable oil to a large pot, Dutch oven, or deep fryer to a depth of at least 2 inches. Heat oil to 350°F (175°C).
- Fry Donuts: Using a metal spatula, gently lower one or two donuts into the hot oil. Fry each side for about 1 minute or until golden brown. Remove and drain on a cooling rack placed over a baking sheet.
- Make Glaze: In a medium bowl, sift together powdered sugar and cocoa powder. Gradually stir in milk or water and vanilla extract until smooth and pourable.
- Glaze Donuts: Dip each donut into the glaze covering one side, then place on a wire rack to allow the glaze to set and harden.
- Decorate Donuts: While the glaze is still wet, sprinkle funfetti, red sanding sugar, and/or fall leaf sprinkles over the donuts. Use a mixture of colors or solid colors on each donut for variety.
- Add Vampire Features: Fold plastic vampire fangs in half and place one in the donut hole to resemble a mouth. Position two candy eyes above the mouth to complete the vampire face.
- Serve and Enjoy: Allow the glaze to fully set before serving these spooky Vampire Donuts as a festive treat.
Notes
- For best results, ensure milk and water are warm but not hot, to activate yeast properly.
- You can substitute water for milk in the glaze if you prefer a lighter consistency.
- Ensure oil maintains 350°F to avoid greasy or undercooked donuts.
- Use a stand mixer with a dough hook for easier kneading, or knead by hand on a floured surface.
- These donuts are best enjoyed fresh but can be stored in an airtight container for 1-2 days.
Nutrition
- Serving Size: 1 donut
- Calories: 300
- Sugar: 17 grams
- Sodium: 97 milligrams
- Fat: 6 grams
- Saturated Fat: 3 grams
- Unsaturated Fat: 2 grams
- Trans Fat: 0 grams
- Carbohydrates: 54 grams
- Fiber: 2 grams
- Protein: 7 grams
- Cholesterol: 28 milligrams


