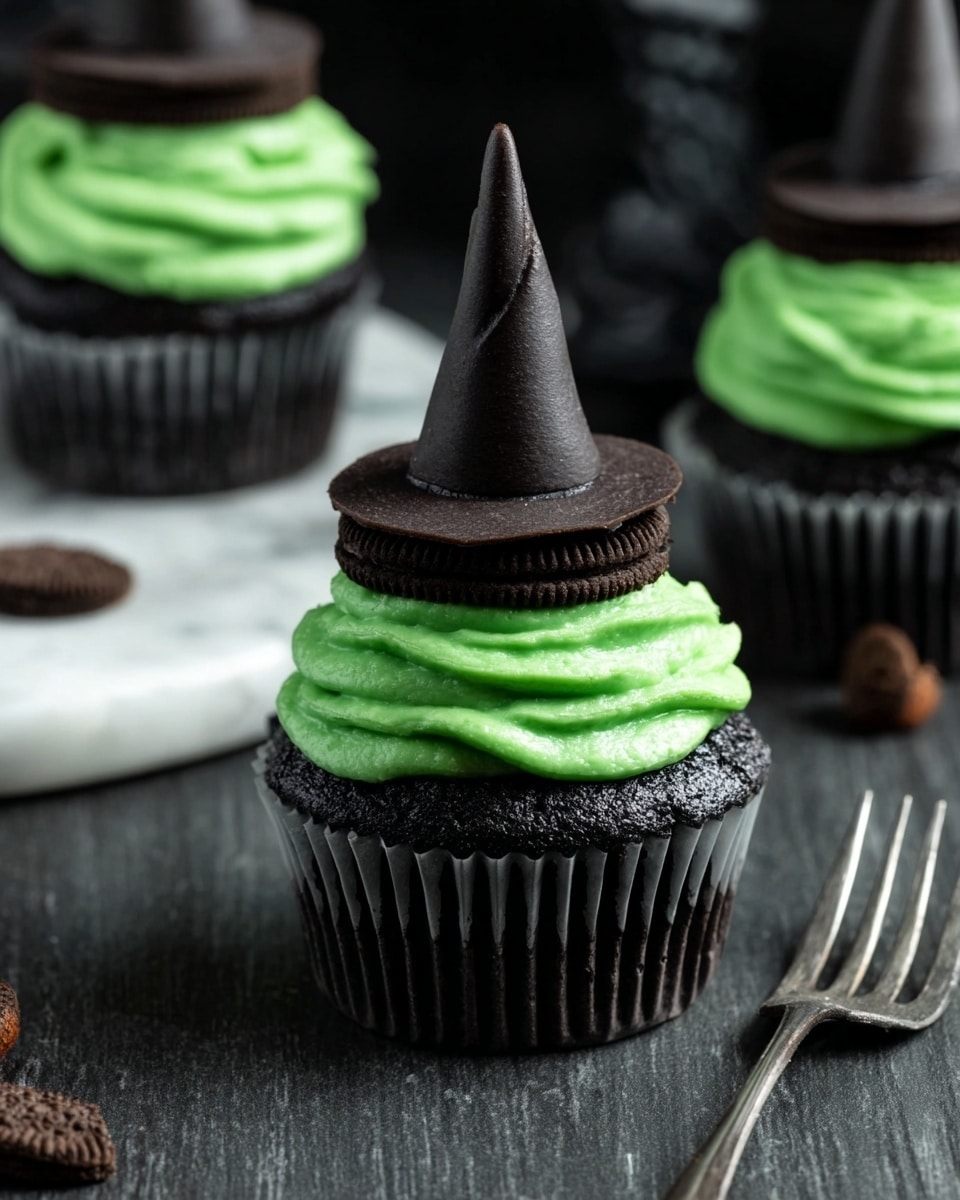
If you’re looking for a Halloween treat that’s as fun to make as it is to eat, you’re in the right place! I’m thrilled to share my favorite Witches Hat Cupcakes Recipe that never fails to impress. These spooky little cupcakes not only taste amazing with rich chocolate undertones and creamy green frosting but also come topped with the cutest handcrafted witches’ hats. Trust me, whether you’re baking for your family, a party, or just to satisfy your sweet tooth, these cupcakes will become an instant hit!
Why You’ll Love This Recipe
- Beautiful & Festive Design: The handmade witches’ hats give these cupcakes a whimsical, Halloween-perfect look that’s sure to wow your guests.
- Deliciously Moist Cupcakes: The chocolate chip studded batter keeps the cupcakes extra moist, with a subtle sweetness that balances perfectly with the frosting.
- Easy-to-Follow Steps: Even if this is your first time working with fondant, I break it down so it’s stress-free and enjoyable.
- Make-Ahead Friendly: You can prep cupcakes and decorations in advance, so no last-minute scrambling before your party.

Ingredients You’ll Need
Every ingredient in this Witches Hat Cupcakes Recipe plays a role in creating that spooky yet scrumptious combination. I always recommend using quality butter and fresh eggs for the richest flavor, and choosing fondant that rolls easily helps with the decorations.
- Unsalted Butter: Using room temperature butter ensures it creams well with the sugar, which helps make the cupcakes fluffy.
- Caster Sugar: It dissolves faster than granulated sugar, giving you a smoother crumb.
- Eggs: These bind the batter and provide richness—always use large for consistent results.
- Vanilla Extract: A splash elevates the overall flavor and blends well with the chocolate chips.
- Plain/All-Purpose Flour: Provides the structure for your cupcakes without being too heavy.
- Baking Powder: Your rising agent to give those cupcakes a nice lift.
- Salt: Just a pinch to balance sweetness and enhance flavors.
- Milk Chocolate Chips: This adds pleasant melty pockets of chocolate inside the cupcakes—a personal favorite.
- Milk: Controls batter consistency, keeping it tender.
- Black Food Coloring: I prefer gel form like Wilton’s for vibrant color without watering down the batter.
- Icing/Powdered Sugar: For a silky smooth frosting that pipes beautifully.
- Green Food Coloring: Go slow—you want a spooky green that’s not too bright.
- Black Fondant Icing: This is key for sculpting the witches’ hats.
- Oreo Cookies: Halved and de-filling them creates a perfect base for the hats.
- Green Fondant Icing: Used for decorating the band around the hat, this adds that perfect pop of color.
- Edible Glue: Helps your fondant pieces stay put—don’t skip this step!
Variations
While I love the classic look and flavors of this Witches Hat Cupcakes Recipe, I also enjoy making a few tweaks to surprise my family and guests. Don’t be afraid to customize—baking should be fun and reflect your own tastes!
- Chocolate Ganache Filling: I experimented once by hollowing out the cupcakes slightly and filling them with rich chocolate ganache—absolutely decadent and a crowd-pleaser!
- Dairy-Free Version: Swap the butter for coconut oil or vegan butter and use dairy-free milk to make these suitable for dairy allergies.
- Spiced Cupcakes: Add a teaspoon of cinnamon or pumpkin pie spice for a seasonal twist that makes the flavor profile extra cozy.
- Sour Cream Frosting: For a tangier contrast, try mixing sour cream with the icing sugar and butter—it adds a delightful depth.
How to Make Witches Hat Cupcakes Recipe
Step 1: Cream the Butter and Sugar
Start by beating the room temperature butter and caster sugar together until the mixture is light and fluffy—about 2 minutes on medium-high with a stand mixer or hand mixer. This step is crucial because it introduces air, giving your cupcakes a tender crumb. Don’t rush it; you want it pale and creamy.
Step 2: Add the Eggs and Vanilla
Next, beat in the eggs one at a time with the vanilla extract. Scrape down the bowl as needed to make sure everything is well incorporated. I discovered that adding eggs slowly helps prevent the batter from curdling—it keeps things smooth and silky!
Step 3: Mix the Dry Ingredients and Chocolate Chips
In a separate bowl, combine the flour, baking powder, salt, and chocolate chips. Stir the chocolate chips in well to coat them with flour — this little trick stops them from sinking to the bottom while baking, which has saved me lots of disappointment!
Step 4: Combine Wet and Dry Ingredients
Slowly add the dry ingredients to your wet mixture on low speed. Then pour in the milk and keep mixing until everything just comes together. Now, here’s where the fun begins—add black food coloring a little at a time. I usually use Wilton gel; it’s vibrant and won’t thin your batter. Mix until the batter is evenly black, smooth, and a little mysterious-looking, just like you want those witches’ hats to be!
Step 5: Bake Your Cupcakes
Spoon or scoop the batter into cupcake liners—about two-thirds full is perfect. I swear by my 2-tablespoon cookie scoop for evenly sized cupcakes that bake uniformly. Pop them into a preheated 350°F (180°C) oven for about 18–22 minutes. The cupcakes are done when they’ve risen nicely and a skewer inserted into the center comes out clean. Cool them on a wire rack right away to keep the liners from peeling off, which I’ve learned is a neat little quirk of these cupcakes.
Step 6: Craft the Witches’ Hats
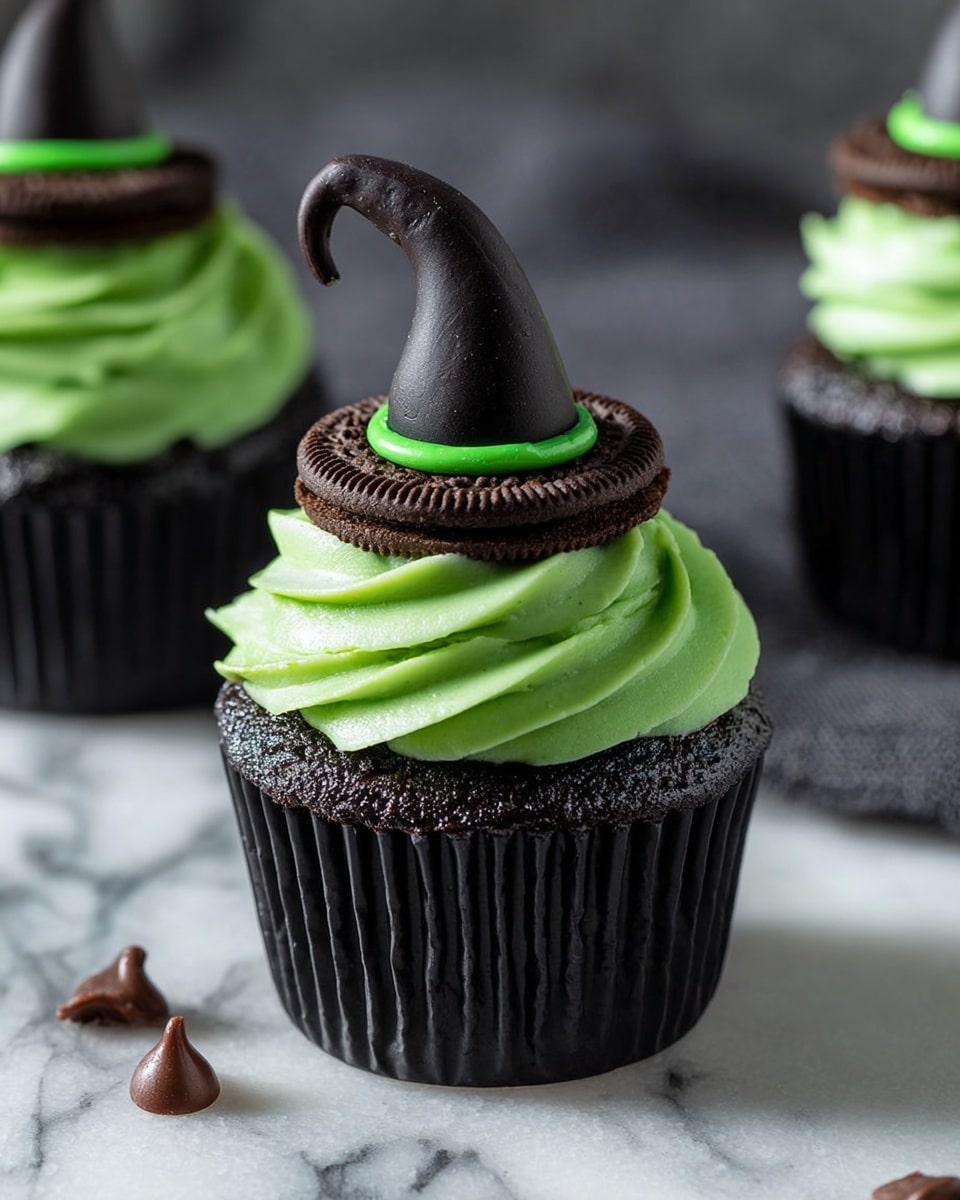
While your cupcakes cool, get creative with the decorations! Set up a clean surface—like a silicone pastry mat—and place Oreo halves with the text side facing up. Then, divide the black fondant icing into 12 portions. Roll each into a rough sausage shape, then taper and shape it into a pointed cone. Stand the cone upright on its thick end and shape the base to be about half an inch wide, creating that classic witch’s hat silhouette.
Brush some edible glue on the cone base, then stick it in the center of an Oreo half. Cut thin strips of green fondant for the hatbands—using one long strip as your template works wonders. Wrap the strip around the base of each hat, securing with a touch of glue and gently pinching the ends to close. Let these set for about 30 minutes, which keeps everything neat and stable.
Step 7: Make the Green Frosting
Beat together the butter and icing sugar on low speed, then increase to medium once it begins to come together. Add milk little by little to get that perfect creamy, pipeable consistency. Then carefully add your green food coloring in small amounts until you hit the spooky green hue you want—remember, it looks different on the cupcake! My trick is to pipe a little swirl onto wax paper before frosting the cupcakes so you can adjust your shade.
Step 8: Frost & Assemble
Fill a piping bag fitted with an open star nozzle halfway with frosting. Pipe a generous swirl atop each cupcake. Then, place a witches’ hat right on top—tilted or straight up, anything goes! I usually do them straight up for that classic look, and it really shows off your handiwork.
Pro Tips for Making Witches Hat Cupcakes Recipe
- Use Gel Food Coloring: It provides rich, vibrant colors without watering down your batter or frosting, which I definitely recommend for the black and green shades.
- Coat Chocolate Chips in Flour: This tiny step prevents them from sinking and keeps every bite loaded with chocolatey goodness.
- Chill Fondant Decorations: Letting your witches’ hats set helps them firm up so they stand perfectly when placed atop frosting.
- Don’t Overbake Cupcakes: Check them a few minutes before the timer’s up; overbaking dries them out, and moist cupcakes make the best base for your decorations.
How to Serve Witches Hat Cupcakes Recipe
Garnishes
I usually keep the garnishes simple since the hats steal the show, but a sprinkle of edible glitter or orange confetti sprinkles can add whimsy and extra Halloween sparkle. If you want to get creative, tiny candy spiders or a light dusting of cocoa powder around the base look incredible without competing with the hats.
Side Dishes
These cupcakes pair wonderfully with a warm cup of spiced apple cider or a fizzy black cherry soda for kids. For adult parties, a creamy pumpkin spice latte or a cold brew coffee bring out the chocolate and vanilla notes beautifully.
Creative Ways to Present
Once, I displayed mine on a tiered cake stand with dry ice fog creeping around the edges—everyone’s eyes lit up with delight! You can also place little bat or spider rings around the cupcakes or nestle them in a bed of candy corn for an extra festive touch. Wrapped individually in clear cupcake boxes, they make adorable party favors too.
Make Ahead and Storage
Storing Leftovers
I store leftover cupcakes in an airtight container in the fridge, which keeps them nice for up to 3 days. The Oreo hats can soften over time, so if you want them crisp, consider adding the hats just before serving. Keeping them chilled also helps the frosting hold its shape.
Freezing
Freezing fully decorated cupcakes isn’t ideal because the fondant and frosting can change texture, but you can freeze just the baked cupcakes (without frosting). Wrap each individually in plastic wrap, then freeze in a container for up to 2 months. When ready, thaw overnight in the fridge before frosting and decorating.
Reheating
I rarely reheat cupcakes because they taste best at room temperature or chilled, but if you want them warm, pop them in the microwave for about 10 seconds (without the decorations). This refreshes the softness without melting your frosting.
FAQs
-
Can I use regular black food coloring instead of gel?
You can, but be aware that liquid black food coloring might thin your batter slightly and require more to reach the same intensity. Gel coloring is much more concentrated and won’t affect the texture, so I recommend using gel if you can.
-
How do I make the witches’ hats stand upright without falling?
Using edible glue to attach the black fondant cones to the Oreo halves is key. Also, letting the hats set for 30 minutes before assembling ensures they’re firm enough to hold their shape on the frosting without slipping.
-
Can I substitute the Oreo base for something else?
Absolutely! Some folks use chocolate wafer cookies or even circle-shaped brownies cut down to size. Just pick something sturdy enough to hold the fondant hats and that holds up well on the frosting.
-
Is there an alternative to using green food coloring for the frosting?
You can use natural alternatives like matcha powder or spirulina for green tint, but keep in mind these might affect the flavor. For the classic witches hat look, I find gel food coloring gives the best balance of color and taste.
-
Can these cupcakes be made vegan?
With a few ingredient swaps—like vegan butter, plant-based milk, egg replacements, and vegan-friendly fondant—you can absolutely make a vegan version. Just allow for slight texture variations but still expect lots of Halloween fun in every bite.
Final Thoughts
I absolutely love how this Witches Hat Cupcakes Recipe turns out every time—it’s fun, festive, and simply delicious. When I first tried making those fondant hats, I was nervous, but once you get the hang of it, it’s surprisingly easy and adds so much character to your cupcakes. Whether you’re baking with kids or whipping up a standout dessert for Halloween, give this recipe a go. You’ll find the perfect mix of spooky charm and bakery-worthy flavor that keeps everyone coming back for more—plus, you get to impress with your crafting skills! Happy baking, and may your Halloween be delightfully magical.
Print
Witches Hat Cupcakes Recipe
- Prep Time: 45 minutes
- Cook Time: 20 minutes
- Total Time: 1 hour 5 minutes
- Yield: 12 cupcakes
- Category: Dessert
- Method: Baking
- Cuisine: American
Description
These Witches Hat Cupcakes are spooky yet delightful treats perfect for Halloween or themed parties. Moist chocolate chip studded black vanilla cupcakes are topped with a light, fluffy green buttercream frosting and finished with adorable homemade witches hat decorations made from Oreo cookies, fondant, and edible glue. The cupcakes are baked to perfection, then creatively decorated to bring a festive touch to your dessert table.
Ingredients
For the Cupcakes:
- 1 stick (113g) unsalted butter, at room temperature
- 1 cup (200g) caster/white sugar
- 2 large eggs
- 2 tsp vanilla extract
- 1 1/2 cups (210g) plain/all-purpose flour
- 2 tsp baking powder
- Pinch of salt
- 1 cup (175g) milk chocolate chips
- 1/3 cup + 2 tbsp (100ml) milk
- Black food colouring (Wilton gel recommended), as needed for desired colour
For the Frosting:
- 2 sticks (226g) unsalted butter, at room temperature
- 2 1/2 cups (300g) icing/powdered sugar
- 1-2 tbsp milk
- Green food colouring (Wilton gel recommended), as needed for desired colour
For the Witches Hat Decorations:
- 6 oz (175g) black fondant icing
- 6 Oreo cookies, halved with filling scraped out
- 1.5 oz (42g) green fondant icing
- Edible glue
Instructions
- Preheat Oven: Preheat your oven to 180°C (350°F) and line a 12-hole cupcake tray with cupcake liners.
- Make Cupcake Batter: In a large bowl or stand mixer, beat 113g butter and 1 cup sugar on medium-high speed for about 2 minutes until light and fluffy. Add eggs and vanilla extract, mixing well for 1 minute on medium-high. In a separate bowl, mix flour, baking powder, salt, and chocolate chips, ensuring all chips are coated in flour. Gradually add this dry mixture to the wet mixture on low speed, then add 100ml milk and mix until combined. Add black food colouring little by little until batter reaches the desired black color, mixing until smooth and even.
- Fill Cupcake Liners: Using a 2 tbsp cookie scoop or spoon, evenly divide the batter among the cupcake liners, filling each about two-thirds full.
- Bake Cupcakes: Bake in the preheated oven for 18-22 minutes, until the cupcakes are risen and a skewer inserted in the center comes out clean. Remove from the oven and transfer cupcakes to a wire rack to cool completely to prevent liners from peeling.
- Prepare Witches Hat Toppers: On a clean surface or silicone mat, place Oreo halves with the cookie side up. Divide the black fondant icing into 12 equal portions (approx. 3 pea-sized amounts each). Roll each portion into a rough sausage, then shape one end into a point to create a cone. Stand the cone upright on the thicker end and adjust the base to measure about 1/2 inch across. Brush edible glue on the base then adhere the cone to the center of each Oreo half. Cut the green fondant icing into thin strips (~5mm wide) long enough to wrap around the cone’s base. Brush edible glue around the base of the cone and attach the green strip around it, gently pinching to seal. Allow these hats to set for about 30 minutes.
- Make Frosting: In a large bowl or stand mixer, beat 226g butter and 300g powdered sugar on low speed until combined. Increase speed to medium and beat until fluffy. Add 1/2 tbsp milk and green food colouring gradually, mixing until reaching a light, fluffy frosting that will hold its shape but is still pipeable. Add more milk in 1/2 tbsp increments if needed.
- Decorate Cupcakes: Fill a piping bag fitted with an open star nozzle about halfway with the green frosting. Pipe a swirl of frosting on each cooled cupcake.
- Top with Witches Hats: Place one prepared witches hat topper on each frosted cupcake either straight up or at a slight angle as desired.
- Serve or Store: Serve immediately, or store in an airtight container in the refrigerator for up to 1 day (cupcakes remain fresh 3 days refrigerated; Oreo toppers may soften beyond 1 day).
Notes
- Once the black fondant cone is attached to the Oreo, you can leave the tip straight or bend it over to simulate a floppy hat top.
- Use gel food colouring for more vibrant colors with less added liquid.
- Make cupcakes a few hours ahead to save time on party day.
- Store cupcakes chilled and covered to maintain freshness.
- Use a silicone mat or parchment paper when assembling decorations for easy cleanup.
Nutrition
- Serving Size: 1 cupcake
- Calories: 320 kcal
- Sugar: 30 g
- Sodium: 120 mg
- Fat: 18 g
- Saturated Fat: 11 g
- Unsaturated Fat: 5 g
- Trans Fat: 0.5 g
- Carbohydrates: 37 g
- Fiber: 1 g
- Protein: 3 g
- Cholesterol: 55 mg


